Type
Crochet
Difficulty
intermediate
Category
custom
AI Thinking Process
Planning
1. **Design Strategy**: Creating a beginner-friendly crop top tank top in size medium using worsted weight yarn. The design will feature a simple stitch pattern (double crochet) that works up quickly and provides good drape. The crop length will hit at the natural waist, and the tank top will have adjustable straps. Construction will be flat pieces sewn together for easiest beginner execution.
2. **Construction Plan**: The tank will be worked in three flat pieces: front panel, back panel, and two straps. Front and back panels will be worked from bottom to top with waist shaping. Side seams will be sewn leaving armhole openings. Simple chain straps will be attached and adjusted to fit. Ribbed edging at bottom and armholes for a polished finish.
3. **Quality Assurance**: Key concerns include proper stitch counts for shaping, ensuring armhole depth is adequate, and maintaining consistent gauge for proper fit. Will include detailed stitch counts at end of each row and clear notes about shaping. Must verify that bust measurement accommodates medium size (approximately 36-38" bust, finished garment 34-35" for slight negative ease).
4. **Final Calculations**:
- Gauge: 14 dc x 8 rows = 4" in double crochet
- Finished bust: 34" (85.5 cm)
- Finished length: 16" from bottom to underarm, 8" armhole depth = 24" total (but crop stops at ~14" for cropped effect)
- Front/Back panel width at bust: 17" each (59.5 sts)
- Crop length: 14" (28 rows to underarm)
Verification
[PRE-FLIGHT CHECKS]
1. **Completeness**: Pattern includes title, description, materials, gauge, size, abbreviations, pattern notes, step-by-step instructions for all pieces, assembly, and finishing.
2. **Consistency**: 14 dc = 4", so 17" requires 59.5 sts (will use 60 for even number). 8 rows = 4", so 14" length = 28 rows. Math verified.
3. **Constraints**: Beginner level maintained with simple dc fabric, minimal shaping, and flat construction. Medium size specifications met. Worsted weight yarn used.
4. **Safety**: All row stitch counts will be explicitly stated. Shaping increments are gradual and clearly marked. Assembly instructions are detailed.
Pattern
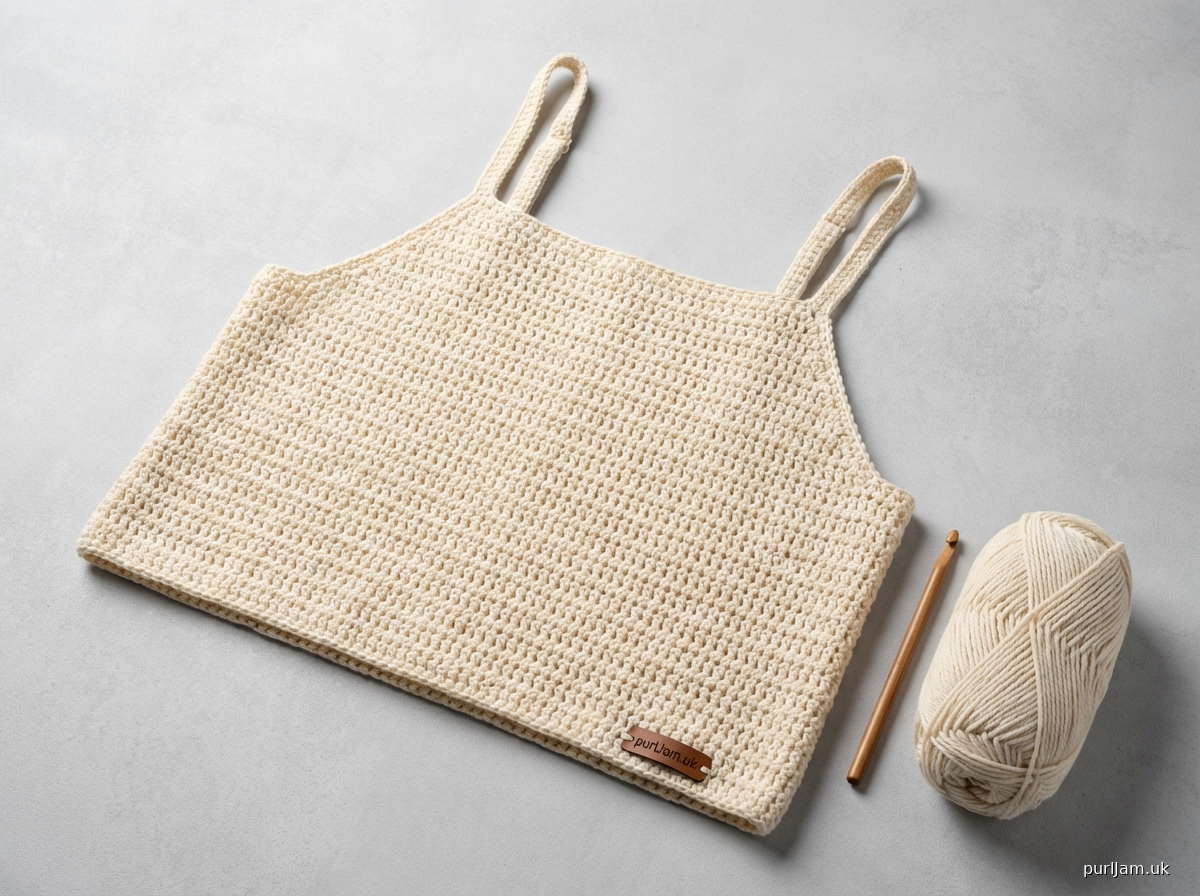
# **Summer Breeze Crop Tank Top**

A breezy, beginner-friendly crop top tank that's perfect for warm weather! This simple design features comfortable double crochet fabric, adjustable straps, and a flattering cropped length. Worked in easy-to-assemble flat pieces.

**Finished Measurements:**
- Bust: 34" (86 cm) - designed to fit 36-38" bust with slight negative ease
- Length (bottom edge to underarm): 14" (35.5 cm)
- Crop length hits at natural waist

**Difficulty Level:** Beginner

---

## MATERIALS

**Yarn:**
- Worsted weight (#4) cotton or cotton blend yarn
- Approximately 550-600 yards
- Sample shown in light, breathable cotton

**Hook:**
- US Size H/8 (5.0 mm) or size needed to obtain gauge

**Notions:**
- Yarn needle for seaming
- Stitch markers
- Measuring tape
- Scissors

---

## GAUGE

**14 dc and 8 rows = 4" (10 cm)** in double crochet

**Take time to check your gauge!** Proper gauge is essential for correct fit.

To make gauge swatch: Ch 20, dc in 4th ch from hook and in each ch across (18 dc including turning ch). Ch 3, turn. Work in dc for 12 rows total. Block swatch lightly and measure.

---

## ABBREVIATIONS

- ch = chain
- dc = double crochet
- hdc = half double crochet
- sc = single crochet
- sl st = slip stitch
- st(s) = stitch(es)
- BLO = back loop only
- RS = right side
- WS = wrong side

---

## PATTERN NOTES

- Turning chain-3 counts as first dc throughout
- All stitch counts include the turning chain as 1 stitch
- Stitch count at end of each row shown in parentheses
- Front and Back panels are worked identically
- Work flat in rows with RS rows odd-numbered

---

## INSTRUCTIONS

### FRONT PANEL

**Foundation:** Ch 54.

**Row 1 (RS):** Dc in 4th ch from hook (skipped chs count as first dc), dc in each ch across. (52 dc) *[Math check: 54 ch - 3 skipped = 51 dc + 1 from skipped chs = 52 dc]*

**Row 2 (WS):** Ch 3 (counts as dc here and throughout), turn, dc in each st across. (52 dc)

**Rows 3-4:** Repeat Row 2. (52 dc)

**Begin Waist Shaping (slight A-line shape):**

**Row 5 (RS):** Ch 3, turn, 2 dc in next st (increase made), dc in each st across to last 2 sts, 2 dc in next st, dc in top of turning ch. (54 dc) *[Math check: 1 + 1 (inc) + 50 + 1 (inc) + 1 = 54]*

**Rows 6-8:** Ch 3, turn, dc in each st across. (54 dc)

**Row 9 (RS):** Ch 3, turn, 2 dc in next st, dc in each st across to last 2 sts, 2 dc in next st, dc in top of turning ch. (56 dc)

**Rows 10-12:** Ch 3, turn, dc in each st across. (56 dc)

**Row 13 (RS):** Ch 3, turn, 2 dc in next st, dc in each st across to last 2 sts, 2 dc in next st, dc in top of turning ch. (58 dc)

**Rows 14-16:** Ch 3, turn, dc in each st across. (58 dc)

**Row 17 (RS):** Ch 3, turn, 2 dc in next st, dc in each st across to last 2 sts, 2 dc in next st, dc in top of turning ch. (60 dc) *[Math check: This creates 17" width: 60 sts ÷ 14 sts per 4" × 4" = 17.14"]*

**Rows 18-28:** Ch 3, turn, dc in each st across. (60 dc) *[Math check: 28 rows ÷ 8 rows per 4" × 4" = 14"]*

**Armhole Shaping:**

**Row 29 (RS):** Sl st in first 6 sts, ch 3, dc in each st across to last 5 sts, leave last 5 sts unworked, turn. (50 dc) *[Math check: 60 - 5 - 5 = 50 dc]*

**Row 30:** Ch 3, turn, dc in each st across. (50 dc)

Fasten off. Weave in ends.

---

### BACK PANEL

Work exactly as Front Panel, Rows 1-30. (50 dc at end)

Fasten off. Weave in ends.

---

### STRAPS (make 2)

**Foundation:** Ch 81 (or length desired for your fit - this creates approximately 27" strap).

**Row 1:** Sc in 2nd ch from hook and in each ch across. (80 sc)

Fasten off, leaving a 12" tail for sewing.

**Note:** Straps can be adjusted to preferred length before attaching. Try on the top and measure desired strap length, then adjust chain count as needed (ch 1 = approximately ⅓").

---

## ASSEMBLY

**Step 1 - Side Seams:**
1. Place Front and Back panels together with RS facing each other.
2. Using yarn needle and working yarn, whipstitch or sc seam the side edges together from bottom edge up to Row 28 (where armhole shaping begins).
3. Repeat for other side.
4. Turn right side out.

*[Math check: Seaming 28 rows creates 14" body length before armhole]*

**Step 2 - Bottom Edging:**
1. With RS facing, join yarn at side seam.
2. Ch 1, sc evenly around bottom edge, working approximately 2 sc per dc row-end and 1 sc in each dc st along bottom edge. Sl st to first sc to join.
3. **Round 2:** Ch 1, working in BLO, sc in each sc around. Sl st to join.
4. Fasten off and weave in ends.

**Step 3 - Armhole Edging:**
1. With RS facing, join yarn at underarm seam.
2. Ch 1, sc evenly around armhole opening (working across Row 28 of front, up armhole edges, across Row 28 of back, down other armhole edge). Aim for approximately 76-80 sc total around armhole. Sl st to join.
3. **Round 2:** Ch 1, working in BLO, sc in each sc around. Sl st to join.
4. Fasten off and weave in ends.
5. Repeat for other armhole.

**Step 4 - Attach Straps:**
1. Try on the top and position straps where desired (typically 3-4" in from armhole edge on front and back).
2. Pin straps in place, adjusting length as needed.
3. Using yarn needle and tail from strap, securely sew each strap end to the inside top edge of front and back panels, sewing through multiple sts for security.
4. Weave in all remaining ends.

---

## FINISHING

1. Weave in any remaining yarn ends.
2. Block lightly if desired by laying flat, lightly misting with water, and allowing to air dry.
3. Steam blocking is not recommended for cotton yarn as it may cause stretching.

---

## CUSTOMIZATION TIPS

**Length Adjustment:**
- For a longer crop: Work additional rows in the straight section (Rows 18-28) before armhole shaping. Every 2 rows adds approximately 1" of length.
- For a shorter crop: Work fewer rows in the straight section.

**Width Adjustment:**
- For a larger bust: Work additional increase rows before beginning straight section, spacing them every 4 rows.
- For a smaller bust: Omit one or more increase rows.

**Strap Style:**
- For wider straps: Work sc in Row 1, then work Row 2: Ch 1, turn, sc in each sc across for a double-thick strap.
- For braided straps: Make 3 chains of desired length and braid together before attaching.

---

## CARE INSTRUCTIONS

Hand wash in cool water with mild detergent. Lay flat to dry, reshaping as needed. Do not wring or twist.

---

**Pattern designed for beginner crocheters**
**© 2024 - For personal use only**

---

## SIZE MODIFICATIONS

To adjust this pattern for other sizes, use the following guidelines:

**Small (32-34" bust):**
- Start with ch 48 (46 dc)
- Increase to 54 dc over shaping rows
- Final bust measurement: 30-31"

**Large (40-42" bust):**
- Start with ch 60 (58 dc)
- Increase to 66 dc over shaping rows
- Final bust measurement: 37-38"

**X-Large (44-46" bust):**
- Start with ch 66 (64 dc)
- Increase to 72 dc over shaping rows
- Final bust measurement: 41-42"

Maintain the same increase schedule (every 4 rows) and adjust number of increases to reach desired final width.
Disclaimer: This pattern was generated by AI and should be reviewed for accuracy before use. While we strive for quality, AI-generated content may contain errors. Please verify measurements, stitch counts, and instructions before beginning your project. Generated by purlJam.uk
Access your pattern anytime
Bookmark this page to access your pattern anytime