Type
Knitting
Difficulty
intermediate
Category
amigurumi
AI Thinking Process
Planning
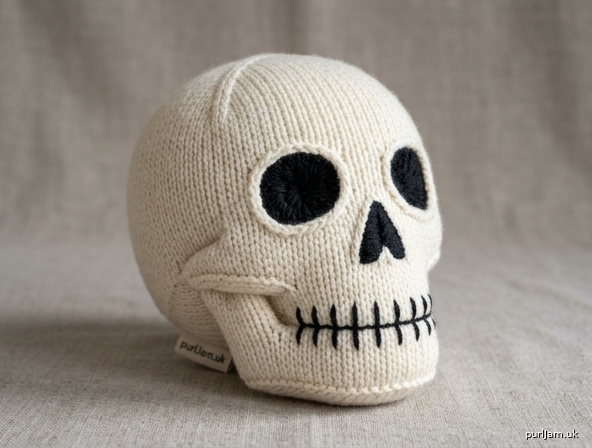
1. **Design Strategy**: A beginner-friendly 3D stuffed Sea of Thieves skull worked in the round in stockinette using bone-white worsted yarn, with embroidered/felt eye sockets and nose to capture the iconic spooky skull look. Soft, rounded cranium with a separate lower jaw for character.
2. **Construction Plan**: Two main pieces worked seamlessly in the round (cranium and jaw), stuffed firmly and seamed, with embroidered features.
3. **Quality Assurance**:
- Keep tension tight so stuffing doesn't show through.
- Symmetry of eye sockets — mark positions before embroidering.
- Closing the cranium top smoothly without puckering.
4. **Final Calculations**: Tension 22 sts × 30 rounds = 10 cm in st st on 3.5 mm needles. Cranium cast-on 8 sts, increased to 48 (≈22 cm circumference ≈ 7 cm diameter). Jaw worked flat-ish at 24 sts. Finished height ≈ 12 cm.
Verification
[PRE-FLIGHT CHECKS]
1. **Completeness**: Includes materials (with stuffing estimate), tension note, cranium, jaw, eye sockets, nose, assembly, finishing — all template sections present. ✓
2. **Consistency**: 48 sts ÷ 22 sts per 10 cm = 21.8 cm circumference → diameter ≈ 6.9 cm. Crown shaping decreases 48→8 verified in multiples of 6/8. ✓
3. **Constraints**: UK English, metric-first, worsted yarn, tension term used, beginner level, 3D stuffed skull honoured. ✓
4. **Safety**: Increase/decrease maths checked round-by-round; totals consistent. ✓
Pattern
# The Cursed Skull — A Sea of Thieves Inspired Amigurumi

*A beginner-friendly 3D stuffed skull, worked seamlessly in the round. Perfect for any pirate's mantelpiece.*

---

## Finished Measurements
- Height: approximately **12 cm** (4¾ in), including jaw
- Width: approximately **7 cm** (2¾ in) at widest
- Circumference of cranium: approximately **22 cm** (8¾ in)

---

## Materials
- **Yarn:** Worsted weight (Aran) yarn in **bone white / ivory** — approx. 60 g (≈110 m). A small amount of **black** for embroidering the eye sockets, nose and tooth lines.
- **Needles:** 3.5 mm (UK old size 9–10) double-pointed needles (DPNs) **or** one long circular for Magic Loop. This is 1–2 sizes smaller than the worsted label recommendation, to create a tight fabric.
- **Polyester fibrefill stuffing:** approximately **25–30 g**.
- **Tapestry needle** for seaming and embroidery.
- Optional: stitch markers, a small length of grey or off-white floss to define the teeth.

---

## Tension (Gauge)
**22 sts × 30 rounds = 10 cm (4 in)** over stockinette stitch (st st) in the round, worked on 3.5 mm needles after firm stuffing settles.

> **Tension note:** Exact stitch count is less important than a **tight, even fabric**. Knit firmly so the white stuffing cannot peek through. If your fabric looks loose or gappy, drop down a needle size.

---

## Abbreviations (UK)
- **k** — knit
- **p** — purl
- **kfb** — knit into front and back of stitch (1 st increased)
- **k2tog** — knit two together (1 st decreased)
- **ssk** — slip, slip, knit (1 st decreased)
- **st(s)** — stitch(es)
- **rep** — repeat
- **rnd** — round
- **st st** — stockinette stitch (knit every round in the round)

---

## Construction Overview
The skull is made in **two pieces**:
1. **The Cranium** — a rounded ball, worked from the crown down, stuffed firmly.
2. **The Lower Jaw** — a small curved piece, stuffed lightly and seamed to the front-base of the cranium.

Features are **embroidered** in black, so no safety eyes are needed (this keeps it beginner-friendly and gives the menacing hollow-socket look).

---

## PART 1 — The Cranium

Using bone white yarn and your preferred in-the-round method, cast on **8 sts**. Distribute evenly and join to work in the round, taking care not to twist. Place a marker at the start of the round.

**Rnd 1:** k all (8 sts)
**Rnd 2:** *kfb; rep from * to end → 16 sts
**Rnd 3:** k all (16 sts)
**Rnd 4:** *k1, kfb; rep from * to end → 24 sts
**Rnd 5:** k all (24 sts)
**Rnd 6:** *k2, kfb; rep from * to end → 32 sts
**Rnd 7:** k all (32 sts)
**Rnd 8:** *k3, kfb; rep from * to end → 40 sts
**Rnd 9:** k all (40 sts)
**Rnd 10:** *k4, kfb; rep from * to end → 48 sts

*Maths check: 8 → 16 → 24 → 32 → 40 → 48, each increase round adds 8 sts. ✓*

**Rnds 11–24:** k all (48 sts) — 14 straight rounds form the rounded cranium.

> This is the point to **mark your eye-socket positions** (see Finishing). Lay the work flat with the marker at centre-back; the front is opposite.

### Shaping the lower cranium (cheekbones)
**Rnd 25:** *k4, k2tog; rep from * to end → 40 sts
**Rnd 26:** k all (40 sts)
**Rnd 27:** *k3, k2tog; rep from * to end → 32 sts
**Rnd 28:** k all (32 sts)

*Maths check: 48 → 40 → 32, each decrease round removes 8 sts. ✓*

**Stuff the cranium firmly now**, shaping it into a round ball as you go. Keep adding stuffing as you complete the final rounds.

**Rnd 29:** *k2, k2tog; rep from * to end → 24 sts
**Rnd 30:** *k1, k2tog; rep from * to end → 16 sts
**Rnd 31:** *k2tog; rep from * to end → 8 sts

*Maths check: 32 → 24 → 16 → 8. ✓*

Top up stuffing firmly. Cut yarn leaving a 20 cm tail. Thread through the remaining 8 sts, pull tight to close, and secure. Pass the needle through the centre and out elsewhere to bury the tail.

---

## PART 2 — The Lower Jaw

The jaw is a small shallow cup that sits at the front-base of the skull.

Using bone white yarn, cast on **6 sts**, join to work in the round.

**Rnd 1:** *kfb; rep from * to end → 12 sts
**Rnd 2:** k all (12 sts)
**Rnd 3:** *k1, kfb; rep from * to end → 18 sts
**Rnd 4:** k all (18 sts)
**Rnd 5:** *k2, kfb; rep from * to end → 24 sts

*Maths check: 6 → 12 → 18 → 24, increases of 6 each. ✓*

**Rnds 6–8:** k all (24 sts) — 3 straight rounds.

**Rnd 9:** *k2, k2tog; rep from * to end → 18 sts

*Maths check: 24 → 18. ✓*

Stuff **lightly** (the jaw should stay flat-ish, not bulbous). Cut yarn leaving a 25 cm tail for seaming. Thread through the remaining 18 sts but **do not pull fully closed** — leave the open edge slightly flattened so it can be seamed against the cranium as a jaw.

---

## Finishing & Assembly

### 1. Embroider the eye sockets
- Using black yarn and the tapestry needle, embroider **two large hollow circles/ovals** on the front of the cranium, about Rnd 18–22, spaced symmetrically either side of centre.
- Fill each socket with **vertical satin stitches** (rows of straight stitches packed close together) to create deep, dark eye holes. Aim for sockets roughly **2 cm** across.
- **Tip:** Use a removable pin or contrast thread to mark both socket centres first, then check symmetry before stitching.

### 2. Embroider the nose
- Below and between the eyes, stitch a small **inverted triangle (▽)** in black satin stitch — the classic skull nasal cavity, about 1 cm tall.

### 3. Attach the lower jaw
- Position the jaw at the **front-base of the cranium**, directly beneath the nose.
- Using the long tail and **mattress stitch**, seam the open edge of the jaw to the cranium, working all the way around so the jaw cups forward and slightly down.
- Add a tiny pinch more stuffing through any gap before closing fully, if needed.

### 4. Define the teeth
- Using grey or off-white floss (or simply white against the bone yarn), stitch a row of short **vertical lines** along the seam where jaw meets cranium — about 5–6 evenly spaced lines — to suggest a grinning row of teeth.

### 5. Weave in ends
- Thread each remaining end onto the tapestry needle, pass it deep **inside the stuffed body**, out at a distant point, and snip flush. This hides ends securely and keeps the surface smooth.

---

## Assembly Order Summary (verify before you start)
1. Knit and stuff the **cranium**, close the crown.
2. Embroider **eye sockets** and **nose** while you still have easy access to the front.
3. Knit the **jaw**, stuff lightly.
4. **Seam jaw** to the front-base.
5. Add **teeth** detailing.
6. **Weave in all ends** inside the body.

---

## Care
Hand wash gently in cool water; reshape and air dry flat. Do not wring — squeeze excess water in a towel.

*May this cursed treasure bring you good fortune on the seas. ☠️*
Disclaimer: This pattern was generated by AI and should be reviewed for accuracy before use. While we strive for quality, AI-generated content may contain errors. Please verify measurements, stitch counts, and instructions before beginning your project. Generated by purlJam.uk
Access your pattern anytime
Bookmark this page to access your pattern anytime