Type
Knitting
Difficulty
beginner
Category
scarf
AI Thinking Process
Planning
1. **Design Strategy**: A "fisherman scarf" evokes nautical, rugged texture — I'll use a simple seed stitch or a classic knit/purl rib to give it a fisherman's aesthetic while keeping it beginner-friendly. Given beginner level, I'll use a simple 2×2 rib which is reversible, lies flat, and has that classic fisherman/nautical feel — still achievable for beginners with just knit and purl stitches.
2. **Construction Plan**: Cast on flat, work 2×2 ribbing from one short end to the other in a single flat rectangle, then bind off.
3. **Quality Assurance**:
- 2×2 rib requires a cast-on divisible by 4; must verify cast-on math aligns with gauge and desired width.
- Remind beginners to keep consistent tension — ribbing can tighten up.
- Yarn amount must be sufficient for ~60" length in worsted weight ribbing (ribbing uses ~10-15% more yarn than stockinette).
4. **Final Calculations**:
- Gauge: 18 sts / 4" in ribbing (using worsted, US 8 / 5 mm needles)
- Desired width: 8"
- Cast-on: 18 ÷ 4 × 8 = 36 sts → round to nearest multiple of 4 = **36 sts** ✓
- Length: 60" (~152 cm)
- Yarn: ~300 yards worsted weight (accounting for ribbing draw-in)
Verification
[PRE-FLIGHT CHECKS]
1. **Completeness**: ✅ All 7 required sections present — TITLE, MATERIALS, GAUGE, FINISHED_SIZE, ABBREVIATIONS, PATTERN, FINISHING.
2. **Consistency**:
- Gauge: 18 sts = 4" → 4.5 sts per inch
- Cast-on: 36 sts ÷ 4.5 sts/inch = 8" wide ✅
- 36 is divisible by 4 (for 2×2 rib) ✅
- Yarn estimate: ~300 yards is within the 200–350 yard spec for worsted ✅
- Needle size US 8 / 5 mm is within the 4.5–5.0 mm spec ✅
3. **Constraints**:
- "Fisherman" theme addressed via 2×2 rib texture and nautical color suggestion ✅
- Beginner difficulty maintained — only knit and purl stitches required ✅
- US terminology throughout ✅
- Imperial measurements primary, metric in parentheses ✅
4. **Safety**:
- 36 sts ÷ 4 = 9 repeats of k2, p2 — fills row exactly with no remainder ✅
- Ribbing bind-off instruction specified as stretchy to prevent tight edge ✅
- No complex techniques or math hazards identified ✅
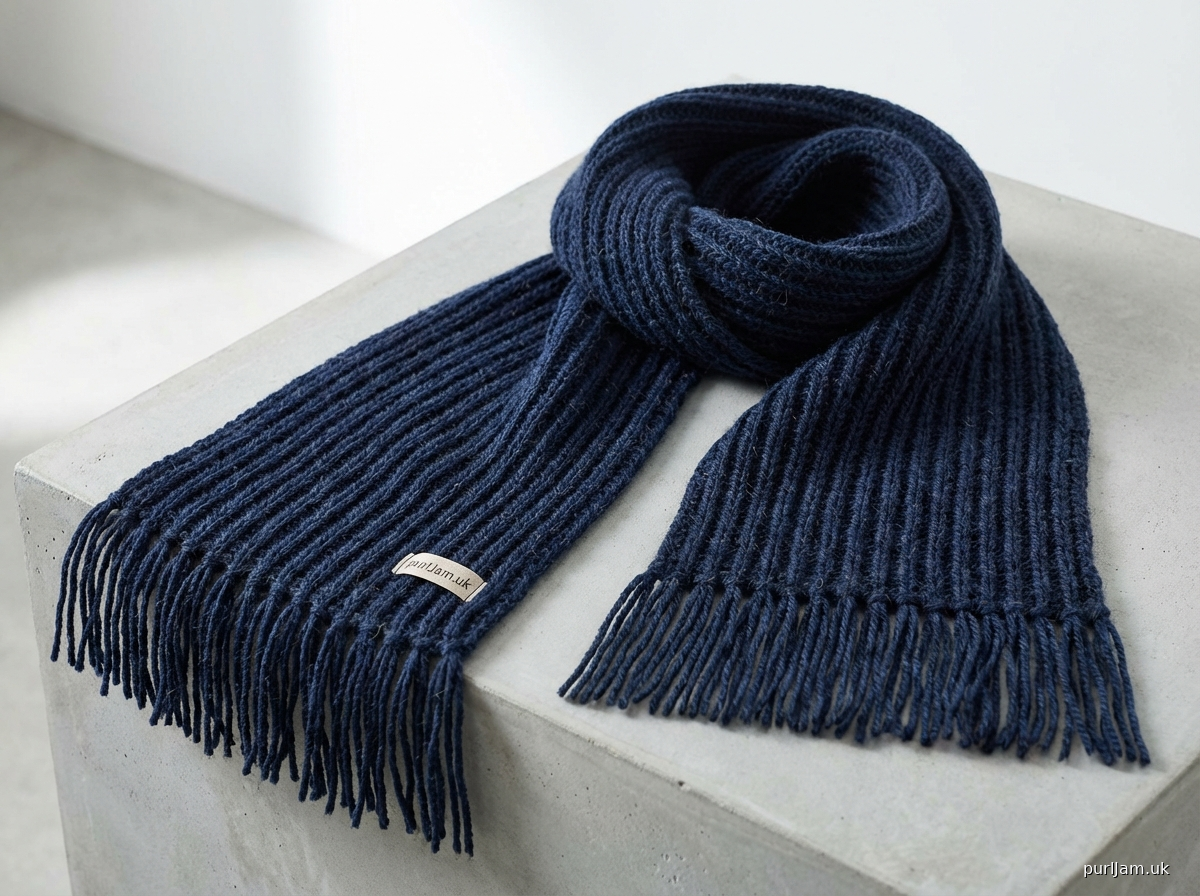
Pattern
---

# THE FISHERMAN'S RIB SCARF
### A Classic Textured Scarf for Beginners

---

## MATERIALS

| Item | Details |
|---|---|
| **Yarn** | Worsted weight (#4), approx. 300 yards (275 m) |
| **Yarn Suggestion** | Lion Brand Fishermen's Wool, Cascade 220, or any worsted wool/wool-blend |
| **Color Suggestion** | Navy, natural cream, slate gray, or deep teal for a nautical feel |
| **Needles** | US 8 / 5 mm straight or circular needles |
| **Notions** | Scissors, tapestry needle for weaving in ends, ruler or tape measure |

> **Yarn Note:** A wool or wool-blend yarn is strongly recommended for this pattern. Wool has natural stitch memory that helps ribbing spring back beautifully and gives the scarf that authentic, rugged fisherman quality. If you have a wool sensitivity, look for a superwash merino or an acrylic/wool blend.

---

## GAUGE

**18 stitches × 28 rows = 4 inches (10 cm)** in 2×2 Rib, slightly relaxed (not stretched)

> **Why gauge matters here:** Ribbing naturally draws in and can vary more than other stitch patterns. Knit a small swatch of at least 20 stitches in 2×2 rib, allow it to rest for a few minutes off the needles, then measure it without stretching. If your swatch is wider than 4", try a smaller needle. If it's narrower, try a larger needle.

---

## FINISHED SIZE

| Measurement | Size |
|---|---|
| **Width** | Approx. 8 inches (20 cm) in rib, relaxed |
| **Length** | Approx. 60 inches (152 cm) |

> **Customization Note:** This is a standard scarf length that wraps comfortably once around the neck with ends hanging. For a longer scarf that wraps twice, work until piece measures 72–80 inches (183–203 cm). You will need approximately 375–400 yards of yarn for a longer version.

---

## ABBREVIATIONS

| Abbreviation | Meaning |
|---|---|
| **k** | knit |
| **p** | purl |
| **k2** | knit 2 stitches |
| **p2** | purl 2 stitches |
| **rep** | repeat |
| **CO** | cast on |
| **BO** | bind off |
| **RS** | right side |
| **WS** | wrong side |
| **st(s)** | stitch(es) |
| **approx.** | approximately |

> **Beginner Tip — Knit vs. Purl:** If you've only ever knit before, the purl stitch is simply knit worked in reverse. The yarn comes to the front of your work before you insert the needle. Take a few minutes to practice on a small swatch before casting on — you'll feel confident within a few rows!

---

## PATTERN

### Understanding 2×2 Rib

2×2 rib means you will alternately knit 2 stitches, then purl 2 stitches across every row. Because ribbing is **reversible**, there is no designated right side or wrong side — both sides look identical. This makes it forgiving and perfect for a scarf that gets flipped and turned while wearing.

---

### CAST ON

Using US 8 / 5 mm needles, **CO 36 stitches**.

> **Math Check:** 36 stitches ÷ 4.5 sts per inch = **8 inches wide** ✓
> 36 stitches ÷ 4 (rib repeat) = **9 complete repeats** — no partial repeats, clean edges ✓

Use the **long-tail cast on** if you know it — it creates a neat, slightly stretchy foundation edge that suits ribbing well. If you're not familiar with long-tail cast on, any cast on method you know will work fine.

---

### RIB PATTERN ROW

Every row is worked exactly the same:

**All Rows:** \*K2, p2; rep from \* to end of row.

That's it! There is only **one row to remember**, repeated over and over.

> **Reading the instruction:** The asterisk (\*) means "start repeating here." So you knit 2 stitches, purl 2 stitches, knit 2, purl 2 — continuing that sequence all the way to the end of the row. You will work exactly **9 repeats** of (k2, p2) per row.

---

### WORKING THE SCARF

Work the Rib Pattern Row on every row until the scarf measures **60 inches (152 cm)** from the cast-on edge.

Lay your work flat and measure along the center, from the cast-on edge to the needle, without stretching.

> **Progress Guide (approximate):**
> - After 28 rows → approx. 4 inches
> - After 56 rows → approx. 8 inches
> - After 105 rows → approx. 15 inches
> - After 210 rows → approx. 30 inches (halfway!)
> - After 420 rows → approx. 60 inches ✓

> **Beginner Tip — Keeping Your Place:** Because every row is identical in this pattern, it's easy to lose count. Consider using a row counter (a small mechanical counter or a free app on your phone) to track your progress. Alternatively, simply measure your work every time you finish a ball of yarn.

---

### BIND OFF

When the scarf measures **60 inches (152 cm)**, you are ready to bind off.

Work a **stretchy bind off** to match the elasticity of the ribbing:

**Stretchy Bind Off:** \*K2, pass first stitch over second stitch (1 stitch bound off); p1, pass stitch on right needle over new stitch (1 stitch bound off); rep from \* until all stitches are bound off.

In other words: bind off in pattern — knit the knit stitches and purl the purl stitches as you bind off, rather than knitting every stitch. This keeps the edge from pulling in and looking tight against the body of the scarf.

Cut yarn, leaving a **6-inch (15 cm) tail**. Pull the tail through the last stitch to secure.

---

## FINISHING

### Weaving In Ends

1. Thread the yarn tail onto a tapestry needle.
2. Weave the tail through the backs of 4–5 nearby stitches in a zigzag pattern, going in one direction and then back.
3. Pull gently snug — do not pull tight.
4. Trim any excess yarn close to the fabric.
5. Repeat for all yarn tails (cast-on end, bind-off end, and any ends from joining new yarn).

### Blocking (Optional but Recommended)

Blocking will even out your stitches and give the scarf a polished, professional finish.

1. Fill a basin with cool water and a drop of gentle wool wash or baby shampoo.
2. Submerge the scarf and gently press water through it — do not wring or twist.
3. Lift the scarf out and gently squeeze out excess water.
4. Roll it in a clean towel and press to remove more moisture.
5. Lay flat on a dry towel or blocking mat, gently patting it to **8 inches wide × 60 inches long**.
6. Allow to dry completely before moving (usually 12–24 hours).

> **Note:** Do not stretch ribbing aggressively when blocking — a light, relaxed block is ideal to preserve the rib's natural elasticity.

### Fringe (Optional)

For a classic fisherman look, add fringe to each short end:

1. Cut approximately **48 strands** of yarn, each **14 inches (35 cm)** long.
2. Group strands into bundles of **4 strands each** — you will have **12 bundles** (6 per end).
3. Fold each bundle in half to form a loop.
4. Insert a crochet hook (or your fingers) through a stitch at the scarf's edge, pull the loop through, then pull the cut ends through the loop and tighten.
5. Space the 6 fringe bundles evenly across each short end.
6. Trim fringe to an even length of approximately **5–6 inches (13–15 cm)**.

> **Fringe Yarn Note:** Adding fringe will require approximately **20–25 additional yards** of yarn. Keep this in mind if you are working with a limited amount.

---

### CONGRATULATIONS!

You've completed The Fisherman's Rib Scarf. 🎣

This scarf makes a wonderful gift and a satisfying first project. The 2×2 rib pattern is a building block for dozens of other knitting projects — you've just leveled up your skills!

---

*Pattern uses US knitting terminology and imperial measurements.*
*Gauge: 18 sts = 4" in 2×2 rib on US 8 / 5 mm needles.*
*Finished size: approx. 8" × 60".*

---
Disclaimer: This pattern was generated by AI and should be reviewed for accuracy before use. While we strive for quality, AI-generated content may contain errors. Please verify measurements, stitch counts, and instructions before beginning your project. Generated by purlJam.uk
Access your pattern anytime
Bookmark this page to access your pattern anytime