Type
Crochet
Difficulty
intermediate
Category
custom
AI Thinking Process
Planning
Verification
Pattern
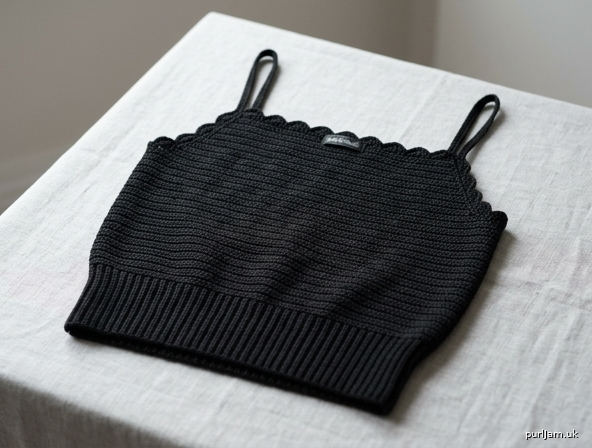
The Noir Camisole — Fitted Cotton Tank Top
A sleek, minimalist fitted camisole in solid black cotton. The wide back-loop-only ribbed waistband hugs the body with gentle stretch, the smooth single-crochet body carries a subtle horizontal ridge texture, and a delicate scalloped neckline with thin straps completes the elegant silhouette. Worked flat in two panels and seamed.
Skill Level: Easy (Advanced Beginner / Beginner-to-Intermediate)
Materials
- Yarn: Sport weight (#2 Fine) 100% cotton, solid black.
- Suggested: mercerized cotton, ~340 yds per 100g.
- Yardage by size:
Size Yardage XS ~750 yds S ~825 yds M ~900 yds L ~1,000 yds XL ~1,125 yds XXL ~1,225 yds
- Hook: US G/6 (4.0 mm) main hook; US F/5 (3.75 mm) for edging (optional, for tidier scallops).
- Notions: Tapestry needle, stitch markers (6–8), locking markers, measuring tape, scissors.
Gauge
- 22 sc x 26 rows = 4" (10 cm) in single crochet, blocked, using US G/6 (4.0 mm).
- This equals 5.5 sc per inch and 6.5 rows per inch.
- Gauge is critical for a fitted garment. Make a 5" x 5" swatch, block it, and measure the center 4".
Sizes (XS–XXL)
Designed with ~2" negative ease for a fitted look.
| Size | To Fit Bust | Finished Bust | Panel Width | Panel sc count |
|---|---|---|---|---|
| XS | 32" | 30" | 15" | 82 |
| S | 34" | 32" | 16" | 88 |
| M | 36" | 34" | 17" | 94 |
| L | 40" | 38" | 19" | 104 |
| XL | 44" | 42" | 21" | 116 |
| XXL | 48" | 46" | 23" | 126 |
Math check (M): 17" × 5.5 sc/in = 93.5 → rounded to 94 (even number for clean shaping). Two panels = 188 sc ÷ 5.5 = 34.2" ≈ 34" finished bust. ✓
Body length (waistband bottom to underarm), adjust as desired:
- Waistband height: 2.5" (all sizes)
- Body to underarm above waistband: ~9" (XS/S), ~9.5" (M/L), ~10" (XL/XXL)
Instructions are written for XS with other sizes in parentheses: XS (S, M, L, XL, XXL). Where a single number appears, it applies to all sizes.
Abbreviations (US Terms)
- ch — chain
- sc — single crochet
- sl st — slip stitch
- st(s) — stitch(es)
- BLO — back loop only
- sc2tog — single crochet 2 together (decrease)
- RS / WS — right side / wrong side
- rep — repeat
- sk — skip
- sp — space
Pattern Notes
- The camisole is worked as two flat panels (Front and Back — identical construction), then seamed at the sides. Neckline and straps are added after seaming.
- Waistband is worked sideways in short rows using BLO sc to create vertical ribs that stretch horizontally around the body. It is then rotated 90° and stitches are picked up along its long edge for the body.
- Body is worked in standard sc through both loops, turning each row — the turning ridges create the subtle horizontal texture.
- Turning chain: The ch-1 at the start of each sc row does NOT count as a stitch. Work your first sc into the first stitch.
- Stitch counts are given in parentheses at the end of rows.
- Both panels are worked identically until the neckline; the front and back are the same for this minimalist straight-neck design.
Special Stitches
- BLO sc: Insert hook under the back loop only of the indicated stitch, complete a normal sc.
- sc2tog: [Insert hook in next st, yo, pull up loop] twice (3 loops on hook), yo, pull through all 3 loops.
- Scallop: (worked in edging) — sk 1 st, 5 dc in next st, sk 1 st, sl st in next st.
INSTRUCTIONS
PART 1 — Waistband (make 2, one per panel)
The waistband is worked as a narrow strip in short rows, then turned sideways.
Waistband height = 2.5" tall = 14 sc rows tall (using our 5.5 sts/in... note: height here means the foundation length).
Foundation: Ch 15. (14 ch = 2.5" band height at 5.5 sts/in ≈ 2.55"; the +1 is the turning chain.)
Row 1 (RS): Sc in 2nd ch from hook and in each ch across, turn. (14 sc)
Row 2: Ch 1, working in BLO, sc in each st across, turn. (14 sc)
Rows 3 to [see table]: Rep Row 2.
Work the waistband until it reaches the required panel width when slightly stretched. Because BLO ribbing compresses, work the following number of ribbing rows per size:
| Size | Ribbing rows | Relaxed width target |
|---|---|---|
| XS | 82 | 15" |
| S | 88 | 16" |
| M | 94 | 17" |
| L | 104 | 19" |
| XL | 116 | 21" |
| XXL | 126 | 23" |
Each BLO row = 1 rib column. The number of rows equals the number of body stitches we will pick up (1 sc per rib), so we pick up [panel sc count] stitches. ✓
Do not fasten off after the last row. Turn the band 90° to work along the long edge.
PART 2 — Body (worked up from the waistband)
Set-up Row (RS): Ch 1. Working across the long top edge of the waistband, sc evenly into the end of each ribbing row — 1 sc per rib row — placing your stitches so you have 82 (88, 94, 104, 116, 126) sc. Turn.
Check: pick up count = panel sc count from the table. ✓
Straight body section
Rows 1–8: Ch 1, sc in each st across, turn. (82 (88, 94, 104, 116, 126) sc)
Waist shaping — gentle taper for a fitted look
We decrease at each edge, then increase back, to shape the waist. Decreases and increases are mirrored.
Decrease Row A (RS): Ch 1, sc2tog, sc across to last 2 sts, sc2tog, turn. (decrease 2 sts) Work 3 rows even in sc between shaping rows. Repeat Decrease Row A a total of 2 times, working 3 even rows after each.
Stitch count after 2 decrease rows: start − 4.
- XS: 82 − 4 = 78
- S: 88 − 4 = 84
- M: 94 − 4 = 90
- L: 104 − 4 = 100
- XL: 116 − 4 = 112
- XXL: 126 − 4 = 122
Work 6 rows even (this is the natural waist).
Increase Row B (RS): Ch 1, sc in first st, 2 sc in next st, sc across to last 2 sts, 2 sc in next st, sc in last st, turn. (increase 2 sts) Work 3 rows even between shaping rows. Repeat Increase Row B a total of 2 times, working 3 even rows after each.
Stitch count returns to original:
- XS: 78 + 4 = 82 ✓
- S: 84 + 4 = 88 ✓
- M: 90 + 4 = 94 ✓
- L: 100 + 4 = 100... check: 100 + 4 = 104 ✓
- XL: 112 + 4 = 116 ✓
- XXL: 122 + 4 = 126 ✓
Continue to underarm
Work even in sc until the body measures 9 (9, 9.5, 9.5, 10, 10)" from the top of the waistband, ending after a WS row.
Row math (M): 9.5" × 6.5 rows/in ≈ 62 rows total in the body section — includes the 8 set-up rows, shaping rows, and even rows. Adjust final even rows to reach measurement.
PART 3 — Neckline & Bust Bib (each panel)
The straight neckline is created by working a narrower center panel (the "bib") up from the full body while the sides stop.
Determine bib width = center portion, leaving underarm/armhole edges free.
| Size | Total body sts | Center bib sts | Sts left each side |
|---|---|---|---|
| XS | 82 | 46 | 18 |
| S | 88 | 50 | 19 |
| M | 94 | 54 | 20 |
| L | 104 | 58 | 23 |
| XL | 116 | 66 | 25 |
| XXL | 126 | 72 | 27 |
Check (M): 20 + 54 + 20 = 94 ✓
Bib Row 1 (RS): Ch 1, sc in first st and across, working to the last stitch of the body — but only across the center bib: sk the first 18 (19, 20, 23, 25, 27) sts by fastening off and rejoining, OR count in and place markers. Simplest method:
- With RS facing, skip the first 18 (19, 20, 23, 25, 27) sts, join yarn with sl st in the next st.
- Ch 1, sc in same st and in the next 46 (50, 54, 58, 66, 72) sts. Leave remaining 18 (19, 20, 23, 25, 27) sts unworked. Turn. (46 (50, 54, 58, 66, 72) sc)
Bib Rows 2 and up: Ch 1, sc in each st across, turn. Work even until bib measures 2.5 (2.5, 3, 3, 3, 3.5)" from the armhole split.
Fasten off. Repeat all of PART 1–3 for the second panel (identical).
PART 4 — Seaming
- Block both panels flat to measurements and let dry.
- With RS together, whipstitch or mattress-stitch the side seams from the bottom of the waistband up to the armhole split (the point where the bib narrows). Leave the armhole opening free above.
- Seam the waistbands cleanly for an invisible join at the ribs.
After seaming, finished bust circumference = 2 panels × [panel width]. M: 2 × 17" = 34" ✓
PART 5 — Scalloped Neckline & Armhole Edging
Work with the smaller F/5 (3.75 mm) hook for tidy scallops (optional).
Neckline edging (front and back top edges)
- Join yarn at a top corner of the bib with RS facing.
- Foundation round: Sc evenly across the top straight edge of the bib and around the neckline, keeping an even, flat count (about 5 sc per inch). Work a multiple of 3 sts + 1 to fit the scallop repeat. Sl st to join if working around; otherwise turn to work the scallop row along the straight top.
- Scallop Row: Ch 1, sc in first st, sk 1 st, 5 dc in next st, sk 1 st, sc in next st; rep from * across. Fasten off.
Scallop check: pattern uses 3 sts per repeat (sk 1, 5dc in 1, sk 1) plus anchoring sc — a multiple of 3 + 1 keeps the scallops even and centered. Adjust foundation sc count to the nearest multiple.
Armhole edging
- Join yarn at underarm seam, RS facing.
- Sc evenly around each armhole opening (about 5 sc per inch); sl st to join. Fasten off. Keep this edge plain (no scallops) so straps attach cleanly.
PART 6 — Thin Shoulder Straps
Straps are ~1" wide (5 sc) and adjustable in length.
Strap width: 5 sc = ~0.9". Strap length (start point): ~12 (12, 13, 13, 14, 14)" — measure over your own shoulder from front bib corner to back bib corner and adjust.
Make 2 straps.
Foundation: Ch 6. Row 1: Sc in 2nd ch from hook and across, turn. (5 sc) Rows 2 to end: Ch 1, sc in each st across, turn. (5 sc) Work until strap measures desired length. Fasten off, leaving a long tail for sewing.
Attach: Try the camisole on. Pin one end of each strap to a front bib top corner and the other end to the corresponding back bib top corner, adjusting length for fit. Whipstitch securely with the tapestry needle. Weave in all ends.
Finishing
- Weave in all remaining ends on the WS.
- Give a final light steam-block, shaping the scallops and smoothing the body.
- Cotton relaxes slightly with wear; the BLO waistband provides recovery and stretch.
Optional Customization Tips
- Longer/cropped length: Add or remove even rows in the body before the armhole split (6.5 rows ≈ 1").
- More fitted waist: Add a 3rd decrease/increase pair (remember to keep them balanced so counts return to the panel total).
- Less cleavage / higher neck: Increase the center bib stitch count and start it lower (split the armhole earlier).
- Wider straps: Chain 7–8 for the foundation and work more sc rows.
- Racerback look: Attach both back strap ends closer to center back.
- Color accents: Work the scallop row and strap in a contrast color for a modern pop while keeping the elegant black body.
- Longline waistband: Work more ribbing rows tall (start with more foundation ch, e.g. ch 20 for a ~3.5" band).
Quick Math Reference (all sizes verified)
| Size | Panel sc | Bust (2 panels) | Waist decrease low | Returns to |
|---|---|---|---|---|
| XS | 82 | 30" | 78 | 82 ✓ |
| S | 88 | 32" | 84 | 88 ✓ |
| M | 94 | 34" | 90 | 94 ✓ |
| L | 104 | 38" | 100 | 104 ✓ |
| XL | 116 | 42" | 112 | 116 ✓ |
| XXL | 126 | 46" | 122 | 126 ✓ |
Enjoy your elegant, fitted Noir Camisole!
Disclaimer: This pattern was generated by AI and should be reviewed for accuracy before use. While we strive for quality, AI-generated content may contain errors. Please verify measurements, stitch counts, and instructions before beginning your project. Generated by purlJam.uk
Access your pattern anytime
Bookmark this page to access your pattern anytime