Type
Knitting
Difficulty
intermediate
Category
custom
AI Thinking Process
Planning
Verification
Pattern
The Paladin’s Paper Plate
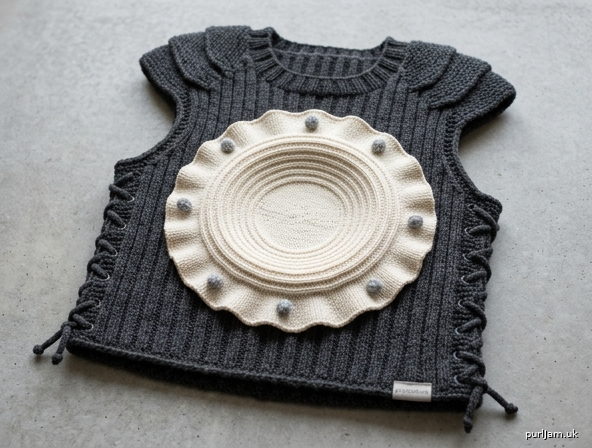
A knitted fantasy cuirass with a paper-plate chestplate
A sleeveless knitted cuirass for cosplay, LARP or spectacularly unwise banquets. The body is dense boxed rib “armour”; the chestplate is a concave knitted paper plate with concentric ridges and a radially fluted rim, bolted on with bobble rivets. Layered short-row pauldrons sit over the shoulders. Sides are laced, so the fit is adjustable over a tunic.
This is an advanced pattern: centre-out circular knitting, modular flutes, short rows, garment shaping and structured finishing.
Sizes
XS (S, M, L, XL)
To fit chest 81 (91, 102, 112, 122) cm [32 (36, 40, 44, 48) in]
Finished chest (laced closed, adjustable) 87 (95, 107, 119, 127) cm [34¼ (37½, 42, 46¾, 50) in]
Length (shoulder to hem) 42 (44, 46, 48, 50) cm [16½ (17¼, 18, 19, 19¾) in]
Armhole depth 20 (21, 22, 23, 24) cm [8 (8¼, 8¾, 9, 9½) in]
Length to underarm 22 (23, 24, 25, 26) cm [8¾ (9, 9½, 9¾, 10¼) in]
Paper-plate diameter (including flutes, all sizes) 28 cm [11 in]
Inner well diameter 18 cm [7 in]
Shown with 4–7 cm ease; side lacing will tighten or loosen the chest by several centimetres.
Materials
Yarn Worsted / aran (10-ply); approx. 200 m per 100 g. Wool or wool-blend for the body (structure); cotton or wool in cream for the plate (paper-like ridges).
- MC (armour — charcoal, pewter, oxblood or forest): 500 (550, 650, 750, 850) m / 250 (275, 325, 375, 425) g
- CC (paper plate — cream, ivory or pale grey): 200 m / 100 g, all sizes
- AC (rivets and I-cord — silver-grey or black): 100 m / 50 g, all sizes
Needles
- 4.5 mm (UK 7) straight or circular, for the body
- 4 mm (UK 8) double-pointed needles and a 40 cm circular, for the plate
- 3.5 mm (UK 9) double-pointed needles, for I-cord and bobbles
Notions
- Stitch markers (8 + 2)
- Stitch holders or waste yarn
- Tapestry needle
- 2.5 m leather thonging or extra AC for lacing I-cords
- Optional stiffening: 18 cm circle of heavy felt or plastic canvas; fabric stiffener (PVA / diluted white glue); 90 cm millinery wire for the flute rim
- Dinner plate or shallow bowl, 18–22 cm, for blocking the chestplate
Tension (gauge)
20 sts and 28 rows = 10 cm over Armour Stitch on 4.5 mm needles, after blocking.
22 sts and 30 rounds = 10 cm over stocking stitch in the round on 4 mm needles (plate fabric).
Work a 12 cm swatch in Armour Stitch. If you have too many stitches to 10 cm, go up a needle size; too few, go down. The plate is deliberately firm and slightly cupped — do not chase a perfectly flat circle.
Abbreviations
k knit
p purl
st(s) stitch(es)
st st stocking stitch (knit RS / purl WS; knit every round in the round)
g st garter stitch (knit every row)
RS / WS right side / wrong side
beg beginning
rem remain(ing)
rep repeat
rnd(s) round(s)
alt alternate
foll following
sl slip
pwise purlwise
wyif / wyib with yarn in front / with yarn in back
k2tog knit 2 together
ssk slip, slip, knit (left-leaning decrease)
m1 / m1L make 1 left (lift strand between sts from front to back, knit through back loop)
m1R make 1 right (lift strand from back to front, knit through front loop)
pm / sm / rm place / slip / remove marker
w&t wrap and turn
CO cast on
pm8 place 8 markers equally
LH / RH left hand / right hand
UK terms throughout: cast off (not bind off), tension, centre, colour, fibre, armour.
Pattern notes
- Body is worked flat in two pieces (back and front). Sides are not seamed; they are laced through eyelets.
- Armour Stitch is a 4-row repeat. Keep a selvedge: slip the first st pwise wyif and knit the last st of every row.
- The paper plate is worked from the centre out, then the rim is worked as 16 separate flared flutes. Yarn is cut after each flute; the tails are used later to tack the flutes into a wave.
- The plate is meant to cup like a real paper plate. Block it over a bowl. Stiffen it. It should sit proud of the front.
- When two numbers are given as 82 (90, 102, 114, 122), work your size only. Where one number is given, it applies to all sizes.
- Join new yarn at edges, not in the middle of a flute or a visible armour panel.
Armour Stitch (multiple of 4 sts + 2, worked flat)
Row 1 (RS): k2, *p2, k2; rep from * to end.
Row 2 (WS): p2, *k2, p2; rep from * to end.
Row 3: p2, *k2, p2; rep from * to end.
Row 4: k2, *p2, k2; rep from * to end.
Rep Rows 1–4. (The slipped selvedge sits outside this count: slip 1, work pattern over the centre sts, k1.)
Eyelet row (RS): sl 1, k1, yo, k2tog, work in Armour Stitch as set to last 4 sts, ssk, yo, k2. (Stitch count unchanged.)
Paper-plate chestplate
Worked first so it can dry/stiffen while you knit the body. One size.
With CC and 4 mm DPNs, cast on 8 sts using a tight circular cast-on (Emily Ocker or a knitted cast-on joined, taking care not to twist). Join to work in the round. Pm for beg of rnd, then pm after every st (8 markers, 1 st per section).
Knit 1 rnd.
Increase rnd: *k to marker, m1L, sm; rep from * to end. 8 sts increased.
Work Increase rnd, then 1 knit rnd, 13 times.
8 + (8 × 13) = 112 sts ✓
(14 sts per section)
Knit 4 rnds even. Inner well complete. Switch to 4 mm circular when comfortable.
Ridge 1: Purl 1 rnd, knit 1 rnd, purl 1 rnd.
Knit 2 rnds.
Ridge 2: Purl 1 rnd, knit 1 rnd, purl 1 rnd.
Knit 2 rnds.
Ridge 3: Purl 1 rnd, knit 1 rnd, purl 1 rnd.
Still 112 sts ✓
Flute set-up rnd: *k7, m1L; rep from * to end.
112 + 16 = 128 sts ✓
(16 groups of 8 sts)
Knit 1 rnd. Place 16 markers every 8 sts if you have not already got a clear 8-st rhythm. Do not cut CC yet.
Fluted rim (16 flutes)
Each flute is worked flat over the next 8 sts only. Cut yarn after each flute, leaving a 20 cm tail.
With RS facing, work the next 8 sts as follows:
Row 1 (RS): k1, m1L, k6, m1R, k1. 10 sts ✓ (8 + 2)
Row 2 (WS): p10.
Row 3: k1, m1L, k8, m1R, k1. 12 sts ✓ (10 + 2)
Row 4: p12.
Row 5: k1, m1L, k10, m1R, k1. 14 sts ✓ (12 + 2)
Row 6: p14.
Row 7: k14.
Row 8: p14.
Cast off 14 sts knitwise. Fasten off. 0 sts remain in this flute ✓
With RS facing, rejoin CC to the next 8 live sts and work the next flute.
Work all 16 flutes. 128 − (16 × 8) = 0 sts ✓
Sixteen flared tabs sit around the rim.
Weave in only the centre-cast-on tail for now. Leave flute tails hanging.
Block the plate. Soak, press out water, and dry it over an inverted bowl so the well is concave and the ridges show. Pin flutes out in a gentle wave. When dry, apply fabric stiffener to the well and ridges (not so heavy that the flutes become brittle). Optional: sew an 18 cm felt or plastic-canvas circle to the WS of the well only, stopping before the flutes. Optional: thread millinery wire through the cast-off edge of each flute and join into a ring.
Set the plate aside.
Back
With MC and 4.5 mm needles, cast on 82 (90, 102, 114, 122) sts.
Set-up row (WS): sl 1, p to last st, k1.
Work in Armour Stitch (with slipped selvedge as given) until the piece measures 4 cm from cast-on, ending with a WS row.
Next row (RS): work Eyelet row.
Continue in Armour Stitch, working an Eyelet row every 12th row 4 (4, 5, 5, 5) times more — 5 (5, 6, 6, 6) eyelet rows in total ✓ — then work even until the back measures 22 (23, 24, 25, 26) cm from cast-on, ending with a WS row. Do not place an eyelet in the last 3 cm below the armhole.
Shape armholes
Cast off 4 (5, 6, 7, 8) sts at beg of next 2 rows.
82 − 8 = 74 (90 − 10 = 80; 102 − 12 = 90; 114 − 14 = 100; 122 − 16 = 106) sts ✓
Dec 1 st at each end of the next RS row, then at each end of every foll RS row 2 (2, 4, 5, 6) times more — 3 (3, 5, 6, 7) decrease rows.
Work decreases 1 st in from the selvedge (k1, ssk, work to last 3 sts, k2tog, k1 on RS).
74 − 6 = 68 (80 − 6 = 74; 90 − 10 = 80; 100 − 12 = 88; 106 − 14 = 92) sts ✓
Work even in pattern until armhole measures 20 (21, 22, 23, 24) cm, ending with a WS row.
Shape shoulders
Cast off 16 (18, 19, 21, 22) sts at beg of next 2 rows.
68 − 32 = 36 (74 − 36 = 38; 80 − 38 = 42; 88 − 42 = 46; 92 − 44 = 48) sts ✓
Cast off rem 36 (38, 42, 46, 48) sts for back neck.
Front
Work exactly as for Back to the start of armhole shaping — same cast-on, same eyelets, same length to underarm.
Shape armholes
Work armhole cast-offs and decreases exactly as for Back.
68 (74, 80, 88, 92) sts ✓
Work even until armhole measures 12 (13, 14, 14, 15) cm, ending with a WS row.
Shape front neck
Next row (RS): work 26 (28, 30, 33, 34) sts, cast off centre 16 (18, 20, 22, 24) sts, work to end.
(68 − 16) / 2 = 26; (74 − 18) / 2 = 28; (80 − 20) / 2 = 30; (88 − 22) / 2 = 33; (92 − 24) / 2 = 34 sts each side ✓
Turn and work the right neck (as worn: this is the second set of sts) first. Leave left-neck sts on a holder.
Right neck
Work 1 WS row.
Dec 1 st at neck edge of next RS row, then at neck edge of every foll RS row 9 (9, 10, 11, 11) times more — 10 (10, 11, 12, 12) neck decreases.
26 − 10 = 16 (28 − 10 = 18; 30 − 11 = 19; 33 − 12 = 21; 34 − 12 = 22) sts ✓
Work even until front armhole matches back armhole length, ending with a WS row. Cast off rem 16 (18, 19, 21, 22) shoulder sts.
Left neck
With WS facing, rejoin MC to rem 26 (28, 30, 33, 34) sts. Work 1 WS row.
Shape neck as for right neck, reversing shaping (dec at neck edge of RS rows: work to last 3 sts, k2tog, k1).
16 (18, 19, 21, 22) sts rem ✓
Cast off.
Neck total: 16 + 10 + 10 = 36 (18 + 10 + 10 = 38; 20 + 11 + 11 = 42; 22 + 12 + 12 = 46; 24 + 12 + 12 = 48) sts, matching back neck ✓
Pauldrons (make 2)
Worked in garter stitch in MC on 4.5 mm needles. Garter is wider in rows than Armour Stitch; measure, do not count on 28 rows = 10 cm here.
Cast on 50 (54, 58, 62, 66) sts.
Knit 2 rows.
Short-row cap (wraps sit on the WS and will be hidden against the shoulder):
Row 1 (RS): k to last 8 sts, w&t.
Row 2: k to last 8 sts, w&t.
Row 3: k to last 12 sts, w&t.
Row 4: k to last 12 sts, w&t.
Row 5: k to last 16 sts, w&t.
Row 6: k to last 16 sts, w&t.
Row 7: k to last 20 sts, w&t.
Row 8: k to last 20 sts, w&t.
Row 9: knit to end, working each wrap with its st.
Row 10: knit to end, working each rem wrap with its st.
Knit 10 (10, 12, 12, 14) rows even (this flap hangs down the upper arm).
Cast off knitwise. Cast-on edge measures approx. 25 (27, 29, 31, 33) cm and is the edge that follows the shoulder seam.
Bobble rivets (make 8)
With AC and 3.5 mm needles, cast on 1 st.
Row 1: (k1, p1, k1, p1) into the st. 4 sts ✓
Rows 2–4: work 3 rows st st, beg with a WS purl row.
Row 5: k4, then pass the 2nd, 3rd and 4th sts over the first. 1 st ✓
Fasten off, leaving a 15 cm tail. Roll into a tight bead and stitch the base closed. Set aside.
I-cord (lacing, optional)
With AC and 3.5 mm DPNs, cast on 3 sts. *K3, do not turn, slide sts to other end of needle; rep from * until cord measures 90 (95, 100, 110, 115) cm. Make 2. Cast off. (Or use leather thonging.)
Finishing
Weave in ends on body pieces except those you will use for seaming.
Block back and front to measurements:
- Width: 41 (45, 51, 57, 61) cm
- Length: 42 (44, 46, 48, 50) cm
- Armhole depth: 20 (21, 22, 23, 24) cm
Do not overstretch the side eyelets. Block pauldrons flat into gentle crescents.
Shoulder seams. Join front to back at shoulders with mattress stitch, matching the 16 (18, 19, 21, 22) sts.
Neckband. With RS facing, MC and 4.5 mm needles, pick up and knit:
- 36 (38, 42, 46, 48) sts across back neck
- 16 (16, 18, 19, 19) sts down left front slope
- 16 (18, 20, 22, 24) sts across centre front cast-off
- 16 (16, 18, 19, 19) sts up right front slope
Total 84 (88, 98, 106, 110) sts ✓
Work 5 rows of 2×2 rib (k2, p2), starting WS with p2 so the rib sits evenly. Cast off loosely in rib.
Armholes. With RS facing, pick up and knit 80 (84, 88, 92, 96) sts around each armhole (about 3 sts per 4 rows along the vertical edges and 1 st per cast-off st). Knit 1 row. Cast off using a 3-st applied I-cord (or cast off in knit for a simpler edge).
Side edges. If the laced edges look loose, work a round of slip-stitch crochet (UK dc) or pick up and immediately cast off along each side from hem to underarm, skipping the eyelets so they stay open.
Pauldrons. Pin each pauldron over a shoulder seam, cast-on edge following the seam from front to back, short-row cup sitting on the point of the shoulder, garter flap hanging 6–8 cm down the upper arm. The pauldron should overlap the armhole edge by about 2 cm. Sew the cast-on edge down firmly; tack the short ends to front and back; leave the lower flap free or add two small tacks.
Attach the paper plate. Centre the plate on the front. The top of the inner well sits about 4 (4, 5, 5, 5) cm below the base of the neckband; the plate is centred left to right. The well and ridges lie against the fabric; the flutes stand free.
Sew the WS of the inner well (and the innermost ridge only) to the front with CC, using a running stitch just inside the first ridge. Do not sew the flutes down flat.
Arrange the flutes. Working round the rim, overlap each flute’s left edge over the previous flute’s right edge by about 1.5 cm, forming a continuous wave like a paper-plate rim. Tack each overlap with the flute tails. Steam lightly (do not crush). The overall diameter should read about 28 cm.
Rivet the plate. Sew the 8 AC bobbles equally around the outermost ridge, as if bolting the plate to the cuirass. Take the stitches through the front fabric for strength.
Lacing. Thread one I-cord (or thong) through the corresponding eyelets of front and back on each side, as for a bodice. Start at the underarm and finish at the hem, or the reverse. Tie.
Final press. Steam the armour body. Do not flatten the plate or the pauldron cups. Trim all remaining ends.
Wear and care
Wear over a tunic or shirt. The plate is costume armour: it will not stop a lance. If you used millinery wire or plastic canvas, do not machine-wash; sponge-clean the plate and hand-wash the body in cool water. Reshape the plate over a bowl to dry.
For a more battle-worn look, duplicate-stitch a few “dents” in AC on the well, or spit-splice a metre of grey into the last two flutes.
Go forth. Dine bravely.
Disclaimer: This pattern was generated by AI and should be reviewed for accuracy before use. While we strive for quality, AI-generated content may contain errors. Please verify measurements, stitch counts, charts, and instructions before beginning your project. Generated by purlJam.uk
Love this pattern?
Save this pattern to your free PurlJam libraryAccess your pattern anytime
Bookmark this page to access your pattern anytime