Type
Crochet
Difficulty
intermediate
Category
dress
AI Thinking Process
Planning
Verification
Pattern
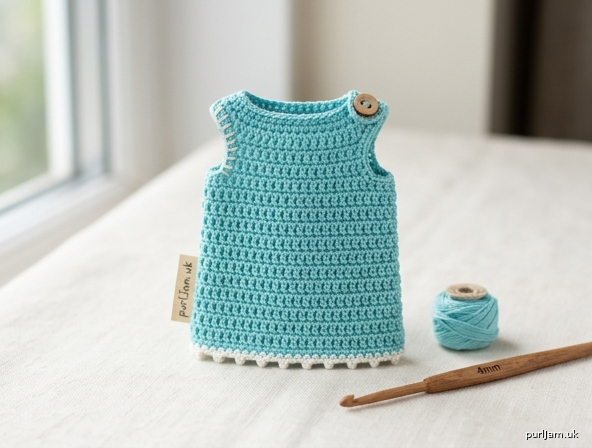
Tiny Summer Shift Dress
For a 10 cm (4") plush doll
A straight, sleeveless shift worked in half double crochet. Generous ease and a buttoned shoulder make it easy to dress a squashy plush head and arms. Cotton gives crisp stitches and a light summer look. Confident beginners who can work in the round, turn rows, and sew on a button can finish this in an evening.
Skill level: Easy / confident beginner
Sizes
One size, written for a typical 10 cm (4") plush doll.
Finished measurements
- Chest (unstretched): 4⅞" (12.4 cm)
- Length, shoulder to hem: 2⅞" (7.3 cm)
- Armhole depth: ⅞" (2.2 cm)
- Neck opening (boat, unstretched): about 3⅛" (8 cm) around the seamed opening, plus the buttoned shoulder
The dress is meant to be loose (about 1½–2" / 4–5 cm positive ease over a 2¾–3½" / 7–9 cm doll chest). Measure your doll’s chest and torso length before you start. See Customization to add or subtract rounds.
Materials
- Yarn: Light worsted weight cotton (light #3 to light #4), about 20 yd / 18 m (under 10 g). A 50 g ball is plenty and will make several dresses. Suggested: mercerized or soft cotton such as Lion Brand 24/7 Cotton DK, Paintbox Yarns Cotton DK, or similar light worsted/DK cotton.
- Hook: US G-6 / 4.0 mm (or size needed to obtain gauge)
- Notions: Stitch marker, tapestry needle, 1 small button (about ¼" / 6–8 mm), scissors
- Optional: Contrasting scrap for a picot hem
Gauge
18 hdc and 14 rows = 4" (10 cm) in hdc, worked in the round, unblocked, using 4.0 mm hook.
Swatch: Ch 20, hdc in 2nd ch from hook and in each ch across (19 hdc). Work 8 rows hdc. Measure the center 4" (10 cm).
If you have too few stitches per 4" (fabric too loose / dress too big), go down to 3.75 mm. If you have too many stitches (fabric too stiff / dress too small), go up to 4.5 mm. For doll clothes a slightly firm fabric is better than a floppy one.
Notes
- US crochet terms throughout.
- The dress is worked from the hem up.
- Body is worked in joined rounds, turning is not required. Join with a sl st to the first hdc of the round. Ch 1 at the start of a round does not count as a stitch.
- After the underarm split, front and back are worked flat, turning at the end of every row. Ch 1 at the start of a row does not count as a stitch.
- Keep a marker in the first stitch of every round until the split.
- Cotton has little stretch. The buttoned left shoulder is what lets the dress go on over the head — do not sew both shoulders closed unless you have tested the neck on your doll.
- Weave ends as you go when you can; the piece is small and tails show.
Stitch multiple: 1 (any even number is fine if you resize).
Abbreviations
- ch — chain
- sl st — slip stitch
- sc — single crochet
- hdc — half double crochet
- st(s) — stitch(es)
- rnd — round
- rep — repeat
- RS — right side
- WS — wrong side
Pattern
Foundation (hem)
Ch 22. Being careful not to twist, sl st to the first ch to form a ring.
Rnd 1 (RS): Ch 1, hdc in each ch around, sl st to first hdc to join. (22 hdc ✓)
Body
Work even in hdc to the underarms. No waist shaping (shift silhouette).
Rnds 2–7: Ch 1, hdc in each st around, sl st to first hdc. (22 hdc ✓)
7 body rounds at 14 rows = 4" → 7 ÷ 14 × 4" = 2" (5 cm) to underarm ✓
Try the tube on the doll. It should slide over the hips and sit with ease around the chest. If it is snug, frog and start with 24 ch (see Customization). If you want a longer skirt, work extra even rounds here before the split.
Armhole split
You will now divide for front and back. 22 sts split as 11 front + 11 back (11 + 11 = 22 ✓). Do not skip underarm stitches — at this scale the row edges become the armholes.
Front Row 1 (RS): Ch 1, hdc in next 11 sts, turn. (11 hdc ✓) Leave remaining 11 sts unworked for the back.
Rows 2–3: Ch 1, hdc in each st across, turn. (11 hdc ✓)
3 rows at 14 rows = 4" → 3 ÷ 14 × 4" = ⅞" (2.2 cm) armhole depth ✓ Fasten off.
Back With RS facing, join yarn with sl st in the first unworked st after the front.
Row 1 (RS): Ch 1, hdc in next 11 sts, turn. (11 hdc ✓)
Rows 2–3: Ch 1, hdc in each st across, turn. (11 hdc ✓) Fasten off, leaving a 8" (20 cm) tail on the right-hand shoulder edge (as worn) for seaming.
Neckline (boat neck)
No center bind-off and no neck decreases. The boat neck is formed by joining only the outer stitches of each shoulder and leaving the center open:
- Each panel is 11 sts.
- Shoulder join = 2 sts each side.
- Front neck left open = 7 sts; back neck left open = 7 sts. (2 + 7 + 2 = 11 ✓)
This gives a wide, shallow boat opening that is then finished with sc.
Shoulders
Right shoulder (as worn): With WS together (or RS together if you prefer the seam on the inside), whipstitch or sl-st seam the outer 2 sts of the front to the outer 2 sts of the back. (2 sts joined ✓)
Left shoulder (button closure): Do not sew. The remaining 2 sts on front and 2 sts on back are the button tabs.
- Sew the button to the back left tab, centered on the 2 hdc.
- On the front left tab, join yarn with sl st in the outer shoulder st, ch 4 (or 5 if your button is larger), sl st in the inner shoulder st to form a loop. Fasten off.
Try the dress on the doll, fastening the button. The boat neck plus the open shoulder should clear the head. If the loop is loose, use ch 3; if tight, use ch 5.
Finishing
Hem With RS facing, join yarn at the center back of the hem.
Simple hem: Ch 1, sc in each st around, sl st to first sc. Fasten off. (22 sc ✓)
Optional picot hem (summer edge): Ch 1, *sc in next 2 sts, ch 2, sl st in 2nd ch from hook (picot), sc in next st; rep from * around to last st, sc in last st, sl st to first sc. Fasten off. (22 sts with 7 picots; 3 sts per repeat, 22 is not a multiple of 3 so the last repeat is 1 sc — this is intentional and will not show at doll scale.)
Armholes With RS facing, join yarn at the underarm (side of the split).
Work 1 rnd sc evenly around the armhole: about 1 sc in each row-end and 1 sc in each unworked side-st if any, aiming for 10–12 sc total so the opening stays soft and does not flare. Sl st to first sc. Fasten off.
Rep for the second armhole.
Neckline With RS facing, join yarn at the right shoulder seam.
Work 1 rnd sc around the entire boat neck and across both left shoulder tabs (work 2 sc across each 2-hdc tab). Do not sc so tightly that the neck gathers; the opening should stay wide. Sl st to first sc. Fasten off.
Weaving Weave in all ends on the WS with the tapestry needle. On cotton, weave through at least 1" (2.5 cm) of stitches, then reverse direction for a few stitches so tails cannot work free. Trim close.
Blocking Cotton benefits from a light block so the hem hangs straight and the boat neck sits open.
- Wet block: Soak in lukewarm water, squeeze (do not wring), roll in a towel. Pin the dress to 4⅞" (12.4 cm) chest and 2⅞" (7.3 cm) length, opening the boat neck and armholes. Dry fully.
- Steam block: Hover a steam iron above the fabric (do not press hard or you will flatten the hdc). Shape with your fingers and pin until cool.
Do not stretch the button loop out of shape.
Customization
Chest / ease
- Snugger (about 4½" / 11.5 cm): foundation ch 20, split 10 / 10, shoulders still 2 sts, neck 6 + 6.
- Looser (about 5⅓" / 13.5 cm): foundation ch 24, split 12 / 12, shoulders 2 sts, neck 8 + 8. Always use an even number so front and back match.
Length (add or subtract before the armhole split only) Gauge is 3.5 rows per inch (14 rows = 4").
- Mini / shorter: work 5 body rounds instead of 7 (about 2½" / 6.5 cm total length).
- Longer / more skirt: add 2–4 even hdc rounds after Rnd 7. Each 2 rounds add about ⅝" (1.5 cm). Do not add length after the split or the armholes will sit too low.
Slight A-line (optional) Start with ch 24. Rnd 1: 24 hdc. Rnds 2–3: 24 hdc. Rnd 4: hdc2tog, hdc 10, hdc2tog, hdc 10 (22 hdc ✓). Then continue from Rnd 5 of the Body as written (you will have 4 even rounds left on 22 sts instead of 6). Hip will measure about 5⅓" (13.5 cm).
Straps If your doll has very narrow shoulders and the 2-st tabs feel skinny, work 1 extra row of 11 hdc on front and back before finishing, then still join only 2 sts. Do not go wider than 3 sts or the boat neck will become too small to clear the head.
Care
Follow the ball band. Most light worsted cottons: hand wash cool, lay flat to dry. Recheck the button after washing.
Disclaimer: This pattern was generated by AI and should be reviewed for accuracy before use. While we strive for quality, AI-generated content may contain errors. Please verify measurements, stitch counts, charts, and instructions before beginning your project. Generated by purlJam.uk
Love this pattern?
Save this pattern to your free PurlJam libraryAccess your pattern anytime
Bookmark this page to access your pattern anytime