Type
Knitting
Difficulty
intermediate
Category
custom
AI Thinking Process
Planning
Verification
Pattern
Victoria Name Panel
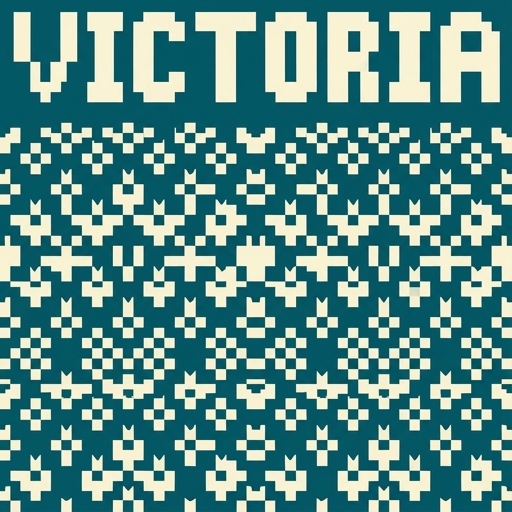
A beginner-friendly knitted rectangular panel featuring the name “Victoria” worked from an attached stitch chart. Perfect as a wall hanging, scarf, or personalized décor piece. Knit flat in worsted-weight yarn with simple garter borders and a stockinette center.
Materials
- Yarn: Worsted weight (category 4), two colors
– Main Color (MC): 220 yd / 200 m
– Contrast Color (CC): 60 yd / 55 m
(Sample uses soft acrylic or wool-blend worsted) - Needles: US 8 / 5 mm straight or circular needles (or size needed to obtain gauge)
- Notions: Tapestry needle, scissors, locking stitch markers (2), optional blocking mats and pins
Gauge
18 stitches and 24 rows = 4" (10 cm) in stockinette stitch after blocking.
Check gauge—correct needle size if necessary so finished width is accurate.
Finished Size
11" wide × 40" long (28 cm × 102 cm), after blocking.
(One size; easily lengthened by adding plain stockinette rows.)
Abbreviations (US)
- BO: bind off
- CC: contrast color
- CO: cast on
- k: knit
- MC: main color
- p: purl
- RS: right side
- st(s): stitch(es)
- WS: wrong side
Pattern Notes
- Panel is worked flat, bottom-up.
- Garter-stitch borders (knit every row) frame top and bottom; side edges are also kept in garter for a clean, non-rolling finish.
- The name is worked from the Attached Stitch Chart in MC and CC. Maintain even tension; catch floats every 3–4 stitches if carrying yarn.
- Stitch count remains 50 stitches throughout—no increasing or decreasing.
- For absolute beginners who prefer not to strand: knit the entire panel in MC, then embroider the name with CC using duplicate stitch following the same chart.
- Slip the first stitch of every row purlwise with yarn in front for a neater edge (optional).
Attached Stitch Chart
Use the separate attached chart panel supplied with this pattern for the visual grid of the name “Victoria.”
The chart appears in the chart panel immediately following the written instructions (or in the accompanying chart file/image).
How to read the chart (knitting):
- Work the chart in stockinette stitch (knit RS rows, purl WS rows).
- RS (odd-numbered) chart rows are read right to left; WS (even-numbered) chart rows are read left to right.
- Each square = 1 stitch. Filled/dark squares = CC; empty/light squares = MC (or as indicated by the chart key).
- Begin Chart Row 1 on a RS row after the lower border and centering setup.
- Color changes: carry the unused color loosely across the back (stranded method) or use intarsia bobbins for large blocks. Twist yarns at color changes to prevent holes.
- Chart width = 36 stitches; chart height = 28 rows.
Stitch-count integration:
Total width = 50 sts.
Place chart as follows on every chart row:
k7 (MC garter edge sts remain in MC), work 36 chart sts, k7 (MC).
7 + 36 + 7 = 50 sts ✓.
After Chart Row 28 is complete, resume plain MC stockinette.
Yarn management:
Cut CC after the chart is finished, leaving a 6" tail to weave in. Keep MC attached throughout.
Instructions
Lower Border
With MC, CO 50 sts.
Rows 1–10: Knit every stitch (garter stitch).
Place a marker on RS so you can identify right side easily.
Body – Setup to Chart
Row 1 (RS): k5, p40, k5.
Row 2 (WS): k5, k40, k5.
(These 5-st garter edges continue for the entire length; the center 40 sts are stockinette except where the chart sits.)
Next row (RS): k5, p2, place marker, knit next 36 sts in MC, place marker, p2, k5.
Next row (WS): k5, k2, slip marker, purl 36, slip marker, k2, k5.
The 36 stitches between markers are the chart zone.
Chart Section
Join CC.
Work the 28 rows of the Attached Stitch Chart over the center 36 stitches as follows:
Every RS row: k5, p2, sm, work next chart row (right to left) across 36 sts, sm, p2, k5.
Every WS row: k5, k2, sm, work next chart row (left to right) across 36 sts, sm, k2, k5.
(Remember: chart squares dictate MC or CC; edge stitches outside the markers stay in MC and in the established garter/stockinette pattern.)
After Chart Row 28 (WS) is complete: 50 sts. Cut CC, leaving a tail.
Body – After Chart
Continue with MC only:
RS rows: k5, p2, sm, k36, sm, p2, k5.
WS rows: k5, k2, sm, p36, sm, k2, k5.
Work even in this pattern until piece measures 37" (94 cm) from cast-on edge, ending after a WS row.
(Approximately 180–190 additional rows after the chart, depending on your exact row gauge; measure rather than count if preferred.)
Upper Border
Remove markers on next row.
Next 10 rows: Knit every stitch (garter stitch).
BO all stitches knitwise on RS.
Finishing
Weave in all ends securely on the wrong side with tapestry needle.
Block gently to finished measurements (11" × 40"): pin flat, spritz or steam, and allow to dry completely. This evens the stitches and sets the chart.
Optional: Add a hanging rod pocket by folding the top garter border over and stitching loosely, or sew a fabric hanging sleeve to the back.
Optional: Fringe or tassels may be added to the cast-on and bind-off edges if using as a scarf.
Your Victoria Name Panel is complete. Enjoy!
Disclaimer: This pattern was generated by AI and should be reviewed for accuracy before use. While we strive for quality, AI-generated content may contain errors. Please verify measurements, stitch counts, charts, and instructions before beginning your project. Generated by purlJam.uk
Love this pattern?
Save this pattern to your free PurlJam libraryAccess your pattern anytime
Bookmark this page to access your pattern anytime