Type
Crochet
Difficulty
intermediate
Category
custom
AI Thinking Process
Planning
Verification
Pattern
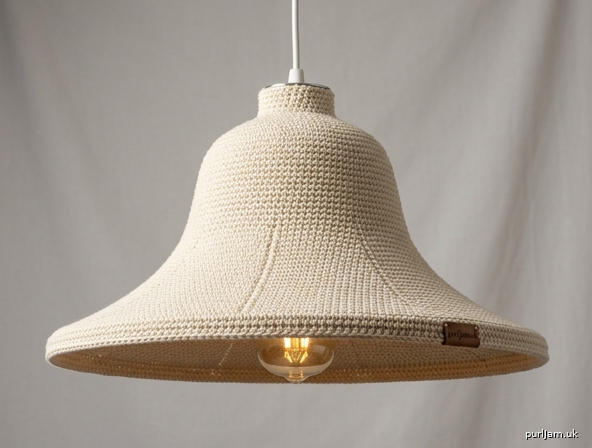
Wide Bell Pendant Lamp Shade
A shallow, wide pendant shade in single crochet, worked in a spiral from a 2¾" (7 cm) upper ring out to a 17¾" (45 cm) lower ring. The first third of the rounds use only a few increases so the shade drops more than it widens. Increases then accelerate. The last third is worked at this gauge’s flat-circle rate (8 increases per round) so the lower edge has exactly the stitches of a 17¾" (45 cm) circle and sits on the large ring without cupping or ruffling. The lower ring hangs about 2¾" (7 cm) below the upper ring.
Difficulty: Intermediate
Materials
- Yarn: Worsted weight (category 4) cotton, 250 yd (230 m). Cotton is preferred for a firm fabric and better heat resistance than acrylic.
- Hook: US E-4 / 3.5 mm (or size needed to obtain gauge). This is smaller than the usual worsted hook; the dense fabric helps the shade hold its shape.
- Notions:
- One 2¾" (7 cm) welded metal craft / lamp ring
- One 17¾" (45 cm) welded metal craft / lamp ring
- Stitch marker
- Tapestry needle
- Optional: fabric stiffener or diluted white glue; blocking pins
- Hardware (not crocheted): Pendant lamp cord and socket. Use LED bulbs only. Yarn is flammable; do not use incandescent or halogen bulbs, and keep the shade well clear of the bulb.
Gauge
Worked in sc, in a rectangle, with US E-4 / 3.5 mm hook:
11 sc = 2⅜" (6 cm); 5 rows = 1⅛" (3 cm)
In the round, 3 rounds of sc measure about ¾" (2 cm).
Gauge controls both ring fit and the increase rate that keeps the lower edge flat. If your swatch is wider than 2⅜" (6 cm) for 11 sc, go down a hook size; if narrower, go up.
Size
One size.
- Upper ring: 2¾" (7 cm) diameter
- Lower ring: 17¾" (45 cm) diameter
- Depth between rings: about 2¾" (7 cm)
- Lower-edge stitch count: 259 sc (matches 17¾" / 45 cm at gauge)
Abbreviations (US terms)
- sc — single crochet
- inc — increase (2 sc in the same stitch)
- rnd — round
- st(s) — stitch(es)
- sl st — slip stitch
- pm — place marker
Pattern Notes
- Work in a continuous spiral (do not join, do not turn) unless a round says otherwise. Place a marker in the first stitch of every round and move it up.
- Work through both loops of every stitch.
- There is no turning chain. The first sc of each round is worked in the first stitch of the previous round.
- Increasing evenly: Each increase round states how many increases to work and the resulting count. Space those increases as evenly as possible. Where a repeat is given, use it. To keep increases from stacking into a visible ridge, do not start every round with an increase — sc 2 or 3 extra stitches before the first increase on alternate rounds (move the start of the repeat, not the stitch count).
- Why 8 increases is the cap: At this gauge a flat sc circle grows by about 8 stitches per round. Fewer than 8 stitches makes the work bowl (the drop you want at the top). More than 8 stitches makes it ruffle. The last third of the shade uses 8 increases every round so the 17¾" (45 cm) edge can lie flat on the ring and not bulge.
- Trying on as you go: After Section 1 the piece should still be steep. After Section 2 it should be flaring. The last round of Section 3 should sit around the large ring with no gathering and no stretching.
- Stitch counts appear in parentheses at the end of every round, with the increase arithmetic shown.
Pattern
Upper ring
With the 2¾" (7 cm) ring and US E-4 / 3.5 mm hook, make a slip knot on the hook.
Ring round: Working over the ring (encasing the metal in each stitch), work 43 sc around the ring. Pm in the first sc. Do not join. (43)
The 43 stitches should cover the ring without gaps and without crowding. If you must use 42 or 44 sc to cover your particular ring, inc 1 extra (or skip 1 inc) on Rnd 1 so you join the written counts at 45 sts.
Section 1 — Drop (few increases)
The shade should grow slowly here — more depth than width.
Rnd 1: Inc, sc 21, inc, sc 20. (2 increases → 43 + 2 = 45 ✓)
Rnd 2: Inc, sc 22, inc, sc 21. (2 increases → 45 + 2 = 47 ✓)
Rnd 3: Inc, sc 23, inc, sc 22. (2 increases → 47 + 2 = 49 ✓)
Rnd 4: Inc, sc 16, inc, sc 15, inc, sc 15. (3 increases → 49 + 3 = 52 ✓)
Rnd 5: Inc, sc 17, inc, sc 16, inc, sc 16. (3 increases → 52 + 3 = 55 ✓)
Rnd 6: [Inc, sc 13] 3 times, inc, sc 12. (4 increases → 55 + 4 = 59 ✓)
Rnd 7: [Inc, sc 14] 3 times, inc, sc 13. (4 increases → 59 + 4 = 63 ✓)
Rnd 8: [Inc, sc 12] 3 times, [inc, sc 11] 2 times. (5 increases → 63 + 5 = 68 ✓)
Rnd 9: [Inc, sc 13] 3 times, [inc, sc 12] 2 times. (5 increases → 68 + 5 = 73 ✓)
Rnd 10: Inc, sc 12, [inc, sc 11] 5 times. (6 increases → 73 + 6 = 79 ✓)
Rnd 11: Inc, sc 13, [inc, sc 12] 5 times. (6 increases → 79 + 6 = 85 ✓)
Section 2 — Accelerate
Increases step up from 6 to 8 per round so the shade begins to flare.
Rnd 12: Inc, sc 14, [inc, sc 13] 5 times. (6 increases → 85 + 6 = 91 ✓)
Rnd 13: [Inc, sc 12] 7 times. (7 increases → 91 + 7 = 98 ✓)
Rnd 14: [Inc, sc 13] 7 times. (7 increases → 98 + 7 = 105 ✓)
Rnd 15: [Inc, sc 14] 7 times. (7 increases → 105 + 7 = 112 ✓)
Rnd 16: [Inc, sc 13] 8 times. (8 increases → 112 + 8 = 120 ✓)
Rnd 17: [Inc, sc 14] 8 times. (8 increases → 120 + 8 = 128 ✓)
Rnd 18: [Inc, sc 15] 8 times. (8 increases → 128 + 8 = 136 ✓)
Rnd 19: [Inc, sc 16] 8 times. (8 increases → 136 + 8 = 144 ✓)
Rnd 20: [Inc, sc 17] 8 times. (8 increases → 144 + 8 = 152 ✓)
Rnd 21: [Inc, sc 18] 8 times. (8 increases → 152 + 8 = 160 ✓)
Rnd 22: [Inc, sc 19] 8 times. (8 increases → 160 + 8 = 168 ✓)
Rnd 23: [Inc, sc 20] 8 times. (8 increases → 168 + 8 = 176 ✓)
Section 3 — Flare to a flat 17¾" (45 cm) edge
Eight increases every round is this gauge’s flat-circle rate. By Rnd 34 the count is exactly the circumference of the 17¾" (45 cm) ring, so the edge can lie flat on the ring without bulging.
Rnd 24: [Inc, sc 21] 8 times. (8 increases → 176 + 8 = 184 ✓)
Rnd 25: [Inc, sc 22] 8 times. (8 increases → 184 + 8 = 192 ✓)
Rnd 26: [Inc, sc 23] 8 times. (8 increases → 192 + 8 = 200 ✓)
Rnd 27: [Inc, sc 24] 8 times. (8 increases → 200 + 8 = 208 ✓)
Rnd 28: [Inc, sc 25] 8 times. (8 increases → 208 + 8 = 216 ✓)
Rnd 29: [Inc, sc 26] 8 times. (8 increases → 216 + 8 = 224 ✓)
Rnd 30: [Inc, sc 27] 8 times. (8 increases → 224 + 8 = 232 ✓)
Rnd 31: [Inc, sc 28] 8 times. (8 increases → 232 + 8 = 240 ✓)
Rnd 32: [Inc, sc 29] 8 times. (8 increases → 240 + 8 = 248 ✓)
Rnd 33: [Inc, sc 30] 8 times. (8 increases → 248 + 8 = 256 ✓)
Rnd 34: Inc, sc 85, inc, sc 84, inc, sc 84. (3 increases → 256 + 3 = 259 ✓)
Do not fasten off.
Join the lower ring
Hold the 17¾" (45 cm) ring against the last round. The 259 stitches should match the ring with no gathering and no stretching.
Joining round: Sc in each st around, working over the 17¾" (45 cm) ring so the metal is encased in every stitch. Join with sl st to the first sc. (259)
Fasten off. Weave in ends.
Finishing
- Block: Dampen the shade and set both rings 2¾" (7 cm) apart (a bowl, box, or a few stacked books as a spacer between the rings works). Smooth the fabric into a gentle bell — steeper near the small ring, opening toward the large ring. Let dry completely.
- Stiffen (optional but recommended): Apply fabric stiffener or 1 part white glue to 1 part water, shape on the rings, and dry. This keeps the bell from sagging in humidity.
- Hang: Thread the pendant cord through the 2¾" (7 cm) ring. The large ring hangs about 2¾" (7 cm) below the small ring. Use an LED bulb only, and leave air space between bulb and crochet.
- Fit check: If the lower edge was slightly loose on the large ring, a round of sl st through BLO over the ring will take it in. If it was slightly tight, the joining-round sc will ease it on.
Increase summary (quick reference)
| Rounds | Increases per round | Stitch count at end of section |
|---|---|---|
| Ring | — | 43 |
| 1–11 (drop) | 2, 2, 2, 3, 3, 4, 4, 5, 5, 6, 6 | 85 |
| 12–23 (accelerate) | 6, 7, 7, 7, then 8 × 8 | 176 |
| 24–34 (flat flare) | 8 × 10, then 3 | 259 |
Total added: 216 stitches. 43 + 216 = 259 ✓
Disclaimer: This pattern was generated by AI and should be reviewed for accuracy before use. While we strive for quality, AI-generated content may contain errors. Please verify measurements, stitch counts, charts, and instructions before beginning your project. Generated by purlJam.uk
Love this pattern?
Save this pattern to your free PurlJam libraryAccess your pattern anytime
Bookmark this page to access your pattern anytime