Type
Knitting
Difficulty
beginner
Category
shawl
Pattern
---

# WOODLAND EDGE SHAWL
### An Asymmetrical Garter & Lace Shawl in 4-Ply Weight

---

## DESIGNER'S NOTES

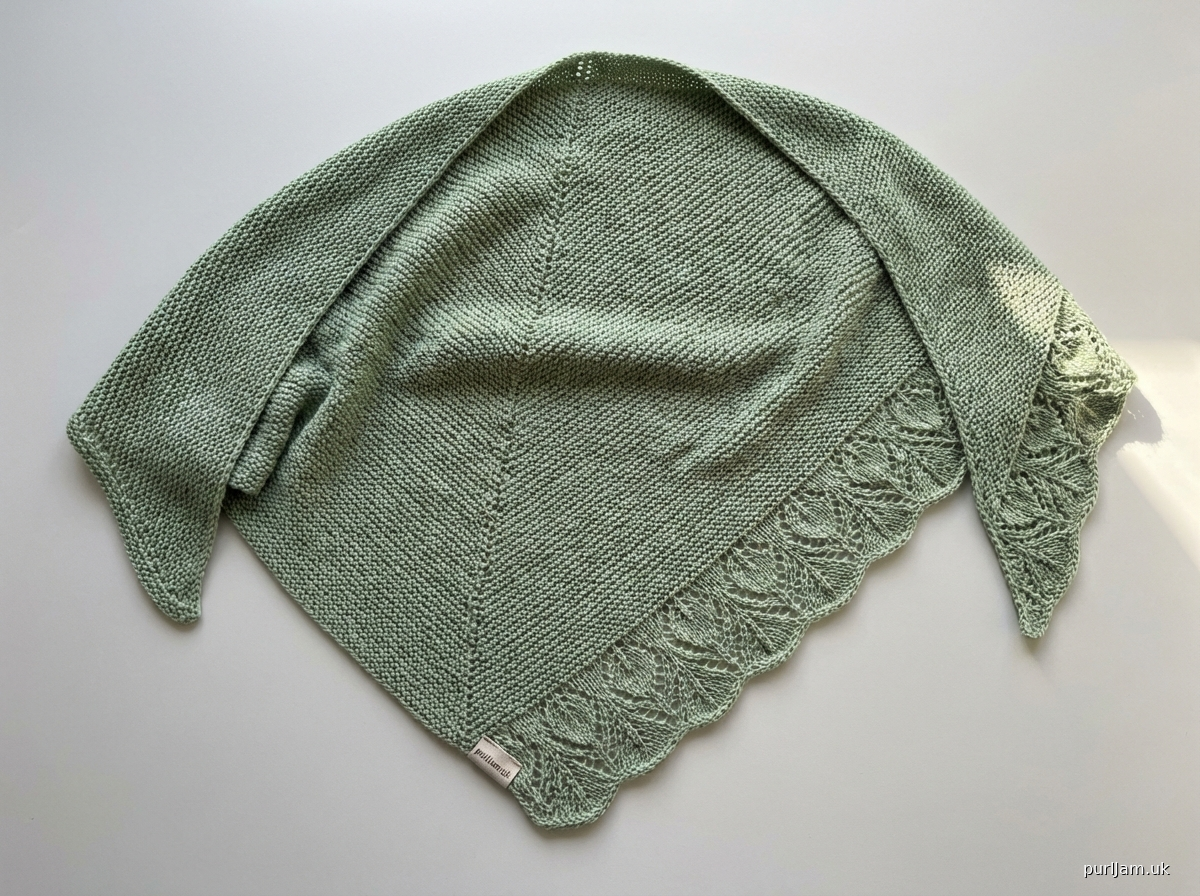
Inspired by the quiet beauty of forest floors and turning leaves, *Woodland Edge* is an asymmetrical triangular shawl worked from the top corner downward. The body grows in garter stitch — the most forgiving and meditative of fabrics — while a delicate leaf-lace border adorns the long diagonal edge. The asymmetrical silhouette means the shawl drapes beautifully over one shoulder or wraps elegantly around the neck with a gentle, uneven sweep.

This pattern is written for beginners who are comfortable with knit stitches, yarn-overs, and simple decreases. The lace border is added last and worked on a small, steady number of stitches, making it an ideal introduction to lace knitting.

---

## FINISHED MEASUREMENTS

| Measurement | Blocked |
|---|---|
| Top edge (short straight edge) | 160 cm (63 in) |
| Depth at deepest point | 80 cm (31½ in) |
| Long diagonal edge (hypotenuse) | approx 179 cm (70½ in) |

*Note: Garter stitch and lace both benefit enormously from blocking. Finished measurements given are after wet blocking.*

---

## MATERIALS

**Yarn:**
- 1 × 100 g skein of 4-ply (fingering weight) yarn
- Recommended: a plant-fibre or plant-blend yarn (cotton/linen/bamboo) or a superwash merino, which both block beautifully and show lace clearly
- Yardage required: approximately 820–900 metres (900–985 yards)
- Sample shown in: a single-ply superwash merino in soft sage green

**Needles:**
- 3.25 mm (UK size 10 / US size 3) circular needle, 80 cm (32 in) or longer
- A longer circular needle is recommended even for a flat project, as the stitch count grows large

**Notions:**
- 1 stitch marker
- Tapestry needle for weaving in ends
- Blocking mats and rust-proof pins
- Spray bottle or basin for wet blocking

---

## TENSION (GAUGE)

**26 stitches × 52 rows = 10 cm × 10 cm (4 in × 4 in) in garter stitch**
(Garter stitch = knit every row; one "ridge" = 2 rows)

*Please take time to swatch. Garter stitch produces a fabric that is wider and shorter than stocking stitch at the same tension. Your finished size depends on matching this tension. Swatch, wash, and block your tension square before beginning.*

---

## ABBREVIATIONS

| Abbreviation | Meaning |
|---|---|
| k | knit |
| p | purl |
| RS | right side |
| WS | wrong side |
| yo | yarn over (creates a new stitch and a hole) |
| k2tog | knit 2 stitches together (right-leaning decrease) |
| ssk | slip 1 knitwise, slip 1 knitwise, knit both together through back loops (left-leaning decrease) |
| k3tog | knit 3 stitches together (double right-leaning decrease) |
| sl1 | slip 1 stitch purlwise with yarn at front |
| pm | place marker |
| sm | slip marker |
| st(s) | stitch(es) |
| rep | repeat |
| rem | remaining |
| approx | approximately |
| BO | bind off (cast off) |
| CO | cast on |

---

## PATTERN NOTES

**Understanding the Asymmetrical Shape:**
Unlike a symmetrical triangular shawl (which has a centre spine and increases on both sides equally), this shawl is a *right triangle*. It has:
- **One straight top edge** (horizontal, runs along the back of the neck/shoulders)
- **One straight side edge** (vertical, runs down one side — the left-hand side as worn)
- **One diagonal edge** (the hypotenuse — this receives the lace border)

Increases happen at **both ends** of the right-side rows but in different ways:
- **Right-hand edge (straight side):** A single yarn-over increase at the very beginning of every RS row.
- **Left-hand edge (top/horizontal edge):** A single yarn-over increase just before the last stitch of every RS row.

This means you gain 2 stitches every RS row (every other row), which causes the fabric to grow as a right triangle.

**Selvedge Stitches:**
The first stitch of every row is slipped purlwise with yarn at front (sl1). This creates a neat, chained selvedge on all four edges and makes the lace border pick-up much easier.

**Reading This Pattern:**
- Row counts in the body section refer to RS rows only for ease. Each RS row is followed by a WS row (knit across). Together they form one "pair."
- The lace border is worked as a separate strip and is written out fully, row by row.

---

## PATTERN

### SECTION 1: CAST ON

Using the long-tail cast-on (or your preferred method), cast on **3 stitches**.

**Set-up:**
- Row 1 (RS): Sl1, k1, yo, k1. **(4 sts)**
- Row 2 (WS): Sl1, knit to end.

---

### SECTION 2: BODY — ASYMMETRICAL GARTER TRIANGLE

The body is worked entirely in garter stitch with 2 increases on every RS row.

**Increase Row (RS):** Sl1, yo, knit to last st, yo, k1.
**(2 sts increased)**

**Plain Row (WS):** Sl1, knit to end.

Repeat these two rows until you have **211 stitches** on your needle.

**Stitch count check:**
- After Row 1 pair (first increase): 4 sts
- After 10 increase rows: 24 sts
- After 50 increase rows: 104 sts
- After 104 increase rows: 211 sts ✓

*At 26 sts / 10 cm, 211 stitches span approximately 81 cm (32 in). This corresponds to the depth of the shawl. The top edge, built up over 104 pairs of rows (208 rows total), spans approximately 160 cm (63 in) at the rate of 52 rows / 10 cm. ✓*

**Do not cast off. Leave all 211 stitches live on a stitch holder or spare needle.**

---

### SECTION 3: LACE BORDER

The lace border is a separate strip of 15 stitches featuring a **Leaf Lace** motif. It is worked lengthwise and sewn (or grafted) along the diagonal edge of the shawl once complete.

*Beginner's note: Working the border as a separate strip rather than picking up and knitting into live stitches means you can take your time with the lace and fix any errors easily. The sewing-on step is simple and is explained fully in the Finishing section.*

#### LACE BORDER CHART — LEAF MOTIF

The border is worked over **15 stitches** in a 12-row repeat.

**How to read this chart:**
- Each square represents 1 stitch.
- Read RS rows (odd-numbered rows) from **right to left**.
- Read WS rows (even-numbered rows) from **left to right**.
- The 12-row chart repeats along the entire length of the border strip.

**CHART KEY:**

| Symbol | Meaning |
|---|---|
| `-` | k on RS, p on WS (knit stitch) |
| `·` | p on RS, k on WS (purl stitch — used for texture between leaves) |
| `O` | yo (yarn over) |
| `\` | k2tog (right-leaning decrease) |
| `/` | ssk (left-leaning decrease) |
| `X` | k3tog (central double decrease — leans right) |
| `V` | sl1, k2tog, psso (central double decrease — leans left; see abbreviations note below) |

*Note: `V` = slip 1 knitwise, knit 2 together, pass slipped stitch over. This is a double decrease that removes 2 stitches and is balanced by 2 yarn-overs in the same row. It is only used in Row 9.*

---

**LEAF LACE CHART (15 sts × 12 rows)**

Row numbers are shown on the right for RS rows.

```
       Sts: 15  14  13  12  11  10  9   8   7   6   5   4   3   2   1
Row 12 WS:  -   -   -   -   -   -   -   -   -   -   -   -   -   -   -
Row 11 RS:  -   -   -   \   O   -   -   -   O   /   -   -   -   -   -
Row 10 WS:  -   -   -   -   -   -   -   -   -   -   -   -   -   -   -
Row  9 RS:  -   -   \   O   -   -   V   -   -   O   /   -   -   -   -
Row  8 WS:  -   -   -   -   -   -   -   -   -   -   -   -   -   -   -
Row  7 RS:  -   \   O   -   -   -   -   -   -   -   O   /   -   -   -
Row  6 WS:  -   -   -   -   -   -   -   -   -   -   -   -   -   -   -
Row  5 RS:  -   -   -   O   /   -   -   -   \   O   -   -   -   -   -
Row  4 WS:  -   -   -   -   -   -   -   -   -   -   -   -   -   -   -
Row  3 RS:  -   -   O   /   -   -   -   -   -   \   O   -   -   -   -
Row  2 WS:  -   -   -   -   -   -   -   -   -   -   -   -   -   -   -
Row  1 RS:  -   O   /   -   -   -   -   -   -   -   \   O   -   -   -
```

*The leaf motif forms two mirrored leaf shapes that grow outward (Rows 1–7) then converge to a tip (Rows 7–11), with a rest row (Row 12) before the repeat begins again. The outer 2 stitches on each side (sts 1–2 and sts 14–15) remain in plain garter throughout, forming a neat selvedge.*

---

#### WRITTEN LACE BORDER INSTRUCTIONS

Cast on 15 stitches using the long-tail cast-on.

**Foundation Row (WS):** Sl1, knit to end.

Now work the 12-row Leaf Lace repeat as follows:

**Row 1 (RS):** Sl1, k1, yo, ssk, k7, k2tog, yo, k2. **(15 sts)**
**Row 2 (WS):** Sl1, knit to end.
**Row 3 (RS):** Sl1, k2, yo, ssk, k5, k2tog, yo, k3. **(15 sts)**
**Row 4 (WS):** Sl1, knit to end.
**Row 5 (RS):** Sl1, k3, yo, ssk, k3, k2tog, yo, k4. **(15 sts)**
**Row 6 (WS):** Sl1, knit to end.
**Row 7 (RS):** Sl1, k1, k2tog, yo, k7, yo, ssk, k2. **(15 sts)**
**Row 8 (WS):** Sl1, knit to end.
**Row 9 (RS):** Sl1, k2, k2tog, yo, k1, sl1-k2tog-psso, k1, yo, ssk, k3. **(15 sts)**
**Row 10 (WS):** Sl1, knit to end.
**Row 11 (RS):** Sl1, k3, k2tog, yo, k1, yo, ssk, k4. **(15 sts)**
**Row 12 (WS):** Sl1, knit to end.

*These 12 rows form one complete leaf motif repeat.*

**Stitch count verification per row:**
- Row 1: 1 sl + 1k + 1yo + 1ssk + 7k + 1k2tog + 1yo + 2k = 1+1+1+1+7+1+1+2 = 15 ✓
- Row 3: 1+2+1+1+5+1+1+3 = 15 ✓
- Row 5: 1+3+1+1+3+1+1+4 = 15 ✓
- Row 7: 1+1+1+1+7+1+1+2 = 15 ✓
- Row 9: 1+2+1+1+1+1(double dec uses 3, gives 1)+1+1+1+3 = sl1, k2, k2tog(−1), yo(+1), k1, sl1k2togpsso(−2+yo×0, but compensated by yo's on each side)... Let us verify carefully:
  - sl1(1) + k2(2) + k2tog(uses 2sts, gives 1) + yo(adds 1) + k1(1) + sl1k2togpsso(uses 3sts, gives 1) + k1(1) + yo(adds 1) + ssk(uses 2sts, gives 1) + k3(3)
  - Stitches consumed: 1+2+2+0+1+3+1+0+2+3 = 15 consumed ✓
  - Stitches produced: 1+2+1+1+1+1+1+1+1+3 = 13... plus 2 yo's = 15 ✓
- Row 11: sl1+k3+k2tog+yo+k1+yo+ssk+k4 = 1+3+2+0+1+0+2+4 consumed=13+2yo=15 ✓

**Repeat Rows 1–12** until the border strip, when slightly stretched, measures the same length as the diagonal edge of your shawl body (approx 179 cm / 70½ in). End after completing Row 12.

Cast off (bind off) loosely knitwise on a RS row.

---

### SECTION 4: FINISHING

#### Attaching the Lace Border

1. Block the lace border strip first (see Blocking Instructions below) — this makes the strip easier to handle and ensures it is the correct length.
2. Block the shawl body.
3. Once both pieces are dry, lay the shawl body flat with the diagonal edge facing you.
4. Pin the lace border strip along the diagonal edge, right sides together, aligning the long straight selvedge edge of the border with the diagonal edge of the body. Ease in any fullness evenly — a little extra ease here allows the border to flare attractively when worn.
5. Using a tapestry needle and a length of your working yarn, mattress stitch or whip stitch the border to the body along this edge. Work from corner to corner.
6. Weave in all ends securely on the wrong side. Wet the join lightly and re-pin if needed.

#### Blocking Instructions

**Wet blocking is strongly recommended for this shawl.** It opens the lace, sets the garter stitch, and brings the finished measurements to their full size.

1. Soak the finished shawl (body and border, after joining) in cool water with a small amount of wool wash or gentle detergent for 15–20 minutes.
2. Gently squeeze out excess water — do not wring or twist.
3. Roll in a clean dry towel and press firmly to remove more moisture.
4. Lay flat on blocking mats.
5. Pin the top straight edge to the mat, then pin the straight side edge at a right angle to form the corner.
6. Gently stretch the diagonal edge to the desired measurement (approx 179 cm / 70½ in) and pin the lace border points out, using as many pins as needed to create neat, even scallops along the outer edge.
7. Pin the depth (approx 80 cm / 31½ in at the deepest point).
8. Leave to dry completely — this may take 24–48 hours depending on your environment.
9. Remove pins only once fully dry.

---

## SCHEMATIC

```
  TOP EDGE (straight) ~160 cm
  ┌─────────────────────────────────────────────┐
  │\                                             │
  │  \                                           │  STRAIGHT
  │    \    G A R T E R   B O D Y               │  SIDE
  │      \                                       │  EDGE
  │        \                                     │  ~80 cm
  │          \                                   │
  │            \   ~~~LACE BORDER~~~             │
  │              \                               │
  └───────────────\──────────────────────────────┘
                   DIAGONAL EDGE ~179 cm
                   (hypotenuse, receives lace border)
```

---

## YARN NOTES

This pattern calls for **4-ply (fingering weight)** yarn. Look for a yarn labelled:
- 4-ply / fingering weight / sock weight
- Approx 350–400 m per 100 g skein
- You will need **820–900 m (900–985 yds)** total — approximately 2 × 100 g skeins, or 1 large 200 g hank

**Fibre suggestions:**
- Superwash merino: soft, easy to wash, blocks beautifully
- Merino/silk blend: lovely sheen that enhances the lace
- Merino/nylon (sock yarn): extra durability for a frequently worn shawl
- Cotton or linen blend: suitable for warmer seasons; note that plant fibres have less stretch and may require slightly larger needles — swatch carefully

---

## CARE INSTRUCTIONS

- Hand wash in cool water with gentle detergent or wool wash
- Do not wring or tumble dry
- Dry flat, reshaping if needed
- Store folded in a breathable bag

---

## QUICK REFERENCE SUMMARY

| Section | Action |
|---|---|
| Cast on | 3 sts |
| Increase Row (RS) | Sl1, yo, k to last st, yo, k1 |
| Plain Row (WS) | Sl1, k to end |
| Work until | 211 sts |
| Lace border | CO 15 sts, work 12-row leaf repeat until 179 cm |
| Join | Mattress/whip stitch border to diagonal edge |
| Block | Wet block pinned to measurements |

---

*Pattern designed for personal use. Please do not reproduce or sell this pattern. Finished items made from this pattern may be sold at craft fairs and small markets with credit to the designer.*

---

**End of Pattern**
Disclaimer: This pattern was generated by AI and should be reviewed for accuracy before use. While we strive for quality, AI-generated content may contain errors. Please verify measurements, stitch counts, and instructions before beginning your project. Generated by purlJam.uk
Access your pattern anytime
Bookmark this page to access your pattern anytime