Type
Knitting
Difficulty
intermediate
Category
pullover
AI Thinking Process
Planning
Verification
Pattern
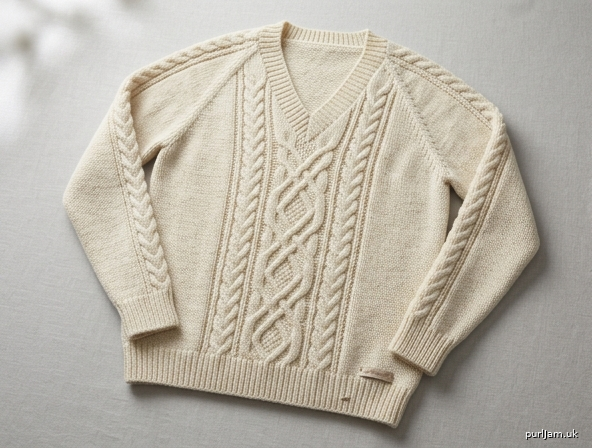
Aran V-Neck Raglan Cable Pullover
Top-Down Seamless Worsted Sweater
Difficulty: Advanced
Sizes: Small (Medium, Large, XL, 2XL)
To fit bust: 34–36 (38–40, 42–44, 46–48, 50–52)″
Finished bust circumference: 36 (40, 44, 48, 52)″ / 91.5 (101.5, 112, 122, 132) cm with approx 2–4″ positive ease
Finished length (back neck to hem): 25 (25½, 26, 26½, 27)″ / 63.5 (65, 66, 67.5, 68.5) cm
Yoke depth (center back neck to underarm): 9 (9½, 10, 10½, 11)″ / 23 (24, 25.5, 26.5, 28) cm
Upper arm circumference: 13 (14, 15, 16, 17)″ / 33 (35.5, 38, 40.5, 43) cm
Sleeve length (underarm to cuff): 18 (18½, 19, 19, 19½)″ / 45.5 (47, 48.5, 48.5, 49.5) cm
Shown in size Medium. Choose size based on finished bust measurement closest to your actual bust + desired ease.
Yarn
Worsted weight yarn (approx 180–200 yds / 165–183 m per 100 g)
Yardage: 1150 (1300, 1450, 1600, 1750) yds / 1050 (1190, 1325, 1460, 1600) m
Sample suggestion: 6 (7, 8, 8, 9) hanks of a smooth wool or wool-blend worsted that shows cables crisply.
Needles
- US 8 / 5 mm circular needle, 32–40″ / 80–100 cm (body)
- US 8 / 5 mm circular needle, 16″ / 40 cm and/or DPNs (sleeves)
- US 6 / 4 mm circular needle, 32–40″ / 80–100 cm (hem)
- US 6 / 4 mm circular needle, 16″ / 40 cm and/or DPNs (cuffs & neckband)
Or sizes needed to obtain gauge.
Notions
- Stitch markers (4 distinct raglan markers + 2 cable-panel markers + 1 BOR marker)
- Cable needle
- Stitch holders or waste yarn
- Tapestry needle
- Blocking wires/pins (recommended for cables)
Gauge
20 sts and 28 rnds = 4″ / 10 cm in stockinette stitch on larger needles, blocked.
Cable panel (28 sts of Front Cable Panel) measures approx 4¼″ / 11 cm wide after blocking.
Always swatch both St st and a cable section; adjust needle size if necessary. Row gauge affects yoke depth and sleeve length—measure as you go.
Abbreviations (US)
BOR beginning of round
C4B sl 2 sts to cn, hold back, k2, k2 from cn
C4F sl 2 sts to cn, hold front, k2, k2 from cn
C6B sl 3 sts to cn, hold back, k3, k3 from cn
C6F sl 3 sts to cn, hold front, k3, k3 from cn
cn cable needle
CO cast on
dec(s) decrease(s)
inc(s) increase(s)
k knit
k2tog knit 2 together
LH left hand
m marker
M1L make 1 left (lift strand between sts from front to back, k through back loop)
M1R make 1 right (lift strand between sts from back to front, k through front loop)
p purl
p2tog purl 2 together
pm place marker
rep repeat
RH right hand
rnd(s) round(s)
RS right side
sm slip marker
ssk slip, slip, knit (slip 1 kwise, slip 1 kwise, insert LH needle into fronts and k2tog)
st(s) stitch(es)
St st stockinette stitch
WS wrong side
wyib with yarn in back
wyif with yarn in front
Stitch Patterns
1×1 Rib (in the round)
All rnds: *K1, p1; rep from * to end.
1×1 Rib (flat)
RS: *K1, p1; rep from * to end.
WS: *K1, p1; rep from * to end (knit the knits and purl the purls as they face you).
Stockinette Stitch (in the round)
Knit every round.
Stockinette Stitch (flat)
RS: Knit. WS: Purl.
Front Cable Panel (worked over 28 sts)
Rnd/Row 1 (RS): P2, k6, p2, k8, p2, k6, p2.
Rnd/Row 2 and all WS rows (when working flat): K the knits and p the purls as they face you (i.e., k2, p6, k2, p8, k2, p6, k2).
Rnd/Row 3: P2, C6B, p2, C4B, C4F, p2, C6F, p2.
Rnd/Row 5: P2, k6, p2, k8, p2, k6, p2.
Rnd/Row 7: P2, k6, p2, C4F, C4B, p2, k6, p2.
Rnd/Row 8: As Row 2.
Rep Rows/Rnds 1–8 for pattern.
Sleeve Cable (worked over 12 sts)
Rnd 1: P2, k8, p2.
Rnd 2: P2, k8, p2.
Rnd 3: P2, C4B, C4F, p2.
Rnd 4: P2, k8, p2.
Rep Rnds 1–4 for pattern.
Raglan Increase Round (in the round, after join)
*Knit to 1 st before raglan m, M1R, k1, sm, k1, M1L; rep from * 3 more times, knit to end.
(8 sts increased)
Raglan Increase Row (flat, RS)
*Knit to 1 st before raglan m, M1R, k1, sm, k1, M1L; rep from * 3 more times, knit to end.
(8 sts increased)
Notes
- Sweater is worked top-down. The V-neck yoke begins flat so neck edges can be increased; once the V reaches the desired depth the work is joined and continued in the round.
- Four raglan lines are marked; each is framed by a single knit stitch that travels diagonally.
- The 28-st Front Cable Panel is centered on the front and is introduced once enough front stitches exist. Until then, work those stitches in St st (or reverse St st purl gutters if preferred).
- Sleeve Cable is centered on each sleeve.
- When instructions give a single number it applies to all sizes; sequences are written Small (Medium, Large, XL, 2XL).
- Inline stitch-count checks appear as “(X sts ✓)”.
- Try on the yoke before separating sleeves—raglan depth is easy to adjust by adding or omitting plain rounds between increase rounds.
- Block the finished sweater firmly to open the cables and set measurements.
PATTERN
Neck Cast-On & Setup
With larger circular needle and using a long-tail or cable cast-on, CO 62 (66, 70, 74, 78) sts. Do not join.
Setup Row (WS): P2 (Right Front), pm, p1 (raglan st), pm, p12 (14, 14, 16, 16) (Right Sleeve), pm, p1 (raglan st), pm, p30 (30, 34, 34, 38) (Back), pm, p1 (raglan st), pm, p12 (14, 14, 16, 16) (Left Sleeve), pm, p1 (raglan st), pm, p2 (Left Front).
62 (66, 70, 74, 78) sts ✓.
Turn. You will now work flat in rows. Attach a locking marker or scrap yarn at each neck edge to make later pickup easier.
Yoke – V-Neck Shaping (worked flat)
Note: Neck-edge increases create the V. Raglan increases are worked every RS row. Cable panel begins when each Front section contains at least 16 sts; until then keep Fronts in St st.
Row 1 (RS – Raglan + Neck Inc): K1, M1L, *knit to 1 st before raglan m, M1R, k1, sm, k1, M1L; rep from * 3 more times, knit to last st, M1R, k1.
10 sts increased: 72 (76, 80, 84, 88) sts ✓.
Row 2 (WS): Purl, slipping markers.
Row 3 (RS – Raglan only): *Knit to 1 st before raglan m, M1R, k1, sm, k1, M1L; rep from * 3 more times, knit to end.
8 sts increased.
Row 4 (WS): Purl.
Rep Rows 1–4 for V-neck and raglan shaping, working neck-edge increases (Row 1 type) every 4th row (i.e., on every other RS row) and raglan increases every RS row.
At the same time, when each Front section reaches 16 sts, place cable-panel markers on the next RS row as follows for the Front only:
Work to the center 28 sts of the entire Front (once Front total ≥ 28), pm, work Front Cable Panel Row 1 over those 28 sts, pm, work to end.
If Front is still growing and temporarily has fewer than 28 sts between the intended panel edges, work all Front sts in St st until 28 sts are available, then establish the panel on the center 28 sts and keep subsequent increases outside the panel markers. Maintain the 8-row cable repeat from that point forward on RS rows; on WS rows work sts as they appear.
Continue until you have worked a total of 28 (30, 32, 34, 36) raglan increase rows (RS rows that included raglan increases).
Neck-edge increase rows worked: 14 (15, 16, 17, 18).
Stitch count after final raglan increase row:
Fronts combined + Back + Sleeves + raglan sts = 62 + (28 (30, 32, 34, 36) × 8) + (14 (15, 16, 17, 18) × 2)
= 62 + 224 (240, 256, 272, 288) + 28 (30, 32, 34, 36)
= 314 (332, 350, 368, 386) sts ✓.
Section counts at this point (approx; cable panel centered on Front):
Each Front: 31 (33, 35, 37, 39) sts
Each Sleeve: 68 (74, 78, 84, 88) sts
Back: 86 (94, 102, 110, 118) sts
Raglan sts: 4
Work 1 WS purl row.
V-depth from cast-on edge should measure approx 7½ (8, 8½, 9, 9½)″ / 19 (20.5, 21.5, 23, 24) cm along the neck edge. Adjust by adding or removing plain RS/WS pairs (no increases) if a deeper or shallower V is desired; keep raglan count consistent with size.
Join to Work in the Round
Joining Rnd (RS): Work as for a raglan increase row across Right Front, Right Sleeve, Back, Left Sleeve, and Left Front, but at the end of the Left Front do not turn—instead bring the Right Front around and knit the first st of Right Front together with the last st of Left Front using k2tog (or simply start the round without joining sts if you prefer a clean V point and will close any gap at neckband). Place BOR marker at center front (V point).
You are now working in the round. 314 (332, 350, 368, 386) sts remain if no k2tog was used; if k2tog was used, 313 (331, 349, 367, 385) sts—pattern continues with the even counts below by treating the center front as the BOR and omitting one plain st if needed. For clarity the pattern assumes 314 (332, 350, 368, 386) sts and a BOR at center front between the two Front halves.
Next rnd: Work even in established patterns (Front Cable Panel over center 28 front sts, St st elsewhere, Sleeve Cables centered on each sleeve once sleeve sections are wide enough—establish each Sleeve Cable over the center 12 sleeve sts on the next rnd). Slip all markers.
Continue working Raglan Increase Rounds every other round (i.e., one increase rnd, one plain rnd) until you have completed a further 0 (0, 0, 0, 0) additional increase rounds beyond the flat portion—total raglan increase rounds remain 28 (30, 32, 34, 36).
If your row gauge or try-on indicates more length is needed before underarm, work extra plain rounds now (no increases). Yoke depth from back neck CO edge to underarm should measure 9 (9½, 10, 10½, 11)″ / 23 (24, 25.5, 26.5, 28) cm.
Final yoke stitch count: 314 (332, 350, 368, 386) sts ✓.
Final section counts:
Front (combined): 86 (94, 102, 110, 118) sts (includes 28-st cable panel)
Back: 86 (94, 102, 110, 118) sts
Each Sleeve: 68 (74, 78, 84, 88) sts
Raglan sts: 4 (these will be split between body and sleeves)
Separate Body & Sleeves
Separation Rnd:
Work across Left Front in pattern to the first raglan m, remove m, k1 (raglan st), place next 68 (74, 78, 84, 88) sleeve sts onto holder or waste yarn, remove next raglan m, CO 6 (8, 8, 10, 10) underarm sts using backward-loop or cable CO, k1 (raglan st), sm (this marker now becomes a side marker if desired), work across Back in St st to next raglan m, remove m, k1, place next 68 (74, 78, 84, 88) sleeve sts on holder, remove next raglan m, CO 6 (8, 8, 10, 10) underarm sts, k1, work remaining Front sts in pattern to BOR.
Body sts: 86 (Front) + 86 (Back) + 6+6 (underarms) + 4 (raglan sts) = 188, adjust by knitting the 4 raglan sts into the adjacent sections: final body count
180 (200, 220, 240, 260) sts ✓
(36 (40, 44, 48, 52)″ × 5 sts/″ = 180 (200, 220, 240, 260) ✓).
Place a side marker at the center of each underarm CO if you wish to track side seams; BOR remains at center front. Continue Front Cable Panel centered on front; all other sts in St st.
Body
Work even in established patterns (Front Cable Panel + St st) until body measures 14 (14, 14½, 14½, 15)″ / 35.5 (35.5, 37, 37, 38) cm from underarm, or 2″ / 5 cm less than total desired length.
Hem transition: Change to smaller circular needle.
Next rnd: Knit, decreasing 0 (0, 0, 0, 0) sts evenly if needed so total is even for 1×1 rib—180 (200, 220, 240, 260) is already even ✓.
Work in 1×1 Rib for 2″ / 5 cm.
Bind off loosely in rib.
Sleeves (make 2)
Return 68 (74, 78, 84, 88) held sleeve sts to larger DPNs or small circular.
With RS facing, beginning at center of underarm CO, pick up and knit 3 (4, 4, 5, 5) sts along first half of underarm CO, knit across sleeve sts (establish or continue Sleeve Cable over center 12 sts), pick up and knit 3 (4, 4, 5, 5) sts along remaining underarm CO.
Join to work in the round. Place BOR at center underarm.
Sleeve sts: 68 (74, 78, 84, 88) + 6 (8, 8, 10, 10) = 74 (82, 86, 94, 98) sts ✓.
Work 1″ / 2.5 cm even in St st with Sleeve Cable centered.
Shape sleeve:
Decrease rnd: K1, k2tog, work in pattern to last 3 sts, ssk, k1. 2 sts dec.
Rep Decrease rnd every 8th (7th, 7th, 6th, 6th) rnd 12 (14, 15, 17, 18) more times.
Sts remaining: 74 (82, 86, 94, 98) − 2 × 13 (15, 16, 18, 19) = 74 − 26 (30, 32, 36, 38) = 48 (52, 54, 58, 60) sts ✓.
Work even until sleeve measures 16 (16½, 17, 17, 17½)″ / 40.5 (42, 43, 43, 44.5) cm from underarm, or 2″ / 5 cm less than desired length. Discontinue Sleeve Cable on the last 4 rnds before cuff if preferred for a smoother rib transition (work those 12 sts in St st).
Cuff: Change to smaller needles.
Next rnd: Knit, decreasing 0 (0, 2, 2, 0) sts evenly to 48 (52, 52, 56, 60) sts for clean 1×1 rib.
Work in 1×1 Rib for 2″ / 5 cm.
Bind off loosely in rib.
V-Neckband
With smaller 16″ / 40 cm circular needle and RS facing, beginning at center-front V point (BOR), pick up and knit sts around neck edge as follows:
- 1 st in the V point itself,
- approx 3 sts for every 4 rows up the right neck edge to shoulder/CO edge,
- 1 st in each CO st across back neck and sleeve tops,
- approx 3 sts for every 4 rows down the left neck edge to V point.
Target total (adjust by 1–2 sts if needed for neatness, keeping an odd or even count that suits mitered dec): 110 (116, 122, 128, 134) sts. Place a marker at center front V (after the single V-point st) and a BOR marker if different.
Rnd 1: Work in 1×1 Rib to 2 sts before center V marker, k2tog (or ssk to match rib), sm, ssk (or k2tog), continue in 1×1 Rib to end. 2 sts dec.
Rnd 2: Work even in 1×1 Rib as established (knit the knits, purl the purls), slipping markers.
Rep Rnds 1–2 until neckband measures 1¼ (1¼, 1½, 1½, 1½)″ / 3 (3, 4, 4, 4) cm, ending after a Rnd 2.
Bind off loosely in rib, working the center two sts as a final decrease if desired for a sharp V.
Finishing
Weave in all ends, closing any small gaps at underarms with the tail.
Soak sweater in lukewarm water with wool wash. Gently squeeze out water (do not wring). Lay flat on blocking mats, pin to finished measurements, and stretch cable panel firmly so motifs are open and even. Allow to dry completely.
Steam lightly if needed, avoiding direct contact with cables if using acrylic blends.
Schematic Measurements (blocked)
- Bust: 36 (40, 44, 48, 52)″
- Yoke depth (CB neck to underarm): 9 (9½, 10, 10½, 11)″
- Body length underarm to hem: 16 (16, 16½, 16½, 17)″
- Total back length: 25 (25½, 26, 26½, 27)″
- Upper arm: 13 (14, 15, 16, 17)″
- Cuff circumference: 9½ (10½, 10½, 11¼, 12)″
- Sleeve length underarm to cuff: 18 (18½, 19, 19, 19½)″
- V-neck depth (from shoulder line): approx 8½ (9, 9½, 10, 10½)″
- Front cable panel width: 4¼″
Tips for Success
- Use differently colored markers for raglans, cable panels, and BOR.
- When working cables and raglan increases on the same round, work increases outside the cable markers so the panel width stays constant.
- Count cable rows carefully—place a progress keeper every 8-rnd repeat.
- Because this is top-down, you may try on the yoke and body; add length before the ribbing if desired.
- For a more pronounced V, work additional neck-edge increase rows before joining (add plain raglan-only rows later to keep armhole depth). For a shallower V, delay some neck increases.
Enjoy your Aran V-neck raglan!
Disclaimer: This pattern was generated by AI and should be reviewed for accuracy before use. While we strive for quality, AI-generated content may contain errors. Please verify measurements, stitch counts, charts, and instructions before beginning your project. Generated by purlJam.uk
Love this pattern?
Save this pattern to your free PurlJam libraryAccess your pattern anytime
Bookmark this page to access your pattern anytime