Type
Knitting
Difficulty
intermediate
Category
shawl
AI Thinking Process
Planning
Pattern
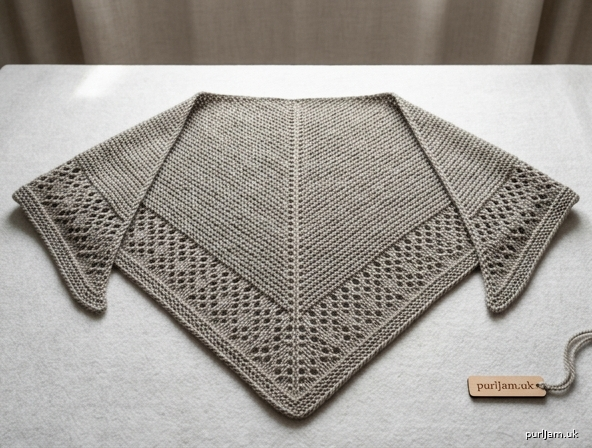
Aspen Triangle Shawl
A shallow triangular shawl worked from the center neck down. The body is reversible garter stitch with a marked center spine; the lower edge is a mirrored eyelet lace border that keeps the same four-increase shaping. Worsted-weight yarn and a straightforward lace repeat make this a satisfying intermediate knit with a polished, blockable finish.
Difficulty: Intermediate
Skills used: Garter tab, yarn-over increases, stitch markers, k2tog and ssk, simple 4-row lace, stretchy bind-off, wet blocking
Finished Size
Blocked: approximately 68" (173 cm) wingspan × 24" (61 cm) depth at the center spine.
Size is easily adjusted: work more or fewer Body repeats before the lace. Every 8 additional Body repeats (16 rows) adds about 2" (5 cm) of depth and about 8" (20 cm) of wingspan, and uses about 40 yd (37 m) more yarn.
              center neck
                  /\
                 /  \
                /    \     depth 24" (61 cm)
               /      \
              /        \
             /          \
            /____________\  wingspan 68" (173 cm)
                 bind-off
Materials
Yarn: Worsted weight (CYC 4), 600 yd / 550 m.
Sample estimate is about 560 yd (512 m); extra yarn allows for swatching and a generous bind-off. A springy wool or wool blend with good stitch definition and blocking memory is ideal.
Needles: US 8 / 5 mm circular needle, 32" (80 cm) or longer, or size needed to obtain gauge. Optional: US 9 / 5.5 mm needle for bind-off only.
Notions:
- 2 stitch markers
- Tapestry needle
- Blocking mats, T-pins, and blocking wires (recommended)
Gauge
16 sts and 32 rows = 4" (10 cm) in garter stitch, blocked.
Gauge is important for yarn quantity and finished size, not for fit. If your blocked swatch is denser than 16 sts = 4" (10 cm), the shawl will be smaller and may need more yarn to reach the stated stitch counts.
Abbreviations (US)
BO — bind off
CO — cast on
k — knit
k2tog — knit 2 together (right-leaning decrease)
m — marker
pm — place marker
rep — repeat
RS — right side
sm — slip marker
ssk — slip 1 knitwise, slip 1 knitwise, insert left needle into the fronts of both slipped stitches and knit them together (left-leaning decrease)
st(s) — stitch(es)
WS — wrong side
yo — yarn over
Pattern Notes
- The shawl is worked flat on a circular needle to hold the growing stitch count.
- Four stitches are increased on every RS row: one inside each 3-st edge, and one on each side of the center stitch. Stitch count increases by 4 on every RS row throughout Body, Lace, and the finishing row (6 increases are never used).
- The 3 stitches at each edge are always knit and are never part of the lace repeats.
- Slip markers as you come to them. The single stitch between markers is the center spine.
- On WS rows, knit every stitch (garter stitch).
- When a stitch count is given, it is the count after that row is complete.
- Do not join yarn at the center; work all the way across each row.
Instructions
Garter Tab
Using US 8 / 5 mm needle, CO 3 sts.
Knit 6 rows (3 garter ridges). Do not turn after the last row.
Rotate the tab 90° clockwise so the long selvedge is on top. Pick up and knit 3 sts along the selvedge (1 st in each garter ridge).
Rotate 90° clockwise again so the original cast-on edge is on top. Pick up and knit 3 sts along the cast-on edge (1 st in each cast-on stitch).
9 sts.
Setup
Setup Row 1 (RS): K3, yo, k1, yo, pm, k1, pm, yo, k1, yo, k3.
(4 sts increased → 9 + 4 = 13 sts ✓)
Setup Row 2 (WS): Knit.
13 sts: 3 edge, 2 right-wing, 1 center, 2 left-wing, 3 edge.
Body (Garter)
Row 1 (RS): K3, yo, knit to marker, yo, sm, k1, sm, yo, knit to last 3 sts, yo, k3.
(4 sts increased)
Row 2 (WS): Knit.
Rep Rows 1–2 60 more times (60 RS increase rows).
Stitch count: 13 + (60 × 4) = 253 sts ✓
Each wing: (253 − 3 − 1 − 3) / 2 = 123 sts ✓
Checkpoints (after the WS row of the repeat):
| RS increase rows completed after Setup | Total sts |
|---|---|
| 10 | 53 |
| 20 | 93 |
| 30 | 133 |
| 40 | 173 |
| 50 | 213 |
| 60 | 253 |
Work measures about 15" (38 cm) from the tab along the center spine, unstretched. End after a WS row, with 253 sts.
Lace Border
The 3 edge stitches and the center stitch are not part of the lace. Each wing has an odd stitch count for the entire border, so the 2-st repeat plus 1 balancing stitch always fits. Counts below are given for the first repeat so you can verify; after that, trust the structure — every RS row still increases 4 sts.
Lace Row 1 (RS): K3, yo, k1, *yo, k2tog; rep from * to marker, yo, sm, k1, sm, yo, *ssk, yo; rep from * to last 4 sts, k1, yo, k3.
(4 sts increased → 253 + 4 = 257 sts ✓)
Lace Row 2 (WS): Knit.
Lace Row 3 (RS): K3, yo, *k2tog, yo; rep from * to 1 st before marker, k1, yo, sm, k1, sm, yo, k1, *yo, ssk; rep from * to last 3 sts, yo, k3.
(4 sts increased → 257 + 4 = 261 sts ✓)
Lace Row 4 (WS): Knit.
(8 sts increased over the 4-row repeat → 253 + 8 = 261 sts after Repeat 1 ✓)
Work Lace Rows 1–4 7 more times (8 times total).
Stitch count: 253 + (8 repeats × 8 sts) = 317 sts ✓
Each wing: (317 − 7) / 2 = 155 sts ✓
End after Lace Row 4.
Finishing Row and Bind-Off
Next Row (RS): K3, yo, knit to marker, yo, sm, k1, sm, yo, knit to last 3 sts, yo, k3.
(4 sts increased → 317 + 4 = 321 sts ✓)
Next Row (WS): Knit.
Bind off all 321 sts loosely knitwise. Use a US 9 / 5.5 mm needle for the bind-off if your usual bind-off is tight. The long edge must be elastic enough to open during blocking.
Optional picot bind-off (also 321 sts): *using the knitted method, CO 2 sts, BO 5 sts, slip the remaining st from the right needle back to the left needle; rep from * until all sts are bound off, ending with a partial repeat if needed and fastening the last st.
Finishing
Weave in ends, leaving them until after blocking so you can use the tails to close any small gaps at the tab corners if needed.
Blocking (required)
Lace and garter both change character with blocking; do not skip this step.
- Soak the shawl in lukewarm water with a little wool wash for 15–20 minutes, until fully saturated.
- Lift it out without wringing. Press water out between your hands, then roll the shawl in a towel and press to remove more moisture.
- Lay the shawl on blocking mats in a shallow triangle, RS up.
- Thread blocking wires (if using) along both diagonal sides just inside the 3-st edges, and along the bind-off edge.
- Pin the center-neck tab at the top. Pin the two wingtips out to approximately 68" (173 cm) apart. Pin the center of the bind-off edge down so the spine measures approximately 24" (61 cm) from tab to bind-off.
- Pin along the wires, opening the lace eyelets evenly. The two halves should be mirror images. Do not overstretch the garter body into a thin film; stop when the fabric is smooth, the spine is straight, and the eyelets are clearly open.
- Let dry completely before removing pins or wires.
Once dry, weave in any remaining ends. Steam is not a substitute for wet blocking on this fabric.
Stitch-Count Summary
| Stage | Stitches | Check |
|---|---|---|
| After garter tab | 9 | 3 + 3 picked up + 3 picked up |
| After Setup Row 1 | 13 | 9 + 4 = 13 ✓ |
| After 60 Body repeats | 253 | 13 + 240 = 253 ✓ |
| After 8 lace repeats | 317 | 253 + 64 = 317 ✓ |
| After finishing RS row | 321 | 317 + 4 = 321 ✓ |
| Bind off | 321 | all stitches |
Enjoy your Aspen Triangle Shawl.
Disclaimer: This pattern was generated by AI and should be reviewed for accuracy before use. While we strive for quality, AI-generated content may contain errors. Please verify measurements, stitch counts, charts, and instructions before beginning your project. Generated by purlJam.uk
Love this pattern?
Save this pattern to your free PurlJam libraryAccess your pattern anytime
Bookmark this page to access your pattern anytime