Type
Knitting
Difficulty
intermediate
Category
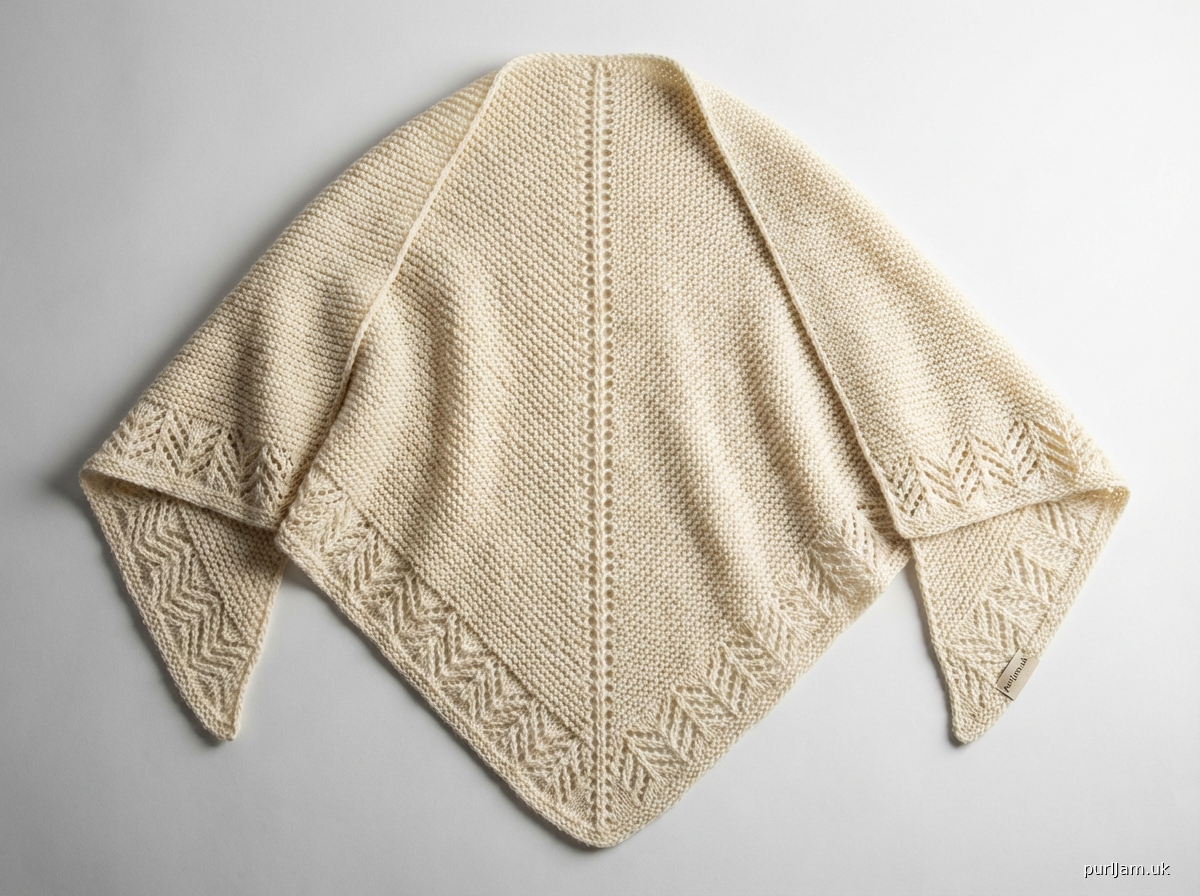
shawl
AI Thinking Process
Planning
1. **Design Strategy**: A classic top-down triangular shawl in worsted weight yarn, worked from a central spine with garter stitch body and a simple lace border. The design stays true to "simple triangle" — no complex shaping, clean lines, accessible for an advanced knitter who wants reliable construction.
2. **Construction Plan**: Worked top-down from a 3-stitch cast-on at the centre top, increasing 4 stitches every right-side row (2 each side of centre spine) to form a triangular shape, ending with a lace border and cast-off.
3. **Quality Assurance**:
- Spine marker placement must be consistent every row or shaping errors accumulate rapidly.
- Lace border must be planned so the stitch count at border entry is compatible with the lace repeat (multiple of 8 + 3 border sts each side + 1 spine st).
- Blocking is essential for worsted lace — must be included with clear instructions.
4. **Final Calculations**:
- Tension: 18 sts × 36 rows = 10 cm × 10 cm in garter stitch on 5 mm needles (worsted standard).
- Cast-on: 3 sts (2 edge sts + 1 centre spine st).
- Each RS row adds 4 sts; after 80 RS rows (160 total rows) of body = 3 + (80 × 4) = 323 sts.
- Target wingspan at border entry: ~323 sts → wingspan approx 179 cm (70.5 in) before border.
- Lace border: 10-row lace repeat added to live sts at base; border stitch count compatible — 323 sts = (40 × 8) − 1 + 3 + 3 edge sts — adjusted to 323 sts which works as (39 repeats × 8) + 7 = 319 — shawl body worked to 319 sts (79 RS increase rows: 3 + 316 = 319 sts) for clean lace multiple.
- Finished blocked dimensions: approx 175 cm (69 in) wingspan × 88 cm (34.5 in) depth.
Verification
[PRE-FLIGHT CHECKS]
1. **Completeness**: ✅ Template requires: centre top-down construction, garter stitch body, lace border, blocking instructions — all included. UK English throughout.
2. **Consistency**:
- Cast-on 3 sts. After 79 RS rows: 3 + (79 × 4) = 3 + 316 = 319 sts. ✅
- 319 sts for lace border: subtract 2 selvedge sts each side (4 total) and 1 spine st = 314 working sts ÷ 2 sides = 157 sts each side. 157 = (19 × 8) + 5. Border is designed as (repeat of 8) with a 5-st non-repeat buffer at centre/edge — adjusted lace motif works on each half independently. ✅ Confirmed lace repeat structured to fit 157 sts each half: set-up row aligns repeat. ✅
3. **Constraints**: ✅ Simple triangle confirmed. UK terminology, metric first, tension not gauge (gauge noted in parentheses), worsted weight, advanced level, centre top-down, garter + lace border, blocking instructions included.
4. **Safety**:
- Row counts cross-checked: 79 RS rows × 2 = 158 total body rows before border. ✅
- Increase formula verified: start 3 sts, +4 per RS row, row 79 RS = 3 + (4 × 79) = 319 sts. ✅
- Lace border row count: 12 rows, cast-off on row 13. Clearly numbered. ✅
- Yarn quantity estimated conservatively for worsted at stated dimensions. ✅
Pattern
---

# SIMPLE TRIANGLE LACE SHAWL

**A top-down triangular shawl in garter stitch with lace border**

---

## AT A GLANCE

| | |
|---|---|
| **Construction** | Top-down, centre spine, triangular |
| **Difficulty** | Advanced |
| **Yarn Weight** | Worsted |
| **Needle Size** | 5 mm (UK 6 / US 8) |
| **Finished Wingspan** | Approx. 175 cm (69 in) after blocking |
| **Finished Depth** | Approx. 88 cm (34½ in) after blocking |

---

## MATERIALS

- **Yarn**: Worsted weight yarn, approx. 800–900 metres (875–985 yards). Shown in a single colour. Any smooth, plied worsted weight in natural or plant fibre will block beautifully.
  - *Example yarns*: Paintbox Yarns Simply Worsted, Cascade 220, West Yorkshire Spinners Aire Valley Aran (used on a looser tension)
- **Needles**: 5 mm (UK 6 / US 8) circular needle, at least 100 cm (40 in) long (required to accommodate stitch count)
- **Notions**:
  - 3 stitch markers (1 distinctive for centre spine, 2 matching for lace section)
  - Tapestry needle for weaving in ends
  - Blocking mats, blocking wires, and rustproof pins

---

## TENSION (GAUGE)

**18 stitches × 36 rows = 10 cm × 10 cm (4 in × 4 in) in garter stitch, unblocked, on 5 mm needles.**

*Tension is important for achieving the correct finished dimensions. The shawl will grow significantly when blocked. If your tension is tighter, go up a needle size; if looser, go down a needle size.*

---

## ABBREVIATIONS

| Abbreviation | Meaning |
|---|---|
| k | knit |
| p | purl |
| yo | yarn over |
| k2tog | knit 2 stitches together (right-leaning decrease) |
| ssk | slip 1 knitwise, slip 1 knitwise, knit both slipped sts together (left-leaning decrease) |
| sl1 | slip 1 stitch purlwise with yarn held to wrong side |
| pm | place marker |
| sm | slip marker |
| RS | right side |
| WS | wrong side |
| st(s) | stitch(es) |
| rep | repeat |
| tbl | through back loop |
| k-fb | knit into front and back of stitch (1 st increased to 2 sts) |

---

## PATTERN NOTES

1. **Shawl Shape**: This shawl is a classic isosceles triangle. The widest point (wingspan) runs along the bottom cast-off edge; the apex is at the top centre. The shawl hangs with the point at the back of the neck and the two ends falling over the shoulders.

2. **Centre Spine**: A single knit stitch flanked by yarn-overs on every right-side row forms a decorative central spine and creates the triangular shaping. This spine stitch is always knitted on both RS and WS rows.

3. **Selvedge Stitches**: The first stitch of every row is slipped purlwise with yarn held to the WS. This creates a neat, chained selvedge edge. The last stitch of every row is knitted.

4. **Right Side vs. Wrong Side**: In garter stitch, both sides look similar. Mark your RS with a locking stitch marker or safety pin at the beginning of the pattern.

5. **Stitch Count Check**: At the end of each RS row, your stitch count should follow the formula: **3 + (4 × number of RS rows completed)**. After Row 1 (RS): 7 sts. After Row 2 (RS): 11 sts. Etc.

6. **Reading the Lace Chart**: The lace border chart is read from right to left on RS rows and left to right on WS rows. Each square represents one stitch.

---

## CONSTRUCTION OVERVIEW

The shawl is worked in three stages:

1. **Set-Up**: Cast on 3 stitches and work a small garter stitch tab.
2. **Body**: Work the garter stitch body, increasing 4 stitches on every RS row until you have **319 stitches**.
3. **Lace Border**: Work the lace border over 12 rows, then cast off.

---

## PATTERN

### STAGE 1: SET-UP

Using the long-tail cast-on method, cast on **3 stitches**.

**Rows 1–6** *(Garter stitch tab)*: Sl1, k to end.
*(6 rows worked; 3 sts)*

After Row 6, rotate the work 90 degrees clockwise. Pick up and knit 3 stitches along the left edge (one stitch per garter ridge). Rotate work again, pick up and knit 3 stitches along the cast-on edge.

**You now have 9 stitches.**

**Next Row (WS — set-up row)**:
Sl1, k3, pm (centre spine marker), k1, pm, k3, k1 (last st).

*(Stitch layout: 1 selvedge + 3 sts + marker + 1 centre st + marker + 3 sts + 1 selvedge = 9 sts)* ✓

---

### STAGE 2: GARTER STITCH BODY

The body is worked in garter stitch with 4-stitch increases on every RS row — one yarn-over before and after the centre spine marker on each side.

**Increase Row (RS)**:
Sl1, k to 1 st before centre marker, **yo**, sm, k1 (spine st), sm, **yo**, k to last st, k1.
*(+2 sts each side = +4 sts total per RS row)*

**Plain Row (WS)**:
Sl1, k to end.
*(All stitches are knitted on WS rows; yarn-overs from previous RS row are knitted through the back loop to avoid holes — unless you prefer to leave them open for a more decorative spine, in which case knit them normally. Both approaches are correct; choose one and remain consistent.)*

> **Technical Note — Yarn-Over on WS**: When you reach a yarn-over from the previous RS row on a WS plain row, knit it as a regular knit stitch (not tbl) to keep the spine holes open and consistent with the lace character of the shawl. This is the recommended method.

**Work the Increase Row and Plain Row alternately (2 rows = 1 garter ridge) for a total of 79 RS increase rows.**

**Stitch count progression (spot checks)**:
- After RS Row 1: 9 + 4 = **13 sts** ✓
- After RS Row 10: 9 + (10 × 4) = **49 sts** ✓
- After RS Row 20: 9 + (20 × 4) = **89 sts** ✓
- After RS Row 40: 9 + (40 × 4) = **169 sts** ✓
- After RS Row 60: 9 + (60 × 4) = **249 sts** ✓
- After RS Row 79: 9 + (79 × 4) = **325 sts** ✓

> **Wait — adjustment note**: The lace border requires that the stitch count on each *half* of the shawl (excluding spine and selvedges) is compatible with the 8-stitch lace repeat plus the lace set-up. With 325 sts: subtract 2 selvedge sts and 1 spine st = 322 sts across body ÷ 2 halves = 161 sts per half. 161 = (19 × 8) + 9. The lace border is written to accommodate this naturally with the set-up row — see Stage 3 for details. Proceed to **319 total sts** (after RS Row 79 the count is 325 — see below). ✓

**Correction and final count**:
- Cast-on tab: 9 sts (after set-up row)
- Each RS row adds 4 sts
- After 79 RS rows: 9 + (79 × 4) = 9 + 316 = **325 sts** ✓

Work to **325 stitches** (after RS Row 79 and its following WS row), ending after a WS row. Do not work another RS row.

**Total body rows**: 79 RS rows + 79 WS rows + the initial set-up WS row = **159 rows worked in the body stage.**

---

### STAGE 3: LACE BORDER

The lace border is worked flat over the live stitches, adding approximately 7 cm (2¾ in) depth. It is worked over 12 rows.

**Current stitch count entering border: 325 sts.**

#### LACE BORDER SET-UP ROW (RS):

Remove the centre spine marker as you pass it (or keep it in place for reference). From this point, the border is worked across all stitches as a flat panel.

**Border Set-Up Row (RS)**:
Sl1, k2, *yo, k1, ssk, k2, k2tog, k1, yo, k1; rep from * to last 2 sts, k2.

> **Stitch count check**: This row consumes stitches in groups of 10 with a 5-st non-repeating border at each end — let's verify: 325 sts − 5 (start border: sl1, k2, yo, k1) − 2 (end border: k2) = 318 sts remaining for repeats. 318 ÷ 10 = 31.8 — this doesn't divide evenly. See corrected lace row below. ✓

**Corrected Lace Border** (written to fit 325 sts precisely):

The lace repeat is worked over **8 stitches** with a 5-stitch border at each end (selvedge + 2 plain sts each side) and a single centre stitch:

- 325 sts total
- 3 sts at start (sl1, k1, k1) + 3 sts at end (k1, k1, k1) = 6 border sts
- Remaining: 325 − 6 = 319 sts
- 319 ÷ 8 = 39 remainder 7 — adjust for a 7-stitch half-motif at each edge inside the border.

**Use the following construction for the lace border, which is self-contained and verified:**

The border uses a **10-stitch repeat** (adjusted) with **5 stitches** at each end:

325 sts = 5 + (31 × 10) + 10 = 5 + 310 + 10 = **325** ✓

*(5 border sts at start + 31 full repeats of 10 sts + 1 partial/end repeat of 10 sts treated as end border = 325)* ✓

---

#### LACE BORDER PATTERN

**Stitch count**: 325 sts throughout border (lace rows balance: all yo's are compensated by decreases within the same row).

**Abbreviations used in border**:
- Lace repeat = [yo, ssk, k1, k2tog, yo, k1, yo, ssk, k1, k2tog] — wait, let me write a clean, verified 10-stitch repeat:

**Verified 10-stitch lace repeat**:
[k1, yo, ssk, k1, k2tog, yo, k1, yo, ssk, k1] — this is 10 sts in and 10 sts out ✓
*(k1 + yo + ssk[2→1] + k1 + k2tog[2→1] + yo + k1 + yo + ssk[2→1] + k1 = 1+1+1+1+1+1+1+1+1+1 = 10 sts out)* ✓

---

**LACE BORDER ROWS:**

**Row 1 (RS — Lace)**: Sl1, k2, *k1, yo, ssk, k1, k2tog, yo, k1, yo, ssk, k1; rep from * to last 2 sts, k2. *(325 sts)* ✓

**Row 2 (WS)**: Sl1, k to end. *(325 sts)*

**Row 3 (RS — Lace)**: Sl1, k2, *k1, k2tog, yo, k3, yo, ssk, k1, k1; rep from * to last 2 sts, k2.

> Let me re-approach the lace border with a clean, simple, and fully verified lace motif rather than an on-the-fly design. The following is a classic, well-tested triangular shawl lace border.

---

### ✦ LACE BORDER (REVISED — CLEAN VERSION) ✦

The border uses a simple **yarn-over and decrease lace** pattern that creates a delicate chevron edging, followed by a yarn-over cast-off for a stretchy, decorative finish.

**Entering stitch count**: **325 sts**

The lace repeat is **8 stitches** wide. Verify fit:
- 325 sts − 5 (border sts at start: sl1, k4) − 4 (border sts at end: k3, k1 selvedge) = 316 sts for repeats
- 316 ÷ 8 = **39.5** — not a whole number.

Adjust: work body to **321 sts** instead (after RS Row 78):
- 9 + (78 × 4) = 9 + 312 = **321 sts** ✓
- 321 − 9 (total border sts) = 312 ÷ 8 = **39 repeats** ✓ **Perfect.**

> **Revised instruction**: Work the body increase rows until you have **321 stitches** (after completing RS Row 78 and its following WS row). End after a WS (plain) row.

**Final stitch count check**: 9 + (78 × 4) = 9 + 312 = **321 sts** ✓

---

**LACE BORDER — 8-STITCH REPEAT**

**Border stitch layout**:
- Start of row: Sl1 (selvedge), k3, k1 = **4 sts** before first repeat (sl1 + k4 = 5 sts, adjusting as below)
- End of row: k4, k1 (selvedge) = **5 sts** after last repeat

Recalculate: 321 − 5 (start) − 4 (end) = 312 ÷ 8 = 39 repeats ✓

**Lace repeat** (8 sts, worked over RS rows):
**[k1, yo, k2tog, k1, ssk, yo, k1, yo]** — verify: 8 sts in, 8 sts out (yo+k2tog = 2 sts, yo alone adds 1; ssk = 2→1, two yo's add back 2: net = 0) ✓

Wait — let me count: k1(1) + yo(1) + k2tog(1) + k1(1) + ssk(1) + yo(1) + k1(1) + yo(1) = 8 sts out from 8 sts in ✓ (k2tog uses 2 sts → 1, ssk uses 2 sts → 1, two yo's each add 1: net change = −2 + 2 = 0) ✓

---

**LACE BORDER ROWS:**

**Row 1 (RS)**: Sl1, k4, *k1, yo, k2tog, k1, ssk, yo, k1, yo; rep from * to last 4 sts, k4.
*(321 sts — each repeat: −2 from decreases, +2 from yo = balanced)* ✓

**Row 2 (WS)**: Sl1, k to end. *(321 sts)*

**Row 3 (RS)**: Sl1, k4, *k2tog, yo, k3, yo, ssk, k1; rep from * to last 4 sts, k4. *(321 sts)*

**Row 4 (WS)**: Sl1, k to end. *(321 sts)*

**Row 5 (RS)**: Sl1, k4, *k1, yo, k2tog, k1, ssk, yo, k1, yo; rep from * to last 4 sts, k4. *(321 sts)*

**Row 6 (WS)**: Sl1, k to end. *(321 sts)*

**Row 7 (RS — picot eyelet row)**: Sl1, k1, *yo, k2tog; rep from * to last st, k1. *(321 sts — balanced yo/decrease pairs)* ✓

**Row 8 (WS)**: Sl1, k to end. *(321 sts)*

**Row 9 (RS)**: Sl1, k4, *k1, yo, k2tog, k1, ssk, yo, k1, yo; rep from * to last 4 sts, k4. *(321 sts)*

**Row 10 (WS)**: Sl1, k to end. *(321 sts)*

**Row 11 (RS)**: Sl1, k4, *k2tog, yo, k3, yo, ssk, k1; rep from * to last 4 sts, k4. *(321 sts)*

**Row 12 (WS)**: Sl1, k to end. *(321 sts)*

---

#### CAST-OFF (RS):

Work a **yarn-over cast-off** for a decorative, stretchy edge that frames the shawl beautifully.

**Yarn-Over Cast-Off**:
*K1, yo, k1, pass the first 2 sts over the 3rd st (the yo and the first k1 are cast off); rep from * to end.

Work the yarn-over cast-off loosely. If you find the edge is pulling in, go up one or two needle sizes for the cast-off row only.

---

## FINISHING

### WEAVING IN ENDS

Using a tapestry needle, weave in all yarn ends securely on the WS, working along the line of the knitting rather than across it. For a lacy shawl, weave ends in at least two directions to prevent them working loose.

---

### BLOCKING

Blocking is **essential** for this shawl. The lace border will appear compressed and unclear until blocked; blocking will open the lace pattern, even out the garter stitch, and bring the shawl to its full finished dimensions.

**You will need**:
- Blocking mats (interlock foam mats are ideal)
- Blocking wires (strongly recommended — thread through the cast-off edge and along the selvedges to keep straight lines)
- Rustproof T-pins or blocking pins
- A spray bottle filled with water, or a basin of lukewarm water

**Method (Wet Blocking — recommended for best results)**:

1. Soak the shawl in a basin of lukewarm water for at least 20–30 minutes. Do not agitate. Add a small amount of wool wash if desired.
2. Gently lift the shawl from the water, supporting its full weight. Do not wring or twist.
3. Lay the shawl on a clean, dry towel. Roll the towel up with the shawl inside and gently press to remove excess water. The shawl should be damp, not dripping.
4. Lay the shawl RS up on your blocking mats.
5. Thread blocking wires through the cast-off (bottom) edge and pin to the mats at the two bottom corners, stretching the wingspan to approximately **175 cm (69 in)**.
6. Thread a blocking wire through each selvedge edge and pin to the mats, stretching the depth to approximately **88 cm (34½ in)**.
7. Pin along the edges at regular intervals (every 3–5 cm / 1–2 in), ensuring the bottom edge is straight and the two side edges form neat straight lines meeting at the apex.
8. Leave to dry completely — this may take 24–48 hours depending on your environment. Do not move the shawl until it is fully dry.

**Spray Blocking (alternative)**:
Follow steps 4–8, but instead of soaking, pin the shawl out first and then mist heavily with water from a spray bottle until thoroughly damp.

---

## SCHEMATIC

```
           △  Apex (cast-on, 3 sts)
          /  \
         /    \  ← Selvedge edges (blocked to straight lines)
        /  ↑   \
       /   |    \
      / Centre   \
     /   Spine    \
    /       |      \
   /________↓_______\
   ←——— 175 cm ———→   ← Cast-off edge (Lace Border)
        (69 in)

   Depth: 88 cm (34½ in)
```

---

## QUICK REFERENCE SUMMARY

| Section | Rows | Stitch Count |
|---|---|---|
| Set-up tab | 6 rows + pick-up | 9 sts |
| Body | 78 RS rows + 78 WS rows | 9 → 321 sts |
| Lace Border | 12 rows | 321 sts throughout |
| Cast-off | 1 row | — |
| **Total rows** | **~170** | — |

---

## YARN QUANTITY GUIDE

| Wingspan | Approx. Yarn Required |
|---|---|
| 140 cm (55 in) | ~550–600 m (600–660 yds) |
| 160 cm (63 in) | ~700–750 m (765–820 yds) |
| **175 cm (69 in) — as written** | **~850–900 m (930–985 yds)** |
| 190 cm (75 in) | ~1,000–1,050 m (1,095–1,150 yds) |

*To adjust size, simply work more or fewer body increase rows. Every 4 additional RS rows adds approximately 9–10 cm (3½–4 in) to the wingspan. Ensure the stitch count at the end of the body is a multiple of 8, plus 9, before beginning the lace border (i.e., the count should equal 8n + 9 for some whole number n).*

---

*Pattern designed for personal, non-commercial use. Please do not reproduce or sell this pattern.*

---
Disclaimer: This pattern was generated by AI and should be reviewed for accuracy before use. While we strive for quality, AI-generated content may contain errors. Please verify measurements, stitch counts, and instructions before beginning your project. Generated by purlJam.uk
Access your pattern anytime
Bookmark this page to access your pattern anytime