Type
Knitting
Difficulty
beginner
Category
shawl
AI Thinking Process
Planning
1. **Design Strategy**: Beginner-friendly top-down triangular shawl in worsted weight, featuring a 3-stitch i-cord edge for clean borders and a very simple yo/k2tog eyelet lace border. Garter stitch body keeps it approachable.
2. **Construction Plan**: Worked top-down from a small garter tab cast-on, increasing 4 sts every RS row (2 beside i-cord edges, 2 beside centre spine) to form a triangular shape.
3. **Quality Assurance**:
- Garter tab cast-on can confuse beginners — provide clear step-by-step.
- Maintaining i-cord edge: slip first 3 sts, k last 3 sts every row.
- Lace border yo count must balance with k2tog to maintain stitch count.
4. **Final Calculations**: Tension 18 sts × 36 rows = 10 cm in garter. Cast on 3 sts, garter tab pick-up yields 7 sts. Work 60 increase repeats → 7 + (60×4) = 247 sts before border. Border adds 8 rows. Finished blocked dimensions: ~150 cm wingspan × 75 cm depth. Yarn ~400 g worsted.
Verification
1. **Completeness**: Materials, tension, abbreviations, instructions, finishing/blocking — all included.
2. **Consistency**: 7 sts + (60 × 4 increases) = 247 sts ✓. Border maintains count via paired yo/k2tog.
3. **Constraints**: UK English ✓, metric first ✓, beginner-level ✓, i-cord edge ✓, simple lace ✓, triangular ✓, worsted ✓.
4. **Safety**: Stitch count formula verified; border row maths balanced (one yo per one k2tog per repeat).
Pattern
# Willow Triangle — A Beginner's Lace Shawl

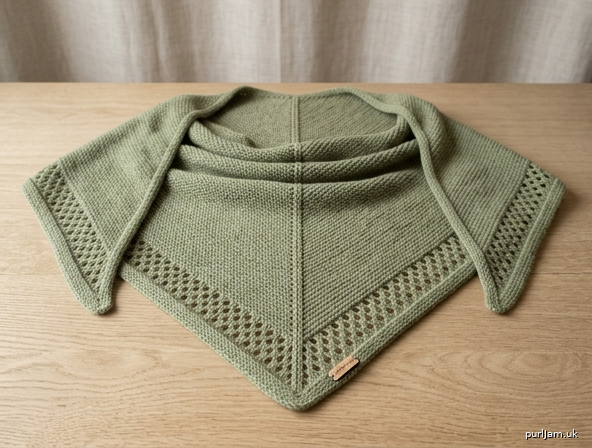
A gentle introduction to lace knitting, the Willow Triangle is a classic top-down triangular shawl worked in cosy worsted-weight yarn. Tidy i-cord edges frame a soft garter stitch body, finishing with a row of simple eyelets that bloom beautifully after blocking.

---

## Skill Level
Beginner

## Finished Measurements (after blocking)
- **Wingspan:** approx. 150 cm (59 in)
- **Depth at centre:** approx. 75 cm (29½ in)

## Materials

- **Yarn:** Worsted weight (CYC 4 / Aran), approx. 400 g / 800 m (875 yds) in a single colour. A smooth, lightly plied wool or wool-blend shows the lace best.
- **Needles:** 5 mm (US 8) circular needle, 80–100 cm cable length. A long cable is required to accommodate the final stitch count.
- **Notions:** 4 stitch markers (optional), tapestry needle, blocking pins/wires, foam blocking mats or a clean towel-covered surface.

## Tension (Gauge)
18 sts × 36 rows = 10 cm (4 in) over garter stitch, after blocking, on 5 mm needles.

Tension is not critical for fit, but it will affect the finished size and yarn quantity.

## Abbreviations (UK)
- **k** – knit
- **p** – purl
- **st(s)** – stitch(es)
- **yo** – yarn over (wrap yarn around needle to create a new stitch / eyelet)
- **k2tog** – knit two stitches together (one stitch decreased)
- **kfb** – knit into the front and back of the same stitch (one stitch increased)
- **sl1 wyif** – slip one stitch purlwise with yarn held in front
- **RS / WS** – right side / wrong side

---

## Construction Notes

The shawl begins with a small garter tab cast-on which forms a neat top edge. Stitches are then increased on every right-side row at four points: just after the i-cord edge, on either side of the centre spine, and just before the i-cord edge. This produces a balanced triangle.

The **i-cord edge** is created simply by slipping the first 3 stitches of every row with yarn in front, and knitting the last 3 stitches of every row. There is nothing fancy to learn — just remember: *slip 3, knit 3*.

---

## Garter Tab Cast-On

1. Cast on **3 sts** using a long-tail or knitted cast-on.
2. Knit **6 rows** in garter stitch (creating 3 garter ridges).
3. Without turning, rotate the work 90° clockwise. Pick up and knit **3 sts** along the long edge of the strip (one st in each garter ridge).
4. Rotate 90° again and pick up and knit **1 st** from each of the **3 cast-on sts** along the bottom edge.

You now have **7 sts** on the needle: 3 (right edge) + 1 (centre spine) + 3 (left edge).

---

## Set-Up Row (WS)
**Row 1 (WS):** Sl1 wyif, k6. *(7 sts)*

---

## Body — Increase Section

The shawl grows by **4 sts every RS row**. WS rows are worked plain.

**Row 2 (RS — increase row):** Sl1 wyif, k2, yo, k1, yo, k1 (centre spine), yo, k1, yo, k3. *(11 sts)*

**Row 3 (WS):** Sl1 wyif, knit to last 3 sts, k3. *(11 sts)*

**Row 4 (RS — increase row):** Sl1 wyif, k2, yo, knit to 1 st before centre st, yo, k1 (centre spine), yo, knit to last 3 sts, yo, k3. *(15 sts)*

**Row 5 (WS):** Sl1 wyif, knit to last 3 sts, k3.

*Tip — finding the centre stitch:* place a removable marker in the centre stitch and move it up every few rows. The centre stitch always has a yo on each side of it on increase rows.

**Repeat Rows 4 and 5** until you have completed **60 increase repeats in total** (counting Row 2 as the first repeat).

**Stitch count check:** 7 + (60 × 4) = **247 sts**.

Finish with a completed WS row. Work measures approximately 65 cm (25½ in) deep before blocking.

> *Want a smaller or larger shawl?* Each additional pair of rows adds 4 sts and roughly 1 cm of depth. Just stop on a WS row at the size you like — ensure your final stitch count is **an odd number divisible by 4 plus 3**, i.e. (4n + 3), so the lace border lines up. 247 = (4 × 61) + 3 ✓.

---

## Simple Lace Border

A single eyelet row is all that's needed for a delicate lace edge.

**Border Row 1 (RS):** Sl1 wyif, k2, *yo, k2tog*; repeat from * to last 4 sts, yo, k2tog, k2. *(247 sts — count unchanged: each yo is paired with one k2tog)*

**Border Row 2 (WS):** Sl1 wyif, knit to last 3 sts, k3.

**Border Row 3 (RS):** Sl1 wyif, knit to last 3 sts, k3.

**Border Row 4 (WS):** Sl1 wyif, knit to last 3 sts, k3.

**Border Row 5 (RS):** Repeat Border Row 1.

**Border Row 6 (WS):** Sl1 wyif, knit to last 3 sts, k3.

**Border Row 7 (RS):** Sl1 wyif, knit to last 3 sts, k3.

**Border Row 8 (WS):** Sl1 wyif, knit to last 3 sts, k3.

---

## Cast Off

Using a stretchy cast-off (recommended: knit 2, *insert left needle into the front of both sts and k2tog through back loops, knit 1*; repeat). This is essential — a tight cast-off will prevent the lower edge from blocking out into lovely points.

Alternative: cast off using a needle one or two sizes larger.

---

## Finishing

1. Weave in all ends on the wrong side using a tapestry needle, following the path of the stitches for an invisible finish.
2. Soak the shawl in lukewarm water with a little wool wash for 20 minutes. Do not agitate.
3. Gently squeeze out excess water (do not wring). Roll in a clean towel and press to remove more moisture.

## Blocking (Important!)

Blocking transforms this shawl — the eyelets open up and the edges sharpen.

1. Lay the damp shawl on foam mats or a towel-covered carpet.
2. Stretch into a triangle, pinning the **top edge straight** along its full 150 cm length.
3. Pin the **centre point** straight down, approximately 75 cm from the top edge.
4. Pin the two **lower diagonal edges** in a smooth, taut line between the top corners and centre point. Use blocking wires through the i-cord edges if you have them — they create the cleanest lines.
5. Stretch firmly but not violently; the eyelets should open and the fabric should feel under gentle tension.
6. Allow to dry completely (12–24 hours) before unpinning.

---

## Care
Hand wash in cool water with a gentle wool wash. Reshape and dry flat. Re-block lightly after each wash to restore the points and open eyelets.

---

*Enjoy your finished Willow Triangle — and well done on completing your first lace shawl!*
Disclaimer: This pattern was generated by AI and should be reviewed for accuracy before use. While we strive for quality, AI-generated content may contain errors. Please verify measurements, stitch counts, and instructions before beginning your project. Generated by purlJam.uk
Access your pattern anytime
Bookmark this page to access your pattern anytime