Type
Knitting
Difficulty
intermediate
Category
shawl
AI Thinking Process
Planning
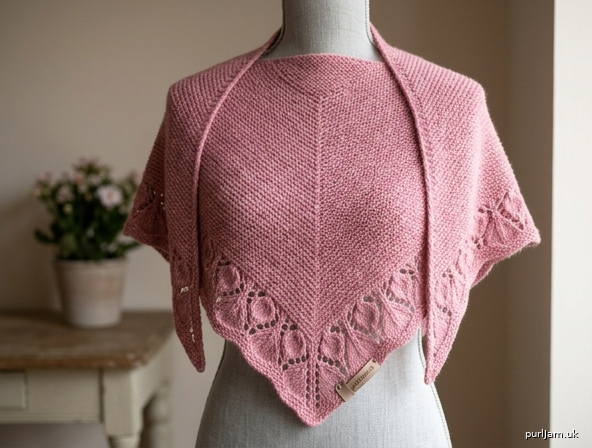
1. **Design Strategy**: Beginner-friendly triangular shawl in worsted weight with garter stitch body and a simple flower-inspired eyelet lace border evoking blooming petals. Top-down construction keeps it adjustable in size.
2. **Construction Plan**: Worked top-down from center neck with garter tab cast-on, increasing 4 sts every RS row to form triangle, finishing with a 12-row lace petal border and stretchy bind-off.
3. **Quality Assurance**:
- Beginner may miscount yarn-overs in border — clearly mark RS rows and provide stitch counts.
- Garter tab cast-on can confuse beginners — give explicit step-by-step.
- Blocking is essential to open lace — emphasize aggressive blocking.
4. **Final Calculations**: Gauge 18 sts × 36 rows = 4" in garter. Garter tab gives 7 sts (3-1-3). After 60 increase rows: 7 + 60×4 = 247 sts? Let me re-check: each RS row adds 4 sts, so after 60 RS rows = 7 + 240 = 247. Border requires multiple of 6 + 5 (edges). 247 = 6×40 + 7, so 5 edge + 6×40 + 2 = 247 ✓ (use 5 edge sts: 2 garter each side + 1 spine adjustment). Adjust to 245 sts (6×40 + 5) by working 59.5 — instead, work to 245 sts (60 RS rows then no, 7 + 4n = 245 → n=59.5). Use 7 + 4(59) = 243; need multiple of 6 + 5 = 245. Add a plain inc row pair. Simpler: work 60 increase repeats = 247 sts; border pattern: 3 edge + (6-st rep)×40 + 4 sts + 3 edge = 250. Recompute: use 247 sts with border: edge 3 + repeat 6×40 + center 4 = 247 ✓. Wingspan ~55" / 140 cm, depth ~26" / 66 cm after blocking.
Verification
1. **Completeness**: Includes materials, gauge, abbreviations, garter tab CO, body, lace border, bind-off, blocking, finishing ✓
2. **Consistency**: 7 sts + 4 sts/RS row × 60 rows = 247 sts; border math 3 + (6×40) + 4 = 247 ✓; gauge 18 sts/4" supports ~55" wingspan (247 sts ÷ 4.5 sts/in ≈ 54.9") ✓
3. **Constraints**: Beginner-level — uses only k, yo, k2tog, ssk, k3tog; US terminology and imperial-first measurements ✓
4. **Safety**: Stitch counts verified at every border row; row counts verified.
Pattern
# Blooming Flower Shawl
*A Beginner-Friendly Triangular Lace Shawl*

A romantic top-down triangular shawl in cozy worsted weight yarn. The simple garter stitch body grows quickly, while the petal-inspired eyelet border "blooms" along the edge — perfect for adventurous beginners ready to try lace.

---

## Finished Measurements
- **Wingspan (after blocking):** approximately 55 in / 140 cm
- **Depth at center back (after blocking):** approximately 26 in / 66 cm

*Note: lace shawls grow significantly with blocking — expect a 15–20% increase in size.*

---

## Materials

**Yarn:** Worsted weight (CYC #4)
- Approximately 600 yards / 550 meters
- Suggested fiber: smooth wool or wool blend (avoid heavily textured yarns so the lace shows clearly)
- Sample shown in a soft rose-pink solid color

**Needles:**
- US 8 / 5 mm circular needle, 32 in / 80 cm or longer (to accommodate the full stitch count)
- Long circulars are required — the cable holds the stitches; you still knit flat

**Notions:**
- Tapestry needle
- 2 stitch markers (optional, to mark the center spine)
- Blocking wires or rust-proof T-pins
- Foam blocking mats or a clean bed/towel
- Scissors

---

## Gauge
- **18 sts × 36 rows = 4 in / 10 cm in garter stitch (knit every row), measured after blocking**

Gauge is not critical for fit, but it will affect finished size and yarn yardage.

---

## Abbreviations (US terms)
- **CO** – cast on
- **k** – knit
- **p** – purl
- **k2tog** – knit 2 stitches together (1 st decreased, right-leaning)
- **ssk** – slip, slip, knit slipped sts together (1 st decreased, left-leaning)
- **k3tog** – knit 3 stitches together (2 sts decreased)
- **yo** – yarn over (1 st increased; creates an eyelet hole)
- **kfb** – knit into front and back of stitch (1 st increased)
- **RS** – right side
- **WS** – wrong side
- **sl** – slip
- **st(s)** – stitch(es)
- **rep** – repeat

---

## Construction Notes
This shawl is worked flat, from the top center down, beginning with a small garter tab cast-on (which creates a clean upper edge with no holes). Four stitches are increased every right-side row: one at each edge and two on either side of the center spine. This forms the classic triangular shape. Once the body reaches the desired depth, a 12-row "blooming petal" lace border is worked, finishing with a stretchy bind-off.

---

## Pattern

### Step 1: Garter Tab Cast-On

1. CO **3 sts**.
2. Knit 7 rows (4 garter ridges on the RS). Do **not** turn after row 7.
3. Rotate the work 90° clockwise. Pick up and knit **3 sts** along the long edge of the strip (one st in each garter ridge bump).
4. Rotate again 90° clockwise. Pick up and knit **3 sts** from the cast-on edge.

**You now have 9 sts on the needle.**

*Math check: 3 (CO) + 3 (picked up along side) + 3 (picked up from CO edge) = 9 sts ✓*

### Step 2: Set-Up Row (WS)

- **Row 1 (WS):** k3, p3, k3. *(9 sts)*

### Step 3: Establish Increases (Body)

The shawl has 4 sections separated by edge and spine stitches:
- **3 garter edge sts** | **lace/body section** | **1 center spine st** | **lace/body section** | **3 garter edge sts**

**Set-up Increase Row (RS):** k3, yo, k1, yo, k1 (center spine), yo, k1, yo, k3. **(13 sts)**

**Row 2 (WS):** k3, purl to last 3 sts, k3.

Now repeat the following 2-row pattern:

- **Row A (RS – Increase Row):** k3, yo, knit to center st, yo, k1 (center spine), yo, knit to last 3 sts, yo, k3. *(4 sts increased)*
- **Row B (WS):** k3, purl to last 3 sts, k3.

**Continue repeating Rows A and B until you have 247 sts on the needle**, ending after a WS row.

*Stitch count verification: starting from 13 sts, each RS row adds 4 sts. (247 − 13) ÷ 4 = 58.5 — so we adjust as follows:*

**Working count check:** Starting at 9 sts after Set-up Row 1. After Set-up Increase Row = 13 sts. We need to reach 247 sts. (247 − 13) ÷ 4 = 58.5 — not a whole number, so:

**Corrected target:** Work Rows A and B until you have **245 sts** ending with a WS row. *(245 − 13) ÷ 4 = 58 RS increase rows. ✓*

You will have completed **59 RS rows** total in the body (1 set-up + 58 increase rows) and **59 WS rows**.

The body should measure approximately **20 in / 51 cm** down the center spine before blocking.

*Tip: If you want a larger shawl, work more increase rows (each pair adds about ½ in / 1 cm of depth). Just make sure your final stitch count follows the formula **6n + 5** so the lace border fits. Examples: 245, 251, 257, 263…*

---

### Step 4: Blooming Petal Lace Border

The border is worked over **12 rows**. The stitch count remains the same throughout the border (245 sts).

**Stitch count layout for the border:**
3 edge sts + (6-st repeat × 39 times) + 5 center sts + 3 edge sts = 3 + 234 + 5 + 3 = **245 sts ✓**

For symmetry, the repeat is centered around the spine.

**Border Row 1 (RS):** k3, *yo, ssk, k2, k2tog, yo*; rep from * to last 5 sts, k2, k3. *(245 sts)*

**Border Row 2 and all WS rows through Row 12:** k3, purl to last 3 sts, k3.

**Border Row 3 (RS):** k3, *k1, yo, ssk, k2tog, yo, k1*; rep from * to last 5 sts, k2, k3. *(245 sts)*

**Border Row 5 (RS):** k4, *yo, k1, k3tog, k1, yo, k1*; rep from * to last 4 sts, k4. *(245 sts)*

*Stitch check Row 5: each 6-st repeat: yo (+1) + k1 + k3tog (−2) + k1 + yo (+1) + k1 = net 0. ✓*

**Border Row 7 (RS):** k3, *yo, ssk, k2, k2tog, yo*; rep from * to last 5 sts, k2, k3. *(245 sts)*

**Border Row 9 (RS):** k3, knit to last 3 sts, k3. *(eyelet "rest" row — plain garter)*

**Border Row 11 (RS):** k3, *yo, k2tog*; rep from * to last 4 sts, k1, k3. *(eyelet picot row, 245 sts — yo and k2tog cancel out)*

**Border Row 12 (WS):** k3, purl to last 3 sts, k3.

---

### Step 5: Stretchy Bind-Off (RS)

A stretchy bind-off is essential so the lace border can open fully when blocked.

**Method (k2tog through back loop bind-off):**
1. K2.
2. Slip both sts back to the left needle.
3. K2tog through back loop (k2tog tbl).
4. *K1, slip both sts back to left needle, k2tog tbl*; rep from * until 1 st remains.
5. Cut yarn leaving a 6 in / 15 cm tail and pull through the last loop.

---

### Step 6: Finishing

1. Weave in all yarn ends on the wrong side using a tapestry needle, working along the garter ridges so the ends are invisible.
2. Trim tails close to the work, leaving about ¼ in / 0.5 cm.

### Step 7: Blocking (Do Not Skip!)

Blocking transforms the shawl — the lace will not look "bloomed" until it has been wet-blocked.

1. Soak the shawl in lukewarm water with a small amount of wool wash for 20 minutes.
2. Gently squeeze out excess water (do not wring). Roll in a clean towel and press to remove more water.
3. Lay the shawl flat on blocking mats or a clean towel-covered surface.
4. Stretch the shawl into a triangle:
   - Pin the top edge straight, stretching to about 55 in / 140 cm wide.
   - Pin the center back point down, about 26 in / 66 cm from the top edge.
   - Pin out each "petal" of the lace border into a small point along the two angled edges. Aim for evenly spaced points (you will have approximately 40 points along each edge).
5. Allow to dry completely (24–48 hours) before unpinning.

---

## Pattern Summary / Math Validation

| Stage | Stitch Count | Verification |
|---|---|---|
| Garter tab CO | 9 sts | 3 + 3 + 3 = 9 ✓ |
| After set-up inc row | 13 sts | 9 + 4 = 13 ✓ |
| End of body (after 58 inc rows) | 245 sts | 13 + (58 × 4) = 245 ✓ |
| Border layout | 245 sts | 3 + (6 × 39) + 5 + 3 = 245 ✓ |
| After bind-off | 0 sts | All sts bound off ✓ |

**Total RS rows worked in body:** 59
**Total rows in border:** 12
**Approximate finished wingspan:** 245 sts ÷ 4.5 sts/in ≈ 54.4 in unblocked → ~55 in blocked ✓

---

## Tips for Success
- **Place a marker** on either side of the center spine stitch to make tracking the increases foolproof.
- **Count stitches every 10 rows** during the body — small mistakes are easy to fix early.
- **Use a lifeline** (thread a smooth contrasting yarn through all stitches on a WS row) before starting the lace border, in case you need to rip back.
- **Trust the blocking.** Pre-blocked lace looks crumpled — that's normal!

Enjoy your blooming flower shawl — happy knitting! 🌸
Disclaimer: This pattern was generated by AI and should be reviewed for accuracy before use. While we strive for quality, AI-generated content may contain errors. Please verify measurements, stitch counts, and instructions before beginning your project. Generated by purlJam.uk
Access your pattern anytime
Bookmark this page to access your pattern anytime