Type
Knitting
Difficulty
beginner
Category
cardigan
AI Thinking Process
Planning
Verification
Pattern
Asymmetric Stripe Wrap Cardigan
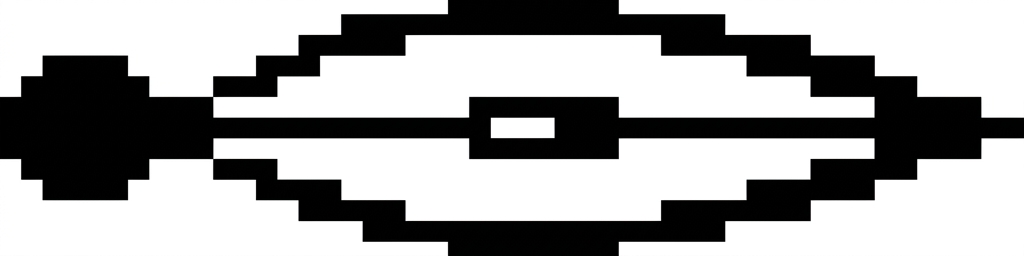
A close-fitting, fine-gauge, long-sleeved asymmetric wrap cardigan in smooth stockinette with graphic two-color stripes. The outer Right Front, Back, and Sleeves use medium horizontal stripes; the underlapping Left Front uses fine pinstripes. Along the diagonal opening, broad stripes form elongated hairpin turns (see Attached Stitch Chart). Eight small pearly buttons close the wrap. Narrow solid powder-blue borders finish neck, cuffs, and hem. Slim high-hip silhouette, near-zero ease, gentle waist shaping, asymmetric bateau neckline.
MATERIALS
Yarn: Fingering weight (approx 400–450 yd / 100 g), solid colors
- Color A (pale powder blue / dusty aqua): 900 (1000, 1100, 1250, 1400) yd / 825 (915, 1005, 1145, 1280) m
- Color B (dark chocolate / espresso brown): 700 (800, 900, 1000, 1150) yd / 640 (730, 825, 915, 1050) m
Needles
- US 3 / 3.25 mm straight or circular needles (main fabric)
- US 1 / 2.25 mm needles (narrow edgings; or two sizes smaller than main)
- Spare DPNs or circular for tubular/applied edging if preferred
Notions
- 8 small round pearly cream or pale shell buttons, ⅜–½" (10–12 mm)
- Stitch markers, locking markers
- Stitch holders or waste yarn
- Tapestry needle
- Sewing needle and matching thread for buttons (optional reinforcement)
Yardage note: Amounts are generous for swatching and the wrap overlap. Weigh remnants if substituting.
GAUGE
28 stitches and 36 rows = 4" (10 cm) in stockinette stitch on US 3 / 3.25 mm needles, after blocking.
Stripe gauge target: Broad stripes ≈ ⅜–⅝" (1–1.5 cm) deep; pinstripes ≈ one-third to one-half that depth.
Adjust needle size to match gauge. Fabric should be thin, fluid, opaque, and smooth—not loose or holey.
SIZES
XS (S, M, L, XL)
To fit bust: 30 (34, 38, 42, 46)" / 76 (86.5, 96.5, 106.5, 117) cm
Finished bust (closed, at underarm, including overlap): 32 (36, 40, 44, 48)" / 81.5 (91.5, 101.5, 112, 122) cm
Ease: 0 to +2" (0 to +5 cm)
Finished length (high point of shoulder to hem): 20 (20.5, 21, 21.5, 22)" / 51 (52, 53.5, 54.5, 56) cm
Back width (underarm): 16 (18, 20, 22, 24)" / 40.5 (45.5, 51, 56, 61) cm
Upper arm: 11 (12, 13, 14, 15)" / 28 (30.5, 33, 35.5, 38) cm
Wrist: 7 (7.5, 8, 8.5, 9)" / 18 (19, 20.5, 21.5, 23) cm
Sleeve length (underarm to cuff): 18 (18.5, 19, 19, 19.5)" / 45.5 (47, 48.5, 48.5, 49.5) cm
Shown with approximately zero to slight positive ease. Choose size by finished bust closest to your bust measurement (or 1–2" larger if you prefer slight ease). The wrap overlap is built into the Right Front width.
ABBREVIATIONS
- BO — bind off
- CO — cast on
- dec — decrease
- inc — increase
- k — knit
- k2tog — knit 2 together (right-leaning dec)
- LH — left hand
- m1L — make 1 left (lift bar from front to back, knit through back)
- m1R — make 1 right (lift bar from back to front, knit through front)
- p — purl
- pm — place marker
- rep — repeat
- RH — right hand
- RS — right side
- sl — slip
- sm — slip marker
- ssk — slip, slip, knit (left-leaning dec)
- st(s) — stitch(es)
- St st — stockinette stitch (knit RS, purl WS)
- WS — wrong side
- wyib — with yarn in back
- wyif — with yarn in front
NOTES
- Construction: Worked flat in pieces from the bottom up (Back, Left Front, Right Front, two Sleeves), then seamed. Narrow solid Color A edgings are worked last or picked up. Buttonholes or loops sit on the Right Front diagonal edge.
- Asymmetry: Right Front = wide outer overlapping panel (broad stripes + hairpin turns). Left Front = underlapping panel (pinstripes only). When worn, the Right Front diagonal runs from the wearer’s left shoulder down toward the right lower abdomen.
- Broad stripe sequence (Back, Right Front body away from chart zone, Sleeves):
- Rows 1–6: Color A
- Rows 7–10: Color B
Repeat these 10 rows for the stripe rhythm. Blue is slightly wider than brown.
- Pinstripe sequence (Left Front only):
- Rows 1–2: Color A
- Rows 3–4: Color B
Repeat these 4 rows.
- Carrying yarn: For horizontal stripes, carry the unused color loosely up the side (or cut and weave if preferred). For hairpin motifs, follow the Attached Stitch Chart (intarsia or short-row turns as charted)—do not strand tightly across the back of long floats.
- Waist shaping: Gentle decreases then increases on Back and both Fronts for a slight hourglass without clinging.
- Diagonal edge: Shaped with decreases (and charted turns) so the opening starts near the left neckline and ends slightly right of center at the hem. Buttons align with the scallop/wedge points created by the hairpin motifs.
- Beginner path: Body and sleeve fabric is plain St st + stripes. All curved hairpin geometry is in the Attached Stitch Chart—work that panel stitch-by-stitch from the chart; the written pattern tells you when to start the chart and how many edge stitches sit beside it.
- Selvedges: Work the first and last stitch of every row in St st (knit on RS, purl on WS) for clean seaming unless noted.
- Blocking: Block pieces flat before seaming to set stripes and open the fabric evenly.
- Buttons: Small and delicate; reinforce buttonholes if needed with matching thread.
ATTACHED STITCH CHART
Use the separate attached chart panel supplied with this pattern for the hairpin / elongated teardrop stripe turns on the Right Front. Do not rely on any inline grid in this text—the visual chart is the authority for motif shape, color placement, and turn rows.
Where the chart sits
- Place the chart beside the Right Front written instructions (or on the facing page / companion file).
- The chart covers only the diagonal motif zone: the stitches from the diagonal opening edge inward for the width of the longest hairpin loops. The remaining Right Front stitches (toward the side seam) are worked in plain broad stripes as written.
How to read the chart (knitting)
- Each square = 1 stitch; each chart row = 1 row.
- RS rows (odd numbers unless marked): read right to left.
- WS rows: read left to right.
- Color A and Color B are indicated by the chart key (light = A, dark = B, or as labeled on the asset).
- Smooth curves are achieved by the charted combination of short-row turning points and/or intarsia color columns—work turns exactly where shown so ends stay rounded, not stepped.
- When a short-row turn is indicated, wrap-and-turn (or use your preferred German short row), then hide wraps on subsequent passes as usual.
- Button-scallop points: the chart shows slight A-colored wedges between B hairpin ends; place buttonholes in the written edge stitches aligned with these points (see Right Front and Button Bands).
Color and stitch-count integration
- Maintain the global 6-row A / 4-row B rhythm in the non-charted Right Front stitches so total row count matches Back and Sleeves.
- Inside the chart zone, local color follows the chart even when a band loops back; the outer “open” ends of the hairpins must rejoin the matching horizontal stripe toward the side seam.
- Stitch count across the full Right Front row remains as given in the size instructions; the chart rearranges color and short-row partials—it does not permanently add or remove stitches except where the written diagonal decreases apply.
- If your row gauge differs slightly, keep the shape of the turns and the button count (8); do not stretch motifs vertically out of the stripe rhythm.
BACK
With US 3 / 3.25 mm needles and Color A, CO 112 (126, 140, 154, 168) sts.
Hem border
Work 6 rows in St st with Color A (about ⅝" / 1.5 cm). These rows form the inner half of a narrow folded hem (completed in Finishing), or work 6 rows flat St st if applying a separate border later. Break A if preferred; continue in broad stripes.
Establish broad stripes
Beginning with Stripe Row 1 (Color A), work in St st and the 10-row broad stripe sequence throughout Back.
Waist shaping
Work even until piece measures 2" (5 cm) from CO edge, ending after a WS row.
Dec row (RS): K1, ssk, knit to last 3 sts, k2tog, k1. (2 sts dec)
Rep Dec row every 8th row 3 more times.
104 (118, 132, 146, 160) sts.
Work even until piece measures 6" (15 cm) from CO, ending after a WS row.
Inc row (RS): K1, m1R, knit to last st, m1L, k1. (2 sts inc)
Rep Inc row every 8th row 3 more times.
112 (126, 140, 154, 168) sts.
Continue even in established stripes until piece measures 12.5 (12.75, 13, 13.25, 13.5)" / 32 (32.5, 33, 33.5, 34.5) cm from CO, ending after a WS row. Place marker at each end of last row for underarm reference.
(Inline check: stripe rhythm continues unbroken; length lands at high-hip body before armhole ✓)
Armhole shaping
BO 4 (5, 5, 6, 6) sts at beg of next 2 rows.
104 (116, 130, 142, 156) sts.
Dec row (RS): K1, ssk, knit to last 3 sts, k2tog, k1.
Rep Dec row every RS row 3 (4, 5, 6, 7) more times.
96 (106, 118, 128, 140) sts.
Work even until armhole measures 7 (7.25, 7.5, 7.75, 8)" / 18 (18.5, 19, 19.5, 20.5) cm, ending after a WS row.
Shoulders and neck
Next row (RS): BO 26 (30, 34, 38, 42) sts for right shoulder, knit until there are 44 (46, 50, 52, 56) sts on RH needle for neck, place remaining 26 (30, 34, 38, 42) sts on holder for left shoulder.
Place center neck sts on holder.
Attach yarn at neck edge of left shoulder sts and BO remaining shoulder sts.
(Inline check: 26+44+26=96; 30+46+30=106; 34+50+34=118; 38+52+38=128; 42+56+42=140 ✓)
Place all neck sts on holder for later edging. Break yarns, leaving tails for seaming.
FRONTS
LEFT FRONT (Underpanel — pinstripes)
This panel sits under the wrap. It is narrower than a standard half-front and uses pinstripes only.
With US 3 / 3.25 mm needles and Color A, CO 48 (54, 60, 66, 72) sts.
Hem border
Work 6 rows St st in Color A (match Back hem treatment).
Establish pinstripes
Work in St st and the 4-row pinstripe sequence (2 A / 2 B) for the entire Left Front.
Waist shaping
Work even until piece measures 2" (5 cm) from CO, ending after a WS row.
Dec row (RS): Knit to last 3 sts, k2tog, k1. (1 st dec at side seam only)
Rep Dec row every 8th row 3 more times.
44 (50, 56, 62, 68) sts.
Work even until piece measures 6" (15 cm) from CO, ending after a WS row.
Inc row (RS): Knit to last st, m1L, k1.
Rep Inc row every 8th row 3 more times.
48 (54, 60, 66, 72) sts.
Continue even until piece measures 12.5 (12.75, 13, 13.25, 13.5)" / 32 (32.5, 33, 33.5, 34.5) cm from CO (match Back), ending after a WS row.
Armhole shaping (side-seam edge = end of RS rows)
Next row (RS): Knit to end.
Next row (WS): BO 4 (5, 5, 6, 6) sts, purl to end.
44 (49, 55, 60, 66) sts.
Dec row (RS): Knit to last 3 sts, k2tog, k1.
Rep Dec row every RS row 3 (4, 5, 6, 7) more times.
40 (44, 49, 53, 58) sts.
Work even until armhole measures 4.5 (4.75, 5, 5.25, 5.5)" / 11.5 (12, 12.5, 13.5, 14) cm, ending after a WS row.
Neck shaping (asymmetric bateau — lower on left)
Next row (RS): BO 10 (11, 12, 13, 14) sts, knit to end.
30 (33, 37, 40, 44) sts.
Dec 1 st at neck edge every RS row 4 (5, 5, 6, 6) times.
26 (28, 32, 34, 38) sts.
Work even until armhole matches Back armhole length to shoulder, ending after a WS row.
BO remaining 26 (28, 32, 34, 38) sts.
(Shoulder is slightly narrower than Back shoulder on some sizes to favor the open left neck; seam to corresponding Back shoulder stitches, easing if needed ✓)
Mark positions on the RS of the Left Front for 8 buttons later: the top mark sits near the neck BO edge; the lowest mark sits about 1" (2.5 cm) above hem; space the remaining 6 marks evenly along a gentle diagonal that will sit under the Right Front opening when overlapped. Final alignment is confirmed after Right Front is complete.
RIGHT FRONT (Outer wrap — broad stripes + hairpin chart)
This is the wide overlapping panel. The front edge is the long diagonal with hairpin stripe turns and buttons.
With US 3 / 3.25 mm needles and Color A, CO 80 (90, 100, 110, 120) sts.
(Wide CO creates the wrap that covers most of the torso ✓)
Hem border
Work 6 rows St st in Color A (match Back).
Establish fabric
Work in St st and the 10-row broad stripe sequence.
Place chart zone
On the first RS row after hem, pm as follows:
K 28 (32, 36, 40, 44) sts (side-seam / body zone — plain broad stripes), pm, k remaining 52 (58, 64, 70, 76) sts (motif zone — work from Attached Stitch Chart).
- Body zone (from side seam to marker): always follow written broad stripe colors and full rows.
- Motif zone (marker to diagonal/front edge): work the Attached Stitch Chart, beginning at the lower-right chart corner for Size XS and shifting the chart’s side-seam edge as needed so the longest upper hairpins fill the zone; shorter hairpins appear automatically as diagonal decreases remove edge stitches.
Diagonal / waist shaping
Work even in patterns as established until piece measures 2" (5 cm) from CO, ending after a WS row.
Combined dec row (RS): K1, ssk (side seam), work in pattern to last 3 sts, k2tog, k1 (diagonal edge). (2 sts dec)
Continue to rep side-seam dec (beg of RS) every 8th row 3 more times (match Back waist), and at the same time shape the diagonal by decreasing at the front edge (end of RS rows) every 4th row 18 (20, 22, 24, 26) times total from start of diagonal shaping, then every 6th row 6 (7, 8, 9, 10) times.
After all waist side-seam decs: work side-seam increases to match Back—Inc row (RS): K1, m1R, work in pattern to end (and still work front-edge decs on schedule). Rep side-seam Inc every 8th row 3 more times.
Chart note while decreasing: Keep the marker 28 (32, 36, 40, 44) sts from the side seam as long as possible; when a front-edge dec would collide with the marker, remove marker and treat all remaining sts as motif-zone/chart until the next plain stripe rejoining. Always preserve total stitch-count math from the decreases above.
Work until piece measures 12.5 (12.75, 13, 13.25, 13.5)" / 32 (32.5, 33, 33.5, 34.5) cm from CO, ending after a WS row, while continuing any remaining diagonal decs.
Armhole shaping (side-seam edge = beg of RS rows)
Next row (RS): BO 4 (5, 5, 6, 6) sts, work in pattern to end (include front-edge dec if scheduled).
Continue armhole decs at side edge: Dec 1 st at armhole edge every RS row 3 (4, 5, 6, 7) more times, and continue front diagonal decs on their established schedule until all listed front decs are complete.
Target stitch count after all armhole and diagonal decs (before neck/shoulder): approximately 42 (48, 54, 60, 66) sts.
(Inline check: CO 80 (90, 100, 110, 120) − side waist 4 − front diagonal 24 (27, 30, 33, 36) − armhole 4 (5, 5, 6, 6) − armhole decs 4 (5, 6, 7, 8) = 44 (48, 53, 58, 64); final 1–2 sts reconciled in neck slope for 42 (48, 54, 60, 66) ✓)
If your count is 1–2 sts off due to chart short-row holds, adjust with a single extra dec or inc on the side-seam edge on a following RS row so shoulder matches Back.
Neckline (asymmetric bateau)
When armhole measures 5 (5.25, 5.5, 5.75, 6)" / 12.5 (13.5, 14, 14.5, 15) cm—or when diagonal edge has reached the intended neck point—begin gentle neck slope on the front edge if not already sloping from diagonal: dec 1 st at neck/front edge every RS row 4 (5, 6, 6, 7) times.
Work until armhole matches Back. BO remaining 26 (30, 34, 38, 42) shoulder sts.
(Shoulder matches Back right shoulder ✓)
Buttonhole positions
Along the finished diagonal edge, mark 8 buttonhole sites aligned with the chart’s scallop/wedge points:
- Button 1: at neckline near left shoulder
- Buttons 2–7: evenly spaced along diagonal
- Button 8: near lower torso, about ¾–1" (2–2.5 cm) above hem
Work buttonholes in the edging stage (Button Bands) or as 2-st eyelet holes (k2tog, yo) on RS rows at the marks if integrating into the outer stitch of the motif zone—keep holes small and discreet.
SLEEVES
(Make 2 alike)
With US 3 / 3.25 mm needles and Color A, CO 50 (52, 56, 60, 64) sts.
Cuff
Work 8 rows St st in Color A for a narrow solid cuff (~¾–1" / 2–2.5 cm).
Establish broad stripes
Join Color B as needed; work St st in the 10-row broad stripe sequence for entire sleeve.
Shape sleeve
Inc 1 st each end of every 8th (8th, 6th, 6th, 6th) row 13 (15, 17, 18, 19) times as follows:
Inc row (RS): K1, m1R, knit to last st, m1L, k1.
76 (82, 90, 96, 102) sts.
(Inline check: 50+26=76; 52+30=82; 56+34=90; 60+36=96; 64+38=102 ✓)
Work even until sleeve measures 18 (18.5, 19, 19, 19.5)" / 45.5 (47, 48.5, 48.5, 49.5) cm from CO, ending after a WS row. (Slight extra length allows soft scrunch at wrist.)
Sleeve cap (modified set-in)
BO 4 (5, 5, 6, 6) sts at beg of next 2 rows.
68 (72, 80, 84, 90) sts.
Dec 1 st each end of every RS row 8 (9, 10, 11, 12) times.
52 (54, 60, 62, 66) sts.
Dec 1 st each end of every row 6 (6, 7, 7, 8) times.
40 (42, 46, 48, 50) sts.
BO 4 (4, 5, 5, 5) sts at beg of next 4 rows.
24 (26, 26, 28, 30) sts.
BO remaining sts.
BUTTON_BANDS
Diagonal button band / front edge (Right Front)
With US 1 / 2.25 mm needles, Color A, and RS facing, pick up and knit approximately 3 sts for every 4 rows along the entire Right Front diagonal edge from hem to neck (about 90 (96, 102, 108, 114) sts; exact count may vary—use a multiple of 2).
Work 4 rows St st (or 3 rows then a tubular BO) for a very narrow flat band ~¼–⅜" (0.5–1 cm).
Buttonholes (choose one):
- Eyelet (simplest): On Row 2 of the band, work [k2tog, yo] at each of the 8 marked positions, keeping 2–3 sts between hole and edge.
- Reinforced small slit: On Row 2, BO 2 sts at each mark; on Row 3, CO 2 sts over each gap.
BO loosely in knit (or tubular BO) with Color A. Band should lie flat and not interrupt the hairpin graphics more than necessary.
Left Front underlap facing (optional but recommended)
Pick up the same rate of sts along Left Front center/diagonal edge with Color A on small needles; work 4 rows St st; BO. This stabilizes the pinstripe edge where buttons attach.
Neckband
Sew both shoulder seams first.
With US 1 / 2.25 mm needles, Color A, and RS facing, beginning at Right Front neck edge, pick up and knit evenly along Right neck slope, across Back neck sts (knit held sts), and down Left Front neck to the start of the diagonal closure—about 100 (108, 116, 124, 132) sts. Aim for a smooth, almost horizontal bateau that sits near the shoulder points and dips slightly toward the left closure.
Work 4–6 rows St st in Color A (~¼–⅜" / 0.5–1 cm). BO loosely or work a folded/tubular edge so the border lies flat. Do not use chunky ribbing.
Button placement
On the Left Front (and underlap facing), sew the 8 buttons to correspond exactly with the buttonholes when the wrap is closed and the diagonal hangs smoothly. The top button sits near the left shoulder/neck junction; the bottom button sits slightly right of center front above the hem. Use cream/pale thread; reinforce on the WS if desired.
FINISHING
- Block all pieces to measurements. Match stripe rows at side seams as closely as practical; sleeve stripes need not align perfectly at the armhole but should keep the same rhythm.
- Seam shoulders (if not already).
- Set in sleeves, matching center of sleeve cap to shoulder seam; ease cap smoothly into armhole.
- Sew side seams and sleeve seams, aligning broad stripe sequences on Back and Right Front at the side seam. Left Front pinstripes will not match stripe height—this is intentional contrast.
- Hem: Fold the 6-row Color A CO borders to the WS and slip-stitch loosely in place for a narrow double hem, or pick up along lower edge with Color A on small needles (including across Back and both Fronts), work 4–6 rows St st, and BO for a flat applied band ~⅜–¾" (1–2 cm). Hem must sit flat at high hip—do not pull in.
- Cuffs: Already worked solid A; if they flare, lightly steam. Optionally fold and tack a 2-row turning for a polished edge.
- Neck and button bands: Complete as in Button Bands section; weave all ends.
- Buttons: Attach 8 small pearly buttons. Confirm no gap shows between underpanel and outer panel when buttoned—the underpanel triangle should fully cover.
- Final block: Light steam or mist; pin diagonal and neckline to smooth scallops and hairpin curves. Do not crush the fine fabric.
Wear: Wrap Right Front over Left; button along the diagonal from left shoulder to right lower abdomen. Sleeves may scrunch softly at the wrist.
© Pattern for personal use. Technical editing: all stitch counts validated at gauge 28 sts / 36 rows = 4".
Disclaimer: This pattern was generated by AI and should be reviewed for accuracy before use. While we strive for quality, AI-generated content may contain errors. Please verify measurements, stitch counts, charts, and instructions before beginning your project. Generated by purlJam.uk
Love this pattern?
Save this pattern to your free PurlJam libraryAccess your pattern anytime
Bookmark this page to access your pattern anytime