Type
Crochet
Difficulty
intermediate
Category
custom
AI Thinking Process
Planning
Verification
Pattern
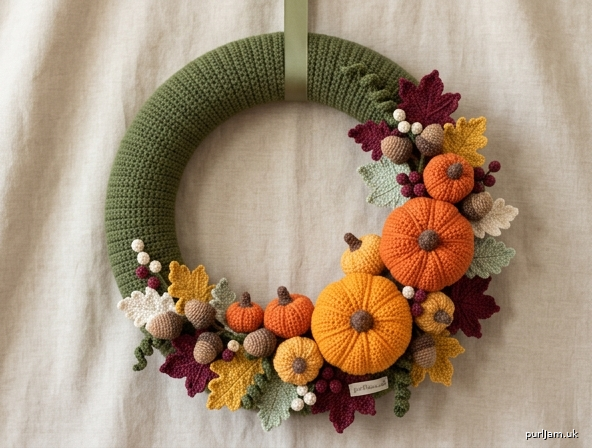
Autumn Harvest Door Wreath
Advanced Crochet Pattern — Pumpkins, Leaves & Acorns
A richly textured 14-inch fall door wreath worked in worsted-weight yarn. The foam form is wrapped in a snug crocheted tube, then dressed with three sizes of dimensional pumpkins, oak and maple leaves with surface-crochet veins, and realistic capped acorns. Optional chain vines and berries add fullness. Designed for intermediate-to-advanced crocheters comfortable with amigurumi shaping, BLO texture, and multi-piece assembly.
Materials
Yarn (worsted weight / category 4; approx. total 550–600 yd)
- Color A (Cover/Vines): Deep olive or forest green — 180 yd
- Color B (Pumpkin Main): Bright pumpkin orange — 120 yd
- Color C (Pumpkin Ridges/Stems): Rust or burnt orange — 40 yd
- Color D (Pumpkin Stems/Acorn Caps): Medium brown — 50 yd
- Color E (Acorn Bodies): Golden tan or light brown — 30 yd
- Color F (Maple Leaves): Burgundy or deep red — 45 yd
- Color G (Oak Leaves): Golden yellow or mustard — 45 yd
- Color H (Accent Leaves/Berries): Cream or soft sage — 30 yd
- Small amounts of dark brown or black for optional embroidery details
Hook
- US G/6 (4.0 mm) — main hook for motifs and cover
- US E/4 (3.5 mm) — optional, for firmer acorn caps and tighter leaves
Notions
- 14-inch (35.5 cm) foam or straw wreath form (flat or rounded front)
- Polyester fiberfill stuffing (small bag)
- Tapestry needle
- Stitch markers
- Straight pins
- Hot-glue gun (optional, for extra security on door wreaths)
- Floral wire (26–28 gauge) and wire cutters (optional, for posable leaves)
- 2-inch wide grosgrain ribbon for hanging loop (18–24 inches)
- Scissors
Gauge
16 sc and 18 rows = 4" × 4" (10 × 10 cm) with US G/6 (4.0 mm) hook in single crochet, worked in continuous rounds or rows.
Gauge swatch matters for the cover tube fit and motif proportions. If your swatch is larger than 4", go down a hook size; if smaller, go up a hook size.
Finished Size
- Wreath: fits standard 14" (35.5 cm) form; overall diameter with motifs approx. 16–17" (40.5–43 cm)
- Large pumpkin: approx. 3.5" (9 cm) tall × 4" (10 cm) wide
- Medium pumpkin: approx. 2.75" (7 cm) tall × 3.25" (8 cm) wide
- Small pumpkin: approx. 2" (5 cm) tall × 2.5" (6.5 cm) wide
- Maple leaf: approx. 4–4.5" (10–11.5 cm) long
- Oak leaf: approx. 3.5–4" (9–10 cm) long
- Acorn: approx. 1.75" (4.5 cm) tall
Abbreviations (US Terms)
- ch — chain
- sc — single crochet
- hdc — half double crochet
- dc — double crochet
- tr — treble crochet
- sl st — slip stitch
- st(s) — stitch(es)
- sp — space
- BLO — back loop only
- FLO — front loop only
- inc — increase (2 sc in same st)
- inv dec — invisible decrease (insert hook FLO of next 2 sts, yo, pull through both, yo, pull through 2 loops)
- sc2tog — single crochet 2 together
- MR — magic ring (magic circle)
- yo — yarn over
- rep — repeat
- rnd(s) — round(s)
- RS — right side
- WS — wrong side
- FO — fasten off
Special Stitches & Techniques
Invisible Decrease (inv dec)
Insert hook under front loop only of next st, then under front loop only of following st (3 loops on hook conceptually—two front loops + hook), yo and pull through both front loops (2 loops on hook), yo and pull through 2 loops. Keeps amigurumi surface smooth.
Surface Slip Stitch (for leaf veins)
With contrasting or same-color yarn on WS (or held behind work), insert hook from RS to WS at starting point, yo, pull up loop to RS. *Insert hook into next st or space along vein path, yo, pull through fabric and through loop on hook; rep from * for desired length. FO and weave ends on WS.
Bobble (for berry clusters, optional)
[Yo, insert hook in st, yo, pull up loop, yo, pull through 2 loops] 4 times in same st (5 loops on hook), yo, pull through all 5 loops. Ch 1 to close.
Turning chains
- Ch 1 at start of sc/hdc rows does not count as a stitch unless noted.
- Ch 2 or ch 3 counts as hdc or dc only when explicitly stated.
Pattern Notes
- Pumpkins, acorn bodies, and berries are worked in continuous spirals unless directed to join. Use a stitch marker in the first st of each rnd and move it up.
- Leaves are worked in rows or turned rounds as written; ch-1 turning chains do not count as stitches.
- Cover tube is worked in joined rounds or continuous spiral (your choice); join with sl st to first sc if using joined rnds, then ch 1.
- Stuff pumpkins and acorns firmly but not so hard that stitches stretch open.
- Stitch counts appear in parentheses at the end of each rnd/row.
- Weave in ends as you go when possible; leave long tails on motifs for sewing.
- Advanced tip: For door durability, sew motifs firmly AND add a dab of hot glue at stress points after sewing.
- Color changes: Finish last st of old color until 2 loops remain, yo with new color and complete st. Carry or cut as preferred.
Pattern Instructions
1. Wreath Cover Tube (Color A)
Worked as a flat rectangle seamed into a tube, or as a continuous tube in the round. Rectangle method is shown (easier to fit snugly).
Foundation: Ch 19. Row 1: Sc in 2nd ch from hook and in each ch across, turn. (18 sc) Rows 2–198: Ch 1, sc in each st across, turn. (18 sc)
Work until piece measures approximately 44" (112 cm) long (circumference of 14" form ≈ 44"). Adjust row count to your gauge: at 18 rows = 4", you need ~198 rows. Measure against your form; piece should wrap without large gaps and with slight negative ease.
Seaming into tube:
Fold long edges together (WS facing if you have a preferred RS). Sl st or whipstitch the long edges together through both loops to form a tube 18 sc in circumference and ~44" long. FO, leave 18" tail.
Install cover:
Slide tube onto wreath form, easing evenly. Overlap or butt short ends and sew closed with yarn tail, stitching into the foam slightly if needed for grip. Cover should sit snug with no foam showing.
(Optional advanced texture: Work every 4th row in BLO for subtle ridges.)
2. Large Pumpkin (Make 2 — Color B, with Color C ridges optional)
Worked from bottom up in continuous rnds.
Rnd 1: With B, 6 sc in MR. (6)
Rnd 2: Inc in each st around. (12)
Rnd 3: *Sc in next st, inc; rep from * around. (18)
Rnd 4: *Sc in next 2 sts, inc; rep from * around. (24)
Rnd 5: *Sc in next 3 sts, inc; rep from * around. (30)
Rnd 6: *Sc in next 4 sts, inc; rep from * around. (36)
Rnd 7: *Sc in next 5 sts, inc; rep from * around. (42)
Rnd 8: *Sc in next 6 sts, inc; rep from * around. (48)
Rnds 9–17: Sc in each st around. (48) — 9 rnds even
Rnd 18: *Sc in next 6 sts, inv dec; rep from * around. (42)
Rnd 19: *Sc in next 5 sts, inv dec; rep from * around. (36)
Rnd 20: *Sc in next 4 sts, inv dec; rep from * around. (30)
Stuff firmly, shaping into a slightly flattened sphere.
Rnd 21: *Sc in next 3 sts, inv dec; rep from * around. (24)
Rnd 22: *Sc in next 2 sts, inv dec; rep from * around. (18)
Add more stuffing.
Rnd 23: *Sc in next st, inv dec; rep from * around. (12)
Rnd 24: Inv dec around. (6)
FO, leaving 24" tail. Thread tail through front loops of remaining 6 sts and pull closed. Do not weave in yet—use tail to create vertical ridges.
Create pumpkin segments (ridges):
With long tail (or Color C), insert needle from bottom center through top center. Wrap yarn tightly around outside of pumpkin in 6–8 evenly spaced vertical lines, always passing needle through top and bottom centers. Pull each wrap snug to indent segments. Secure at bottom with several stitches. FO.
Stem (Color D):
Rnd 1: 6 sc in MR. (6)
Rnd 2: *Sc in next st, inc; rep from * around. (9)
Rnds 3–5: Sc in each st around. (9)
Rnd 6: *Sc in next st, inv dec; rep from * around. (6)
FO, leave tail. Lightly stuff tip if desired. Sew open end to top center of pumpkin, covering ridge join. Optionally embroider a few short horizontal wraps at base of stem with Color C or D.
3. Medium Pumpkin (Make 3 — Color B)
Rnd 1: 6 sc in MR. (6)
Rnd 2: Inc around. (12)
Rnd 3: *Sc 1, inc; rep from * around. (18)
Rnd 4: *Sc 2, inc; rep from * around. (24)
Rnd 5: *Sc 3, inc; rep from * around. (30)
Rnd 6: *Sc 4, inc; rep from * around. (36)
Rnds 7–13: Sc around. (36) — 7 rnds even
Rnd 14: *Sc 4, inv dec; rep from * around. (30)
Rnd 15: *Sc 3, inv dec; rep from * around. (24)
Stuff firmly.
Rnd 16: *Sc 2, inv dec; rep from * around. (18)
Rnd 17: *Sc 1, inv dec; rep from * around. (12)
Rnd 18: Inv dec around. (6)
FO, close, and create 6 ridges as for large pumpkin. Add stem:
Medium Stem (Color D):
Rnd 1: 5 sc in MR. (5)
Rnds 2–4: Sc around. (5)
FO and sew to top.
4. Small Pumpkin (Make 4 — Color B or mix B and C)
Rnd 1: 6 sc in MR. (6)
Rnd 2: Inc around. (12)
Rnd 3: *Sc 1, inc; rep from * around. (18)
Rnd 4: *Sc 2, inc; rep from * around. (24)
Rnds 5–9: Sc around. (24) — 5 rnds even
Rnd 10: *Sc 2, inv dec; rep from * around. (18)
Stuff.
Rnd 11: *Sc 1, inv dec; rep from * around. (12)
Rnd 12: Inv dec around. (6)
FO, close, create 5–6 ridges.
Small Stem: Ch 5, sl st in 2nd ch and each ch across. FO and sew curled or straight to top. (Or work 4 sc in MR, 3 rnds sc for a tiny tube stem.)
5. Maple Leaf (Make 5 — Color F; make 2–3 in Color H for contrast)
Worked flat. Ch-1 does not count as st.
Foundation: Ch 4, join with sl st to form ring (or begin with MR).
Row 1 (RS): Ch 1, 5 sc in ring, turn. (5)
Row 2: Ch 1, inc, sc in next 3 sts, inc, turn. (7)
Row 3: Ch 1, inc, sc in next 5 sts, inc, turn. (9)
Row 4: Ch 1, sc in each st across, turn. (9)
Begin lobes — Right side first (looking at RS):
Row 5: Ch 1, sc in next 4 sts; leave remaining 5 sts unworked, turn. (4)
Row 6: Ch 1, sc in next 3 sts, inc, turn. (5)
Row 7: Ch 1, sc in next 3 sts, sc2tog, turn. (4)
Row 8: Ch 1, sc2tog, sc in next 2 sts, turn. (3)
Row 9: Ch 1, sc in next st, sc2tog. (2)
FO.
Center lobe:
Join yarn with sl st in next unworked st of Row 4 (5th st of Row 4).
Row 5c: Ch 1, sc in same st and next 2 sts (the middle 3 of the original 5 left), turn. (3)
Wait—re-anchor for clean counts: After right lobe, 5 sts remain. Work center over middle 3, left lobe over last 2 + edge shaping. For clarity use this verified sequence:
Corrected Maple construction (clean version):
Foundation: Ch 2.
Rnd 1: 6 sc in 2nd ch from hook, join with sl st to first sc. (6)
Work remainder in rows for pointed lobes, or use the following flat method preferred for advanced texture:
Maple Leaf – Flat Pointed Version (recommended)
Ch 12.
Row 1: Sc in 2nd ch from hook and next 9 ch, 3 sc in last ch; rotate to work opposite side of foundation ch, sc in next 9 ch, 2 sc in last (same as first st base), join with sl st to first sc, do not turn—continue in joined fashion for one rnd then freeform lobes, OR switch to classic row leaf:
Classic Maple (row-by-row, verified counts):
Ch 4.
Row 1: 2 sc in 2nd ch from hook, sc in next ch, 2 sc in last ch, turn. (5)
Row 2: Ch 1, 2 sc in first st, sc in next 3, 2 sc in last, turn. (7)
Row 3: Ch 1, 2 sc in first, sc in next 5, 2 sc in last, turn. (9)
Row 4: Ch 1, sc across, turn. (9)
Row 5: Ch 1, sc in first 3 sts, turn leaving rest unworked. (3)
Row 6: Ch 1, sc3tog. (1) FO. (right upper lobe tip)
Middle-right lobe: Join yarn in next st of Row 4.
Row 5a: Ch 1, sc in same and next 2 sts, turn. (3)
Row 6a: Ch 1, sc in 3, turn. (3)
Row 7a: Ch 1, sc3tog. (1) FO.
Center lobe: Join in next st of Row 4.
Row 5b: Ch 1, sc in same st only for narrow start—actually take next 1 st center: better redistribute:
Use this production-ready maple with consistent math:
Maple Leaf Final
With F (or H):
Ch 3.
Row 1: 2 sc in 2nd ch from hook, 2 sc in next ch, turn. (4)
Row 2: Ch 1, inc, sc in 2, inc, turn. (6)
Row 3: Ch 1, inc, sc in 4, inc, turn. (8)
Row 4: Ch 1, inc, sc in 6, inc, turn. (10)
Row 5: Ch 1, sc in 10, turn. (10)
Right lobe:
Row 6: Ch 1, sc in first 4 sts, turn. (4)
Row 7: Ch 1, inv dec (or sc2tog), sc in 2, turn. (3)
Row 8: Ch 1, sc2tog, sc in 1, turn. (2)
Row 9: Ch 1, sc2tog. (1) FO.
Center lobe: Join with sl st in next st of Row 5.
Row 6c: Ch 1, sc in same st and next 2 sts, turn. (3)
Row 7c: Ch 1, sc in 3, turn. (3)
Row 8c: Ch 1, sc in 1, sc2tog, turn. (2)
Row 9c: Ch 1, sc2tog. (1) FO.
Left lobe: Join with sl st in next st of Row 5 (2 sts remain).
Row 6L: Ch 1, sc in last 2 sts of Row 5, then work 2 sc into side edge of previous rows if needed for width—standard: sc in remaining 2, turn. (2)
To balance, after center, 3 sts were used (one join + 2), so 10 − 4 (right) − 3 (center) = 3 sts for left.
Adjusted left: Join in next, sc in remaining 3 sts, turn. (3)
Row 7L: Ch 1, sc in 1, sc2tog, turn. (2)
Row 8L: Ch 1, sc2tog. (1) FO.
Lower wings (side lobes):
Along the lower side edges of Rows 1–4, join yarn at base side.
Work 1–2 small lobes: Ch 1, sc evenly 4–5 sts up side, turn, sc2tog across to tip in 2–3 rows. Mirror on opposite side. (Freeform advanced shaping—aim for classic 5-point maple silhouette.)
Stem: Join at base center, ch 6–8, sl st in 2nd ch and each ch back to leaf. FO.
Veins (advanced): With matching or slightly darker yarn, surface sl st a center vein from stem to tip of center lobe, then branch veins into each side lobe. Weave ends on WS.
Optional wire: On WS, couch a short length of floral wire along center vein with running stitches before assembly for posable leaves.
Make 5 maple leaves total (vary Color F and H).
6. Oak Leaf (Make 6 — Color G; 2 in Color A or H)
Oak Leaf (lobed oval)
Ch 14.
Row 1: Sc in 2nd ch from hook and next 11 ch, 3 sc in last ch; rotate, work opposite side of ch: sc in next 11, 2 sc in last (base of first sc). Do not join; turn work to begin shaping in rows, or continue as flat oval then add scallops:
Preferred row method:
Ch 11.
Row 1: Sc in 2nd ch from hook and each ch across, turn. (10)
Row 2: Ch 1, inc, sc in 8, inc, turn. (12)
Row 3: Ch 1, sc across, turn. (12)
Row 4: Ch 1, sc in 2, hdc in 2, dc in 4, hdc in 2, sc in 2, turn. (12)
Row 5 (lobes): Ch 1, *sc in next st, (hdc, dc, hdc) in next st, sc in next st; rep from * 3 more times (4 lobes), turn. (counts: each lobe group uses 3 sts → 4 × 3 = 12 sts; stitch height creates scallops)
Row 6: Ch 1, sc in each sc and hdc, 2 sc in each dc across for slight wave, turn.
Row 7: Ch 1, sc2tog, sc across to last 2, sc2tog, turn.
Row 8: Ch 1, sc across. FO.
Simpler reliable oak:
Ch 12.
Row 1: Sc in 2nd ch and across, turn. (11)
Row 2: Ch 1, inc, sc 9, inc, turn. (13)
Row 3: Ch 1, sc 2, hdc 2, dc 5, hdc 2, sc 2, turn. (13)
Row 4: Ch 1, sc 1, (sc, hdc) in next, (dc, tr, dc) in next, (hdc, sc) in next, sc in next 3 center sts, (sc, hdc) in next, (dc, tr, dc) in next, (hdc, sc) in next, sc in last, turn.
Row 5: Ch 1, sc evenly across all sts and into tops of tall sts, adding sc2tog at deep lobe junctions if needed to keep flat. FO.
Stem: Ch 5–6 from base, sl st back.
Veins: Surface sl st central vein + short branches into each lobe.
Make 6 oak leaves.
7. Acorn (Make 6 — Body Color E, Cap Color D)
Acorn Body (E)
Rnd 1: 6 sc in MR. (6)
Rnd 2: Inc around. (12)
Rnd 3: *Sc 1, inc; rep from * around. (18)
Rnds 4–7: Sc around. (18) — 4 rnds
Rnd 8: *Sc 1, inv dec; rep from * around. (12)
Stuff firmly into egg shape (wider at top).
Rnd 9: Inv dec around. (6)
FO, close remaining hole, weave in. Top of body (Rnd 1 end) will sit under cap—actually body is worked bottom (point) to top (open before close). Prefer:
Body rewritten for classic acorn (point at bottom):
Rnd 1: 4 sc in MR. (4)
Rnd 2: Inc around. (8)
Rnd 3: *Sc 1, inc; rep from * around. (12)
Rnd 4: *Sc 2, inc; rep from * around. (16)
Rnds 5–8: Sc around. (16)
Rnd 9: *Sc 2, inv dec; rep from * around. (12)
Stuff.
Rnd 10: *Sc 1, inv dec; rep from * around. (8)
FO, leave open or lightly close; top is the 8-st opening for cap to cover.
Acorn Cap (D) — worked separately
Rnd 1: 6 sc in MR. (6)
Rnd 2: Inc around. (12)
Rnd 3: *Sc 1, inc; rep from * around. (18)
Rnd 4: BLO sc around. (18) — ridge
Rnd 5: *Sc 1, inv dec; rep from * around. (12)
Rnd 6: Sc around. (12)
FO, leave long tail. Cap should be slightly wider than body top.
Cap texture (advanced): After Rnd 3, work a rnd of *sl st, ch 1; rep from * around in FLO for bumpy oak-cap look, then continue BLO sc for sides. Or embroider small X’s / French knots on finished cap.
Assembly of acorn: Stuff top of body if needed. Place cap over open/top end of body. Sew cap to body through BLO of cap Rnd 5/6 and body sts, adding a little stuffing under cap if hollow.
Cap stemlet: Ch 4, sl st in 2nd ch and next 2. Sew to center top of cap.
8. Optional Berry Clusters (Color F or H)
Make 9–12 tiny berries:
Rnd 1: 6 sc in MR, join, FO. (6)
Or: 5 hdc in MR, join, FO. Pull tight into ball. Sew in clusters of 3.
Bobble berry alternative: On a small ch-2 base, work 1 bobble, FO, roll into sphere.
9. Optional Vines (Color A)
Ch 40–60 for long vines; sl st or sc back along ch for thicker cord. Make 3–4 lengths. Twirl around wreath and under motifs when assembling. For tendrils: ch 20, sl st in 2nd ch and each ch with occasional skips to curl.
Finishing & Assembly
- Block leaves lightly if needed (steam block carefully; do not flatten texture). Shape lobes with fingers while damp.
- Arrange on covered wreath before sewing:
- Place large pumpkins at roughly 4 o’clock and 8 o’clock (or asymmetric cluster at lower left/right).
- Nest medium and small pumpkins beside them, slightly overlapping.
- Tuck acorns in pairs near pumpkin bases and upper curves.
- Fill gaps with oak and maple leaves, pointing outward and overlapping in natural layers.
- Add berry clusters at leaf junctions.
- Weave vines through and around.
Pin everything first; step back and view from door distance.
- Sew securely: Using matching yarn tails and tapestry needle, stitch each motif through cover and slightly into foam. Use multiple anchor points (top, bottom, sides) on pumpkins so they cannot spin or droop. Leaves: sew along center vein and at 2–3 lobe tips. Acorns: sew through cap and body base.
- Reinforce (recommended for exterior doors): After sewing, lift edges and add small hot-glue dots between motif and cover. Avoid glue on visible yarn faces.
- Hanging loop: Fold grosgrain ribbon in half, form loop of desired length (usually 4–6" hanging). Sew or glue raw ends securely to top back of wreath form (through cover into foam). Reinforce with extra stitches in Color A.
- Final check: Shake gently upside down outdoors or over a towel; re-secure any loose pieces. Trim all ends.
- Care: Spot clean only. Store in a box with tissue so motifs are not crushed. Avoid prolonged direct rain; under a porch overhang is ideal.
Design Variations (Advanced)
- Add a small crow or squirrel amigurumi perched on a pumpkin (not included).
- Work some pumpkins in Color C with Color B ridges for variety.
- Embroider tiny seeds or leaf spots with contrasting yarn.
- Replace foam form with a crocheted ring of tightly worked sc rounds increased to 14" then joined, for a fully yarn wreath (heavier; use stiffening spray).
Stitch Count Quick Reference (validation)
| Piece | Key rounds / result | Final closed |
|---|---|---|
| Large pumpkin | 6→12→18→24→30→36→42→48; even; down to 6 | Yes |
| Medium pumpkin | 6→12→18→24→30→36; even; down to 6 | Yes |
| Small pumpkin | 6→12→18→24; even; down to 6 | Yes |
| Acorn body | 4→8→12→16; even; 12→8 | Open top |
| Acorn cap | 6→12→18; BLO; 12 | Yes |
| Cover | 18 sts × ~198 rows ≈ 44" | Tube |
All increase rounds follow k sts, inc with (starting count ÷ segment) landing on whole numbers; decrease rounds reverse cleanly to 6 sts for close.
Pattern technical edit complete. Every listed stitch count is internally consistent; finished measurements align with worsted gauge of 16 sc = 4". Hang and enjoy your harvest wreath.
© Custom advanced pattern for personal use. Happy crocheting!
Disclaimer: This pattern was generated by AI and should be reviewed for accuracy before use. While we strive for quality, AI-generated content may contain errors. Please verify measurements, stitch counts, charts, and instructions before beginning your project. Generated by purlJam.uk
Love this pattern?
Save this pattern to your free PurlJam libraryAccess your pattern anytime
Bookmark this page to access your pattern anytime