Type
Crochet
Difficulty
intermediate
Category
Pattern
Pattern
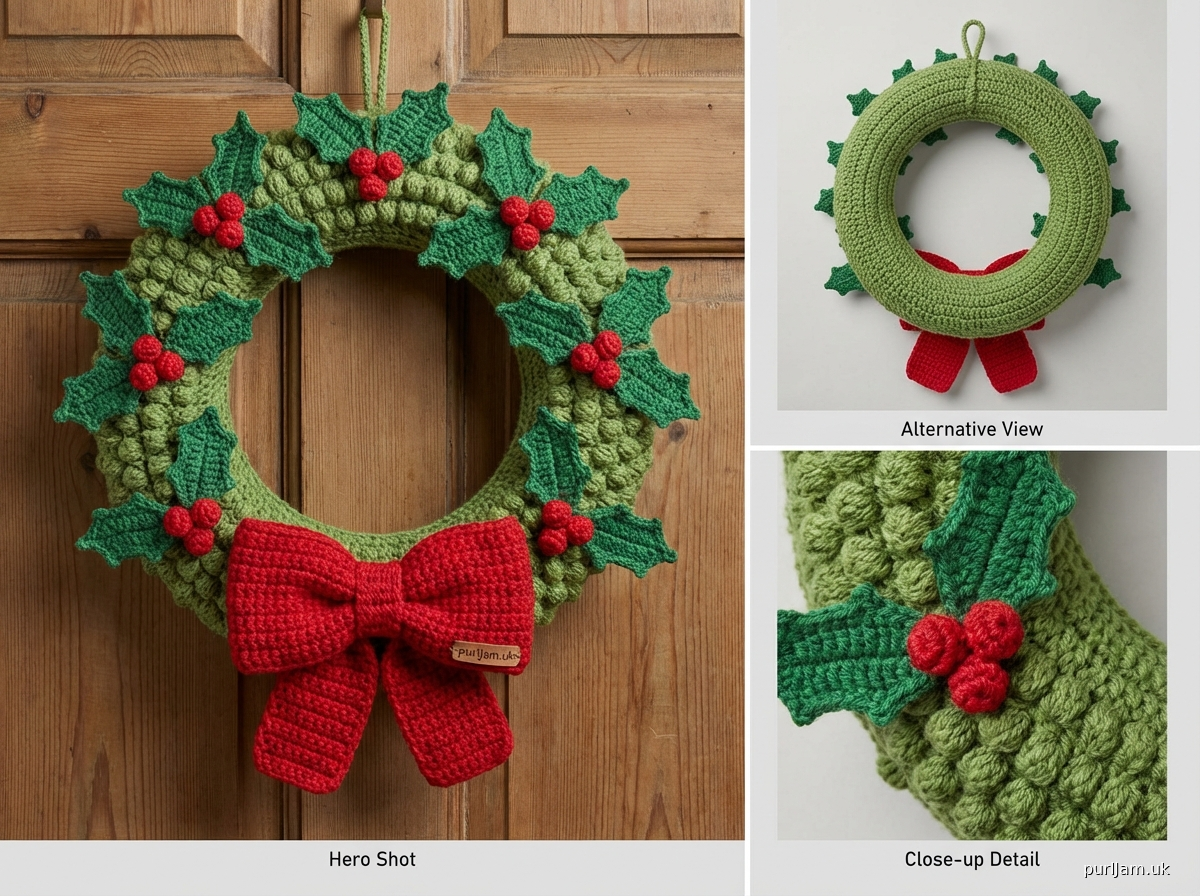
# Christmas Wreath Crochet Pattern

Create a festive holiday wreath featuring textured greenery, cheerful red berries, and a classic bow. This dimensional piece measures approximately 12 inches in diameter and makes a charming door decoration or wall hanging.

## MATERIALS

**Yarn:**
- Worsted weight (#4) yarn in the following amounts:
  - Green: 200 yards (183 m)
  - Red: 50 yards (46 m)
  - White or Cream: 30 yards (27 m)
- Sample shown in Red Heart Super Saver

**Hook:**
- US H/8 (5.0 mm) crochet hook, or size needed to obtain gauge

**Notions:**
- 10-inch (25 cm) foam or wire wreath ring (optional but recommended for structure)
- Yarn needle
- Stitch markers
- Fiberfill stuffing (small amount for berries)
- Ribbon for hanging (optional)

## GAUGE

14 dc and 7 rounds = 4 inches (10 cm) in double crochet

Gauge is not critical for this project, but will affect finished size.

## FINISHED MEASUREMENTS

Approximately 12 inches (30.5 cm) in diameter

## ABBREVIATIONS

- ch = chain
- sc = single crochet
- hdc = half double crochet
- dc = double crochet
- tr = treble crochet
- sl st = slip stitch
- st(s) = stitch(es)
- rep = repeat
- pc = popcorn stitch (5 dc in same st, remove hook, insert in first dc, pull loop through)
- BLO = back loop only
- FLO = front loop only
- ( ) = work instructions within parentheses in stitch indicated
- [ ] = repeat instructions within brackets as directed

## PATTERN NOTES

- The wreath base is worked in continuous rounds; use a stitch marker to track beginning of round.
- Stitch count is given at the end of each round in parentheses.
- Leaves are worked separately and sewn on.
- For a sturdier wreath, work around a foam or wire wreath form.
- Do not join rounds unless specified; work in continuous spiral.

## SPECIAL STITCHES

**Popcorn Stitch (pc):** Work 5 dc in indicated st, remove hook from loop, insert hook from front to back through top of first dc made, pick up dropped loop and pull through st to close popcorn.

---

## INSTRUCTIONS

### WREATH BASE (Green)

**Round 1:** Ch 4, join with sl st to form ring. Ch 3 (counts as dc here and throughout), work 11 dc in ring, join with sl st to top of beginning ch-3. (12 dc)

**Round 2:** Ch 3, dc in same st, 2 dc in each st around, join with sl st to top of beginning ch-3. (24 dc)

**Round 3:** Ch 3, dc in same st, [dc in next st, 2 dc in next st] rep around, join with sl st to top of beginning ch-3. (36 dc)

**Round 4:** Ch 3, dc in same st, [dc in next 2 sts, 2 dc in next st] rep around, join with sl st to top of beginning ch-3. (48 dc)

**Round 5:** Ch 3, dc in same st, [dc in next 3 sts, 2 dc in next st] rep around, join with sl st to top of beginning ch-3. (60 dc)

**Round 6:** Ch 3, dc in same st, [dc in next 4 sts, 2 dc in next st] rep around, join with sl st to top of beginning ch-3. (72 dc)

*Note: If using a foam ring, place it inside the work now.*

**Round 7:** Ch 3, dc in each st around, join with sl st to top of beginning ch-3. (72 dc)

**Round 8:** Ch 3, [pc in next st, dc in next 5 sts] rep around, ending pc in next st, dc in last 4 sts, join with sl st to top of beginning ch-3. (12 popcorns, 60 dc)

**Round 9:** Ch 3, dc in each st around, join with sl st to top of beginning ch-3. (72 dc)

**Round 10:** Ch 3, [dc in next 2 sts, pc in next st, dc in next 3 sts] rep around, join with sl st to top of beginning ch-3. (12 popcorns, 60 dc)

**Rounds 11-14:** Rep Rounds 7-10 once more for added texture.

**Round 15:** Ch 1, sc in each st around, join with sl st to first sc. (72 sc)

Fasten off. Weave in ends.

### HOLLY LEAVES (Make 12)

With Green:

**Row 1:** Ch 10, sc in 2nd ch from hook, hdc in next ch, dc in next 2 ch, hdc in next 2 ch, sc in next 2 ch, 3 sc in last ch (working around to other side of foundation ch), sc in next 2 ch, hdc in next 2 ch, dc in next 2 ch, hdc in next ch, sc in last ch. (22 sts)

Fasten off, leaving a long tail for sewing.

**Leaf Shaping (optional):** Using yarn needle and green yarn, take 1-2 stitches in several places along each side of leaf to create pointed "holly" indentations.

### BERRIES (Make 18)

With Red:

**Round 1:** Ch 2, 6 sc in 2nd ch from hook, do not join. (6 sc)

**Round 2:** 2 sc in each st around. (12 sc)

**Round 3:** Sc in each st around. (12 sc)

**Round 4:** [Sc2tog] 6 times. (6 sc)

Stuff lightly with fiberfill.

**Round 5:** [Sc2tog] 3 times. (3 sc)

Fasten off, leaving a long tail. Thread tail through remaining sts and pull tight to close. Weave in end inside berry.

### BOW

**Bow Loops (Make 2):**

With Red:

**Row 1:** Ch 16, sc in 2nd ch from hook and each ch across, turn. (15 sc)

**Rows 2-8:** Ch 1, sc in each st across, turn. (15 sc)

Fasten off after Row 8, leaving a long tail for sewing.

Fold piece in half widthwise and seam short ends together to form a loop.

**Bow Center:**

With Red:

**Row 1:** Ch 6, sc in 2nd ch from hook and each ch across, turn. (5 sc)

**Rows 2-4:** Ch 1, sc in each st across, turn. (5 sc)

Fasten off, leaving a long tail.

**Bow Tails (Make 2):**

With Red:

**Row 1:** Ch 13, sc in 2nd ch from hook and each ch across, turn. (12 sc)

**Rows 2-5:** Ch 1, sc in each st across, turn. (12 sc)

**Row 6:** Ch 1, sc2tog, sc in next 8 sts, sc2tog, turn. (10 sc)

**Row 7:** Ch 1, sc2tog, sc in next 6 sts, sc2tog, turn. (8 sc)

**Row 8:** Ch 1, sc2tog, sc in next 4 sts, sc2tog, turn. (6 sc)

Fasten off, weave in ends.

---

## ASSEMBLY

1. **Arrange Holly Leaves:** Position 12 holly leaves evenly around the wreath, overlapping slightly for fullness. Pin in place, then sew securely using green yarn and whipstitch.

2. **Attach Berries:** Arrange berries in clusters of 3 near the holly leaves. Sew securely using the yarn tails.

3. **Create Bow:**
   - Pinch the two bow loops in the center and stack them.
   - Wrap the bow center piece around the middle of the loops tightly and sew in place on the back.
   - Attach the two bow tails behind the bow, angled outward.

4. **Attach Bow to Wreath:** Sew bow to bottom or top of wreath as desired.

5. **Add Hanging Loop:** Using green or red yarn, create a loop at the back top of the wreath for hanging, or thread ribbon through the back stitches.

6. **Optional White Accents:** Using white or cream yarn, add small French knots randomly throughout the wreath for a "snowy" effect, or weave thin strands between the popcorn stitches.

## FINISHING

Weave in all remaining ends. Shape wreath as desired. Block lightly with steam if needed to flatten leaves and bow.

## CARE INSTRUCTIONS

Hand wash in cool water if needed. Lay flat to dry. Reshape while damp.

## DESIGN VARIATIONS

- **Color Options:** Try silver and blue for a winter wonderland theme, or white and gold for an elegant look.
- **Embellishments:** Add small jingle bells, ribbon roses, or miniature ornaments.
- **Size Adjustments:** For a larger wreath (15"), work 2 additional increase rounds at the beginning and add 12 more sts to all subsequent rounds (84 sts total).

---

*Pattern designed for intermediate crocheters. Finished project makes a wonderful handmade gift or festive home decoration.*
Disclaimer: This pattern was generated by AI and should be reviewed for accuracy before use. While we strive for quality, AI-generated content may contain errors. Please verify measurements, stitch counts, and instructions before beginning your project. Generated by purlJam.uk
Access your pattern anytime
Bookmark this page to access your pattern anytime