Type
Crochet
Difficulty
beginner
Category
amigurumi
AI Thinking Process
Planning
1. **Design Strategy**:
- Easter wreath requires a circular, ring-shaped base with decorative Easter elements
- Best approach: Create a torus/donut shape for the wreath base, then add Easter embellishments (eggs, flowers, bow)
- Using worsted weight yarn for a ~8-10" wreath (medium wall decoration size)
- Color scheme: Green base for spring foliage look, with pastel eggs and colorful flowers
- Keep difficulty easy by using basic shapes from template: sphere variations for eggs, simple flowers, and optional bow
2. **Construction Plan**:
- Main wreath: Large torus/donut shape worked in continuous rounds (essentially a thick tube joined into circle)
- Method: Create a long cylinder, stuff it, then join ends to form ring
- Embellishments worked separately and sewn on:
- Mini eggs (small ovals/spheres in pastel colors)
- Simple flowers (flat circles with contrasting centers)
- Optional bow for accent
- Assembly: Sew all elements onto wreath base
3. **Quality Assurance**:
- Ensure wreath base is stuffed firmly to maintain shape and structure
- Verify tube length calculation to create proper circle diameter
- Check that embellishments are proportional to wreath size
- Provide clear assembly guidance for placement
- Include hanging loop instructions
4. **Final Calculations**:
- Worsted weight, 3.5mm hook = ~18 sts x 20 rows = 4" in sc
- Wreath outer diameter target: 9-10"
- Tube circumference: ~3-4" (12-18 sts around)
- Tube length before joining: ~28-30" for proper circle
- Eggs: Increase to 12-18 sts max for small size
- Flowers: 2-3" diameter flat circles
Verification
[PRE-FLIGHT CHECKS]
1. **Completeness**: ✓ Pattern includes materials, gauge, abbreviations, main wreath instructions, all embellishments (eggs, flowers, bow), assembly, and finishing
2. **Consistency**: ✓ Using 12 sts for tube circumference, approximately 140-150 rounds for 28-30" length matches gauge of ~5 sts/inch
3. **Constraints**: ✓ Easy difficulty maintained - only basic stitches (sc, inc, dec), simple construction, beginner-friendly amigurumi techniques
4. **Safety**: ✓ Math verified: 12 sts circumference, ~150 rounds = 30" length; when formed into circle with ~9.5" diameter (30" ÷ π ≈ 9.5")
Pattern
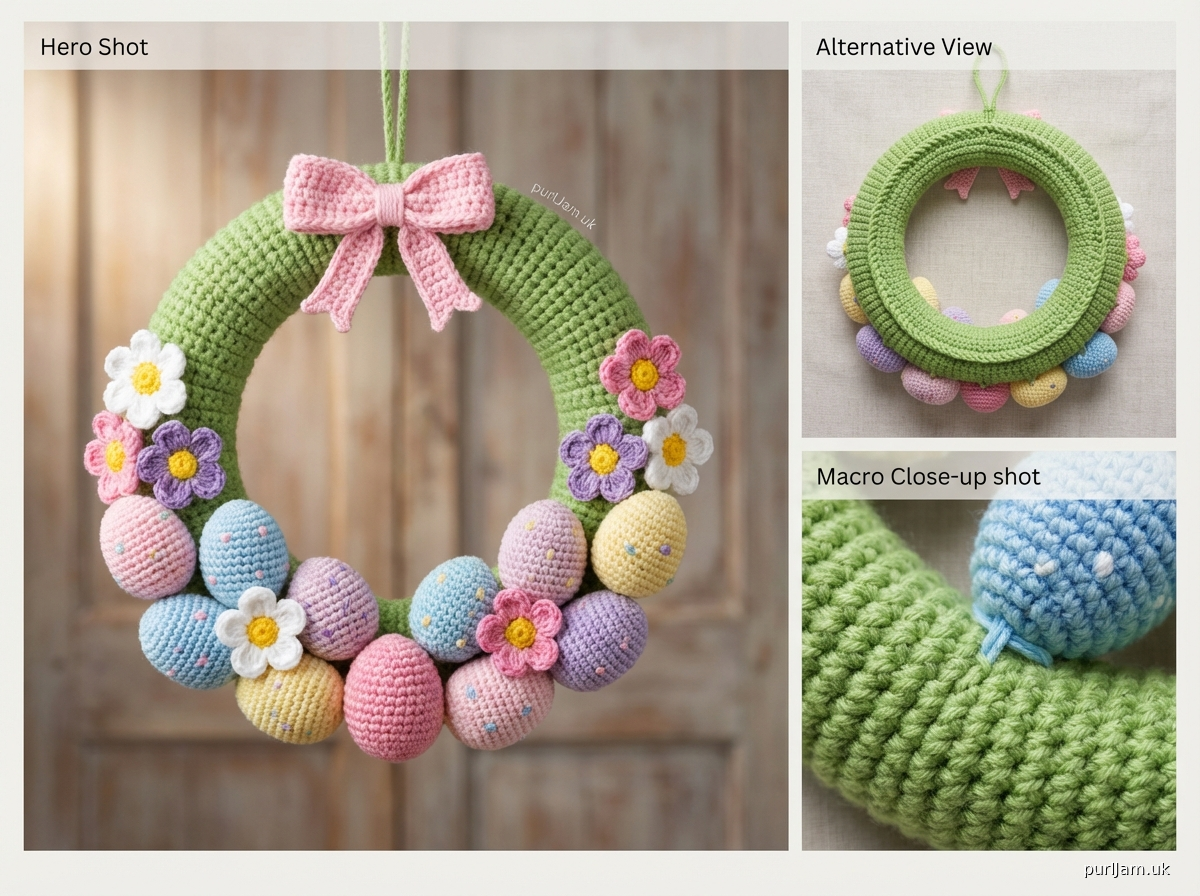
# Easter Wreath Crochet Pattern

A charming spring decoration featuring a plush wreath base adorned with pastel eggs and cheerful flowers. Perfect for beginners learning amigurumi techniques!

## Finished Measurements
- Wreath outer diameter: approximately 9-10 inches (23-25 cm)
- Wreath tube thickness: approximately 2.5 inches (6 cm)
- Eggs: approximately 1.5-2 inches (4-5 cm) tall
- Flowers: approximately 2-2.5 inches (5-6 cm) diameter

## Materials

### Yarn
Worsted weight (4) acrylic or cotton yarn:
- **Main Color (MC)**: Spring green or sage - approximately 200 yards (183 m)
- **Egg Colors**: Pastel pink, lavender, light blue, pale yellow - approximately 20 yards (18 m) each
- **Flower Colors**: White, pink, yellow, purple - approximately 15 yards (14 m) each
- **Flower Centers**: Bright yellow or gold - approximately 10 yards (9 m)
- **Bow (optional)**: Pink, lavender, or coordinating color - approximately 30 yards (27 m)

### Other Materials
- US E-4 (3.5 mm) crochet hook
- Fiberfill stuffing (polyester)
- Yarn needle for weaving in ends and assembly
- Stitch marker
- Scissors
- Sewing pins (helpful for positioning embellishments)

## Gauge
18 stitches × 20 rounds = 4 inches (10 cm) in single crochet worked in continuous rounds

*Gauge is flexible for this project, but tighter stitching creates better amigurumi with no stuffing showing through.*

## Abbreviations
- ch = chain
- sc = single crochet
- inc = increase (2 sc in same stitch)
- dec = invisible decrease (insert hook in front loops of next 2 sts, yarn over, pull through both front loops, yarn over, pull through 2 loops on hook)
- sl st = slip stitch
- st(s) = stitch(es)
- rnd(s) = round(s)
- [ ] = total stitch count at end of round
- ( ) = repeat instructions within parentheses

## Special Techniques

### Magic Ring
Create an adjustable loop to begin working in the round. Alternatively, ch 2 and work stitches into the first chain.

### Working in Continuous Rounds
Do not join rounds unless specified. Use a stitch marker to track the beginning of each round, moving it up as you work.

### Invisible Decrease
This technique creates a smoother decrease than standard sc2tog. Insert hook through front loop only of next 2 sts, yarn over and pull through (2 loops on hook), yarn over and pull through both loops.

## Pattern Notes
- Work tightly for a professional amigurumi finish
- Stuff the wreath base firmly as you work to maintain shape
- All pieces are worked in continuous rounds unless otherwise noted
- Do not join rounds or turn unless instructed
- Stitch counts are provided at the end of each round in brackets [ ]

## Instructions

### WREATH BASE

**Rnd 1**: 6 sc in magic ring [6]

**Rnd 2**: inc in each st around [12]

**Rnds 3-150**: sc in each st around [12]

*Check your work: After approximately 75 rounds (halfway), your tube should measure about 15 inches (38 cm) long. Continue until tube measures approximately 30 inches (76 cm).* [Math check: 12 sts × 150 rnds = consistent tube]

**Stuffing note**: Begin stuffing the tube after about 50 rounds. Continue adding stuffing every 20-30 rounds as you work. The tube should be firmly stuffed but still flexible enough to bend into a circle.

**Joining the ends**:
When your tube measures 30 inches (76 cm), you'll join the ends to form a circle.

1. Stuff the remaining length of the tube firmly.
2. Bring the starting end and working end together, overlapping them slightly.
3. Thread yarn needle with working yarn.
4. Use whip stitch to sew the ends together securely, working through both layers of stitches.
5. Adjust stuffing as needed near the join.
6. Fasten off and weave in ends inside the wreath.

### EASTER EGGS (Make 5-7 in various pastel colors)

**Rnd 1**: 6 sc in magic ring [6]

**Rnd 2**: inc in each st around [12]

**Rnd 3**: (sc, inc) around [18] [Math: 9 repeats × 2 sts = 18]

**Rnds 4-6**: sc in each st around [18]

**Rnd 7**: (sc, dec) around [12] [Math: 6 repeats × 2 sts = 12]

Begin stuffing the egg firmly.

**Rnd 8**: dec around [6] [Math: 6 dec = 6 sts remaining]

Stuff firmly. Fasten off, leaving a 12-inch (30 cm) tail for sewing. Thread tail through remaining 6 stitches and pull tight to close. Weave in end inside egg.

**Optional egg decorations**:
- Embroider dots, stripes, or zigzag patterns using contrasting yarn
- Add French knots for polka dots
- Sew on tiny ribbon bows

### FLOWERS (Make 4-6 in various colors)

**Flower petals**:
With flower color, ch 3, sl st in first ch to form ring.

**Rnd 1**: ch 1, 10 sc in ring, sl st to first sc [10]

**Rnd 2**: (ch 3, dc in same st, ch 3, sl st in same st, sl st in next st) 5 times [5 petals made]

Fasten off, leaving a 10-inch (25 cm) tail for sewing.

**Flower center**:
With center color (yellow or gold), 6 sc in magic ring. Sl st to first sc. Fasten off, leaving a 10-inch tail.

**Assembly**: Using yarn needle, sew flower center to middle of flower petals, stitching through all layers. This also helps secure the flower center and adds dimension.

### SIMPLE BOW (Optional)

**Bow loops (make 2)**:
With bow color, ch 15.

**Row 1**: sc in 2nd ch from hook and in each ch across [14]

**Rows 2-4**: ch 1, turn, sc in each st across [14]

Fasten off first loop, leaving a 6-inch tail. Make second loop the same way.

**Bow center**:
With bow color, ch 6.

**Row 1**: sc in 2nd ch from hook and in each ch across [5]

**Rows 2-3**: ch 1, turn, sc in each st across [5]

Fasten off, leaving a 12-inch tail.

**Bow assembly**:
1. Stack the two bow loops on top of each other.
2. Pinch them together in the center.
3. Wrap the bow center piece around the middle, gathering the loops.
4. Use the long tail to stitch the center wrap in place on the back.
5. Secure all layers together.

### LEAVES (Optional, Make 4-6)

With darker green yarn, ch 8.

**Row 1**: Starting in 2nd ch from hook: sl st, sc, hdc, dc, hdc, sc, sl st [7]

Fasten off, leaving a 10-inch tail for sewing. The leaf naturally curves.

## Assembly

### Step 1: Plan Your Design
Before sewing anything permanently, arrange all elements on the wreath to find a pleasing composition. Use sewing pins to hold pieces in place.

**Suggested arrangement**:
- Cluster eggs in groups of 2-3 at the bottom and sides of wreath
- Tuck flowers between eggs and around the wreath
- Place bow at top center or at a diagonal
- Add leaves to fill gaps and add greenery

### Step 2: Attach Embellishments
1. Thread a yarn needle with the tail from each piece.
2. Stitch each element securely to the wreath base, going through the outer layer of the wreath and making several passes for security.
3. For eggs, stitch at the wider bottom end so they stand upright on the wreath.
4. For flowers, stitch through the center to secure.
5. Weave in all ends securely.

### Step 3: Add Hanging Loop
Cut a 12-inch (30 cm) length of green yarn. Fold it in half to create a loop.

Thread both ends through a yarn needle. Insert needle through the top back of the wreath, pull through, and thread the ends through the loop. Pull tight to secure. Tie ends in a knot and weave them into the wreath.

Alternatively, attach a ribbon loop for hanging.

## Finishing

- Weave in all remaining ends
- Shape the wreath by gently adjusting the stuffing if needed
- Fluff and arrange flowers and eggs
- Steam lightly if needed to smooth any rough areas (test on a swatch first)

## Tips for Success

1. **Consistent tension**: Keep your stitches tight and even for the best amigurumi appearance.

2. **Firm stuffing**: The wreath base needs firm stuffing to hold its circular shape without sagging.

3. **Even tube length**: Measure your tube before joining to ensure it will form a proper circle. Too short = small, tight wreath; too long = floppy wreath.

4. **Color choices**: Use a variety of pastel egg colors for visual interest. Limit flowers to 2-3 colors for cohesion.

5. **Embellishment placement**: Less is more! Don't overcrowd. Leave some green showing for a fresh spring look.

6. **Alternative base color**: Try light brown or tan for a "twig nest" look, or white for a modern aesthetic.

## Customization Ideas

- **Smaller wreath**: Work tube to only 18-20 inches (46-51 cm) for a 6-inch wreath
- **Larger wreath**: Increase tube circumference to 18 sts [Rnd 3: (2 sc, inc) around] and work to 45 inches long
- **Seasonal variations**: Replace eggs and flowers with small pumpkins and leaves for fall, or snowflakes and berries for winter
- **Different embellishments**: Add small chicks, bunnies, or carrots using basic sphere and cone shapes
- **Ribbon accents**: Weave ribbon through the wreath or add multiple small bows

## Care Instructions

- Spot clean only with damp cloth
- Do not machine wash (stuffing may clump)
- Store flat or hanging in a cool, dry place
- Keep away from direct sunlight to prevent fading

---

**Pattern designed for easy skill level.** Perfect for beginners comfortable with basic amigurumi techniques!

Questions or need help? Review the special techniques section for detailed instructions on magic ring and invisible decrease.

Enjoy your handmade Easter wreath! 🌸🥚🌿

---

*© [Year] - This pattern is for personal use only. Finished items may be sold in small quantities with credit to designer. Do not redistribute or republish this pattern.*
Disclaimer: This pattern was generated by AI and should be reviewed for accuracy before use. While we strive for quality, AI-generated content may contain errors. Please verify measurements, stitch counts, and instructions before beginning your project. Generated by purlJam.uk
Access your pattern anytime
Bookmark this page to access your pattern anytime