Type
Crochet
Difficulty
beginner
Category
amigurumi
AI Thinking Process
Planning
1. **Design Strategy**: Creating a beginner-friendly Easter Brontosaurus using simple amigurumi shapes. The brontosaurus (long-necked dinosaur) can be broken down into: oval body, long cylinder neck, small sphere head, four cylinder legs, and tapering tail. Easter theme allows for pastel colors and decorative options. Will emphasize color customization throughout pattern and provide multiple Easter-themed variations.
2. **Construction Plan**: Each piece worked separately in continuous rounds, then assembled. Body is largest piece (oval base), neck attached at front, head at top of neck, legs underneath body, tail at back. This modular approach is beginner-friendly and allows for color changes between pieces. Will use worsted weight yarn with 3.5mm hook for a toy approximately 8-10" long including neck and tail.
3. **Quality Assurance**:
- Clear stitch counts in every round to prevent counting errors
- Stuffing reminders at appropriate points
- Assembly guidance with placement tips
- Color change instructions for striped/spotted variations
- Safety eye placement before closing pieces
- Emphasis on firm stuffing for stability of long neck
4. **Final Calculations**:
- Body: Oval increasing to 30 sts for stable base
- Neck: 12 st cylinder x 15-18 rounds for proper proportion
- Head: Small sphere increasing to 18 sts
- Legs: 9 st cylinders x 6-8 rounds each
- Tail: Tapering cone from 12 sts down to point
- Total height ~6-7", length with neck/tail ~9-10"
Verification
[PRE-FLIGHT CHECKS]
1. **Completeness**: Pattern includes materials, gauge, abbreviations, all body parts (body, neck, head, legs x4, tail), assembly instructions, and extensive customization section for Easter theme with multiple color ideas
2. **Consistency**: Body oval math: starts 6, increases to 30 over 5 rounds (6→12→18→24→30), maintains 30 for height, decreases symmetrically. Neck maintains 12 sts. Head increases to 18 (6→12→18). All counts verified.
3. **Constraints**: Beginner level maintained (only sc, inc, dec), Easter theme emphasized with pastel colors, extensive customization section included, worsted weight specified
4. **Safety**: All increase/decrease math checked. Round counts provide appropriate proportions. Assembly order logical. Stuffing reminders placed before closing pieces.
Pattern
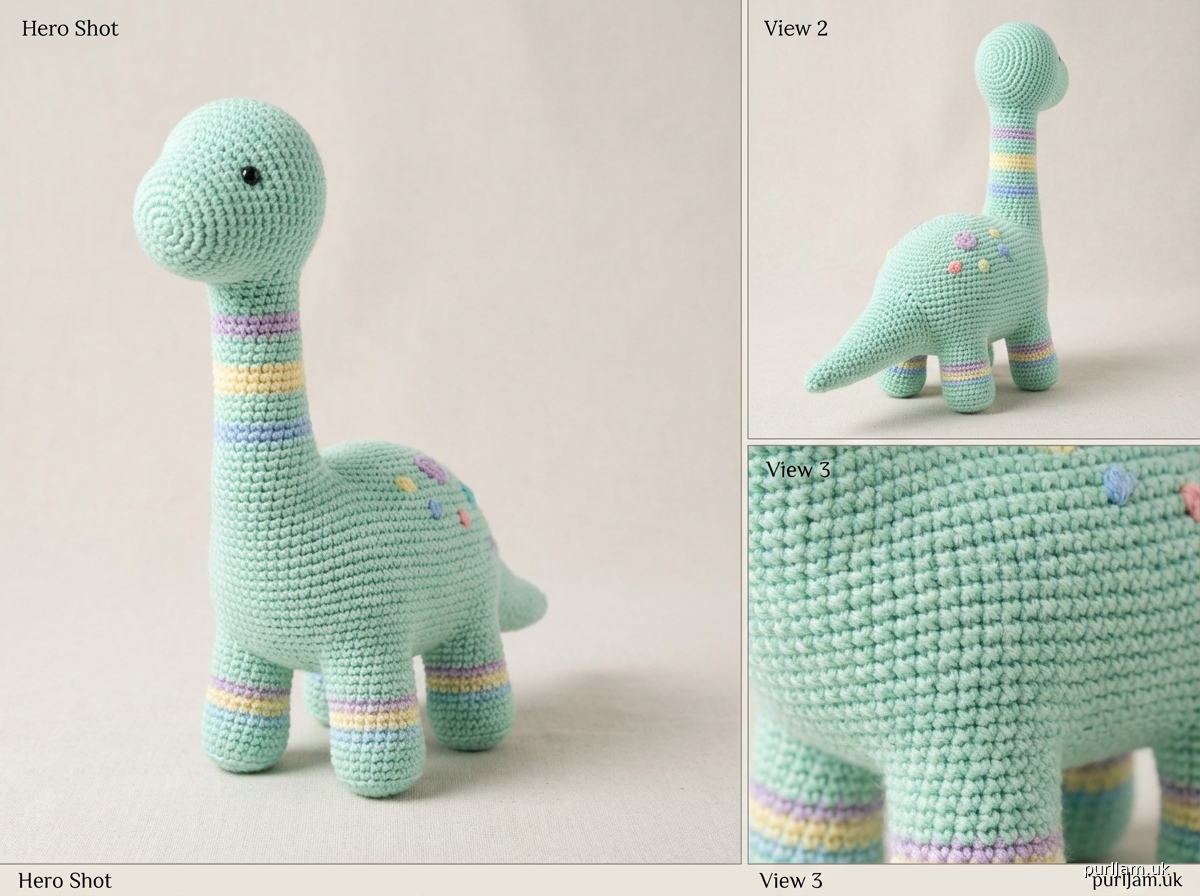
<pattern>
# Easter Brontosaurus Crochet Pattern

**A cheerful long-necked dinosaur perfect for Easter baskets!**

## Design Notes
This adorable brontosaurus is made with simple shapes that are easy for beginners to master. The modular construction lets you customize every piece with different colors, stripes, or spots. Perfect for Easter with pastel colors, or make a classic green dinosaur year-round!

**Finished Size**: Approximately 6-7" tall (including neck), 9-10" long from nose to tail tip

**Difficulty**: Beginner (uses only single crochet, increases, and decreases)

---

## Materials

### Yarn
**Worsted weight (4) acrylic or cotton yarn**

**Main Color Options:**
- Pastel pink, lavender, mint green, baby blue, soft yellow, or peach (50-60 yards)
- Traditional dinosaur green (50-60 yards)

**Contrast Colors (optional, 10-20 yards each):**
- White or cream for belly/accents
- Multiple pastels for stripes or spots
- Bright colors for Easter egg spots

**Specific Yarn Suggestions:**
- Red Heart Super Saver
- Caron Simply Soft
- Lion Brand Vanna's Choice
- Bernat Premium

### Other Supplies
- **Crochet Hook**: US E-4 (3.5mm) or size needed for gauge
- **Safety Eyes**: 9mm or 10mm black (2)
- **Fiberfill Stuffing**: Polyester, about 2 oz
- **Yarn Needle**: For sewing and weaving ends
- **Stitch Marker**: To track beginning of rounds
- **Scissors**
- **Pins**: For positioning pieces before sewing (optional but helpful)

### Optional Embellishments
- Embroidery floss for smile
- Small felt flowers or Easter eggs to glue on
- Ribbon bow for neck
- Fabric paint for spots (instead of embroidered)

---

## Gauge
16 sts × 18 rounds = 4" in single crochet (worked in continuous rounds)

*Gauge is not critical for this project, but affects finished size. Tighter gauge = firmer toy.*

---

## Abbreviations
- **ch**: chain
- **sc**: single crochet
- **inc**: increase (2 sc in same stitch)
- **dec**: invisible decrease (insert hook in front loops of next 2 sts, yarn over, pull through both loops, yarn over, pull through 2 loops on hook)
- **st(s)**: stitch(es)
- **rnd(s)**: round(s)
- **BLO**: back loop only
- **FLO**: front loop only
- **[ ]**: total stitch count at end of round
- **( )**: repeat instructions within parentheses

---

## Special Techniques

### Magic Ring
Wrap yarn around fingers twice, insert hook under first loop, pull up yarn from working end, chain 1, work stitches over both loops. Pull starting tail to close ring tightly.

*Alternative*: Ch 2, work stitches into first chain.

### Invisible Decrease
Insert hook in front loop only of next stitch, insert hook in front loop only of following stitch (3 loops on hook), yarn over and pull through 2 loops, yarn over and pull through remaining 2 loops. This creates a smoother decrease than sc2tog.

### Working in Continuous Rounds
Do not join rounds with slip stitch. Use stitch marker to mark first stitch of round and move marker up as you work. Creates seamless spiral.

### Color Changes
Complete last stitch of old color until 2 loops remain on hook. Yarn over with new color and pull through both loops. Continue with new color. Carry unused color inside piece or cut and rejoin.

---

## Pattern Instructions

### BODY (make 1)

The body is an oval shape worked from the center outward, then increased at the sides for dimension.

**Rnd 1**: 6 sc in magic ring [6]

**Rnd 2**: inc in each st around [12]
*Count: 6 increases = 12 sts total ✓*

**Rnd 3**: (sc, inc) around [18]
*Count: 6 increases + 6 sc = 18 sts total ✓*

**Rnd 4**: (2 sc, inc) around [24]
*Count: 6 increases + 12 sc = 24 sts total ✓*

**Rnd 5**: (3 sc, inc) around [30]
*Count: 6 increases + 18 sc = 30 sts total ✓*

**Rnds 6-13**: sc around [30]
*8 rounds of even single crochet to create body height*

**Rnd 14**: (3 sc, dec) around [24]
*Count: 6 decreases + 18 sc = 24 sts total ✓*

**Begin stuffing firmly. Continue stuffing as you work remaining rounds.**

**Rnd 15**: (2 sc, dec) around [18]
*Count: 6 decreases + 12 sc = 18 sts total ✓*

**Rnd 16**: (sc, dec) around [12]
*Count: 6 decreases + 6 sc = 12 sts total ✓*

**Stuff very firmly to maintain egg shape.**

**Rnd 17**: dec around [6]
*Count: 6 decreases = 6 sts total ✓*

Fasten off, leaving 8" tail. Thread tail through remaining 6 sts and pull tight to close. Weave in end securely. Set aside.

---

### NECK (make 1)

The neck is a long cylinder that gives the brontosaurus its distinctive silhouette.

**Rnd 1**: 6 sc in magic ring [6]

**Rnd 2**: inc in each st around [12]
*Count: 6 increases = 12 sts total ✓*

**Rnds 3-18**: sc around [12]
*16 rounds creates approximately 3.5" neck length*

**For shorter neck**: Work rounds 3-14 (12 rounds = 2.75" length)
**For longer neck**: Work rounds 3-22 (20 rounds = 4.5" length)

**Do not fasten off.** Begin stuffing neck firmly from bottom up (use eraser end of pencil or chopstick to push stuffing up). Continue to Head.

---

### HEAD (make 1)

The head continues directly from the neck opening.

**Rnd 19**: (sc, inc) around [18]
*Count: continuing from neck, 6 increases + 6 sc = 18 sts total ✓*

**Rnds 20-23**: sc around [18]
*4 rounds of even single crochet*

**Insert safety eyes between rounds 21 and 22, about 4-5 sts apart.**

**Rnd 24**: (sc, dec) around [12]
*Count: 6 decreases + 6 sc = 12 sts total ✓*

**Stuff head firmly.**

**Rnd 25**: dec around [6]
*Count: 6 decreases = 6 sts total ✓*

Fasten off, leaving 6" tail. Thread tail through remaining 6 sts and pull tight to close. Weave in end. The head and neck are now one complete piece.

---

### LEGS (make 4)

**Rnd 1**: 6 sc in magic ring [6]

**Rnd 2**: inc in each st around [12]
*Count: 6 increases = 12 sts total ✓*

**Rnd 3**: sc around [12]

**Rnd 4**: (2 sc, dec) around [9]
*Count: 3 decreases + 6 sc = 9 sts total ✓*

**Rnds 5-10**: sc around [9]
*6 rounds creates approximately 1.5" leg length*

**Stuff leg firmly (especially foot area).** Leave neck of leg lightly stuffed for easier attachment.

Fasten off, leaving 12" tail for sewing. Flatten opening slightly. Make 3 more legs.

---

### TAIL (make 1)

The tail tapers to a point.

**Rnd 1**: 6 sc in magic ring [6]

**Rnd 2**: inc in each st around [12]
*Count: 6 increases = 12 sts total ✓*

**Rnds 3-4**: sc around [12]

**Rnd 5**: (2 sc, dec) around [9]
*Count: 3 decreases + 6 sc = 9 sts total ✓*

**Rnds 6-7**: sc around [9]

**Begin stuffing tail firmly.**

**Rnd 8**: (sc, dec) around [6]
*Count: 3 decreases + 3 sc = 6 sts total ✓*

**Rnds 9-11**: sc around [6]
*Tail narrows to point*

**Add small amount of stuffing to maintain shape.**

**Rnd 12**: dec around [3]
*Count: 3 decreases = 3 sts total ✓*

Fasten off, leaving 10" tail. Thread through remaining 3 sts and pull tight. Leave tail for sewing. Set aside.

---

## Assembly

**Assembly order matters for best results!**

### Step 1: Attach Neck to Body
- Position neck/head piece at front-center of body (where you want the chest to be)
- The neck opening should sit against the body at approximately round 4-5 from top of body
- Pin in place
- Using yarn needle and long tail from neck, whipstitch around entire neck opening to body, going through both layers
- Stitch around twice for security
- Weave in end

### Step 2: Attach Legs to Body
- Position legs on underside of body
- **Front legs**: Place about 3-4 rounds back from where neck attaches, approximately 6-8 sts apart
- **Back legs**: Place about 3-4 rounds forward from back end of body, approximately 6-8 sts apart
- Legs should be oriented so body is tilted slightly upward (head higher than tail)
- Pin all 4 legs in place and check balance before sewing
- Using long tails and yarn needle, whipstitch each leg opening to body
- Stitch securely in multiple directions for stability
- Weave in ends

### Step 3: Attach Tail to Body
- Position tail at back-center of body, pointing slightly downward
- Pin in place
- Using long tail and yarn needle, whipstitch tail opening to body
- Stitch securely all around opening
- Weave in end

### Step 4: Add Facial Features
- Safety eyes should already be installed
- **Optional smile**: Using 3 strands of embroidery floss or yarn, embroider small smile below and between eyes using backstitch or straight stitches
- **Optional nostrils**: Make 2 small horizontal stitches near end of snout

### Step 5: Final Check
- Ensure all ends are woven in securely
- Check that brontosaurus stands balanced on all 4 legs
- Add more stuffing if any pieces feel soft (use yarn needle to work small amounts through assembly seams)

---

## Easter Customization Ideas

### Color Schemes

**Pastel Rainbow Brontosaurus**
- Body: Soft pink
- Neck/Head: Lavender
- Legs: Mint green
- Tail: Baby blue
- Creates a magical Easter look!

**Easter Egg Dinosaur**
- Body: Pastel yellow
- Add colorful spots using surface crochet or embroidered French knots in pink, blue, green, and purple
- White legs and tail

**Spring Garden**
- Body: Mint green
- Neck: Soft peach
- Add small felt flowers glued along back and neck

**Bunny-Saur Hybrid**
- Make in soft pink or white
- Add small bunny ears to head (make 2 small ovals, attach to top of head)
- Add cotton ball tail instead of regular tail
- Perfect for Easter!

**Classic Pastel**
- Entire dinosaur in one pastel color (lavender, pink, mint, or blue)
- Simple and elegant
- Add satin ribbon bow around neck

### Pattern Variations

**Striped Brontosaurus**
Change colors every 2 rounds on body and neck:
- Work 2 rounds color A
- Work 2 rounds color B
- Repeat pattern
- Carry yarn up inside or cut and rejoin for cleaner look

**Spotted Pattern**
After completing dinosaur:
- Use contrasting yarn and yarn needle
- Embroider circles of chain stitch or surface slip stitch
- Make 8-12 spots of varying sizes across body, neck, and head
- Great for using up scrap yarn!

**Textured Belly**
- Work body rounds 1-5 in main color
- Switch to white/cream for rounds 6-13 worked in BLO (creates ridges)
- Switch back to main color for rounds 14-17
- Creates distinct belly marking

**Glitter/Sparkle Version**
- Use yarn with metallic thread or sparkle
- Try Caron Simply Soft Party or Red Heart Shimmer
- Perfect for special Easter display

### Embellishment Ideas

**Easter Egg Spots**
- Cut small egg shapes from felt
- Add tiny details with fabric paint or embroidery
- Glue to body and neck with fabric glue
- Can also crochet tiny egg shapes (magic ring 6 sc, inc around, 2 rounds even, dec around, stuff slightly, close)

**Flower Crown**
- Make tiny chain-loop flowers
- Attach around base of neck or on top of head
- Use bright spring colors

**Bow Tie or Ribbon**
- Tie grosgrain ribbon around neck (narrow, 1/4" width)
- Make tiny crocheted bow tie (chain rectangle, cinch in middle)
- Hot glue to front of neck

**Basket Buddy**
Disclaimer: This pattern was generated by AI and should be reviewed for accuracy before use. While we strive for quality, AI-generated content may contain errors. Please verify measurements, stitch counts, and instructions before beginning your project. Generated by purlJam.uk
Access your pattern anytime
Bookmark this page to access your pattern anytime