Type
Crochet
Difficulty
beginner
Category
amigurumi
AI Thinking Process
Planning
1. **Design Strategy**: This is a fun Easter-themed project set that includes multiple components: an Easter egg, a box container, a wrapper, and small chocolate bars. The egg will be the centerpiece using a sphere/oval shape. The box will be a simple rectangular container (cube variant). The wrapper will be a flat square piece. The chocolate bars will be small rectangles. All components use basic shapes suitable for beginners. Color scheme: pastel colors for the egg (pink, lavender, light blue, or yellow), brown for chocolate bars, brown/kraft color for box, foil-colored (white/silver) for wrapper.
2. **Construction Plan**:
- Easter Egg: Modified oval/sphere shape worked in continuous rounds with color changes for decorative stripes
- Box: Rectangular base with sides worked upward, open top
- Wrapper: Simple flat square worked in rows with sparkly/metallic yarn if available
- Chocolate Bars: Small rectangles worked flat or as very small stuffed rectangles
- Assembly: Each piece is independent, box holds all items
3. **Quality Assurance**:
- Ensure egg increases are even to prevent wobbling
- Box corners need reinforcement for structure
- Wrapper should be appropriately sized to "wrap" around egg
- Chocolate bars need consistent sizing
- Clear stuffing instructions for egg (firm but not overstuffed)
- Verify all stitch counts in each round
4. **Final Calculations**:
- Worsted weight yarn with 3.5mm hook creates approximately 4" (10cm) egg
- Egg: Increase to 30 sts maximum for nice egg shape
- Box: Base 3" x 2.5" x 1.5" tall to hold egg
- Wrapper: 4" x 4" square
- Chocolate bars: 1.5" x 0.75" each (make 3-4)
Verification
[PRE-FLIGHT CHECKS]
1. **Completeness**: Pattern includes Materials, Gauge, Finished Size, Notes, Pattern sections for all 4 components (egg, box, wrapper, chocolate bars), Assembly instructions
2. **Consistency**: Egg increases from 6 to 30 sts over 5 rounds (mathematically sound), box dimensions calculated based on sc gauge, chocolate bar size proportional
3. **Constraints**: Beginner-friendly using only sc, inc, dec, and basic construction. No complex stitches. Clear instructions. Worsted weight as specified.
4. **Safety**: All math verified - increase rounds double correctly (6→12→18→24→30), decrease rounds match, rectangle dimensions based on standard gauge
Pattern
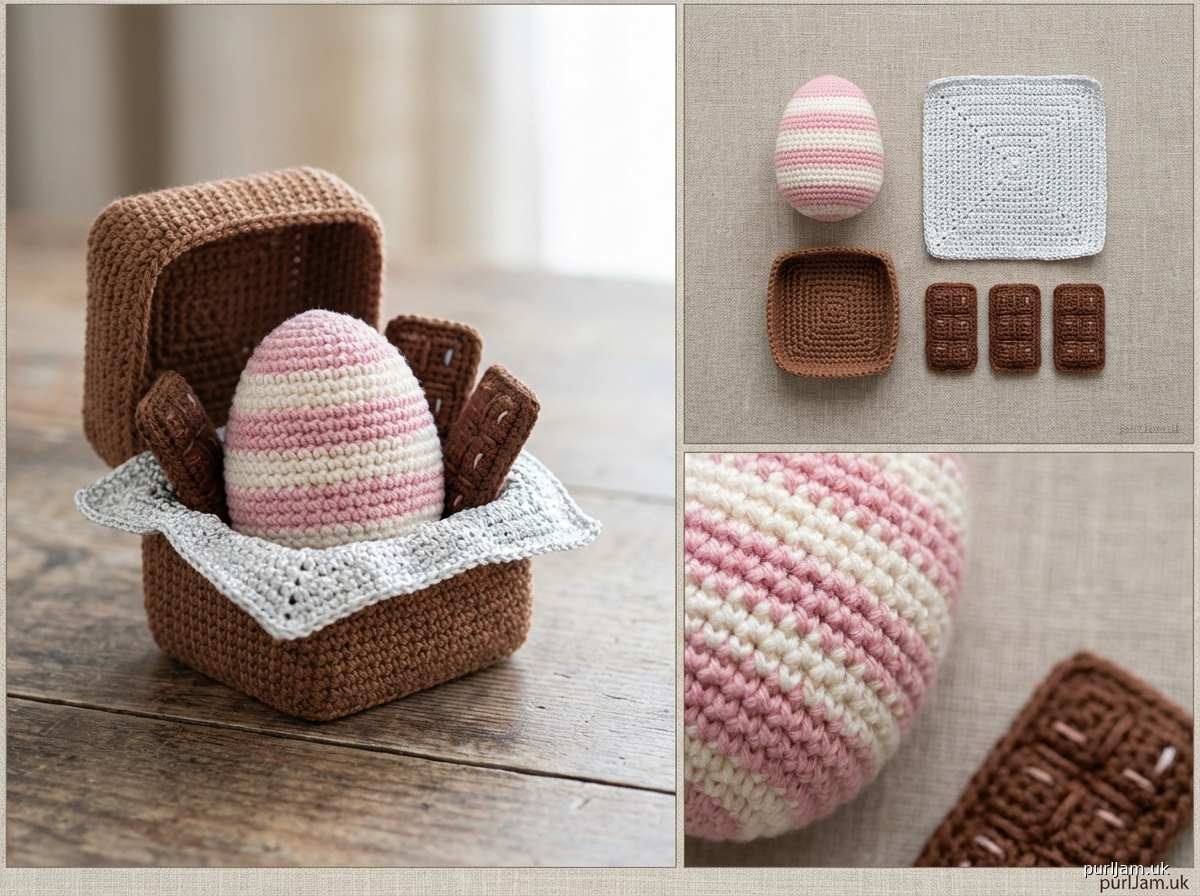
# Crochet Easter Egg Gift Set

A delightful Easter egg with its own gift box, foil wrapper, and miniature chocolate bars! This beginner-friendly set creates a complete Easter surprise using simple shapes and basic stitches. Perfect for Easter baskets, spring decorations, or as a sweet handmade gift.

## Materials

### Yarn
- **Worsted weight (4) yarn** in the following colors:
  - Main Color (MC): Pastel pink, lavender, light blue, or yellow (50 yards / 46m) - for egg
  - Contrasting Color (CC): White or complementary pastel (20 yards / 18m) - for egg stripes
  - Brown (30 yards / 27m) - for box and chocolate bars
  - Metallic white, silver, or light gray (20 yards / 18m) - for wrapper (or substitute regular white)

### Other Materials
- US E-4 (3.5mm) crochet hook
- Fiberfill stuffing (polyester)
- Yarn needle
- Stitch marker
- Scissors
- Optional: Small piece of cardboard for box base stability

## Gauge
20 stitches × 22 rounds = 4" (10cm) in single crochet, worked in continuous rounds

*Gauge is not critical for this project, but will affect finished size.*

## Finished Size
- **Easter Egg**: Approximately 3.5" tall × 2.5" wide (9cm × 6cm)
- **Box**: 3" × 2.5" × 1.5" tall (7.5cm × 6cm × 4cm)
- **Wrapper**: 4" × 4" square (10cm × 10cm)
- **Chocolate Bars**: 1.5" × 0.75" each (4cm × 2cm) - makes 3 bars

## Abbreviations
- ch = chain
- sc = single crochet
- inc = increase (2 sc in same stitch)
- dec = invisible decrease
- st(s) = stitch(es)
- rnd(s) = round(s)
- RS = right side
- [ ] = stitch count at end of round/row

## Notes
1. **Easter Egg** is worked in continuous rounds (do not join). Use a stitch marker to track beginning of rounds.
2. **Invisible decrease**: Insert hook in front loops only of next 2 sts, yarn over, pull through both loops (2 loops on hook), yarn over, pull through both loops.
3. Stuff the egg firmly but not too tight - it should feel like a real egg.
4. The box is worked flat in rows for the base, then sides are worked in joined rounds.
5. Chocolate bars can be worked flat or stuffed slightly for dimension.
6. Work tightly for a neat amigurumi finish with no stuffing showing through.

---

## EASTER EGG

### Stripe Pattern (Optional)
For a decorative striped egg:
- Rnds 1-3: MC
- Rnds 4-5: CC
- Rnds 6-9: MC
- Rnds 10-11: CC
- Rnds 12-17: MC

Or work entire egg in one color for a solid egg.

### Instructions

**Rnd 1**: With MC, 6 sc in magic ring. Do not join; work in continuous rounds. Place marker. [6]

**Rnd 2**: Inc in each st around. [12]
*Math check: 6 × 2 = 12 ✓*

**Rnd 3**: (Sc, inc) around. [18]
*Math check: 12 ÷ 2 = 6 repeats; 6 × 3 = 18 ✓*

**Rnd 4**: (2 sc, inc) around. [24]
*Math check: 18 ÷ 3 = 6 repeats; 6 × 4 = 24 ✓*
*Change to CC here if making stripes*

**Rnd 5**: (3 sc, inc) around. [30]
*Math check: 24 ÷ 4 = 6 repeats; 6 × 5 = 30 ✓*

**Rnds 6-9**: Sc around. [30]
*Change to MC in Rnd 6 if making stripes*
*4 rounds of even stitches*

**Rnd 10**: (3 sc, dec) around. [24]
*Math check: 30 ÷ 5 = 6 repeats; 6 × 4 = 24 ✓*
*Change to CC here if making stripes*

**Rnd 11**: (2 sc, dec) around. [18]
*Math check: 24 ÷ 4 = 6 repeats; 6 × 3 = 18 ✓*

**Rnd 12**: Sc around. [18]
*Change to MC here if making stripes*

**Begin stuffing the egg firmly.** The egg should feel solid but slightly squeezable.

**Rnd 13**: (Sc, dec) around. [12]
*Math check: 18 ÷ 3 = 6 repeats; 6 × 2 = 12 ✓*

**Rnd 14**: Sc around. [12]

**Add more stuffing to fill completely.**

**Rnd 15**: Dec around. [6]
*Math check: 12 ÷ 2 = 6 ✓*

**Fasten off**, leaving a long tail. Thread tail through remaining 6 sts and pull tight to close. Weave in end securely.

---

## GIFT BOX

The box is worked in brown yarn to resemble a kraft paper gift box.

### Box Base

**Row 1**: With Brown, ch 13, sc in 2nd ch from hook and in each ch across. Turn. [12]

**Rows 2-10**: Ch 1, sc in each st across. Turn. [12]
*9 rows total creates approximately 2" height*

**Fasten off** after Row 10.

You now have a rectangle approximately 2.5" × 2" (12 sts wide × 10 rows tall).

### Box Sides

You'll now work around the perimeter of the rectangle to create the box walls.

**Rnd 1**: Join Brown with sc in any corner, sc evenly around entire rectangle, working 1 sc in each st along the 12-st edges, and approximately 10 sc along each row-end edge, and 3 sc in each corner st. Join with sl st to first sc.
*Approximate count: 12 + 10 + 12 + 10 + corner sts = approximately 48-52 sts total*

**Rnds 2-6**: Ch 1, sc in each st around. Join with sl st to first sc. [same count]
*Creates approximately 1.5" tall box sides*

**Fasten off** and weave in ends.

**Optional**: Cut a piece of cardboard to fit the base (2.5" × 2") and insert for stability.

---

## FOIL WRAPPER

Worked flat to create a square wrapper that can "wrap" the egg.

**Row 1**: With metallic white/silver yarn, ch 21, sc in 2nd ch from hook and in each ch across. Turn. [20]

**Rows 2-20**: Ch 1, sc in each st across. Turn. [20]
*Creates a 4" × 4" square*

**Fasten off** and weave in ends.

The wrapper can be loosely wrapped around the egg or laid flat in the box with the egg on top.

---

## CHOCOLATE BARS (make 3)

Each bar is worked flat to create a small rectangular "chocolate bar."

**Row 1**: With Brown, ch 8, sc in 2nd ch from hook and in each ch across. Turn. [7]

**Rows 2-4**: Ch 1, sc in each st across. Turn. [7]
*Creates approximately 1.5" × 0.75" bar*

**Fasten off**, leaving a long tail for optional seaming.

**Optional 3D version**: Make 2 rectangles per bar. Hold wrong sides together and sc around edges, stuffing lightly before closing completely.

**Repeat** to make 3 chocolate bars total.

### Optional Chocolate Bar Details
- Use a strand of lighter brown or tan to embroider a line down the center
- Add a small rectangle of pink, blue, or yellow yarn sewn to the center as a "label"
- Embroider "CHOCOLATE" in surface slip stitch

---

## Assembly & Finishing

1. **Weave in all ends** securely on all pieces.

2. **Arrange the set**:
   - Place the wrapper flat in the bottom of the box
   - Nestle the Easter egg on top of the wrapper
   - Tuck the 3 chocolate bars around the egg in the box

3. **Alternative presentation**:
   - Wrap the egg loosely in the wrapper (gather the corners on top)
   - Place wrapped egg in box with chocolate bars alongside

4. **Optional embellishments**:
   - Add a small bow to the egg using embroidery thread
   - Embroider dots or a simple design on the egg
   - Create a "ribbon" for the box using a chain stitch tied around

5. **Care**: This is a decorative item. If needed, spot clean with damp cloth. Do not machine wash.

---

## Customization Ideas

### Color Variations
- **Classic pastel**: Soft pink, baby blue, mint green, or lavender egg with white stripes
- **Rainbow**: Work stripes in rainbow color order
- **Metallic**: Use sparkle yarn for the egg to create a shimmery effect
- **Natural**: Cream egg with brown speckles embroidered on

### Size Adjustments
- **Larger egg**: Add one more increase round (Rnd 6: (4 sc, inc) around [36]), work more even rounds, then add corresponding decrease round
- **Smaller egg**: Eliminate Rnd 5, work only to 24 sts maximum
- **More chocolate bars**: Make 4-6 bars to fill the box

### Design Variations
- **Decorated egg**: Use embroidery to add flowers, hearts, or geometric patterns
- **Surprise inside**: Before closing egg, insert a jingle bell or make egg hollow with a small opening (decrease to 12 sts and stop) to hold small treats
- **Box lid**: Work another rectangle the same size as the base with 1-2 rounds of sides to create a removable lid

---

## Skill Building

This pattern teaches:
- Working in continuous rounds for 3D shapes
- Shaping spheres/ovals with increases and decreases
- Working flat rectangles in rows
- Color changes for stripes
- Basic amigurumi construction

Perfect for beginners ready to practice consistent tension and shape manipulation!

---

## About This Pattern

**Designed for**: Beginners who know basic crochet stitches
**Time to complete**: 3-4 hours for complete set
**Perfect for**: Easter baskets, spring decorations, handmade gifts, seasonal displays

Enjoy creating your Easter egg gift set! This makes a wonderful handmade touch for spring celebrations. 🐰🥚

---

*Pattern tested with worsted weight acrylic yarn and 3.5mm hook.*
Disclaimer: This pattern was generated by AI and should be reviewed for accuracy before use. While we strive for quality, AI-generated content may contain errors. Please verify measurements, stitch counts, and instructions before beginning your project. Generated by purlJam.uk
Access your pattern anytime
Bookmark this page to access your pattern anytime