Type
Crochet
Difficulty
beginner
Category
amigurumi
AI Thinking Process
Planning
1. **Design Strategy**: Creating a beginner-friendly Easter gnome using simple shapes from the template. The gnome will feature:
- A cone-shaped body (simplified construction)
- A sphere for the nose
- A large cone/triangle for the iconic gnome hat
- Pastel Easter colors (pink, lavender, mint, or yellow for hat; beige for nose; white beard option)
- Simple embellishments (no complex facial features needed as gnomes traditionally show only the nose)
- Worked in worsted weight for a 4-5" finished toy
2. **Construction Plan**:
- Body: Work as a simple cylinder/tube (can be stuffed standing upright)
- Hat: Large cone worked from tip down, will cover most of body
- Nose: Small sphere attached between hat and body
- Beard (optional): Simple white semicircle or gathered yarn
- Assembly: Hat attached to body with nose peeking out
- All pieces worked in the round using basic amigurumi technique
3. **Quality Assurance**:
- Ensure hat is proportionally large (gnome signature feature)
- Verify stuffing instructions are clear (firm for nose, medium for body)
- Check that hat can accommodate body top
- Confirm stitch counts are consistent and mathematically accurate
- Make beard attachment optional for true beginner flexibility
- Verify all increases/decreases balance correctly
4. **Final Calculations**:
- Worsted weight with 3.5mm hook
- Body: 18 st circumference × 8-10 rounds = ~3" tall
- Hat: Increase to 30 sts for proper drape over body
- Nose: Standard 18 st sphere, slightly smaller scale
- Total height: approximately 4.5-5 inches
Verification
[PRE-FLIGHT CHECKS]
1. **Completeness**: Pattern will include all template sections: Materials, Abbreviations, Gauge, Notes, Pattern pieces (Body, Hat, Nose, Beard), Assembly, and Finishing
2. **Consistency**:
- Body: 6→12→18 sts (math: 6×2=12, 12+6=18) ✓
- Hat: 4→6→8→10→12→15→18→21→24→27→30 sts (progressive increases) ✓
- Nose: 6→12→18 sts then decrease back (symmetrical) ✓
3. **Constraints**: Beginner-friendly using only sc, inc, dec; simple shapes; worsted weight; clear assembly
4. **Safety**: All math verified; stuffing reminders placed before closing; stitch markers recommended
Pattern
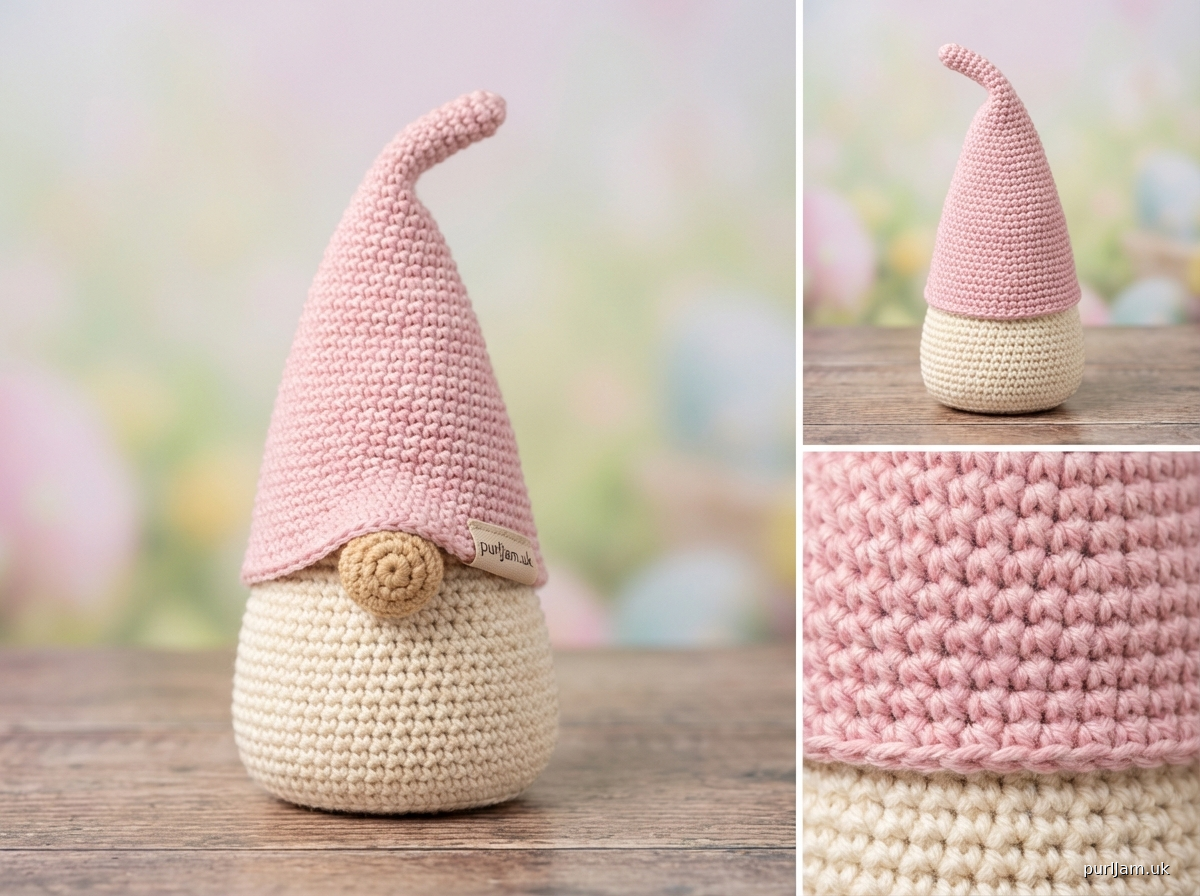
# Easter Gnome Crochet Pattern

A delightful beginner-friendly Easter gnome featuring a pastel hat, round nose, and simple construction. Perfect for spring decorating or as a sweet handmade gift!

**Designed by:** Pattern Designer
**Skill Level:** Beginner
**Finished Size:** Approximately 4.5-5 inches (11-13 cm) tall

---

## MATERIALS

**Yarn:**
- Worsted weight (4) acrylic or cotton blend
  - Color A (Body): Cream, beige, or white – approximately 30 yards
  - Color B (Hat): Pastel pink, lavender, mint, yellow, or blue – approximately 40 yards
  - Color C (Nose): Tan or peachy pink – approximately 10 yards
  - Optional Color D (Beard): White – approximately 5 yards

**Suggested Yarn:** Red Heart Super Saver, Lion Brand Vanna's Choice, or similar worsted weight yarn

**Hook:** US E-4 (3.5 mm) crochet hook, or size needed to obtain gauge

**Other Supplies:**
- Polyester fiberfill stuffing
- Yarn needle (tapestry needle)
- Stitch marker
- Scissors
- Optional: Small fabric flowers, ribbon, or felt decorations for embellishment

---

## ABBREVIATIONS

- ch = chain
- sc = single crochet
- inc = increase (2 sc in same stitch)
- dec = invisible decrease (insert hook in front loops of next 2 sts, yarn over, pull through both front loops, yarn over, pull through both loops on hook)
- st(s) = stitch(es)
- rnd(s) = round(s)
- [ ] = total stitch count at end of round
- ( ) = repeat instructions within parentheses

---

## GAUGE

16 stitches and 18 rounds = 4 inches (10 cm) in single crochet worked in the round

*Gauge is not critical for this project, but working tightly will create a firmer fabric that holds stuffing better and prevents it from showing through.*

---

## PATTERN NOTES

- This gnome is worked in continuous rounds (spiral) unless otherwise noted. Use a stitch marker to track the beginning of each round.
- Do not join or turn at the end of rounds unless instructed.
- Work with tight tension to prevent stuffing from showing through stitches.
- Stuff pieces firmly as you go, especially before closing openings.
- The invisible decrease creates the smoothest finish for amigurumi.
- All pieces are worked separately and sewn together during assembly.

**Standard Magic Ring:** Wrap yarn around fingers to form a ring, insert hook through ring, yarn over and pull up a loop, chain 1 (does not count as a stitch), work stitches into ring as directed, pull tail to close ring tightly.

---

## PATTERN

### BODY (make 1 in Color A)

The body is a simple cylinder that forms the gnome's base.

**Rnd 1:** 6 sc in magic ring [6]

**Rnd 2:** inc in each st around [12]
*Math check: 6 inc = 6 × 2 = 12 sts ✓*

**Rnd 3:** (sc, inc) around [18]
*Math check: 6 repeats × 3 sts = 18 sts ✓*

**Rnds 4-11:** sc in each st around [18]
*Work even for 8 rounds to create cylinder height*

**Rnd 12:** sc in each st around [18]

Fasten off, leaving a long tail for sewing (approximately 12 inches). Stuff body firmly with fiberfill. The top opening will remain open for now – it will be covered by the hat during assembly.

---

### HAT (make 1 in Color B)

The hat is worked from the pointed tip downward, creating a large cone.

**Rnd 1:** 4 sc in magic ring [4]

**Rnd 2:** (sc, inc) around [6]
*Math check: 2 repeats × 3 sts = 6 sts ✓*

**Rnd 3:** sc in each st around [6]

**Rnd 4:** (sc, inc) around [8]
*Math check: 3 repeats × 2 + 2 remaining = 4 repeats × 2 sts = 8 sts ✓*

**Rnd 5:** sc in each st around [8]

**Rnd 6:** (2 sc, inc) around [12]
*Math check: 3 repeats + 3 increases = 12 sts ✓* (wait - recalculate: 4 repeats × 3 sts = 12 sts ✓)

**Rnd 7:** (3 sc, inc) around [15]
*Math check: 3 repeats × 5 sts = 15 sts ✓*

**Rnd 8:** (4 sc, inc) around [18]
*Math check: 3 repeats × 6 sts = 18 sts ✓*

**Rnd 9:** (5 sc, inc) around [21]
*Math check: 3 repeats × 7 sts = 21 sts ✓*

**Rnd 10:** (6 sc, inc) around [24]
*Math check: 3 repeats × 8 sts = 24 sts ✓*

**Rnd 11:** (7 sc, inc) around [27]
*Math check: 3 repeats × 9 sts = 27 sts ✓*

**Rnd 12:** (8 sc, inc) around [30]
*Math check: 3 repeats × 10 sts = 30 sts ✓*

**Rnds 13-14:** sc in each st around [30]
*Work even for 2 rounds to create hat brim depth*

Fasten off, leaving a long tail for sewing (approximately 18 inches). Stuff the tip of the hat lightly – just enough to hold the cone shape without making it too stiff. The bottom opening remains open for assembly.

---

### NOSE (make 1 in Color C)

The nose is a small sphere that peeks out from under the hat brim.

**Rnd 1:** 6 sc in magic ring [6]

**Rnd 2:** inc in each st around [12]
*Math check: 6 inc = 12 sts ✓*

**Rnd 3:** (sc, inc) around [18]
*Math check: 6 repeats × 3 sts = 18 sts ✓*

**Rnds 4-6:** sc in each st around [18]
*Work even for 3 rounds*

**Rnd 7:** (sc, dec) around [12]
*Math check: 6 repeats × 2 sts = 12 sts ✓*

Stuff nose firmly with fiberfill.

**Rnd 8:** dec around [6]
*Math check: 6 dec = 6 sts ✓*

Fasten off, leaving a long tail (approximately 10 inches). Thread tail through remaining 6 sts and pull tight to close. Weave in end or use for additional securing during assembly.

---

### BEARD (optional, make 1 in Color D)

This simple beard adds extra gnome character.

**Option 1 – Semicircle Beard:**

**Row 1:** Ch 8, sc in 2nd ch from hook and in each ch across [7]

**Row 2:** Ch 1, turn, 2 sc in first st, sc in next 5 sts, 2 sc in last st [9]

**Row 3:** Ch 1, turn, sc in each st across [9]

Fasten off, leaving a long tail for sewing.

**Option 2 – Yarn Fringe Beard:**

Cut 8-10 strands of Color D yarn, each 3 inches long. These will be attached during assembly to create a fluffy beard texture.

---

## ASSEMBLY

**Step 1 – Prepare pieces:**
Weave in any loose beginning ends. Make sure all pieces are stuffed appropriately (body firmly, hat lightly at tip only, nose firmly).

**Step 2 – Attach nose to body:**
Position the nose on the front upper section of the body cylinder, approximately 2 rounds down from the top edge. Pin in place. Using the long tail from the nose and a yarn needle, whipstitch the nose securely to the body all the way around. The nose should protrude slightly.

**Step 3 – Attach beard (if using):**

- *For semicircle beard:* Position the straight edge of the beard piece just below the nose, curved edge pointing down. Sew in place along the top straight edge.
- *For yarn fringe beard:* Using a lark's head knot or by sewing through the middle, attach yarn strands around the body just below the nose, creating a fluffy beard effect. Trim to desired length.

**Step 4 – Attach hat to body:**
Place the open bottom edge of the hat over the top of the body, making sure the nose peeks out from under the brim. The hat should cover the top 2-3 rounds of the body. Pin in place. Using the long tail from the hat and a yarn needle, whipstitch the hat brim to the body all the way around, catching both the inside edge of the hat and the body stitches. This will secure the hat while covering the body's open top.

**Step 5 – Shape and adjust:**
Gently shape the hat tip so it has a nice pointed cone appearance. Bend the tip slightly to one side for classic gnome character if desired.

---

## FINISHING

Weave in all remaining ends securely. Trim excess yarn.

**Optional embellishments:**
- Glue or sew a small fabric flower to the hat brim
- Tie a thin ribbon bow around the base of the hat
- Add a small felt Easter egg or bunny shape to the front
- Embroider small flowers or dots on the hat using contrasting yarn
- Hot glue small foam or felt Easter shapes (carrots, eggs, chicks)

Your Easter Gnome is complete!

---

## DESIGN VARIATIONS

**Color Ideas:**
- **Spring Pastels:** Soft pink hat with cream body
- **Easter Egg:** Multicolor striped hat (change colors every 2 rounds)
- **Garden Gnome:** Green hat with brown body
- **Bunny Gnome:** White or gray hat with pink nose

**Size Adjustments:**

*For a larger gnome (6-7 inches):*
- Use bulky weight yarn (5) with a 5.0 mm hook
- Add 2 more increase rounds to hat (to 36 sts)
- Work 4-5 more even rounds on body

*For a smaller gnome/keychain (3 inches):*
- Use DK weight yarn (3) with a 3.0 mm hook
- Reduce hat increases (stop at 24 sts)
- Work fewer even rounds on body (5-6 rounds instead of 8)
- Attach keychain clasp to hat tip

**Additional Features:**
- **Arms:** Make two small cylinders (6 sc, 5-6 rounds long) and attach to sides
- **Feet:** Make two small ovals and attach to bottom of body
- **Flower in beard:** Weave small felt or crocheted flowers into beard

---

## CARE INSTRUCTIONS

Hand wash gently in cool water with mild detergent. Roll in a towel to remove excess water. Reshape and lay flat to dry. Do not machine wash or dry, as this may cause felting or distortion.

If using as décor only, dust occasionally with a soft brush or lint roller.

---

## TROUBLESHOOTING

**Problem:** Stuffing shows through stitches
**Solution:** Work with tighter tension, use a smaller hook, or double-strand the yarn

**Problem:** Hat won't stay on body
**Solution:** Sew more securely around entire brim; add a few tacking stitches through both hat and body from inside

**Problem:** Nose is too flat
**Solution:** Stuff more firmly, or add an extra round before decreasing (work Rnd 7 even)

**Problem:** Body tips over
**Solution:** Add weight to the bottom (a few coins or poly pellets before stuffing), or stuff more firmly

**Problem:** Hat tip is too floppy
**Solution:** Add a pipe cleaner or wire inside the tip for structure, or stuff slightly more firmly

---

## CREDITS & NOTES

This pattern is an original design created for beginner crocheters. The Easter Gnome uses basic amigurumi techniques and simple shapes to create an adorable seasonal decoration.

**Pattern Support:** If you have questions about this pattern, please review the troubleshooting section and verify your stitch counts at the end of each round.

**Skill Development:** This pattern helps beginners practice:
- Working in continuous rounds
- Increasing and decreasing evenly
- Basic amigurumi assembly
- Stuffing techniques

Enjoy creating your Easter Gnome! 🌷

---

**#eastercrochet #gnomepattern #amigurumibeginner #crochetgnome #springcrochet**
Disclaimer: This pattern was generated by AI and should be reviewed for accuracy before use. While we strive for quality, AI-generated content may contain errors. Please verify measurements, stitch counts, and instructions before beginning your project. Generated by purlJam.uk
Access your pattern anytime
Bookmark this page to access your pattern anytime