Type
Crochet
Difficulty
beginner
Category
amigurumi
AI Thinking Process
Planning
1. **Design Strategy**: Creating a beginner-friendly Easter gnome using basic amigurumi shapes - a cone/cylinder body, sphere for nose, and simple beard. Easter theme will be incorporated through pastel colors and simple embellishments (felt egg or flower). The gnome will be approximately 4-5" tall using worsted weight yarn, perfect for spring décor.
2. **Construction Plan**:
- Body: Cone shape worked from bottom up, stuffed as we go
- Hat: Elongated cone in pastel Easter color (pink, lavender, or mint)
- Nose: Small sphere in peach/pink
- Beard: Simple textured piece or yarn strands
- Assembly: Nose sewn to body, hat placed on top, beard attached
- No complex shaping needed - all basic increases and decreases
3. **Quality Assurance**:
- Ensuring stitch counts are accurate for proper shaping
- Clear stuffing instructions before closing sections
- Simple assembly order to prevent confusion
- Hat should be proportional to body (not too heavy)
- Marking where nose placement should be for symmetry
4. **Final Calculations**:
- Worsted weight with 3.5mm hook = approximately 5 sts/inch
- Body base: 24 sts around = ~4.8" circumference, ~1.5" diameter
- Total height with hat: approximately 5-6"
- Hat: starts at 6 sts, increases to match body opening
- Nose: 12 sts max = ~1" diameter sphere
Verification
[PRE-FLIGHT CHECKS]
1. **Completeness**: Pattern includes materials, gauge, abbreviations, all component instructions (body, hat, nose, beard), assembly, and finishing
2. **Consistency**: Body increases to 24 sts, hat increases to 24 sts to fit on top; nose stays small at 12 sts max; math verified for each round
3. **Constraints**: Beginner-friendly with only basic stitches (sc, inc, dec), worsted weight yarn, clear instructions, Easter theme with pastel color suggestions
4. **Safety**: All increase/decrease rounds calculated and verified; stitch counts progress logically; stuffing reminders included before closings
Pattern
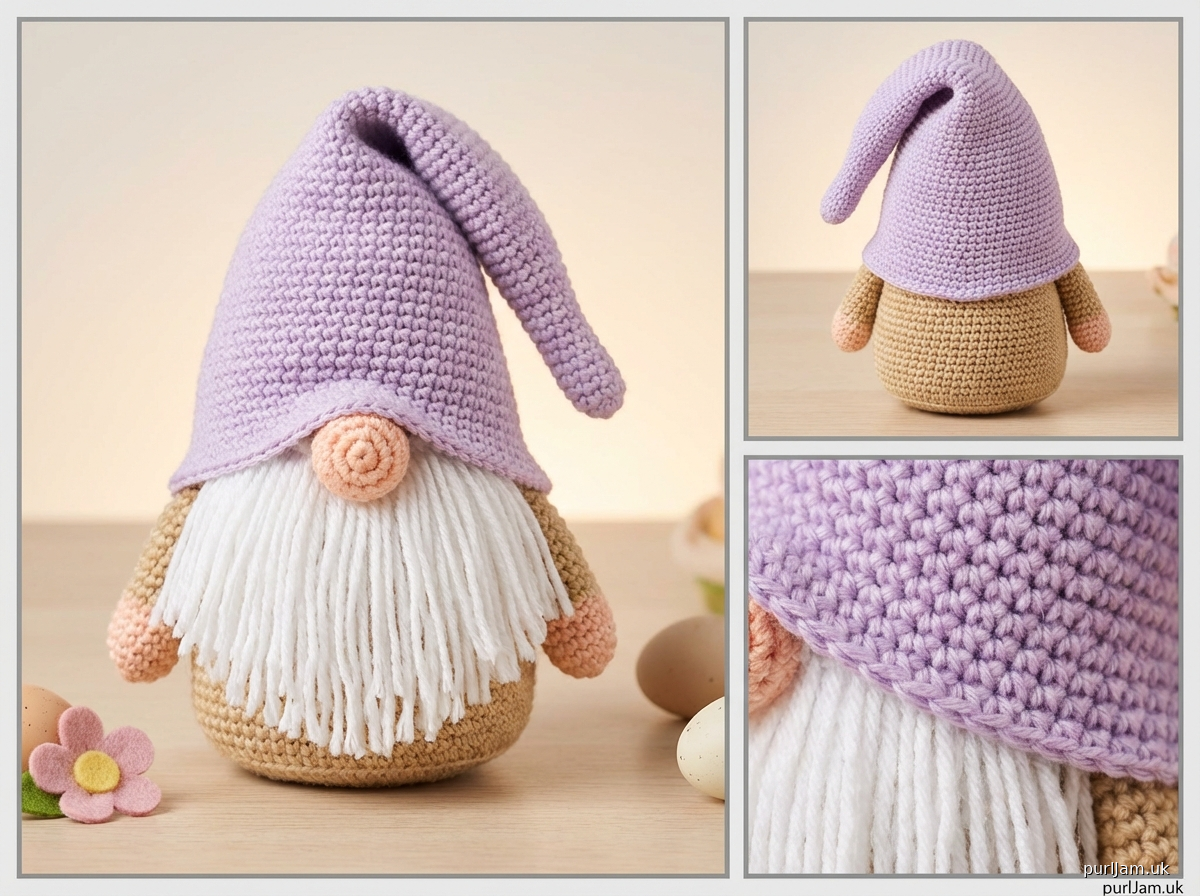
# Easter Gnome Crochet Pattern

A charming beginner-friendly Easter gnome perfect for spring décor! This adorable little character features a pastel floppy hat, fluffy beard, and sweet button nose. Uses simple amigurumi techniques with basic shapes.

**Finished Size**: Approximately 5-6 inches (12.5-15 cm) tall
**Difficulty Level**: Beginner
**Technique**: Worked in continuous rounds (amigurumi style)

---

## MATERIALS

**Yarn**: Worsted weight (4) acrylic or cotton yarn
- **Body/Nose**: Peach, tan, or light pink (approx. 25 yards)
- **Hat**: Pastel color of choice - lavender, mint green, baby pink, or soft yellow (approx. 40 yards)
- **Beard**: White or cream (approx. 15 yards)

**Suggested Yarns**: Red Heart Super Saver, Caron Simply Soft, Lion Brand Vanna's Choice

**Hook**: US E-4 (3.5 mm) or size needed to obtain gauge

**Other Supplies**:
- Fiberfill stuffing (polyester)
- Yarn needle for weaving and assembly
- Stitch marker
- Scissors
- Optional: Small felt flower or egg for embellishment, fabric glue

---

## GAUGE

5 sc and 5 rows = 1 inch (2.5 cm) in single crochet, worked in rounds

*Gauge is not critical for this project, but a tighter gauge creates a firmer fabric that holds stuffing better.*

---

## ABBREVIATIONS

- ch = chain
- sc = single crochet
- inc = increase (2 sc in same stitch)
- dec = invisible decrease (insert hook in front loops of next 2 stitches, yarn over, pull through both loops, yarn over, pull through 2 loops on hook)
- st(s) = stitch(es)
- rnd(s) = round(s)
- [ ] = stitch count at end of round

---

## SPECIAL TECHNIQUES

**Magic Ring**: Wrap yarn around fingers to form a loop, insert hook and pull up a loop, ch 1, work stitches into ring, pull tail to close.

**Invisible Decrease**: Insert hook into front loop only of next 2 stitches, yarn over and pull through both front loops (2 loops on hook), yarn over and pull through both loops. Creates a smoother decrease than standard sc2tog.

**Continuous Rounds**: Do not join rounds with slip stitch. Use stitch marker to track beginning of round, moving marker up as you work.

---

## PATTERN NOTES

- Work in continuous rounds unless otherwise specified
- Do not join or turn unless instructed
- Stuff pieces firmly as you go for best results
- Use invisible decreases for smoother surface
- Keep working tension tight to prevent stuffing from showing through

---

## INSTRUCTIONS

### BODY (Peach/Tan)

The body is worked from the bottom up in a cone shape.

**Rnd 1**: 6 sc in magic ring [6]

**Rnd 2**: inc in each st around [12]
*Math check: 6 × 2 = 12 ✓*

**Rnd 3**: (sc, inc) around [18]
*Math check: 12 ÷ 2 = 6 repeats, 6 × 3 = 18 ✓*

**Rnd 4**: (2 sc, inc) around [24]
*Math check: 18 ÷ 3 = 6 repeats, 6 × 4 = 24 ✓*

**Rnds 5-9**: sc in each st around [24]
*Work 5 rounds even to create height*

**Rnd 10**: (2 sc, dec) around [18]
*Math check: 24 ÷ 4 = 6 repeats, 6 × 3 = 18 ✓*

**Rnd 11**: sc in each st around [18]

**Rnd 12**: (sc, dec) around [12]
*Math check: 18 ÷ 3 = 6 repeats, 6 × 2 = 12 ✓*

**Begin stuffing body firmly with fiberfill. Continue stuffing as you work the remaining rounds.**

**Rnd 13**: sc in each st around [12]

**Rnd 14**: dec around [6]
*Math check: 12 ÷ 2 = 6 ✓*

Fasten off, leaving a long tail. Thread tail through remaining 6 sts and pull tight to close opening. Weave in end securely.

---

### HAT (Pastel Color)

The hat is worked from the top down to create a floppy, elongated cone.

**Rnd 1**: 6 sc in magic ring [6]

**Rnd 2**: sc in each st around [6]

**Rnd 3**: (sc, inc) around [9]
*Math check: 6 ÷ 2 = 3 repeats, 3 × 3 = 9 ✓*

**Rnd 4**: sc in each st around [9]

**Rnd 5**: (2 sc, inc) around [12]
*Math check: 9 ÷ 3 = 3 repeats, 3 × 4 = 12 ✓*

**Rnd 6**: sc in each st around [12]

**Rnd 7**: (3 sc, inc) around [15]
*Math check: 12 ÷ 4 = 3 repeats, 3 × 5 = 15 ✓*

**Rnd 8**: sc in each st around [15]

**Rnd 9**: (4 sc, inc) around [18]
*Math check: 15 ÷ 5 = 3 repeats, 3 × 6 = 18 ✓*

**Rnd 10**: sc in each st around [18]

**Rnd 11**: (2 sc, inc) around [24]
*Math check: 18 ÷ 3 = 6 repeats, 6 × 4 = 24 ✓*

**Rnds 12-13**: sc in each st around [24]

Fasten off, leaving a long tail for sewing. Do not stuff the hat - it should be floppy and soft. Set aside.

---

### NOSE (Peach/Pink)

A small sphere for the gnome's button nose.

**Rnd 1**: 6 sc in magic ring [6]

**Rnd 2**: inc in each st around [12]
*Math check: 6 × 2 = 12 ✓*

**Rnd 3**: sc in each st around [12]

**Rnd 4**: dec around [6]
*Math check: 12 ÷ 2 = 6 ✓*

**Stuff nose lightly with a small amount of fiberfill.**

Fasten off, leaving a long tail for sewing. Thread tail through remaining 6 sts and pull to close. Set aside.

---

### BEARD (White/Cream)

**Option 1: Simple Fringe Beard (Easier)**

Cut 12-15 strands of white/cream yarn, each approximately 4 inches (10 cm) long.

Using your yarn needle, attach fringe strands around rounds 8-10 of the body by folding each strand in half, pulling the folded loop through a stitch, then pulling the ends through the loop to secure. Space evenly around the front half of the body (where the nose will go).

Trim beard to desired length and fluff.

**Option 2: Crocheted Beard Triangle**

**Row 1**: Ch 10, sc in 2nd ch from hook and in each ch across [9]

**Row 2**: Ch 1, turn, dec, sc 5, dec [7]
*Math check: 9 - 2 = 7 ✓*

**Row 3**: Ch 1, turn, dec, sc 3, dec [5]
*Math check: 7 - 2 = 5 ✓*

**Row 4**: Ch 1, turn, dec, sc, dec [3]
*Math check: 5 - 2 = 3 ✓*

**Row 5**: Ch 1, turn, dec over all 3 sts [1]

Fasten off, leaving tail for sewing.

**Optional**: Cut additional 2-inch strands and attach as fringe along the edges of the crocheted triangle for extra fluffiness.

---

## ASSEMBLY

Follow these steps in order for best results:

1. **Position the nose**: Place the nose on the upper portion of the body (around rounds 11-12), centered where you want the front of the gnome to be. The nose should sit just below where the body begins to narrow.

2. **Sew the nose**: Using the long tail and yarn needle, sew the nose to the body with small whip stitches around the edge. Secure tail and weave in end.

3. **Attach the beard**:
   - For fringe beard: Attach strands in a semi-circle below and around the nose (see instructions above)
   - For crocheted beard: Position the triangle with the wide edge at the top, just below the nose. Sew along the top edge to secure. The point should hang down in front.

4. **Add the hat**: Place the hat on top of the body, with the opening of the hat aligned with the top of the body (round 14). The hat should sit slightly over where the nose is placed. Pin in place if needed.

5. **Sew the hat**: Using the long tail from the hat and yarn needle, sew around the base of the hat to the top of the body using whip stitch. Make sure it's secure but you can leave one side slightly loose to create a "floppy" look if desired.

6. **Shape the hat**: Bend the top of the hat to one side and tack in place with a few stitches if you want it to maintain a specific floppy position.

7. **Optional embellishments**:
   - Glue or sew a small felt flower to the hat
   - Add a tiny felt Easter egg
   - Embroider small flowers with contrasting yarn
   - Tie a small ribbon bow around the base of the hat

8. **Final touches**: Weave in all remaining ends securely. Trim any excess yarn. Fluff and shape the beard.

---

## VARIATIONS

**Color Ideas**:
- Classic Easter: Lavender hat, white beard, peach nose
- Spring Garden: Mint green hat, cream beard, pink nose
- Pastel Rainbow: Soft yellow hat, white beard, peach nose
- Pretty in Pink: Baby pink hat, white beard, light pink nose

**Size Adjustments**:
- **Smaller (3-4")**: Use DK weight yarn with 3.0mm hook
- **Larger (7-8")**: Use bulky weight yarn with 5.0mm hook, or add 2 more increase rounds to body (increasing to 30 sts)

**Embellishment Ideas**:
- Add tiny pompom to hat tip
- Create small carrot from orange yarn to place near gnome
- Make multiple gnomes in different colors for a display
- Add small button to hat brim
- Embroider closed eyes with black yarn for sleepy gnome

---

## TROUBLESHOOTING

**Stuffing shows through stitches**: Your tension may be too loose. Try using a smaller hook or pulling your stitches tighter as you work.

**Hat won't stay on**: Make sure you're sewing completely around the base. Add a few extra securing stitches at the back.

**Body is wobbly**: You may need more stuffing. Stuff very firmly for a sturdy gnome that will stand or sit upright.

**Nose looks lumpy**: Stuff only lightly - too much stuffing creates bumps. Make sure to use small pieces of fiberfill.

**Beard looks sparse**: Add more fringe strands, or use a fluffier yarn for the beard like a sparkly eyelash yarn or brushed acrylic.

---

## CARE INSTRUCTIONS

**Washing**: Hand wash in cool water with mild detergent if needed. Gently squeeze out excess water (do not wring). Reshape and lay flat to dry.

**Storage**: Store in a cool, dry place away from direct sunlight to prevent fading.

**Note**: This gnome is a decorative item. If giving to a child under 3, ensure all parts are securely attached and supervise play.

---

## ABOUT THIS PATTERN

This Easter Gnome uses basic amigurumi techniques perfect for beginners. You'll practice working in continuous rounds, increasing, decreasing, and simple assembly. Once you've mastered this pattern, try making gnomes in different colors or adding your own creative embellishments!

**Designed for**: Beginner crocheters
**Time to complete**: Approximately 2-3 hours
**Perfect for**: Spring décor, Easter baskets, gift giving, or tiered tray displays

---

Happy crocheting, and enjoy your adorable Easter gnome! 🌷🐰

---

*Pattern tested with Red Heart Super Saver worsted weight yarn and 3.5mm hook. Finished gnome measured 5.5 inches tall.*
Disclaimer: This pattern was generated by AI and should be reviewed for accuracy before use. While we strive for quality, AI-generated content may contain errors. Please verify measurements, stitch counts, and instructions before beginning your project. Generated by purlJam.uk
Access your pattern anytime
Bookmark this page to access your pattern anytime