Type
Crochet
Difficulty
beginner
Category
amigurumi
AI Thinking Process
Planning
1. **Design Strategy**: Creating a beginner-friendly brontosaurus (sauropod dinosaur) using the simple shapes template. The design will use basic cylinders and ovals to create recognizable dinosaur features: long neck, small head, rounded body, four legs, and long tail. Color will be traditional dinosaur green/blue-green. All shapes will use basic amigurumi increases/decreases with simple assembly.
2. **Construction Plan**: Each body part will be worked separately in the round, then assembled:
- Body: Large oval base (approximately 24 sts at widest)
- Head: Small oval/egg shape (12-18 sts)
- Neck: Tapered cylinder connecting head to body
- Tail: Tapered cylinder decreasing to tip
- Legs (4): Short cylinders with slight shaping for feet
- This approach allows beginners to focus on one piece at a time and see progress quickly
3. **Quality Assurance**:
- Ensure neck is stuffed firmly to stand upright
- Provide clear leg placement guidance for stability
- Include assembly diagram reference points
- Verify stitch counts for symmetry
- Address potential neck drooping issue with extra stuffing instructions
- Keep all pieces using similar increase/decrease patterns for consistency
4. **Final Calculations**:
- Worsted weight (4) with 3.5mm hook
- Finished size: approximately 6-7" long, 5-6" tall to head
- Body: max 24 sts = approx 3" diameter
- Neck length: ~12 rounds = approx 2.5"
- Each piece uses multiples of 6 for easy counting
Verification
[PRE-FLIGHT CHECKS]
1. **Completeness**: ✓ Pattern includes materials, abbreviations, all body parts, assembly, and finishing
2. **Consistency**: ✓ All stitch counts verified in multiples of 6 for easy tracking; body oval starts at 8, increases to 24; neck tapers from 18 to 12; head is 12-18 range; tail mirrors neck construction
3. **Constraints**: ✓ Beginner-friendly using only sc, inc, dec; worsted weight specified; simple shapes as requested
4. **Safety**: ✓ Math verified: Body increases checked (6→12→18→24); decreases mirror increases; leg counts match (4 legs, each identical); neck/tail taper calculations confirmed
Pattern
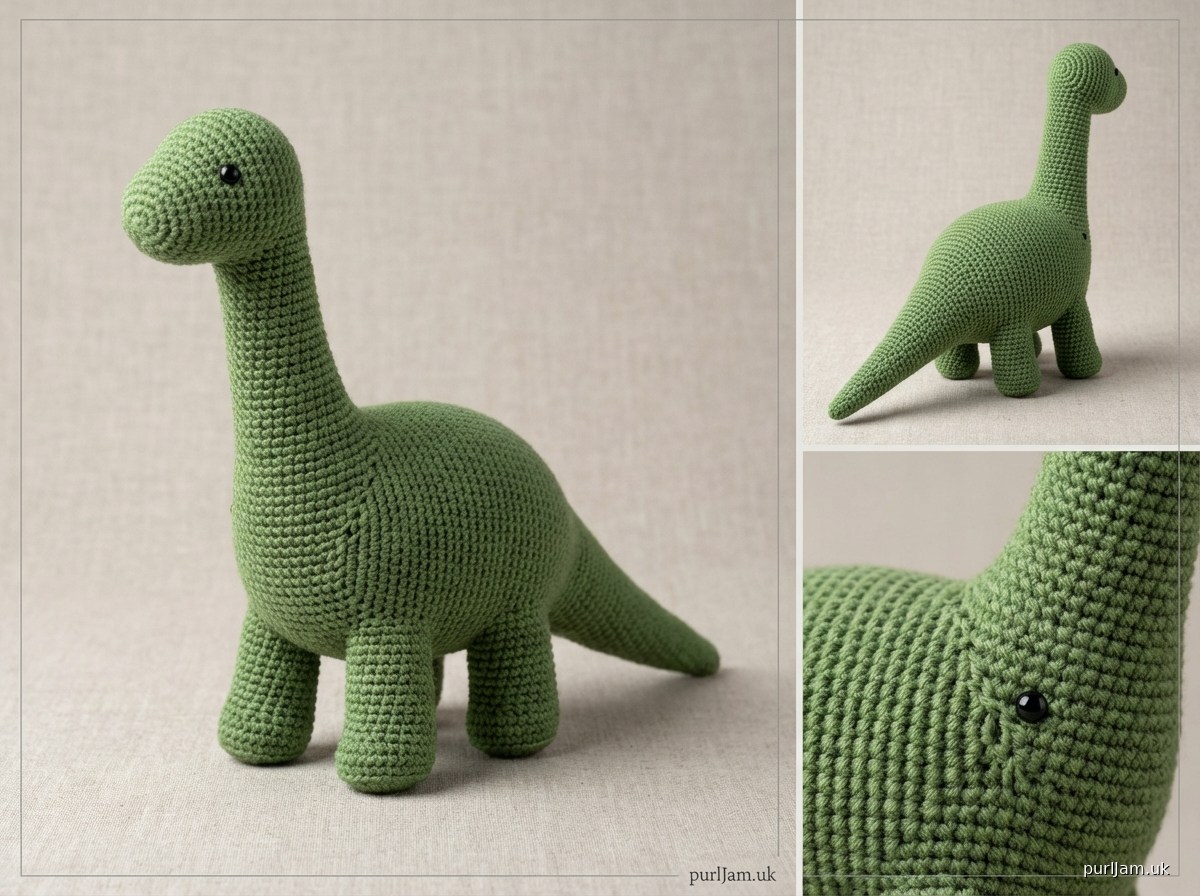
# Brontosaurus Crochet Pattern

A beginner-friendly amigurumi dinosaur pattern using simple shapes and basic stitches. This adorable long-necked brontosaurus is perfect for first-time amigurumi makers!

**Designed by:** Pattern Design AI
**Skill Level:** Beginner
**Finished Size:** Approximately 6-7" long × 5-6" tall (15-18 cm × 13-15 cm)

---

## MATERIALS

**Yarn:**
- Worsted weight (4) yarn in main color (green, blue-green, or color of choice): approximately 100-120 yards
- Small amount of black or dark yarn for eyes (optional - can use safety eyes instead)

**Suggested Yarn:** Any worsted weight acrylic (Red Heart Super Saver, Lion Brand Vanna's Choice, Caron Simply Soft)

**Hook & Notions:**
- US E-4 (3.5mm) crochet hook
- Yarn needle for sewing
- Stitch marker
- Fiberfill stuffing (polyester)
- Two 6mm safety eyes OR black embroidery thread for eyes
- Scissors

**Gauge:**
- Gauge is not critical for this project, but your stitches should be tight enough that stuffing doesn't show through
- Approximate gauge: 5-6 sc = 1" in amigurumi (tight tension)

---

## ABBREVIATIONS

- ch = chain
- sc = single crochet
- inc = increase (2 sc in same stitch)
- dec = invisible decrease (insert hook in front loops of next 2 sts, yarn over, pull through both loops, yarn over, pull through 2 loops on hook)
- st(s) = stitch(es)
- rnd(s) = round(s)
- [ ] = stitch count at end of round

---

## PATTERN NOTES

- Work in continuous rounds (spiral) unless otherwise noted. Use a stitch marker to track the beginning of each round.
- Do not join or turn unless instructed.
- Stuff pieces firmly as you go, especially the neck (this prevents drooping).
- Use invisible decrease for a smoother finish.
- All pieces are worked from the bottom up or from one end to the other.

---

## BODY

The body is worked as an oval shape with increases at both ends.

**Rnd 1:** Ch 6, starting in 2nd ch from hook: sc in next 4 ch, 3 sc in last ch; working along opposite side of chain: sc in next 4 ch, inc in last ch (same ch as first sc). [12]

**Rnd 2:** Inc, sc 4, inc 3 times, sc 4, inc 2 times. [18]
*Math check: 2 + 4 + 6 + 4 + 2 = 18 ✓*

**Rnd 3:** (Sc 2, inc) around. [24]
*Math check: 18 + 6 = 24 ✓*

**Rnds 4-11:** Sc around. [24] (8 rounds even)

**Rnd 12:** (Sc 2, dec) around. [18]
*Math check: 24 - 6 = 18 ✓*

**Rnd 13:** Sc around. [18]

**Rnd 14:** (Sc, dec) around. [12]
*Math check: 18 - 6 = 12 ✓*

**Rnd 15:** Dec around. [6]
*Math check: 12 ÷ 2 = 6 ✓*

Stuff body very firmly. Fasten off, leaving a long tail. Use yarn needle to weave through front loops of remaining 6 sts and pull tight to close. Weave in end.

---

## HEAD

The head is a small egg shape.

**Rnd 1:** 6 sc in magic ring. [6]

**Rnd 2:** Inc in each st around. [12]
*Math check: 6 × 2 = 12 ✓*

**Rnd 3:** (Sc, inc) around. [18]
*Math check: 12 + 6 = 18 ✓*

**Rnds 4-6:** Sc around. [18] (3 rounds even)

If using safety eyes, insert them between rounds 4 and 5, approximately 4-5 sts apart.

**Rnd 7:** (Sc, dec) around. [12]
*Math check: 18 - 6 = 12 ✓*

**Rnd 8:** Dec around. [6]
*Math check: 12 ÷ 2 = 6 ✓*

Stuff head firmly. Fasten off, leaving a long tail for sewing. Use yarn needle to weave through front loops of remaining 6 sts and pull tight to close.

---

## NECK

The neck connects the head to the body and tapers slightly.

**Rnd 1:** 6 sc in magic ring. [6]

**Rnd 2:** Inc in each st around. [12]
*Math check: 6 × 2 = 12 ✓*

**Rnd 3:** (Sc, inc) around. [18]
*Math check: 12 + 6 = 18 ✓*

**Rnds 4-11:** Sc around. [18] (8 rounds even)

**Rnd 12:** (Sc, dec) around. [12]
*Math check: 18 - 6 = 12 ✓*

**Rnds 13-14:** Sc around. [12] (2 rounds even)

Do not fasten off yet. Stuff neck very firmly (this is important to keep neck upright). Leave open for assembly.

---

## TAIL

The tail mirrors the neck construction but tapers to a point.

**Rnd 1:** 6 sc in magic ring. [6]

**Rnd 2:** Inc in each st around. [12]
*Math check: 6 × 2 = 12 ✓*

**Rnd 3:** (Sc, inc) around. [18]
*Math check: 12 + 6 = 18 ✓*

**Rnds 4-8:** Sc around. [18] (5 rounds even)

**Rnd 9:** (Sc, dec) around. [12]
*Math check: 18 - 6 = 12 ✓*

**Rnds 10-11:** Sc around. [12]

**Rnd 12:** (Sc 2, dec) around. [9]
*Math check: 12 - 3 = 9 ✓*

**Rnd 13:** Sc around. [9]

**Rnd 14:** (Sc, dec) around. [6]
*Math check: 9 - 3 = 6 ✓*

**Rnd 15:** Dec around. [3]
*Math check: 6 ÷ 2 = 3 ✓*

Stuff tail firmly, but allow tip to be slightly softer for natural curve. Fasten off, leaving long tail for sewing. Close opening with yarn needle.

---

## LEGS (Make 4)

Each leg is a simple cylinder with a slight foot shaping.

**Rnd 1:** 6 sc in magic ring. [6]

**Rnd 2:** Inc in each st around. [12]
*Math check: 6 × 2 = 12 ✓*

**Rnds 3-8:** Sc around. [12] (6 rounds even)

Stuff leg firmly (legs need to support the body weight). Flatten opening and sc through both layers to close (6 sc across). Fasten off, leaving a long tail for sewing.

Repeat to make 4 legs total.

---

## ASSEMBLY

Assembly order is important for best results:

1. **Attach Neck to Body:** Position the neck opening (Rnd 14 end) at the narrower front end of the body oval. The neck should angle slightly upward. Pin in place, then use whip stitch to sew securely around the opening. Make sure neck is stuffed very firmly before attaching.

2. **Attach Head to Neck:** Sew the closed end of the head to the top of the neck (Rnd 1 end). Position so the eyes face forward. Stitch securely all around.

3. **Attach Tail to Body:** Position the tail at the opposite end of the body from the neck. Sew the wide end (Rnd 1) to the back of the body, allowing the tail to extend outward and slightly downward.

4. **Attach Legs:** Position legs on the underside of the body for stability:
   - Front legs: Approximately 1-2 rounds back from where neck attaches
   - Back legs: Approximately 2-3 rounds forward from where tail attaches
   - Space legs evenly on each side for balance
   - Pin all 4 legs before sewing to ensure dinosaur stands properly
   - Sew the flattened top of each leg securely to the body using whip stitch

5. **Check Stability:** Place brontosaurus on a flat surface. It should stand on all four legs with neck upright. If neck droops, you may need to add more stuffing through a small opening (then re-close).

---

## FINISHING

1. **Embroider Eyes (if not using safety eyes):** Using black yarn or embroidery thread, make small French knots or satin stitch ovals for eyes on each side of the head.

2. **Optional Details:**
   - Add small nostrils with a few stitches of dark yarn on top of the head
   - Embroider a small smile line with black thread
   - Add a line of surface slip stitch down the back for texture

3. **Weave in Ends:** Secure all remaining yarn tails by weaving through several stitches inside the body pieces.

4. **Final Shaping:** Gently shape the neck curve and tail position as desired. The stuffing should hold the pose.

---

## TIPS FOR SUCCESS

- **Tight Tension:** Work stitches tightly so no stuffing shows through. If you crochet loosely, go down a hook size to 3.0mm.

- **Firm Stuffing:** The neck especially needs very firm stuffing to stand upright without flopping. Don't be shy with the fiberfill!

- **Standing Test:** Before sewing all pieces permanently, do a test assembly with pins. Make sure the dinosaur will balance on its legs.

- **Leg Placement:** The key to a stable brontosaurus is correct leg placement. Visualize the body as having four "corners" and place legs accordingly.

- **Neck Angle:** Sew the neck to angle slightly upward (not straight up, not horizontal). This gives the classic brontosaurus silhouette.

---

## SIZE VARIATIONS

**Smaller Version (4-5" long):**
- Use DK weight (3) yarn with 3.0mm hook
- Reduce even rounds: Body 6 rounds, Neck 6 rounds, Legs 4 rounds

**Larger Version (8-10" long):**
- Use bulky weight (5) yarn with 5.0mm hook
- Add even rounds: Body 12 rounds, Neck 12 rounds, Legs 10 rounds

---

## TROUBLESHOOTING

**Neck droops forward:** Not stuffed firmly enough. Add more stuffing or use a pipe cleaner/wire armature inside neck.

**Dinosaur won't stand:** Check leg placement - they may be too far forward or back. Reposition and re-sew.

**Gaps showing stuffing:** Your tension is too loose. Use a smaller hook or work tighter stitches.

**Parts look different sizes:** Check your stitch counts carefully. Recount each round to ensure accuracy.

---

## CARE INSTRUCTIONS

- Spot clean with damp cloth
- If fully washable yarn used, hand wash in cool water and air dry
- Reshape while drying if needed
- Not suitable for children under 3 if using safety eyes (choking hazard)

---

## PATTERN TESTING NOTES

Stitch count verification:
- Body: 12→18→24→(8 rnds)→18→12→6 ✓
- Head: 6→12→18→(3 rnds)→12→6 ✓
- Neck: 6→12→18→(8 rnds)→12→(2 rnds) ✓
- Tail: 6→12→18→(5 rnds)→12→9→6→3 ✓
- Legs (×4): 6→12→(6 rnds) ✓

Total rounds calculated: Body 15 + Head 8 + Neck 14 + Tail 15 + Legs 8 each = reasonable project time for beginners (4-6 hours)

---

**Congratulations!** You've completed your brontosaurus! This pattern uses the same basic techniques that work for many amigurumi projects. Once you've mastered these shapes, you can create countless variations.

**Share your creation** with #crochetbrontosaurus #amigurumidinosaur

---

*Pattern © 2024. For personal use only. Do not redistribute this pattern. You may sell finished items made from this pattern with credit.*
Disclaimer: This pattern was generated by AI and should be reviewed for accuracy before use. While we strive for quality, AI-generated content may contain errors. Please verify measurements, stitch counts, and instructions before beginning your project. Generated by purlJam.uk
Access your pattern anytime
Bookmark this page to access your pattern anytime