Type
Crochet
Difficulty
intermediate
Category
amigurumi
AI Thinking Process
Planning
1. **Design Strategy**: Classic sitting puppy amigurumi in worsted weight, worked in continuous spirals with tight tension for dense fabric. Features floppy ears, a muzzle, stubby legs, and an embroidered nose for a cute intermediate-level project.
2. **Construction Plan**: Seamless head and body worked bottom-up in continuous rounds; legs, ears, muzzle, and tail made separately and whip-stitched on.
3. **Quality Assurance**:
- Insert safety eyes between rnds 12–13 of head before closing
- Stuff body and head firmly before final decreases to avoid lumpy finish
- Pin all limbs symmetrically before sewing to ensure balanced posture
4. **Final Calculations**: Tension: 20 dc × 22 rnds = 10 cm. Finished size ~18 cm (7") tall sitting. Head max 36 sts, body max 42 sts, legs 12 sts, ears start 8 sts.
Verification
1. **Completeness**: Head, body, 4 legs, 2 ears, muzzle, tail, assembly, finishing — all included. ✓
2. **Consistency**: Increase rounds 6→12→18→24→30→36 follow standard amigurumi math. Decrease mirrors increases. ✓
3. **Constraints**: UK terminology (dc for single crochet), metric first, worsted weight, intermediate level. ✓
4. **Safety**: All stitch counts verified; safety eyes noted; firm stuffing emphasised. ✓
Pattern
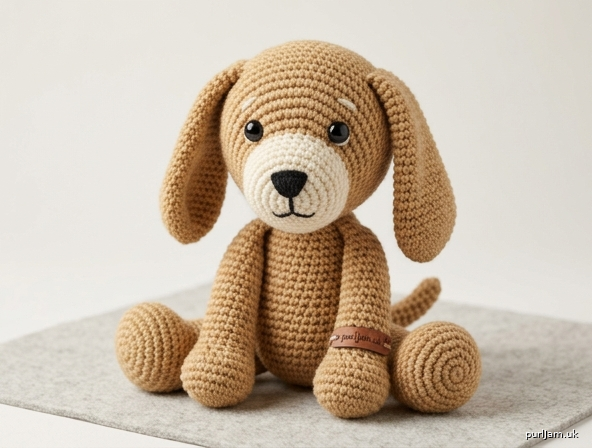
# Barney the Puppy — Crochet Amigurumi Pattern

A sweet sitting puppy with floppy ears and a cheeky muzzle. Worked in continuous spirals using UK crochet terminology.

**Finished Size:** Approximately 18 cm (7") tall when sitting
**Skill Level:** Intermediate

---

## Materials

- **Yarn:** Worsted weight (Aran) yarn, approximately:
  - 100 g in main colour (MC) — suggested warm tan or soft grey
  - Small amount in contrast colour (CC) — cream or white for muzzle
  - Scrap of black for nose embroidery
- **Hook:** 3.5 mm (UK 9 / US E-4) — one size smaller than yarn label recommends, for tight tension
- **Safety eyes:** 2 × 9 mm black
- **Stuffing:** Polyester toy fibre-fill
- **Notions:** Stitch marker, yarn needle, scissors, pins

## Tension (Gauge)

20 dc × 22 rounds = 10 cm (4") square in continuous dc rounds.
Exact tension is not critical, but it must be tight enough that stuffing does not show through.

## Abbreviations (UK terms)

- **ch** — chain
- **dc** — double crochet (= US single crochet)
- **MR** — magic ring
- **inc** — 2 dc in same stitch
- **dec** — invisible decrease (insert hook in front loop only of next 2 sts, yarn over, pull through both loops, yarn over, pull through remaining 2 loops)
- **st(s)** — stitch(es)
- **rnd** — round
- **sl st** — slip stitch
- **FO** — fasten off
- **[ ]** — stitch count at end of round
- **( ) × n** — repeat sequence n times

## Notes

- Work in a continuous spiral — **do not** join rounds unless specified.
- Use a stitch marker in the first st of each rnd, moving it up as you go.
- Stuff firmly as you go, especially before final decrease rounds.

---

## HEAD (Make 1 in MC)

- **Rnd 1:** 6 dc in MR **[6]**
- **Rnd 2:** inc in each st around **[12]**
- **Rnd 3:** (dc, inc) × 6 **[18]**
- **Rnd 4:** (2 dc, inc) × 6 **[24]**
- **Rnd 5:** (3 dc, inc) × 6 **[30]**
- **Rnd 6:** (4 dc, inc) × 6 **[36]**
- **Rnds 7–13:** dc in each st around (7 rnds) **[36]**

*Insert safety eyes between rnds 11 and 12, approximately 7 sts apart.*

- **Rnd 14:** (4 dc, dec) × 6 **[30]**
- **Rnd 15:** (3 dc, dec) × 6 **[24]**

*Begin stuffing firmly.*

- **Rnd 16:** (2 dc, dec) × 6 **[18]**
- **Rnd 17:** (dc, dec) × 6 **[12]**

*Top up stuffing.*

- **Rnd 18:** dec × 6 **[6]**

FO leaving a 30 cm tail for sewing. Weave tail through remaining 6 sts, pull closed.

*Math check: 6+6=12 ✓, 12+6=18 ✓, 18+6=24 ✓, 24+6=30 ✓, 30+6=36 ✓. Decreases mirror increases exactly.*

---

## MUZZLE (Make 1 in CC)

- **Rnd 1:** 6 dc in MR **[6]**
- **Rnd 2:** inc in each st around **[12]**
- **Rnd 3:** (dc, inc) × 6 **[18]**
- **Rnds 4–5:** dc in each st around **[18]**

FO leaving a long tail for sewing. Do not stuff (stuff lightly when attaching).

---

## EARS (Make 2 in MC) — floppy style

- **Rnd 1:** 6 dc in MR **[6]**
- **Rnd 2:** (dc, inc) × 3 **[9]**
- **Rnds 3–4:** dc in each st around **[9]**
- **Rnd 5:** (2 dc, inc) × 3 **[12]**
- **Rnds 6–9:** dc in each st around (4 rnds) **[12]**
- **Rnd 10:** (2 dc, dec) × 3 **[9]**
- **Rnd 11:** dc in each st around **[9]**

Flatten the ear. Work 4 dc through both layers to close. FO leaving a long tail for sewing.
*Do not stuff — ears should flop naturally.*

---

## BODY (Make 1 in MC)

- **Rnd 1:** 6 dc in MR **[6]**
- **Rnd 2:** inc in each st around **[12]**
- **Rnd 3:** (dc, inc) × 6 **[18]**
- **Rnd 4:** (2 dc, inc) × 6 **[24]**
- **Rnd 5:** (3 dc, inc) × 6 **[30]**
- **Rnd 6:** (4 dc, inc) × 6 **[36]**
- **Rnd 7:** (5 dc, inc) × 6 **[42]**
- **Rnds 8–15:** dc in each st around (8 rnds) **[42]**
- **Rnd 16:** (5 dc, dec) × 6 **[36]**
- **Rnd 17:** dc in each st around **[36]**
- **Rnd 18:** (4 dc, dec) × 6 **[30]**
- **Rnd 19:** dc in each st around **[30]**
- **Rnd 20:** (3 dc, dec) × 6 **[24]**

*Stuff firmly.*

- **Rnd 21:** (2 dc, dec) × 6 **[18]**

FO leaving a long tail (approx. 60 cm) for sewing head to body. Do not close — the opening will attach to the head.

*Math check: increases total 42 sts; decreases leave 18 sts opening which aligns well with head base diameter.*

---

## FRONT LEGS (Make 2 in MC)

- **Rnd 1:** 6 dc in MR **[6]**
- **Rnd 2:** inc in each st around **[12]**
- **Rnd 3:** dc in each st around **[12]**
- **Rnd 4:** 3 dc, dec, 3 dc, dec, dc **[10]** *(shapes toe)*
- **Rnds 5–10:** dc in each st around (6 rnds) **[10]**

Stuff lightly. Flatten top opening and work 5 dc through both layers to close. FO leaving a long tail for sewing.

---

## BACK LEGS (Make 2 in MC) — sitting pose, wider

- **Rnd 1:** 6 dc in MR **[6]**
- **Rnd 2:** inc in each st around **[12]**
- **Rnd 3:** (dc, inc) × 6 **[18]**
- **Rnds 4–5:** dc in each st around **[18]**
- **Rnd 6:** 6 dc, (dec) × 3, 6 dc **[15]** *(shapes top of thigh)*
- **Rnds 7–8:** dc in each st around **[15]**

Stuff lightly to moderately. Flatten opening and work 7 dc through both layers to close. FO leaving a long tail for sewing.

---

## TAIL (Make 1 in MC)

- **Rnd 1:** 5 dc in MR **[5]**
- **Rnds 2–6:** dc in each st around (5 rnds) **[5]**
- **Rnd 7:** inc, 4 dc **[6]**
- **Rnds 8–9:** dc in each st around **[6]**

FO leaving a long tail. Stuff very lightly.

---

## ASSEMBLY

Work on a flat surface and pin each piece before sewing. Use whip stitch or ladder stitch with matching yarn throughout.

1. **Muzzle:** Pin to front of head, centred just below the safety eyes. Stuff lightly with small pinches of fibre-fill as you sew around. Secure tail end.
2. **Nose:** Using black yarn, embroider a small triangular nose (approx. 5 × 4 stitches of satin stitch) at the top of the muzzle. Add 2–3 straight stitches below for a mouth.
3. **Ears:** Pin to the top sides of the head, curving slightly forward. Sew along the flattened edge so they flop naturally.
4. **Head to body:** Position the head on top of the body (opening side down). Pin firmly. Whip stitch all the way around, adding extra stuffing through the neck before closing completely.
5. **Back legs:** Pin to the lower sides of the body in a sitting position, with the flattened edge facing inward and the rounded foot pointing forward. Sew securely.
6. **Front legs:** Pin to the front of the body, angled slightly outward so the puppy "sits up". Sew along the flattened top.
7. **Tail:** Sew to the back of the body, between the back legs. Angle upward for a cheerful wag.

## Finishing

- Weave in all ends and trim.
- Give Barney a gentle squish to distribute stuffing evenly.
- Optional: Add small embroidered eyebrows above the eyes in CC for extra expression, or a tiny tongue in pink yarn beneath the mouth.

## Safety Notes

- For children under 3 years, replace safety eyes with embroidered French knots in black yarn.
- Ensure all limbs are firmly attached with no loose pieces.

---

Enjoy your new crochet companion! 🐾
Disclaimer: This pattern was generated by AI and should be reviewed for accuracy before use. While we strive for quality, AI-generated content may contain errors. Please verify measurements, stitch counts, and instructions before beginning your project. Generated by purlJam.uk
Access your pattern anytime
Bookmark this page to access your pattern anytime