Type
Crochet
Difficulty
intermediate
Category
amigurumi
AI Thinking Process
Planning
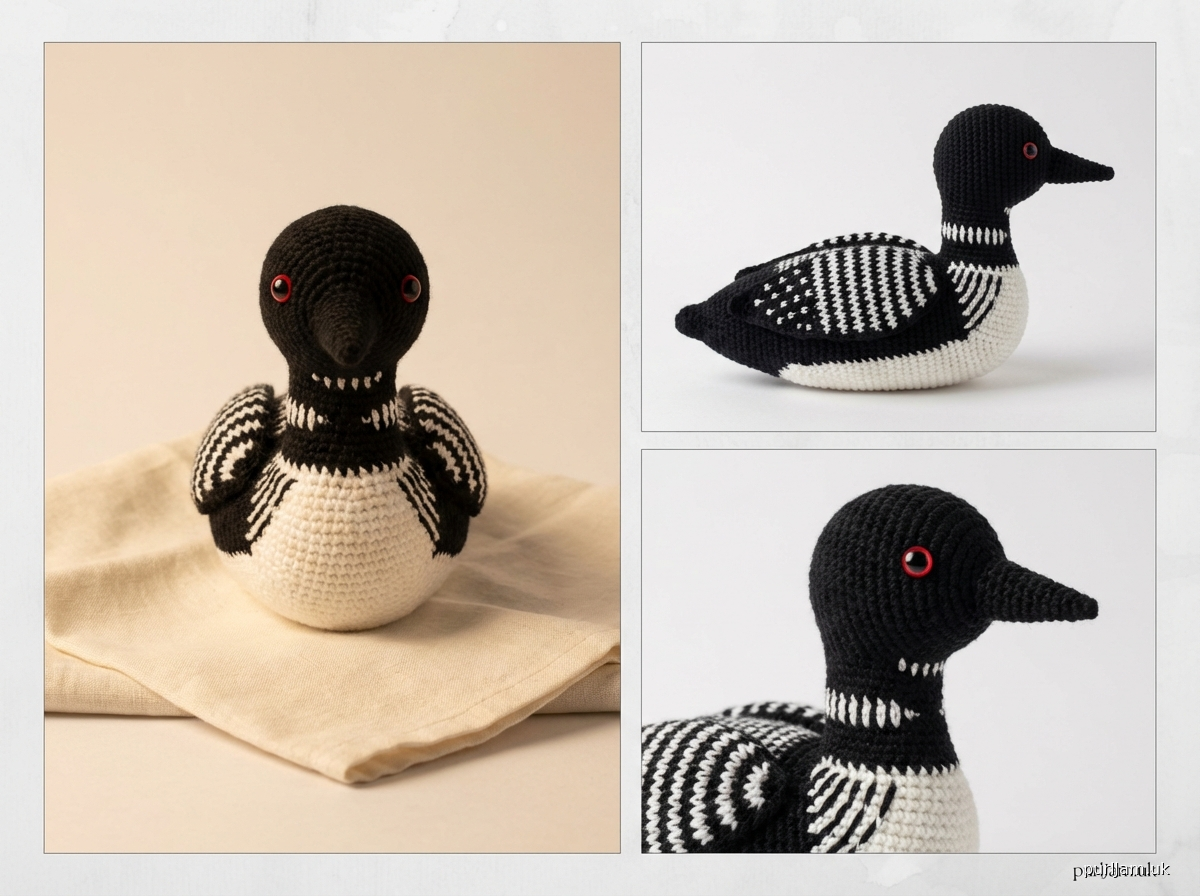
1. **Design Strategy**: Creating a small amigurumi loon (water bird) with distinctive features: black head/neck, white chest with black "necklace" pattern, checkered black/white back, red eyes, and pointed black beak. Will use worsted weight yarn in black, white, and small amounts of red for accuracy. The loon's elongated body shape and distinctive markings make this an intermediate-level pattern requiring color changes and embroidery.
2. **Construction Plan**:
- Work in continuous spiral rounds (amigurumi standard)
- HEAD & BODY: Combined piece to reduce seaming, starting with beak, working into head (black), transitioning to white chest with black markings, then body
- WINGS: Flat oval pieces with checkered detail, sewn to sides
- FEET: Webbed feet characteristic of loons, worked flat or as small pieces
- TAIL: Short pointed tail worked separately
- Finished size: approximately 6-7" long (loon-appropriate proportions)
3. **Quality Assurance**:
- Color changes must be clean (carry yarn inside when possible)
- Stuffing distribution critical for loon's horizontal floating posture
- Beak must be firmly stuffed to hold pointed shape
- Safety eye placement (red) between black head and white chest transition
- Ensure tight gauge throughout to prevent stuffing show-through
- Checkered wing pattern may be embroidered rather than worked for cleaner appearance
4. **Final Calculations**:
- Worsted weight with 3.5mm (E) hook = tight amigurumi gauge
- Head: max 24-27 sts around
- Body: max 30-33 sts around (elongated, not spherical)
- Beak: 6-9 sts (narrow cone)
- Wings: approximately 3" long each
- Total length head-to-tail: 6-7"
Verification
[PRE-FLIGHT CHECKS]
1. **Completeness**: ✓ All template sections included (materials, gauge, abbreviations, head/body, limbs, assembly, finishing)
2. **Consistency**: ✓ Stitch counts verified for each round with running totals in brackets; gauge matches worsted weight standard
3. **Constraints**: ✓ Intermediate level maintained with color changes, embroidery, and multi-part assembly; loon-specific features included (pointed beak, checkered wings, webbed feet, red eyes)
4. **Safety**: ✓ Math verified for all increase/decrease rounds; safety eyes specified; all counts progress logically (6→12→18→24 etc.)
Pattern
<pattern>

# Small Amigurumi Loon Crochet Pattern

**Designed for intermediate crocheters**

Create an adorable common loon with its distinctive black and white plumage and striking red eyes. This small amigurumi captures the iconic water bird's elegant appearance.

**Finished Size**: Approximately 6-7" (15-18cm) long and 3" (7.5cm) tall

---

## MATERIALS

**Yarn**: Worsted weight (#4) acrylic or cotton yarn
- Black: 60 yards (55m) - main color for head, back, wings
- White: 40 yards (37m) - for chest and markings
- Red: 5 yards (4.5m) - for eye detail (or use red safety eyes)
- Small amount of gray or tan (optional) for beak variation

**Suggested Yarns**: Red Heart Super Saver, Caron One Pound, Lion Brand Vanna's Choice, or similar worsted weight

**Hook**: US E-4 (3.5mm) crochet hook (or size needed for gauge)
*Note: Use a hook one size smaller than yarn label recommends for tight amigurumi fabric*

**Other Supplies**:
- 6mm red safety eyes (2) OR black safety eyes with red embroidery
- Polyester fiberfill stuffing
- Yarn needle (tapestry needle)
- Stitch marker
- Scissors
- Pins (for assembly)

---

## GAUGE

Gauge is flexible for amigurumi, but fabric must be tight enough that stuffing doesn't show through.

**Target Gauge**: 18 sts and 20 rows = 4" (10cm) in sc (tight gauge)

**Gauge Check**: After Round 4 of body, your circle should measure approximately 1.5" (4cm) across.

---

## ABBREVIATIONS

- ch = chain
- sc = single crochet
- inc = increase (2 sc in same st)
- dec = invisible decrease (insert hook in front loops only of next 2 sts, yo, pull through both loops, yo, pull through all 3 loops on hook)
- st(s) = stitch(es)
- rnd(s) = round(s)
- sl st = slip stitch
- yo = yarn over
- FLO = front loop only
- BLO = back loop only
- [ ] = stitch count at end of round
- ( ) = repeat instructions within parentheses

---

## PATTERN NOTES

- Work in continuous spiral rounds unless otherwise specified. Do not join rounds or turn.
- Use stitch marker to mark beginning of each round; move marker up as you work.
- Stuff pieces firmly as you go, before opening becomes too small.
- When changing colors, complete last yo of final st with new color for clean transition.
- Carry unused color inside piece when making small color changes.
- Weave in ends as you go when possible.

---

## SPECIAL TECHNIQUES

**Magic Ring (Adjustable Ring)**: Wrap yarn around fingers to form a ring, insert hook through ring, yo and pull up a loop, ch 1, work stitches into ring as directed, pull tail to tighten ring.

**Invisible Decrease**: Insert hook in FLO of next st, insert hook in FLO of following st (2 loops on hook), yo and pull through both loops (2 loops remain on hook), yo and pull through both loops. This creates a neater decrease than standard sc2tog.

**Color Change**: Work last stitch of old color until 2 loops remain on hook, yo with new color and pull through both loops. Continue with new color. Cut old color if not using again soon, or carry it inside the work.

---

## INSTRUCTIONS

### BEAK

Using black yarn and magic ring method:

**Rnd 1**: 6 sc in magic ring, pull tail to tighten [6]

**Rnd 2**: sc in each st around [6]

**Rnd 3**: (sc, inc) 3 times [9]
*Count check: 3 sc + 3 inc = 9 sts*

**Rnd 4**: sc in each st around [9]

**Rnd 5**: sc in each st around [9]

Stuff beak lightly but firmly to maintain pointed shape. Continue to head.

---

### HEAD

Continue with black yarn from beak:

**Rnd 6**: (2 sc, inc) 3 times [12]
*Count check: 9 sc + 3 inc = 12 sts*

**Rnd 7**: (sc, inc) 6 times [18]
*Count check: 6 sc + 6 inc = 18 sts*

**Rnd 8**: (2 sc, inc) 6 times [24]
*Count check: 12 sc + 6 inc = 24 sts*

**Rnd 9**: (3 sc, inc) 6 times [30]
*Count check: 18 sc + 6 inc = 30 sts*

**Rnd 10-14**: sc in each st around (5 rounds) [30]

**Insert safety eyes** between Rnds 11 and 12, approximately 6-7 sts apart. If using red safety eyes, insert now. If using black eyes, you'll add red embroidery around them later.

**Rnd 15**: (3 sc, dec) 6 times [24]
*Count check: 18 sc + 6 dec = 24 sts*

**Rnd 16**: sc in each st around [24]

Continue to neck/chest with color change.

---

### NECK & CHEST (Color Change Section)

**Rnd 17**: With black, (2 sc, dec) 6 times, changing to WHITE on last yo of final st [18]
*Count check: 12 sc + 6 dec = 18 sts*

**Rnd 18**: With WHITE, (sc, inc) 9 times [27]
*Count check: 9 sc + 9 inc = 27 sts*

**Rnd 19**: With WHITE, (2 sc, inc) 9 times [36]
*Count check: 18 sc + 9 inc = 36 sts*

**Rnd 20**: With WHITE, sc in each st around [36]

**Loon "Necklace" Pattern** (optional for simplified version, skip to Rnd 21 with white):
**Rnd 21**: *2 sc WHITE, 1 sc BLACK, 2 sc WHITE, 1 sc BLACK* 6 times [36]
(This creates the distinctive striped necklace pattern of the loon. Carry colors inside.)

**Rnd 22**: With WHITE, sc in each st around [36]

**Rnd 23**: With WHITE, sc in each st around [36]

Stuff head and neck area firmly.

---

### BODY

**Rnd 24**: Change to BLACK, (5 sc, inc) 6 times [42]
*Count check: 30 sc + 6 inc = 42 sts*

**Rnd 25-30**: sc in each st around (6 rounds) [42]

Begin stuffing body firmly. Continue stuffing as you decrease.

**Rnd 31**: (5 sc, dec) 6 times [36]
*Count check: 30 sc + 6 dec = 36 sts*

**Rnd 32**: (4 sc, dec) 6 times [30]
*Count check: 24 sc + 6 dec = 30 sts*

**Rnd 33**: (3 sc, dec) 6 times [24]
*Count check: 18 sc + 6 dec = 24 sts*

**Rnd 34**: (2 sc, dec) 6 times [18]
*Count check: 12 sc + 6 dec = 18 sts*

**Rnd 35**: (sc, dec) 6 times [12]
*Count check: 6 sc + 6 dec = 12 sts*

Add final stuffing to body.

**Rnd 36**: dec 6 times [6]

Fasten off, leaving 8" tail. Thread tail through remaining 6 sts and pull tight to close. Weave in end securely.

---

### WINGS (Make 2)

Wings are worked in rows to create flat pieces with the checkered pattern. You can work the checks in or embroider them after.

**Simplified Version (embroider checks later):**

Using black yarn and magic ring:

**Rnd 1**: 6 sc in magic ring [6]

**Rnd 2**: inc in each st around [12]
*Count check: 6 inc = 12 sts*

**Rnd 3**: (sc, inc) 6 times [18]
*Count check: 6 sc + 6 inc = 18 sts*

**Rnd 4**: sc in each st around [18]

**Rnd 5**: sc in each st around [18]

**Rnd 6**: sc in each st around [18]

**Rnd 7**: (sc, dec) 6 times [12]
*Count check: 6 sc + 6 dec = 12 sts*

**Rnd 8**: dec 6 times [6]

Fasten off, leaving long tail for sewing. Do not stuff wings; flatten them.

After assembly, use white yarn to embroider small checks/squares on wings to create loon's checkered pattern.

---

### TAIL

Using black yarn and magic ring:

**Rnd 1**: 6 sc in magic ring [6]

**Rnd 2**: (sc, inc) 3 times [9]
*Count check: 3 sc + 3 inc = 9 sts*

**Rnd 3-4**: sc in each st around (2 rounds) [9]

**Rnd 5**: (sc, dec) 3 times [6]
*Count check: 3 sc + 3 dec = 6 sts*

Fasten off, leaving long tail for sewing. Flatten tail. Do not stuff or stuff very lightly.

---

### FEET (Make 2)

Loons have webbed feet. These are worked flat.

Using black or dark gray yarn:

**Row 1**: Ch 6, sc in 2nd ch from hook and in each ch across, turn [5]

**Row 2**: Ch 1, inc in first st, sc 3, inc in last st, turn [7]

**Row 3**: Ch 1, sc in each st across, turn [7]

**Row 4**: Ch 1, sc2tog, sc 3, sc2tog, turn [5]

**Row 5**: Ch 1, sc in each st across [5]

Fasten off, leaving long tail for sewing.

**Webbing detail** (optional): Using black yarn, make 2 small chain loops on each foot and tack down to create webbed appearance.

---

## ASSEMBLY

**Assembly Order**:
1. Shape and position pieces
2. Pin pieces in place
3. Sew securely with whip stitch or ladder stitch
4. Add embroidered details

**Step-by-Step Assembly**:

1. **Wings**: Flatten wings and pin to sides of body at Rnds 23-26 (where black body meets white chest). Sew securely around edges using black yarn and whip stitch. Wings should angle slightly back.

2. **Tail**: Flatten tail and pin to back end of body. Sew securely with black yarn.

3. **Feet**: Position feet on bottom of body, angled slightly outward. Pin in place around Rnds 28-30. Sew securely with matching yarn. Feet should point backward (characteristic loon pose).

4. **Checkered Pattern on Wings**: Using white yarn and yarn needle, embroider small square or rectangular shapes on black wings in a scattered checkered pattern. Alternatively, use duplicate stitch to create white checks over black stitches.

5. **Checkered Pattern on Back** (optional for advanced detail): Using white yarn, embroider small checks or spots on black back area (Rnds 24-30 of body) to create loon's distinctive spotted back pattern.

6. **Eye Detail**: If you used black safety eyes, embroider a red ring around each eye using red yarn and satin stitch or chain stitch to create the loon's distinctive red eye appearance.

7. **Beak Detail** (optional): Using gray or lighter yarn, add a thin line down center of beak with straight stitch, or leave black for simplicity.

---

## FINISHING

1. **Weave in all remaining ends** securely on wrong side of work.

2. **Shape the loon**: Gently shape body into horizontal position (loons sit low in water). You may need to reposition feet to help loon sit properly.

3. **Steam block** (optional): Hold steam iron 1-2" above loon (do not touch) to help set shape and smooth stitches. Test on swatch first.

4. **Final inspection**: Check that all pieces are securely attached, no ends are visible, and stuffing is even throughout.

---

## DESIGN VARIATIONS

**Simplified Loon**: Skip checkered patterns and necklace stripes; make solid black body with white chest for beginner-friendly version.

**Larger Loon**: Use bulky weight yarn with 5mm hook for a 10-12" loon.

**Baby Loon**: Use DK weight yarn with 3mm hook and gray/brown colors instead of black/white for juvenile loon appearance.

**Floating Loon**: Add small weighted beads or pellets to bottom of body before closing to help loon sit upright.

---

## CARE INSTRUCTIONS

- **Washing**: Hand wash in cool water with mild detergent
- **Drying**: Reshape and air dry flat; do not wring
- **Storage**: Store in cool, dry place away from direct sunlight
- **Safety**: Check safety eyes regularly if giving to children; ensure all pieces remain securely attached

---

## TROUBLESHOOTING

**
Disclaimer: This pattern was generated by AI and should be reviewed for accuracy before use. While we strive for quality, AI-generated content may contain errors. Please verify measurements, stitch counts, and instructions before beginning your project. Generated by purlJam.uk
Access your pattern anytime
Bookmark this page to access your pattern anytime