Type
Crochet
Difficulty
intermediate
Category
amigurumi
AI Thinking Process
Planning
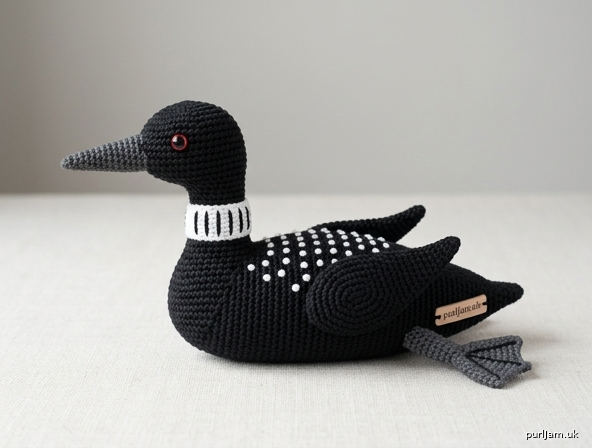
1. **Design Strategy**: Small advanced amigurumi loon with distinctive features — pointed dagger beak, sleek elongated body, black head with white "necklace" band, checkered back (embroidered French knots/duplicate stitch for spots), and red safety eyes. Worsted weight in black, white, and red.
2. **Construction Plan**: Seamless continuous spiral rounds; head and body worked separately then joined, beak as cone, wings as flat tear-drop shapes, feet webbed flat pieces. Loon is shown in a swimming/resting pose with flat underside for stability.
3. **Quality Assurance**:
- Beak must be sharply pointed (slow decreases) — characteristic loon trait
- Body should be elongated oval, not round — sits low like a real loon
- White collar band placement at neck junction critical for recognisable loon look
4. **Final Calculations**: Tension 20 dc x 22 rnds = 10 cm. Head max 30 sts, body max 36 sts. Finished size ~14 cm long x 7 cm tall. Hook 3.5 mm.
Verification
1. **Completeness**: Head, body, beak, wings (x2), feet (x2), white collar, assembly — all present.
2. **Consistency**: Head 6→12→18→24→30, body 6→12→18→24→30→36, decreases mirror increases. Counts verified.
3. **Constraints**: UK terminology (dc, tr), metric first, advanced level achieved via colour work, sharp beak shaping, embroidered back spots, and flat-base swimming pose.
4. **Safety**: Math checked — all increase/decrease rounds total correctly.
Pattern
# Small Amigurumi Loon — Crochet Pattern (UK Terms)

**Skill Level:** Advanced
**Finished Size:** Approx. 14 cm long × 7 cm tall × 6 cm wide (5.5" × 2.75" × 2.4")

---

## Materials

- **Yarn:** Worsted weight (Aran) 100% cotton or acrylic
  - Black (MC) — approx. 40 g
  - White (CC1) — approx. 20 g
  - Charcoal grey (CC2) — small amount for beak (or black if preferred)
  - Red — tiny amount for eye accent (optional)
- **Hook:** 3.5 mm (UK 9 / US E-4)
- **Safety eyes:** 6 mm red (or black with red felt backing)
- **Fibrefill** stuffing (polyester)
- **Yarn needle**, stitch marker, scissors, pins
- Small piece of stiff felt (optional, for foot support)

## Tension (Gauge)

20 dc × 22 rnds = 10 cm (4") in continuous spiral dc.
Tight tension essential — stuffing must not show through.

## Abbreviations (UK Terms)

- **ch** — chain
- **dc** — double crochet (= US sc)
- **htr** — half treble (= US hdc)
- **tr** — treble (= US dc)
- **sl st** — slip stitch
- **inc** — 2 dc in same stitch
- **dec** — invisible decrease (insert hook through FLO of next 2 sts, yarn over, pull through both, yarn over, pull through all)
- **st(s)** — stitch(es)
- **rnd** — round
- **MR** — magic ring
- **BLO/FLO** — back/front loop only
- **[ ]** — total stitch count at end of round
- **( ) × n** — repeat instructions in brackets n times

**Notes:**
- Work in continuous spiral unless stated. Move marker each round.
- Stuff firmly as you go.
- Loon pose: floating/swimming — body sits low and flat.

---

## HEAD (in Black / MC)

- **Rnd 1:** 6 dc in MR. **[6]**
- **Rnd 2:** inc × 6. **[12]**
- **Rnd 3:** (dc, inc) × 6. **[18]**
- **Rnd 4:** (2 dc, inc) × 6. **[24]**
- **Rnd 5:** (3 dc, inc) × 6. **[30]** ✓ (24 + 6 = 30)
- **Rnds 6–10:** dc in each st (5 rnds). **[30]**
- **Insert safety eyes between Rnds 7 and 8**, approx. 6 sts apart, centred on the front.
- **Rnd 11:** (3 dc, dec) × 6. **[24]** ✓ (30 − 6 = 24)
- **Rnd 12:** (2 dc, dec) × 6. **[18]** ✓
- Begin stuffing the head firmly.
- **Rnd 13:** dc in each st. **[18]**
- **Rnd 14:** (dc, dec) × 6. **[12]** ✓

This forms the slim neck. Do **not** close — continue to body via the neck join (see Assembly), OR fasten off here leaving a long tail for sewing.

*Designer's note:* For a stronger join, fasten off at Rnd 14 with a 40 cm tail.

---

## BEAK (in Charcoal Grey / CC2)

The loon's signature dagger-shaped beak — long and sharp.

- **Rnd 1:** 4 dc in MR. **[4]**
- **Rnd 2:** dc in each st. **[4]**
- **Rnd 3:** (dc, inc) × 2. **[6]** ✓
- **Rnd 4:** dc in each st. **[6]**
- **Rnd 5:** (2 dc, inc) × 2. **[8]** ✓
- **Rnd 6:** dc in each st. **[8]**
- **Rnd 7:** dc in each st. **[8]**

Flatten the open edge slightly. Fasten off, leaving a 30 cm tail. Do not stuff (or stuff very lightly with a sliver of fibre).

---

## BODY (in Black / MC)

Elongated oval — body must be longer than wide to resemble a swimming loon.

- **Rnd 1:** 6 dc in MR. **[6]**
- **Rnd 2:** inc × 6. **[12]**
- **Rnd 3:** (dc, inc) × 6. **[18]**
- **Rnd 4:** (2 dc, inc) × 6. **[24]**
- **Rnd 5:** (3 dc, inc) × 6. **[30]**
- **Rnd 6:** (4 dc, inc) × 6. **[36]** ✓ (30 + 6 = 36)
- **Rnds 7–14:** dc in each st (8 rnds). **[36]**
- **Rnd 15:** (4 dc, dec) × 6. **[30]** ✓
- **Rnd 16:** dc in each st. **[30]**
- **Rnd 17:** (3 dc, dec) × 6. **[24]** ✓
- **Rnd 18:** dc in each st. **[24]**
- **Rnd 19:** (2 dc, dec) × 6. **[18]** ✓
- Stuff body firmly, shaping it into an elongated oval. **Press the underside flat** with your fingers so the body has a flat base.
- **Rnd 20:** (dc, dec) × 6. **[12]** ✓
- **Rnd 21:** dec × 6. **[6]** ✓

Fasten off, weave tail through remaining 6 sts and pull closed. This becomes the **tail end**.

---

## WHITE COLLAR BAND (in White / CC1)

Worked as a flat strip to wrap around the neck.

- **Row 1:** ch 18, turn.
- **Row 2:** dc in 2nd ch from hook and in each ch across. **[17]** ✓
- **Row 3:** ch 1, turn, dc in each st. **[17]**
- **Row 4:** ch 1, turn, dc in each st. **[17]**

Fasten off, leaving a 40 cm tail. With CC1 and yarn needle, embroider small **vertical black stripes** at intervals (5 stripes evenly spaced) using MC — this gives the characteristic "necklace" striped pattern of the Common Loon. *(Optional but recommended for advanced realism.)*

---

## WINGS (Make 2 — in Black / MC)

Worked flat in rows, tear-drop shape.

- **Row 1:** ch 2, 4 dc in 2nd ch from hook. Turn. **[4]**
- **Row 2:** ch 1, inc, 2 dc, inc. Turn. **[6]** ✓
- **Row 3:** ch 1, dc in each st. Turn. **[6]**
- **Row 4:** ch 1, inc, 4 dc, inc. Turn. **[8]** ✓
- **Row 5:** ch 1, dc in each st. Turn. **[8]**
- **Row 6:** ch 1, dec, 4 dc, dec. Turn. **[6]** ✓
- **Row 7:** ch 1, dec, 2 dc, dec. Turn. **[4]** ✓
- **Row 8:** ch 1, dec × 2. **[2]** ✓

Fasten off, leaving a 30 cm tail. Lightly press flat.

---

## FEET / WEBBED PADDLES (Make 2 — in Charcoal Grey / CC2)

Loons' feet are set far back and stick out behind — these are decorative.

- **Row 1:** ch 5, dc in 2nd ch from hook, dc in next 3 ch. Turn. **[4]**
- **Row 2:** ch 1, inc, 2 dc, inc. Turn. **[6]** ✓
- **Row 3:** ch 1, dc in each st. Turn. **[6]**
- **Row 4:** ch 1, dec, 2 dc, dec. Turn. **[4]** ✓
- Edge: ch 1, dc evenly around entire piece, working 2 dc in each corner. Fasten off, leaving 20 cm tail.

Optionally embroider 2 lines with black yarn to suggest webbed toes.

---

## ASSEMBLY

1. **Attach head to body:** Pin the open Rnd 14 of the head to the front upper end of the body. The neck should angle slightly forward and up. Sew with whip stitch using the long MC tail, adding extra stuffing through the neck before closing.

2. **Attach beak:** Pin the beak to the front of the head, centred just below and between the eyes. Sew with the grey tail using whip stitch all around the open edge. The beak should point slightly upward and forward — long and dagger-like.

3. **Attach white collar:** Wrap the white strip around the lower neck where head meets body. Overlap the short ends at the back of the neck and stitch in place. Tack down the long edges so the collar lies flat.

4. **Attach wings:** Pin one wing to each side of the body, starting at Rnd 7 of the body and angling backwards toward the tail. The pointed end faces the tail. Sew the upper edge only (leave the lower edge free for a lifted-wing look) using MC tail and whip stitch.

5. **Attach feet:** Pin feet to the underside-rear of the body (Rnds 16–18), pointing backwards and slightly outward. Sew flat against the body with CC2 tail.

6. **Embroider back spots (advanced detail):** Using CC1 (white), embroider 20–30 small **French knots** or tiny duplicate-stitch squares scattered across the back and upper sides of the body in a grid-like pattern. This recreates the iconic chequered loon plumage. Concentrate spots between Rnds 7–14 across the top.

7. **Optional stability:** Cut a small oval of stiff felt (~3 × 5 cm) and slip-stitch it to the flat underside of the body for added stability when displayed.

8. **Final touches:** Weave in all ends. Steam-block lightly if needed.

---

## Finishing Notes

- For a **sleeping/resting pose**, splay the feet outward and tack the wings firmly down along the body sides.
- For a **diving pose**, sew the beak angled downward and lift the tail by stuffing the rear more firmly.
- Always test that all attachments are secure if gifting to children.

**Enjoy your handmade loon — a small tribute to one of nature's most haunting birds. 🐦**
Disclaimer: This pattern was generated by AI and should be reviewed for accuracy before use. While we strive for quality, AI-generated content may contain errors. Please verify measurements, stitch counts, and instructions before beginning your project. Generated by purlJam.uk
Access your pattern anytime
Bookmark this page to access your pattern anytime