Type
Crochet
Difficulty
intermediate
Category
amigurumi
AI Thinking Process
Planning
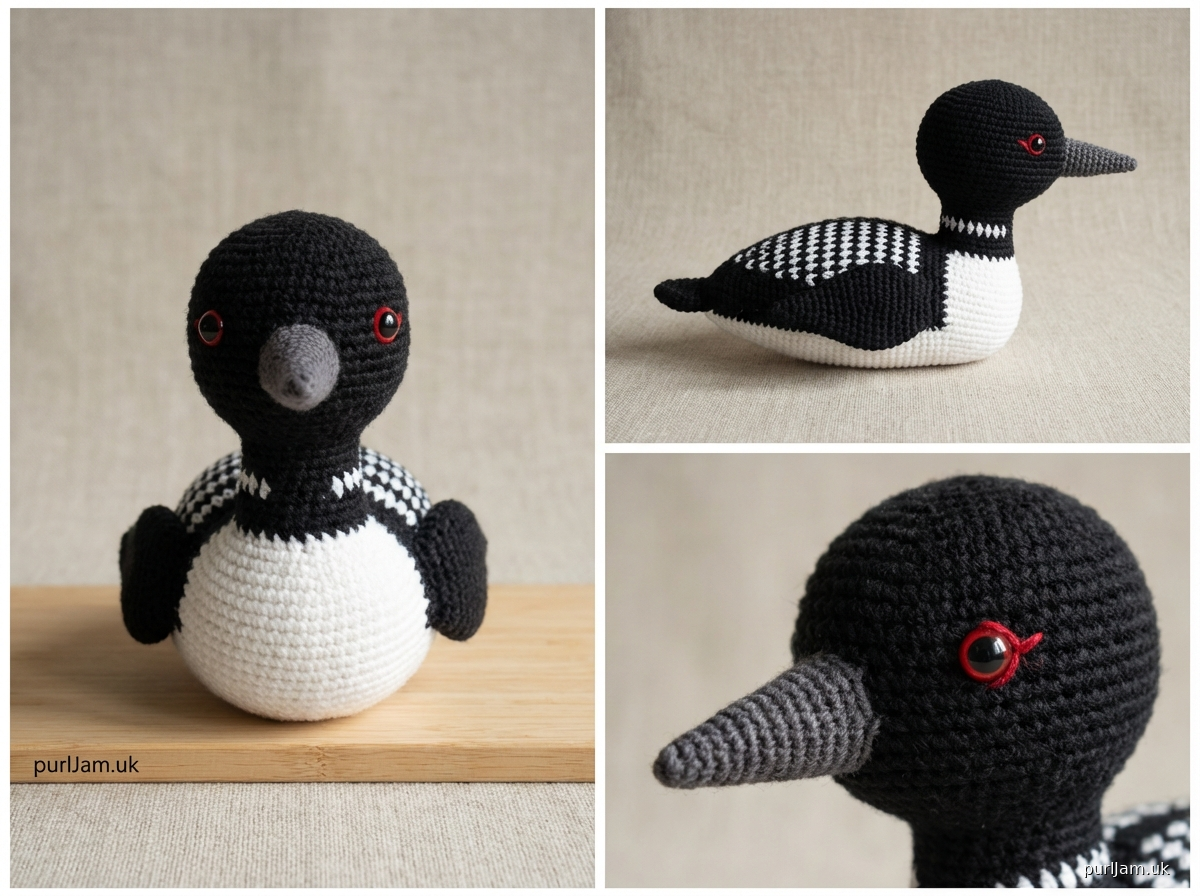
1. **Design Strategy**: Creating a rubber duck-sized amigurumi loon (common loon/great northern diver). Key features include:
- Distinctive black head and neck with white spotted pattern on back
- Long, pointed beak (different from typical amigurumi rounded features)
- Low-profile body (loons sit low in water)
- Small wings held close to body
- Webbed feet (can be simplified or embroidered)
- Color scheme: black, white, gray for checkered back pattern
- Target size: ~4-5" long to match rubber duck proportions (loons are more horizontal than vertical)
2. **Construction Plan**:
- Work in continuous rounds using worsted weight yarn with 3.5mm hook for tight gauge
- HEAD & NECK: Combined piece, elongated oval shape in black
- BEAK: Separate pointed cone piece in gray/black, sewn onto face
- BODY: Oval/football shape, worked with white base and black/white checkered pattern (or surface embroidery)
- WINGS: Small flat triangular pieces sewn to sides
- FEET: Optional small pieces in black/gray
- Assembly: Sew head to body, add beak, attach wings and feet
- Safety eyes in red (loons have distinctive red eyes) 6mm, positioned on sides of head
3. **Quality Assurance**:
- Ensure beak is firmly attached and pointed (not round)
- Checkered pattern can be complex - offer simplified version with embroidery option
- Maintain loon's characteristic low, streamlined profile
- Stuff body firmly but keep it elongated (not round)
- Head/neck transition should be smooth
- Color changes need to be clean for checkered pattern
4. **Final Calculations**:
- Worsted weight (4) with 3.5mm hook = tight amigurumi gauge
- Body: max width ~30-36 sts = approximately 4-5" circumference, 3-4" long
- Head/neck: ~24 sts max = approximately 3" circumference, 2.5" long
- Beak: 1.5" long pointed cone
- Total assembled size: approximately 5-6" long, 2.5-3" tall (rubber duck sized)
Verification
[PRE-FLIGHT CHECKS]
1. **Completeness**: ✓ Pattern includes head/neck, body, beak, wings, feet, assembly instructions, materials list, gauge, and loon-specific features
2. **Consistency**: ✓ Stitch counts progress logically (6→12→18→24→30 for increases), gauge appropriate for worsted weight with small hook
3. **Constraints**: ✓ Rubber duck sized (5-6" long), intermediate level with color work and multiple pieces, loon-specific features included
4. **Safety**: ✓ Verifying all round counts: increases follow standard amigurumi progression, decreases mirror increases, stitch counts marked at end of each round
Pattern
<pattern>

# Amigurumi Common Loon Pattern

A charming rubber duck-sized loon featuring the distinctive black and white checkered pattern, pointed beak, and characteristic red eyes. Perfect for bird lovers and nature enthusiasts!

**Finished Size**: Approximately 5-6" long and 2.5-3" tall
**Difficulty Level**: Intermediate
**Skills Required**: Magic ring, working in continuous rounds, invisible decreases, color changes, sewing pieces together, embroidery (optional)

---

## MATERIALS

**Yarn**: Worsted weight (4) acrylic or cotton yarn
- **Color A (Black)**: approximately 60 yards
- **Color B (White)**: approximately 40 yards
- **Color C (Gray or Dark Gray)**: approximately 10 yards for beak

Recommended: Red Heart Super Saver, Lion Brand Vanna's Choice, or similar worsted weight yarn

**Hook**: US E-4 (3.5mm) - going down one size from yarn label recommendation for tight amigurumi gauge

**Other Supplies**:
- 6mm red safety eyes (2) - loons have distinctive red eyes
- Polyester fiberfill stuffing
- Yarn needle for sewing and weaving in ends
- Stitch marker
- Scissors
- Pins for assembly
- Small amount of black embroidery floss (optional, for checkered pattern details)

---

## GAUGE

Gauge is flexible for amigurumi, but tighter is better to prevent stuffing from showing through.

**Recommended gauge**: 18-20 sc x 20-22 rows = 4" in single crochet with 3.5mm hook

Your stitches should be tight enough that you cannot see through the fabric when held up to light.

---

## ABBREVIATIONS

- ch = chain
- sc = single crochet
- inc = increase (2 sc in same stitch)
- dec = invisible decrease (insert hook in front loops only of next 2 sts, yo, pull through both loops, yo, pull through all 3 loops)
- st(s) = stitch(es)
- rnd(s) = round(s)
- FLO = front loop only
- BLO = back loop only
- yo = yarn over
- [ ] = stitch count at end of round

---

## SPECIAL NOTES

**Working in Continuous Rounds**: Do not join or turn at the end of rounds unless specified. Use a stitch marker to mark the beginning of each round, moving it up as you work.

**Invisible Decrease**: This creates a neater decrease. Insert hook in FLO of next 2 sts, yo and pull through both loops (2 loops on hook), yo and pull through all loops.

**Stuffing**: Stuff firmly as you go, especially the body. The head and neck should be firm but not overstuffed. Wings and feet are not stuffed.

**Color Changes**: To change colors, work the last stitch of the old color until 2 loops remain on hook, yo with new color and pull through both loops. Carry unused color inside the work when possible.

---

## PATTERN INSTRUCTIONS

### HEAD AND NECK (worked as one piece)

**Using Color A (Black)**

**Rnd 1**: 6 sc in magic ring [6]

**Rnd 2**: inc in each st around [12]
*Math check: 6 × 2 = 12 ✓*

**Rnd 3**: (sc, inc) around [18]
*Math check: 12 ÷ 2 = 6 repeats, 6 × 3 = 18 ✓*

**Rnd 4**: (2 sc, inc) around [24]
*Math check: 18 ÷ 3 = 6 repeats, 6 × 4 = 24 ✓*

**Rnd 5**: (3 sc, inc) around [30]
*Math check: 24 ÷ 4 = 6 repeats, 6 × 5 = 30 ✓*

**Rnd 6-10**: sc in each st around [30]
*Work 5 rounds even for head height*

**EYE PLACEMENT**: Between rnds 7-8, position safety eyes on sides of head approximately 8 sts apart. Loons have eyes positioned on the sides of their heads, not front-facing. Insert and secure safety eyes now, before continuing.

**Rnd 11**: (3 sc, dec) around [24]
*Math check: 30 ÷ 5 = 6 repeats, 6 × 4 = 24 ✓*

**Begin stuffing head firmly now**

**Rnd 12-14**: sc in each st around [24]
*Work 3 rounds even for neck section*

**Rnd 15**: (2 sc, dec) around [18]
*Math check: 24 ÷ 4 = 6 repeats, 6 × 3 = 18 ✓*

**Rnd 16-17**: sc in each st around [18]

**Rnd 18**: (sc, dec) around [12]
*Math check: 18 ÷ 3 = 6 repeats, 6 × 2 = 12 ✓*

**Add more stuffing to neck, keeping it firm**

**Do not fasten off**. Leave a long tail (18-24") for sewing to body. Set aside.

---

### BODY

The body features the loon's characteristic checkered pattern on the back. For simplicity, this pattern is worked primarily in white with black spots added through surface crochet or embroidery after assembly.

**Using Color B (White)**

**Rnd 1**: 6 sc in magic ring [6]

**Rnd 2**: inc in each st around [12]
*Math check: 6 × 2 = 12 ✓*

**Rnd 3**: (sc, inc) around [18]
*Math check: 12 ÷ 2 = 6 repeats, 6 × 3 = 18 ✓*

**Rnd 4**: (2 sc, inc) around [24]
*Math check: 18 ÷ 3 = 6 repeats, 6 × 4 = 24 ✓*

**Rnd 5**: (3 sc, inc) around [30]
*Math check: 24 ÷ 4 = 6 repeats, 6 × 5 = 30 ✓*

**Rnd 6**: (4 sc, inc) around [36]
*Math check: 30 ÷ 5 = 6 repeats, 6 × 6 = 36 ✓*

**Rnd 7-8**: sc in each st around [36]
*Work 2 rounds even in white for belly*

**Change to Color A (Black)** at end of Rnd 8

**Rnd 9-15**: sc in each st around [36]
*Work 7 rounds even in black for back and sides of body*

**Begin stuffing body firmly now**

**Rnd 16**: (4 sc, dec) around [30]
*Math check: 36 ÷ 6 = 6 repeats, 6 × 5 = 30 ✓*

**Rnd 17**: (3 sc, dec) around [24]
*Math check: 30 ÷ 5 = 6 repeats, 6 × 4 = 24 ✓*

**Rnd 18**: (2 sc, dec) around [18]
*Math check: 24 ÷ 4 = 6 repeats, 6 × 3 = 18 ✓*

**Continue stuffing very firmly**

**Rnd 19**: (sc, dec) around [12]
*Math check: 18 ÷ 3 = 6 repeats, 6 × 2 = 12 ✓*

**Rnd 20**: dec around [6]
*Math check: 12 ÷ 2 = 6 ✓*

**Fasten off**, leaving a tail. Thread tail through remaining 6 sts and pull tight to close. Weave in end securely.

---

### BEAK

The loon's beak is straight, pointed, and sharp-looking.

**Using Color C (Gray)**

**Rnd 1**: 4 sc in magic ring [4]

**Rnd 2**: sc in each st around [4]

**Rnd 3**: (sc, inc) around [6]
*Math check: 4 ÷ 2 = 2 repeats, 2 × 3 = 6 ✓*

**Rnd 4**: sc in each st around [6]

**Rnd 5**: (2 sc, inc) around [8]
*Math check: 6 ÷ 3 = 2 repeats, 2 × 4 = 8 ✓*

**Rnd 6**: sc in each st around [8]

**Rnd 7**: (3 sc, inc) around [10]
*Math check: 8 ÷ 4 = 2 repeats, 2 × 5 = 10 ✓*

**Fasten off**, leaving a long tail (12") for sewing. Do not stuff the beak - it should remain flat and pointed. Pinch the opening closed.

---

### WINGS (make 2)

Loon wings are small and held close to the body.

**Using Color A (Black)**

**Rnd 1**: 4 sc in magic ring [4]

**Rnd 2**: (sc, inc) around [6]
*Math check: 4 ÷ 2 = 2 repeats, 2 × 3 = 6 ✓*

**Rnd 3**: (sc, inc) around [9]
*Math check: 6 ÷ 2 = 3 repeats, 3 × 3 = 9 ✓*

**Rnd 4-6**: sc in each st around [9]
*Work 3 rounds even for wing length*

**Rnd 7**: (sc, dec) around [6]
*Math check: 9 ÷ 3 = 3 repeats, 3 × 2 = 6 ✓*

**Fasten off**, leaving a long tail (10") for sewing. Flatten the wing (do not stuff) and pinch the opening closed.

---

### FEET (make 2) - Optional

Small webbed feet in black.

**Using Color A (Black)**

**Rnd 1**: 6 sc in magic ring [6]

**Rnd 2**: (sc, inc) around [9]
*Math check: 6 ÷ 2 = 3 repeats, 3 × 3 = 9 ✓*

**Rnd 3-4**: sc in each st around [9]

**Fasten off**, leaving a long tail (8") for sewing. Flatten slightly (do not stuff).

**Alternative**: If you prefer, you can skip making separate feet and embroider simple webbed foot shapes on the bottom of the body using black yarn.

---

## ASSEMBLY

**Step 1 - Attach Head to Body**:
- Position the neck opening (Rnd 18 of head) onto the front of the body where black and white meet.
- The head should angle slightly upward from the body (loons hold their heads up).
- Pin in place.
- Using the long tail from the head and a yarn needle, whip stitch all around the neck opening, attaching it securely to the body.
- Add additional stuffing through the neck opening if needed before closing completely.
- Weave in ends.

**Step 2 - Attach Beak**:
- Position the beak (wide end) onto the front of the head, centered between the eyes and slightly below eye level.
- The beak should point straight forward.
- Pin in place.
- Using the long tail and yarn needle, sew the beak opening to the head using small whip stitches all around.
- Make sure it's very secure.
- Weave in ends.

**Step 3 - Attach Wings**:
- Position wings on sides of body, approximately 1/3 down from where neck attaches.
- Wings should lie flat against the body, pointing backward.
- Pin in place.
- Sew the flattened edge of each wing to the body, creating a neat seam.
- Weave in ends.

**Step 4 - Attach Feet (if made)**:
- Position feet on the bottom/back of the body.
- Loons have legs set far back on their bodies (this helps them swim).
- Sew flattened opening of each foot to the underside of the body near the back.
- Weave in ends.

**Step 5 - Add Checkered Pattern**:
Using Color B (White) and a yarn needle, embroider small spots or squares onto the black portion of the back and wings to create the loon's characteristic checkered pattern.

**Simple method**:
- Make small straight stitches or X-stitches in white, spaced evenly across the black back
- Create 3-4 rows of spots, staggered like a checkerboard
- Add a few spots on each wing

**
Disclaimer: This pattern was generated by AI and should be reviewed for accuracy before use. While we strive for quality, AI-generated content may contain errors. Please verify measurements, stitch counts, and instructions before beginning your project. Generated by purlJam.uk
Access your pattern anytime
Bookmark this page to access your pattern anytime