Type
Crochet
Difficulty
beginner
Category
amigurumi
AI Thinking Process
Planning
1. **Design Strategy**: Small handheld loon amigurumi using simple oval body and sphere head construction. Black main color with white belly accent and embroidered white spots on back, plus red eye and black/yellow beak for realism.
2. **Construction Plan**: Bottom-up seamless body (oval base), separate small sphere head attached to one end, with small wing flaps and a pointed beak made from cone shape.
3. **Quality Assurance**:
- Loon body is oval not spherical — must increase at both ends
- Beak needs to be sharply pointed (small cone, few rounds)
- Head should sit slightly elevated, not flush with body
4. **Final Calculations**: Gauge 4 sc/inch in worsted; finished size ~4" long x 2" tall — fits in hand. Body max 24 sts, head max 18 sts.
Verification
1. **Completeness**: Materials, gauge, abbreviations, body, head, beak, wings, assembly, finishing — all included.
2. **Consistency**: Body oval starts ch 6, increases to 24 sts, matches handheld size from template (24-30 sts max).
3. **Constraints**: Easy difficulty (basic stitches only: ch, sc, inc, dec, sl st); fits in hand (~4").
4. **Safety**: All stitch counts verified inline.
Pattern
# Little Loon — Pocket-Sized Amigurumi

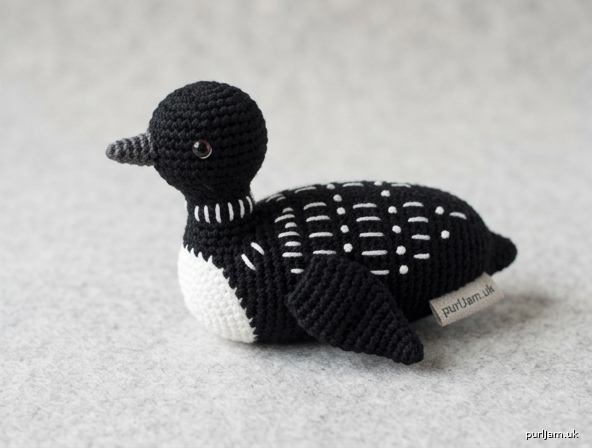
A charming handheld loon with classic black-and-white markings. Perfect for beginners — uses only basic amigurumi shapes (oval body, small sphere head, mini cone beak). Finished size approximately **4 inches (10 cm)** long.

---

## Materials

- **Worsted weight yarn (Yarn Weight 4)** in:
  - Black — main color (MC), about 25 yards
  - White (CC1) — about 10 yards
  - Dark gray or black (CC2) — 2 yards, for beak (or use MC)
  - Red — scrap, for eye accent (optional)
- **Crochet hook:** US E-4 (3.5 mm)
- Polyester fiberfill stuffing
- Yarn needle
- Stitch marker
- 2 small black safety eyes (4–6 mm), OR embroider with black yarn
- Scissors

## Gauge

4 sc = 1 inch (2.5 cm) in single crochet, worked in the round. Exact gauge not critical — work tightly so stuffing doesn't show through.

## Abbreviations (US Terms)

- **ch** — chain
- **sc** — single crochet
- **sl st** — slip stitch
- **inc** — 2 sc in same stitch (increase)
- **dec** — invisible decrease (sc 2 stitches together)
- **st(s)** — stitch(es)
- **rnd** — round
- **MC** — main color (black)
- **CC** — contrast color
- **[ ]** — total stitch count at end of round
- **( ) x N** — repeat instructions in parentheses N times

## Notes

- Work in continuous spirals (do not join) unless told to.
- Use a stitch marker in the first stitch of each round, moving it up as you go.
- Stuff firmly as you go.

---

## BODY (make 1, in MC – black)

The body is an elongated oval worked around a starting chain.

**Foundation:** With MC, ch 6.

**Rnd 1:** Starting in 2nd ch from hook: 2 sc in 2nd ch, sc in next 3 ch, 3 sc in last ch. Rotate to work along opposite side of chain: sc in next 3 ch, inc in last ch (same as starting ch). **[12 sts]**
*(Check: 2 + 3 + 3 + 3 + 1 = 12 ✓)*

**Rnd 2:** inc, sc 3, (inc) x 3, sc 3, (inc) x 2. **[18 sts]**
*(Check: 1+3+3+3+2 stitches worked into 12 = 12 sts; increases add 6 → 18 ✓)*

**Rnd 3:** sc, inc, sc 4, (sc, inc) x 3, sc 4, (sc, inc) x 2. **[24 sts]**
*(Check: 24 - 18 = 6 increases ✓)*

**Rnds 4–8:** sc in each st around. **[24 sts]** (5 rounds even)

**Rnd 9:** sc, dec, sc 4, (sc, dec) x 3, sc 4, (sc, dec) x 2. **[18 sts]**
*(Check: 24 - 6 = 18 ✓)*

Begin stuffing firmly. Continue stuffing as you go.

**Rnd 10:** (sc, dec) around. **[12 sts]**

**Rnd 11:** dec around. **[6 sts]**

Finish stuffing. Fasten off, leaving a 6-inch tail. Use yarn needle to weave through remaining 6 sts and cinch closed. Weave in end.

> The body should be a smooth oval shape, about 3.5" long and 2" wide.

---

## HEAD (make 1, in MC – black)

A small sphere that sits slightly raised at one end of the body.

**Rnd 1:** With MC, 6 sc in magic ring. **[6]**

**Rnd 2:** inc in each st. **[12]**

**Rnd 3:** (sc, inc) around. **[18]**

**Rnds 4–6:** sc around. **[18]** (3 rounds)

**Rnd 7:** (sc, dec) around. **[12]**

Stuff firmly.

**Rnd 8:** dec around. **[6]**

Fasten off, leaving an 8-inch tail for sewing. Cinch top closed if needed; tail will be used for assembly.

---

## BEAK (make 1, in CC2 – dark gray/black)

A tiny pointed cone.

**Rnd 1:** With CC2, 4 sc in magic ring. **[4]**

**Rnd 2:** sc around. **[4]**

**Rnd 3:** (sc, inc) x 2. **[6]**

**Rnd 4:** sc around. **[6]**

Fasten off, leaving a 6-inch tail. Do not stuff (it's tiny and pointed).

---

## WINGS (make 2, in MC – black)

Small flat ovals.

Ch 5.

**Row 1:** Starting in 2nd ch from hook: sc, sc, sc, 3 sc in last ch. Rotate, sc in next 2 ch, inc in last ch. **[9 sts]** Do not turn.

Sl st in next st to even out edge. Fasten off, leaving a 6-inch tail.

---

## BELLY PATCH (optional, in CC1 – white)

For a more realistic loon, add a white oval belly. Skip if you prefer a simpler finish.

Ch 5.

**Row 1:** Starting in 2nd ch from hook: sc, sc, 2 sc in next, 3 sc in last ch. Rotate: sc, sc, inc. **[9 sts]** Sl st to next st.

Fasten off, leaving an 8-inch tail.

---

## ASSEMBLY

1. **Attach head:** Position the head at one end of the body (the rounder end). Using the head's long tail, sew around the base of the head to the body, going around twice for security. The head should sit slightly tilted upward.

2. **Attach beak:** Sew the beak to the front of the head, positioned at center, pointing forward. Use the beak's tail to whip-stitch the open edge to the head.

3. **Add eyes:** If using safety eyes, you would have inserted them between Rnds 5 and 6 of the head (about 4 sts apart). Otherwise, embroider two small eyes with red yarn (loons have red eyes!) at the same position, then add a tiny black dot in the center with black yarn.

4. **Attach wings:** Pin one wing on each side of the body, about ⅓ back from the head, angled slightly downward. Whip-stitch around the edge of each wing using the tail.

5. **Belly patch (optional):** Sew the white oval to the underside of the body using the long tail, whip-stitching around the edges.

6. **White spots (signature loon markings):** With white yarn and a yarn needle, embroider small horizontal lines or French knots across the back and sides of the body. Traditional loons have rows of small white dots — embroider in clusters for a realistic look.

7. **Necklace (optional detail):** With white yarn, embroider 4–6 short vertical lines around the base of the neck to mimic a loon's white "collar."

8. Weave in all ends. Shape and lightly squeeze to round out the body.

---

## Finished Measurements

- Length (beak to tail): ~4 inches (10 cm)
- Width: ~2 inches (5 cm)
- Height: ~2.5 inches (6 cm)

Your little loon is now ready to perch in your hand! 🪶
Disclaimer: This pattern was generated by AI and should be reviewed for accuracy before use. While we strive for quality, AI-generated content may contain errors. Please verify measurements, stitch counts, and instructions before beginning your project. Generated by purlJam.uk
Access your pattern anytime
Bookmark this page to access your pattern anytime