Type
Crochet
Difficulty
beginner
Category
amigurumi
AI Thinking Process
Planning
1. **Design Strategy**: Creating a beginner-friendly axolotl using the Simple Shapes template. An axolotl has a distinctive body shape with external gills, four legs, and a paddle-shaped tail. I'll simplify this to basic geometric shapes: an oval body, cylinder legs, small cone gills (3 per side), and a flattened tail. The design will use pink yarn (most popular axolotl color) with simple embroidered face details to keep it beginner-appropriate.
2. **Construction Plan**: The axolotl will be constructed from separate pieces sewn together:
- Body: elongated oval base (similar to potato shape in template)
- Head integrated with body for simplicity
- Legs: 4 short cylinders (worked flat at ends for feet)
- Gills: 6 small finger-like projections (3 per side)
- Tail: flat paddle shape worked in rows
- Eyes: safety eyes or embroidered
- Face: simple embroidered smile
3. **Quality Assurance**: Key concerns for beginners:
- Keeping stitch counts simple and consistent
- Clear placement instructions for legs and gills
- Preventing overstuffing which can distort shape
- Ensuring gills are proportional and don't overwhelm body
- Making tail attachment secure but simple
- Providing visual reference for gill placement (3 per side, branching outward)
4. **Final Calculations**:
- Worsted weight with 3.5mm hook
- Body: increase to 24 sts for ~3-4" length
- Legs: 6 st tubes, ~1.5" long
- Gills: 4 st tubes, ~1" long each
- Tail: ~2" wide at base, tapering
- Total finished size: approximately 5-6" long including tail
Verification
[PRE-FLIGHT CHECKS]
1. **Completeness**: Pattern will include Materials, Abbreviations, Notes, Gauge, individual piece instructions (Body, Legs x4, Gills x6, Tail), Assembly, and Finishing sections per template requirements.
2. **Consistency**:
- Body increases: 6→12→18→24 (standard progression)
- Legs all identical: 6 st cylinders
- Gills all identical: 4 st cylinders
- Math verified for each round
3. **Constraints**:
- Beginner level maintained with only sc, inc, dec stitches
- Worsted weight specified
- US terminology throughout
- Clear assembly instructions for multiple small pieces
4. **Safety**:
- Stitch counts verified for each round
- Increase/decrease math checked (6×2=12, 6×3=18, 6×4=24)
- All pieces accounted for in materials and assembly
- Safety eye warning included for young children
Pattern
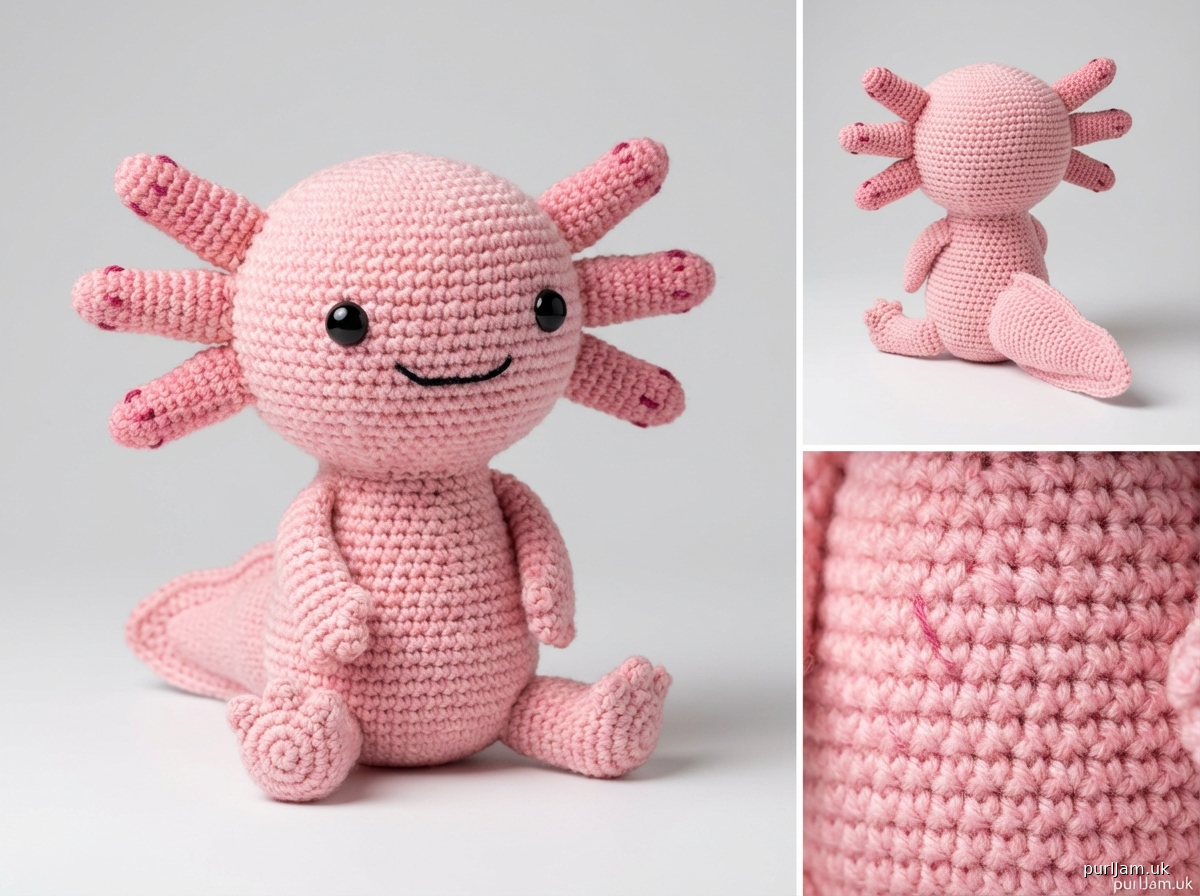
# Adorable Axolotl Amigurumi

A beginner-friendly crochet pattern for a cute axolotl plush! This cheerful salamander features simple shapes sewn together - perfect for your first amigurumi project. The finished axolotl measures approximately 5-6 inches long.

**Skill Level**: Beginner

## MATERIALS

**Yarn:**
- Worsted weight (4) acrylic yarn in pink (approximately 100 yards)
- Small amount of black or dark gray for embroidery (optional)
- Small amount of dark pink or coral for gill tips (optional)

**Recommended Yarns:**
- Red Heart Super Saver
- Lion Brand Vanna's Choice
- Caron Simply Soft

**Other Supplies:**
- US E-4 (3.5mm) crochet hook
- Polyester fiberfill stuffing
- Yarn needle for sewing
- Stitch marker
- 6mm safety eyes (2) OR black yarn for embroidered eyes
- Pins for assembly
- Scissors

**Safety Note:** If making this toy for children under 3 years old, embroider the eyes instead of using safety eyes.

## ABBREVIATIONS
- ch = chain
- sc = single crochet
- inc = increase (2 sc in one stitch)
- dec = invisible decrease (insert hook in front loops of next 2 sts, pull through, yarn over, pull through both loops)
- st(s) = stitch(es)
- rnd(s) = round(s)
- [ ] = total stitch count
- ( ) = repeat instructions within parentheses

## PATTERN NOTES

**Gauge:**
- 5 sts × 5 rows = 1 inch in single crochet (not critical for this project)

**Construction:**
- Worked in continuous spiral rounds unless otherwise noted
- Do not join rounds or turn unless instructed
- Use stitch marker to track beginning of round
- All pieces are worked separately and sewn together

**Tips:**
- Work tightly to prevent stuffing from showing through
- Stuff pieces firmly but not so tight that they become distorted
- Count your stitches at the end of each round
- Pin pieces in place before sewing for best placement
- Use invisible decrease for smoother appearance

## INSTRUCTIONS

### BODY

The body is an elongated oval shape that serves as both body and head.

**Rnd 1:** 6 sc in magic ring [6]

**Rnd 2:** inc in each st around [12]
*Math check: 6 increases = 12 sts*

**Rnd 3:** (sc, inc) around [18]
*Math check: 6 × 3 = 18 sts*

**Rnd 4:** (2 sc, inc) around [24]
*Math check: 6 × 4 = 24 sts*

**Rnds 5-12:** sc around [24]
*Work 8 rounds even to create length*

**Rnd 13:** (2 sc, dec) around [18]
*Math check: 6 decreases, 24 - 6 = 18 sts*

Begin stuffing body firmly. Continue stuffing as you work the remaining rounds.

**Rnd 14:** (sc, dec) around [12]
*Math check: 6 decreases, 18 - 6 = 12 sts*

**Rnd 15:** dec around [6]
*Math check: 6 decreases, 12 - 6 = 6 sts*

Fasten off, leaving a long tail. Use yarn needle to weave through remaining 6 sts and pull tight to close. Weave in end.

**Insert safety eyes between Rnds 8 and 9, approximately 6 stitches apart before closing.**

### LEGS (Make 4)

The legs are short cylinders with flat oval feet.

**Rnd 1:** 6 sc in magic ring [6]

**Rnds 2-5:** sc around [6]
*Work 4 rounds even for leg length*

**Rnd 6:** (sc, inc) around [9]
*Math check: 3 increases, 6 + 3 = 9 sts*

Flatten the opening and work 4 sc across to close (working through both layers). This creates the flat foot shape.

Fasten off, leaving a long tail for sewing. Stuff leg lightly - keep feet flat and unstuffed.

### GILLS (Make 6)

The gills are thin finger-like projections - 3 will go on each side of the head.

**Rnd 1:** 4 sc in magic ring [4]

**Rnds 2-4:** sc around [4]
*Work 3 rounds even for gill length*

Fasten off, leaving a long tail for sewing. Do not stuff - gills should remain thin and flexible.

**Optional:** With darker pink yarn, make French knots or small stitches at the tip of each gill for detail.

### TAIL

The tail is worked flat in rows to create a paddle shape.

**Row 1:** Ch 8, sc in 2nd ch from hook and in each ch across [7]

**Row 2:** Ch 1, turn, inc, sc in next 5 sts, inc [9]
*Math check: 7 + 2 increases = 9 sts*

**Rows 3-4:** Ch 1, turn, sc across [9]

**Row 5:** Ch 1, turn, dec, sc in next 5 sts, dec [7]
*Math check: 9 - 2 decreases = 7 sts*

**Row 6:** Ch 1, turn, dec, sc in next 3 sts, dec [5]
*Math check: 7 - 2 decreases = 5 sts*

**Row 7:** Ch 1, turn, dec, sc, dec [3]
*Math check: 5 - 2 decreases = 3 sts*

**Row 8:** Ch 1, turn, dec (working all 3 sts together if possible, or sc3tog) [1]

Fasten off, leaving a long tail for sewing.

**Optional edging:** With tail still attached, work sc evenly around entire edge of tail for a more finished look.

## ASSEMBLY

Use pins to position pieces before sewing. Use the long tails and yarn needle to sew pieces securely with whip stitch or mattress stitch.

**Step 1 - Attach Legs:**
- Position 4 legs on underside of body
- Front legs: attach at Rnd 6-7 of body, approximately 4 sts apart
- Back legs: attach at Rnd 10-11 of body, approximately 4 sts apart
- Legs should point slightly outward
- Sew securely around entire circumference of each leg opening

**Step 2 - Attach Gills:**
- Position 3 gills on each side of head (Rnds 6-8 of body)
- Arrange in a fan pattern: one pointing up/forward, one pointing straight out, one pointing down/back
- Space gills approximately 2-3 sts apart
- Sew the base of each gill securely to the body
- Gills should project outward from sides of head

**Step 3 - Attach Tail:**
- Position wide end of tail at back of body (where you closed the body)
- Center tail on back end
- Sew securely around entire wide edge of tail
- Tail should extend straight back

**Step 4 - Weave in all remaining ends.**

## FINISHING

**Embroider Face (optional):**
- With black yarn, embroider a small curved smile below and between the eyes (approximately on Rnd 10)
- Add tiny nostrils with French knots if desired
- Keep facial features simple and sweet

**Final Check:**
- Ensure all pieces are securely attached
- Check that no stuffing is visible
- Reshape body and gills as needed

## CUSTOMIZATION IDEAS

**Color Variations:**
- White/leucistic axolotl: Use white or cream yarn
- Golden albino: Use golden yellow yarn with pink gill tips
- Wild type: Use dark brown or gray with gray-black gills
- Melanoid: Use solid black yarn

**Size Adjustments:**
- **Larger axolotl:** Increase body to 30 or 36 sts (add Rnd 5: (3 sc, inc) around [30] or Rnd 6: (4 sc, inc) around [36]), work more even rounds, and make legs and gills proportionally longer
- **Mini keychain:** Use DK or sport weight yarn with smaller hook, increase body to only 18 sts maximum

**Embellishments:**
- Add spots with darker yarn and duplicate stitch
- Embroider tiny toe details on feet
- Add blush to cheeks with pink embroidery or fabric blush
- Attach keychain loop to top of head

**Difficulty Additions (Intermediate):**
- Add surface crochet texture lines along gills
- Create ruffled gill edges with picot stitches
- Make bendable legs with pipe cleaners inside

## CARE INSTRUCTIONS

- Spot clean with damp cloth
- Hand wash in cool water if needed, lay flat to dry
- Not suitable for machine washing due to safety eyes (if used)
- Keep away from heat sources

## PATTERN NOTES & CREDITS

This pattern is designed for personal use and handmade business use (up to 100 finished items for sale). Please credit "Adorable Axolotl Amigurumi Pattern" if selling finished items.

Do not redistribute or resell this pattern.

---

**Finished Size:** Approximately 5-6 inches long (not including tail), 2 inches tall

**Time to Complete:** 3-4 hours for beginners

Enjoy your adorable new axolotl friend! 🦎💕
Disclaimer: This pattern was generated by AI and should be reviewed for accuracy before use. While we strive for quality, AI-generated content may contain errors. Please verify measurements, stitch counts, and instructions before beginning your project. Generated by purlJam.uk
Access your pattern anytime
Bookmark this page to access your pattern anytime