Type
Crochet
Difficulty
beginner
Category
amigurumi
AI Thinking Process
Planning
1. **Design Strategy**: Creating a beginner-friendly bald eagle plush using simple amigurumi shapes. The eagle will feature a white head and tail, brown body, yellow beak and feet, and characteristic fierce expression. Breaking down the complex bird into basic shapes: sphere for head, oval for body, cones for beak, cylinders for wings and tail feathers, small shapes for feet. Using worsted weight yarn for a 4-5" handheld plush size.
2. **Construction Plan**:
- Head: White sphere (standard 6-24 st increases)
- Body: Brown oval, slightly elongated
- Wings: Brown flattened ovals worked separately and sewn on
- Tail: White triangle/fan shape made from joined decreases
- Beak: Yellow cone
- Feet: Yellow with simple toe details
- Eyes: Safety eyes or embroidered for fierce look
- Assembly: Head to body, add wings flat against sides, tail at back, beak on face, feet at bottom
3. **Quality Assurance**:
- Ensure clear stitch counts in every round to prevent counting errors
- Specify stuffing points to avoid difficulty accessing
- Provide clear color changes for white head/brown body transition
- Simple wing attachment instructions for beginners
- Optional eye placement guidance for characteristic eagle expression
4. **Final Calculations**:
- Worsted weight, 3.5mm hook = approx 5 sts per inch
- Head: 24 st max = ~4.8" circumference = ~1.5" diameter sphere
- Body: 30 st max = ~6" circumference = ~2" at widest
- Total height: approximately 4-5 inches
- Materials: ~50g brown, ~30g white, ~10g yellow
Verification
[PRE-FLIGHT CHECKS]
1. **Completeness**: Pattern includes all template sections - materials, gauge, abbreviations, construction for all body parts, assembly, and finishing
2. **Consistency**: Stitch counts verified for each round with running totals in brackets. Head increases from 6→12→18→24, body from 6→30 with proper increase ratios
3. **Constraints**: Beginner level maintained - only sc, inc, dec stitches used. Worsted weight specified. Simple shapes approach confirmed. US terminology throughout.
4. **Safety**: Math double-checked:
- Head: 6×2=12, 6×3=18, 6×4=24 ✓
- Body: 6×2=12, 6×3=18, 6×4=24, 6×5=30 ✓
- All decrease rounds properly calculated
- Safety eyes mentioned with size guidance
Pattern
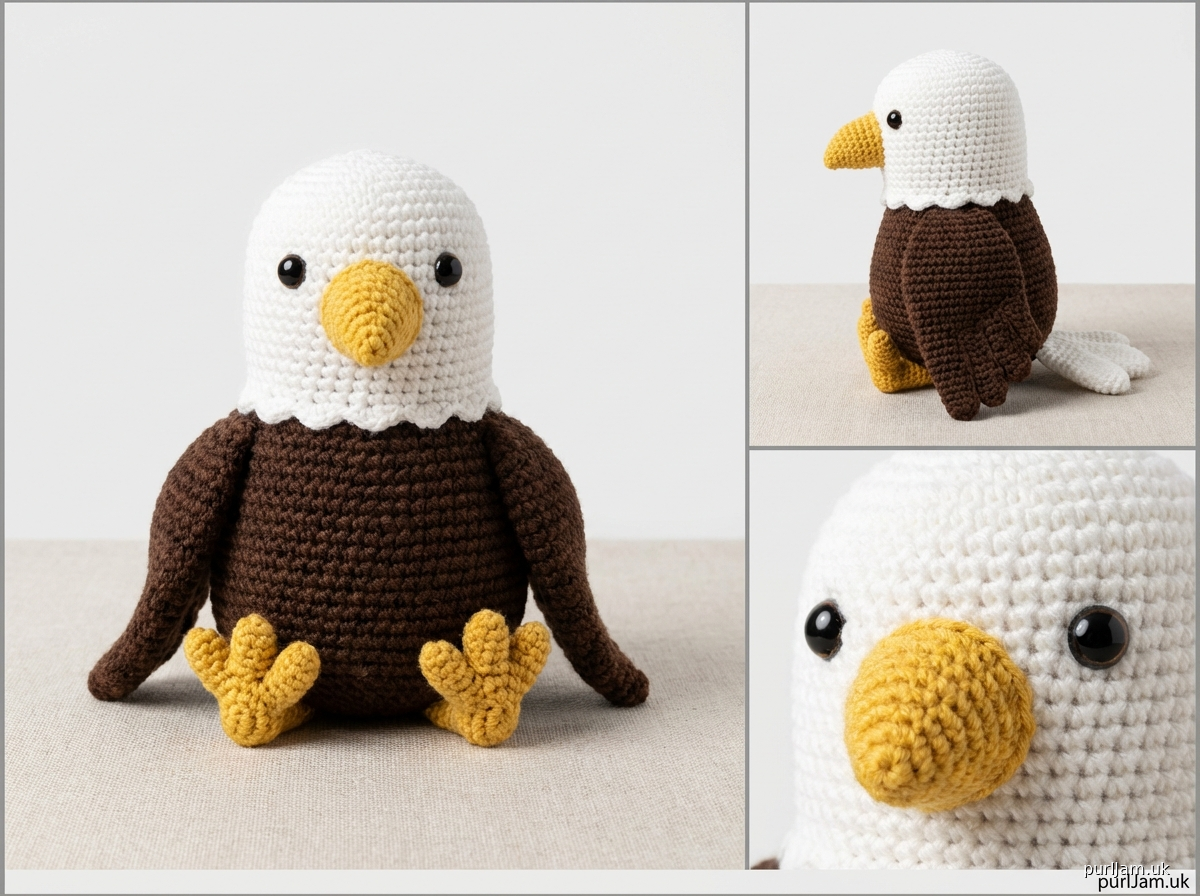
# Bald Eagle Amigurumi Plush

A beginner-friendly amigurumi pattern creating an adorable bald eagle plush using simple shapes and basic stitches. Perfect for your first animal project!

**Finished Size**: Approximately 4-5 inches (10-13 cm) tall when made with worsted weight yarn

**Skill Level**: Beginner

---

## MATERIALS

**Yarn**: Worsted weight (4) acrylic yarn
- Brown (dark brown or chocolate): approximately 50g (60 yards)
- White: approximately 30g (35 yards)
- Yellow (golden yellow): approximately 10g (12 yards)
- Small amount of black for embroidery (optional)

**Suggested Yarn**: Red Heart Super Saver, Caron Simply Soft, or similar worsted weight yarn

**Hook**: US E-4 (3.5mm) crochet hook

**Other Supplies**:
- Fiberfill stuffing (polyester)
- Yarn needle for weaving in ends and assembly
- Stitch marker
- 9mm safety eyes (2) OR black embroidery thread for eyes
- Scissors
- Pins for assembly (optional but helpful)

---

## GAUGE

Gauge is not critical for this project, but for reference:
- Approximately 5 stitches = 1 inch in single crochet
- Work tightly to prevent stuffing from showing through

---

## ABBREVIATIONS

- ch = chain
- sc = single crochet
- inc = increase (2 sc in same stitch)
- dec = invisible decrease (insert hook in front loops of next 2 sts, yarn over, pull through both loops, yarn over, pull through 2 loops on hook)
- st(s) = stitch(es)
- rnd(s) = round(s)
- [ ] = stitch count at end of round

---

## PATTERN NOTES

- Work in continuous spiral rounds unless otherwise noted; use stitch marker to track beginning of round
- Do not join or turn unless instructed
- Stuff pieces firmly as you go for best results
- Use invisible decrease method for smoother appearance
- All pieces are worked in brown unless color change is noted

---

## INSTRUCTIONS

### HEAD (White)

Using white yarn:

**Rnd 1**: 6 sc in magic ring [6]

**Rnd 2**: inc in each st around [12]
*Math check: 6 × 2 = 12 ✓*

**Rnd 3**: (sc, inc) around [18]
*Math check: 12 ÷ 2 = 6 repeats, 6 × 3 = 18 ✓*

**Rnd 4**: (2 sc, inc) around [24]
*Math check: 18 ÷ 3 = 6 repeats, 6 × 4 = 24 ✓*

**Rnds 5-9**: sc in each st around [24]
*5 rounds of even stitches*

**Insert safety eyes** between Rnds 6 and 7, approximately 6 stitches apart. If embroidering eyes, mark placement now but embroider after stuffing.

**Rnd 10**: (2 sc, dec) around [18]
*Math check: 24 ÷ 4 = 6 repeats, 6 × 3 = 18 ✓*

Begin stuffing head firmly.

**Rnd 11**: (sc, dec) around [12]
*Math check: 18 ÷ 3 = 6 repeats, 6 × 2 = 12 ✓*

**Rnd 12**: dec around [6]
*Math check: 12 ÷ 2 = 6 ✓*

Stuff head completely and firmly. Fasten off, leaving long tail. Use yarn needle to weave through remaining 6 stitches and pull tight to close. Weave in end securely.

---

### BODY (Brown)

Using brown yarn:

**Rnd 1**: 6 sc in magic ring [6]

**Rnd 2**: inc in each st around [12]
*Math check: 6 × 2 = 12 ✓*

**Rnd 3**: (sc, inc) around [18]
*Math check: 12 ÷ 2 = 6 repeats, 6 × 3 = 18 ✓*

**Rnd 4**: (2 sc, inc) around [24]
*Math check: 18 ÷ 3 = 6 repeats, 6 × 4 = 24 ✓*

**Rnd 5**: (3 sc, inc) around [30]
*Math check: 24 ÷ 4 = 6 repeats, 6 × 5 = 30 ✓*

**Rnds 6-11**: sc in each st around [30]
*6 rounds of even stitches*

**Rnd 12**: (3 sc, dec) around [24]
*Math check: 30 ÷ 5 = 6 repeats, 6 × 4 = 24 ✓*

**Rnd 13**: (2 sc, dec) around [18]
*Math check: 24 ÷ 4 = 6 repeats, 6 × 3 = 18 ✓*

Begin stuffing body firmly.

**Rnd 14**: (sc, dec) around [12]
*Math check: 18 ÷ 3 = 6 repeats, 6 × 2 = 12 ✓*

**Rnd 15**: dec around [6]
*Math check: 12 ÷ 2 = 6 ✓*

Stuff body completely and firmly. Fasten off, leaving long tail for assembly. Use yarn needle to weave through remaining 6 stitches and pull tight to close.

---

### BEAK (Yellow)

Using yellow yarn:

**Rnd 1**: 4 sc in magic ring [4]

**Rnd 2**: sc in each st around [4]

**Rnd 3**: (sc, inc) around [6]
*Math check: 4 ÷ 2 = 2 repeats, 2 × 3 = 6 ✓*

**Rnd 4**: sc in each st around [6]

Fasten off, leaving long tail for sewing. Stuff lightly with small amount of fiberfill. The beak should be small and cone-shaped.

---

### WINGS (make 2, Brown)

Using brown yarn:

**Rnd 1**: 6 sc in magic ring [6]

**Rnd 2**: (sc, inc) around [9]
*Math check: 6 ÷ 2 = 3 repeats, 3 × 3 = 9 ✓*

**Rnd 3**: sc in each st around [9]

**Rnd 4**: (2 sc, inc) around [12]
*Math check: 9 ÷ 3 = 3 repeats, 3 × 4 = 12 ✓*

**Rnds 5-7**: sc in each st around [12]
*3 rounds of even stitches*

**Rnd 8**: (2 sc, dec) around [9]
*Math check: 12 ÷ 4 = 3 repeats, 3 × 3 = 9 ✓*

**Rnd 9**: sc in each st around [9]

Fasten off, leaving long tail for sewing. Do NOT stuff wings. Flatten wings with opening running horizontally to create wing shape.

---

### TAIL FEATHERS (White)

Using white yarn:

**Rnd 1**: 6 sc in magic ring [6]

**Rnd 2**: (sc, inc) around [9]
*Math check: 6 ÷ 2 = 3 repeats, 3 × 3 = 9 ✓*

**Rnd 3**: (2 sc, inc) around [12]
*Math check: 9 ÷ 3 = 3 repeats, 3 × 4 = 12 ✓*

**Rnd 4**: (3 sc, inc) around [15]
*Math check: 12 ÷ 4 = 3 repeats, 3 × 5 = 15 ✓*

**Rnds 5-6**: sc in each st around [15]

Fasten off, leaving long tail for sewing. Do NOT stuff. Flatten tail piece to create fan shape.

---

### FEET (make 2, Yellow)

Using yellow yarn:

**Rnd 1**: 6 sc in magic ring [6]

**Rnds 2-3**: sc in each st around [6]

Fasten off, leaving long tail for sewing. Stuff very lightly or leave unstuffed.

**Optional Toes** (make 6 total, 3 per foot):
Ch 3, fasten off. Sew to bottom of each foot.

---

## ASSEMBLY

Use pins to position pieces before sewing for best results.

1. **Attach Head to Body**: Position white head on top of brown body. The head should sit slightly forward. Using the long tail from the head and whip stitch, sew head securely to body, adding more stuffing if needed before closing completely.

2. **Attach Beak**: Position yellow beak on front of face, centered below and between the eyes. Sew in place with yellow yarn tail, ensuring pointed end extends forward.

3. **Attach Wings**: Position flattened wings on either side of body, approximately at Rnds 6-10 of body (upper-middle section). The pointed end should face toward tail. Sew along the back edge of each wing, leaving front edge free for dimension.

4. **Attach Tail**: Position flattened white tail piece at back of body at bottom. Sew along the top edge only, allowing tail to fan outward.

5. **Attach Feet**: Position feet at bottom front of body. Sew securely in place. If adding optional toes, sew 3 short chains to bottom of each foot, spaced evenly.

6. **Embroider Details** (optional):
   - If not using safety eyes, embroider two oval eyes with black yarn
   - Add small white highlight dots to eyes for expression
   - Embroider fierce eyebrow lines above eyes with brown or black yarn for characteristic eagle look

7. **Weave in all remaining ends** securely.

---

## FINISHING

- Check all attachments are secure
- Reshape eagle as needed
- Add additional stuffing through small gaps if any areas seem flat
- For display, eagle can sit upright or you can add a hanging loop at top of head

---

## CUSTOMIZATION IDEAS

**Size Variations**:
- **Smaller eagle**: Use DK weight yarn (3) with 3.0mm hook for 3-4" plush
- **Larger eagle**: Use bulky weight yarn (5) with 5.0mm hook for 6-7" plush

**Color Variations**:
- Use dark brown/chocolate brown for body and wings
- Cream or off-white instead of pure white for softer look
- Golden yellow for beak and feet

**Feature Options**:
- Add wire to wings for poseable effect (adult supervision required)
- Embroider small white spots on brown body for juvenile eagle
- Add small felt talons to feet
- Create perch with brown cylinder

---

## CARE INSTRUCTIONS

- Spot clean only with damp cloth
- If using safety eyes, not suitable for children under 3 years
- Do not machine wash (may cause pilling and distortion)
- Store in cool, dry place

---

## TROUBLESHOOTING

**Eagle won't sit upright**: Add more stuffing to bottom of body for weight, or create slightly flattened bottom

**Wings stick out too much**: Sew along more of the wing edge to body for flatter appearance

**Head tilts**: Ensure head is sewn evenly around entire neck opening; add more stuffing for stability

**Gaps showing stuffing**: Work more tightly; use smaller hook or thicker yarn

---

## SKILL BUILDING NOTES

This pattern teaches:
- Magic ring technique
- Even increase rounds for sphere shaping
- Oval body construction
- Working with color changes
- Assembly and positioning of multiple pieces
- Flat vs. stuffed component techniques

---

**Pattern designed for beginner crocheters. Happy stitching!**

*Completed eagle makes a wonderful patriotic decoration, gift for bird lovers, or educational toy.*
Disclaimer: This pattern was generated by AI and should be reviewed for accuracy before use. While we strive for quality, AI-generated content may contain errors. Please verify measurements, stitch counts, and instructions before beginning your project. Generated by purlJam.uk
Access your pattern anytime
Bookmark this page to access your pattern anytime