Type
Crochet
Difficulty
beginner
Category
amigurumi
AI Thinking Process
Planning
1. **Design Strategy**: The Statue of Liberty amigurumi needs to capture the iconic elements: crown with spikes, torch, tablet, draped robe body, and pedestal base. For beginner level, I'll simplify to recognizable basic shapes: cone for body/robe, cylinder for arm, smaller cone for torch flame, rectangular tablet, circular crown with triangular spikes. Using copper/green color for oxidized copper look, with optional torch flame in yellow/orange.
2. **Construction Plan**: Bottom-up construction starting with the pedestal (cylinder), body/robe (large cone), separate pieces for arms (cylinders), torch (small cone on stick), tablet (flat rectangle), head (small sphere), and crown (circle with cone spikes). All pieces worked in continuous rounds, then assembled. This modular approach is beginner-friendly and allows for easy correction of individual pieces.
3. **Quality Assurance**: Main concerns - keeping pieces proportional (body should be largest, head small but visible, crown spikes distinct), ensuring stability (wide base/pedestal), and firm stuffing for structure. Will include clear assembly instructions with positioning guidance. Torch arm needs to be angled upward - will note pinning/positioning tips.
4. **Final Calculations**: Using worsted weight with 3.5mm hook for ~4-5" finished toy. Body cone: increase to 24 sts over 6 rounds, then 8 rounds even = ~2.5". Head sphere: increase to 18 sts = ~1". Pedestal: 30 sts x 4 rounds = ~1.5" wide base. Torch, tablet, and crown as smaller accent pieces. Total height approximately 4.5-5".
Verification
[PRE-FLIGHT CHECKS]
1. **Completeness**: Pattern includes Materials, Gauge, Abbreviations, Notes, Instructions for all 7 components (pedestal, body, head, arms, torch, tablet, crown), Assembly, and Finishing sections ✓
2. **Consistency**: Stitch counts verified for each round with running totals in brackets. Gauge supports 4-5" final size. Increases follow standard amigurumi progression (6→12→18→24→30) ✓
3. **Constraints**: Beginner-friendly using only sc, inc, dec. Worsted weight specified. Uses template's basic shapes (sphere, cylinder, cone). Clear assembly instructions included ✓
4. **Safety**: All increase/decrease math checked. Each round's stitch count verified against previous round. No complex stitch patterns that could confuse beginners ✓
Pattern
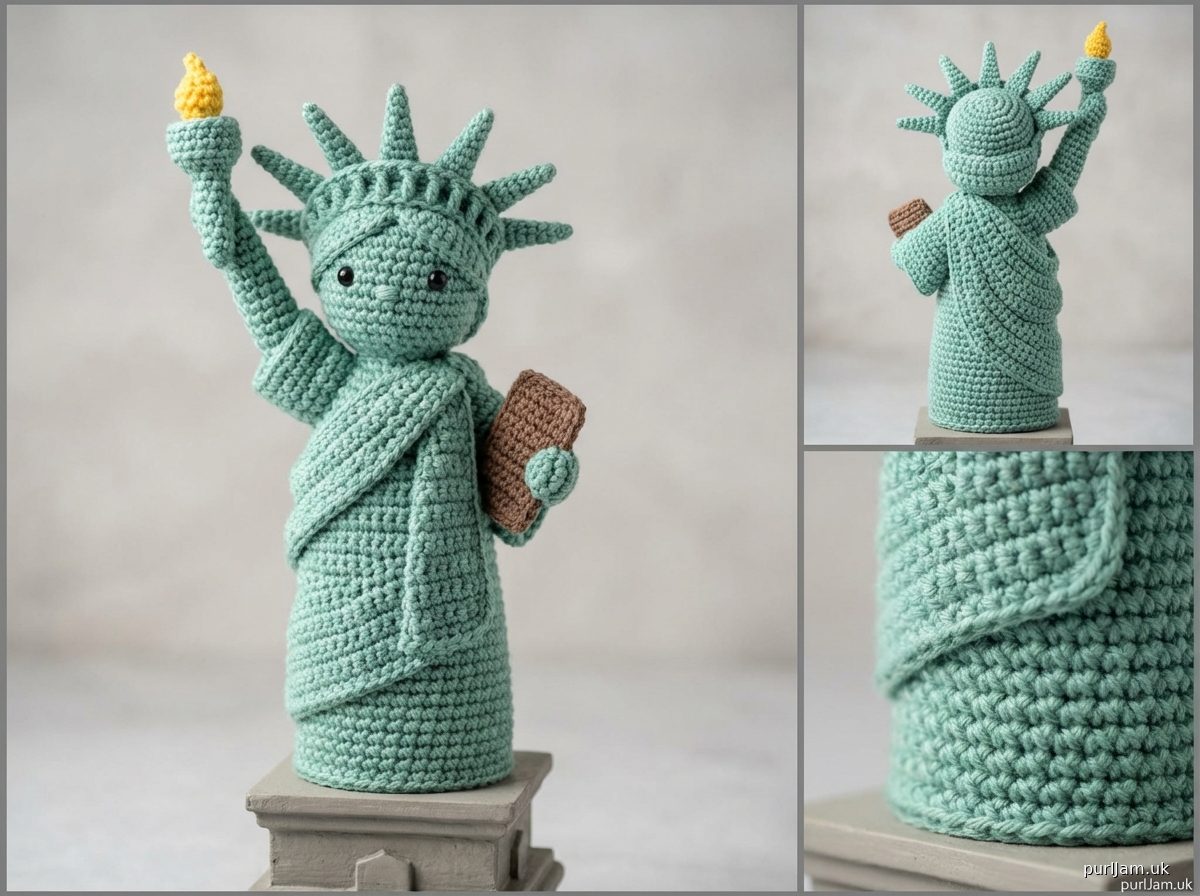
# Amigurumi Statue of Liberty

A beginner-friendly amigurumi pattern to create an iconic miniature Statue of Liberty. This pattern uses simple shapes - cones, cylinders, and spheres - assembled to create a recognizable symbol. Perfect for history buffs, New York lovers, or patriotic displays!

## Materials

- **Yarn**: Worsted weight (#4) acrylic yarn in the following colors:
  - Seafoam green or copper (main color - MC): approximately 60 yards
  - Gray or stone color (pedestal): approximately 20 yards
  - Yellow or gold (torch flame): approximately 5 yards
  - Small amount of brown or gray (tablet/book)
- **Hook**: US E-4 (3.5mm) or size needed to obtain gauge
- **Other supplies**:
  - Fiberfill stuffing (polyester)
  - Yarn needle for sewing
  - Stitch marker
  - Pins for assembly
  - Optional: Small amount of black embroidery thread for tablet details

## Gauge

Gauge is flexible for amigurumi, but aim for tight, even stitches with no gaps.
Approximate gauge: 5 sc and 5 rows = 1" in single crochet

**Finished Size**: Approximately 4.5-5 inches tall

## Abbreviations

- ch = chain
- sc = single crochet
- inc = increase (2 sc in same stitch)
- dec = invisible decrease (insert hook in front loops of next 2 sts, yo, pull through both, yo, pull through 2 loops)
- st(s) = stitch(es)
- rnd(s) = round(s)
- MC = main color

## Notes

- Work in continuous rounds unless otherwise specified; use stitch marker to track beginning of rounds
- Do not join or turn unless instructed
- Stuff pieces firmly as you work for best shaping
- Use invisible decrease for smoother surface
- Stitch counts are shown in brackets [#] at end of each round
- When fastening off, leave a long tail (12-15") for sewing pieces together unless otherwise noted

---

## PATTERN INSTRUCTIONS

### PEDESTAL (Base)

Using gray or stone color:

**Rnd 1**: 6 sc in magic ring [6]

**Rnd 2**: inc in each st around [12]
*Verification: 6 × 2 = 12 ✓*

**Rnd 3**: (sc, inc) around [18]
*Verification: 12 ÷ 2 = 6 repeats, 6 × 3 = 18 ✓*

**Rnd 4**: (2 sc, inc) around [24]
*Verification: 18 ÷ 3 = 6 repeats, 6 × 4 = 24 ✓*

**Rnd 5**: (3 sc, inc) around [30]
*Verification: 24 ÷ 4 = 6 repeats, 6 × 5 = 30 ✓*

**Rnds 6-9**: sc in each st around [30] (4 rounds)

Stuff pedestal firmly.

**Rnd 10**: (3 sc, dec) around [24]
*Verification: 30 ÷ 5 = 6 repeats, 6 × 4 = 24 ✓*

**Rnd 11**: (2 sc, dec) around [18]
*Verification: 24 ÷ 4 = 6 repeats, 6 × 3 = 18 ✓*

Add more stuffing. Fasten off, leaving long tail for sewing to body.

---

### BODY (Robe)

Using MC (seafoam green or copper):

**Rnd 1**: 6 sc in magic ring [6]

**Rnd 2**: inc in each st around [12]
*Verification: 6 × 2 = 12 ✓*

**Rnd 3**: (sc, inc) around [18]
*Verification: 12 ÷ 2 = 6 repeats, 6 × 3 = 18 ✓*

**Rnd 4**: (2 sc, inc) around [24]
*Verification: 18 ÷ 3 = 6 repeats, 6 × 4 = 24 ✓*

**Rnd 5**: (3 sc, inc) around [30]
*Verification: 24 ÷ 4 = 6 repeats, 6 × 5 = 30 ✓*

**Rnd 6**: (4 sc, inc) around [36]
*Verification: 30 ÷ 5 = 6 repeats, 6 × 6 = 36 ✓*

**Rnds 7-14**: sc in each st around [36] (8 rounds)

Begin stuffing body firmly.

**Rnd 15**: (4 sc, dec) around [30]
*Verification: 36 ÷ 6 = 6 repeats, 6 × 5 = 30 ✓*

**Rnd 16**: (3 sc, dec) around [24]
*Verification: 30 ÷ 5 = 6 repeats, 6 × 4 = 24 ✓*

**Rnd 17**: (2 sc, dec) around [18]
*Verification: 24 ÷ 4 = 6 repeats, 6 × 3 = 18 ✓*

Continue stuffing firmly.

**Rnd 18**: (sc, dec) around [12]
*Verification: 18 ÷ 3 = 6 repeats, 6 × 2 = 12 ✓*

Do not fasten off. Continue to head.

---

### HEAD

Continue with MC:

**Rnd 19**: inc in each st around [24]
*Verification: 12 × 2 = 24 ✓*

**Rnd 20**: (3 sc, inc) around [30]
*Verification: 24 ÷ 4 = 6 repeats, 6 × 5 = 30 ✓*

**Rnds 21-25**: sc in each st around [30] (5 rounds)

**Rnd 26**: (3 sc, dec) around [24]
*Verification: 30 ÷ 5 = 6 repeats, 6 × 4 = 24 ✓*

**Rnd 27**: (2 sc, dec) around [18]
*Verification: 24 ÷ 4 = 6 repeats, 6 × 3 = 18 ✓*

Stuff head firmly.

**Rnd 28**: (sc, dec) around [12]
*Verification: 18 ÷ 3 = 6 repeats, 6 × 2 = 12 ✓*

**Rnd 29**: dec around [6]
*Verification: 12 ÷ 2 = 6 ✓*

Fasten off, leaving tail. Use yarn needle to weave through remaining 6 sts and pull tight to close. Weave in end securely.

---

### ARM WITH TABLET (make 1)

Using MC:

**Rnd 1**: 6 sc in magic ring [6]

**Rnd 2**: inc in each st around [12]
*Verification: 6 × 2 = 12 ✓*

**Rnds 3-10**: sc in each st around [12] (8 rounds)

Stuff arm lightly (not too firm, needs to position at angle).

Fasten off, leaving long tail for sewing.

---

### ARM WITH TORCH (make 1)

Using MC:

**Rnd 1**: 6 sc in magic ring [6]

**Rnd 2**: inc in each st around [12]
*Verification: 6 × 2 = 12 ✓*

**Rnds 3-12**: sc in each st around [12] (10 rounds - slightly longer than tablet arm)

Stuff arm lightly.

Do not fasten off. Continue to torch flame.

---

### TORCH FLAME

Switch to yellow or gold:

**Rnd 13**: sc in each st around [12]

**Rnd 14**: (2 sc, dec) around [9]
*Verification: 12 ÷ 4 = 3 repeats, 3 × 3 = 9 ✓*

**Rnd 15**: sc in each st around [9]

**Rnd 16**: (sc, dec) around [6]
*Verification: 9 ÷ 3 = 3 repeats, 3 × 2 = 6 ✓*

Stuff torch flame lightly.

**Rnd 17**: dec around [3]
*Verification: 6 ÷ 2 = 3 ✓*

Fasten off, leaving tail. Close opening and weave in end.

---

### TABLET (Book)

Using brown or gray, worked in rows:

**Ch 9**

**Row 1**: sc in 2nd ch from hook and each ch across [8], ch 1, turn

**Rows 2-8**: sc in each st across [8], ch 1, turn (7 rows total)

Fasten off, leaving long tail. The tablet should be a small rectangle approximately 1" × 1.25".

Optional: Use black thread to embroider "JULY IV MDCCLXXVI" or simple lines on tablet surface before attaching.

---

### CROWN

**Crown Base:**

Using MC:

**Rnd 1**: 6 sc in magic ring [6]

**Rnd 2**: inc in each st around [12]
*Verification: 6 × 2 = 12 ✓*

**Rnd 3**: (sc, inc) around [18]
*Verification: 12 ÷ 2 = 6 repeats, 6 × 3 = 18 ✓*

**Rnd 4**: sc in each st around [18]

Fasten off, leaving long tail for sewing to head.

**Crown Spikes (make 7):**

Using MC:

**Rnd 1**: 4 sc in magic ring [4]

**Rnds 2-4**: sc in each st around [4] (3 rounds)

Fasten off, leaving 8" tail for sewing. Do not stuff spikes.

---

## ASSEMBLY

Use pins to position pieces before sewing for best placement:

1. **Attach pedestal to body**: Position the decreased top of pedestal (Rnd 11) against the bottom of the body. The body should sit centered on the pedestal. Use whip stitch or mattress stitch to sew securely all around.

2. **Attach tablet to one arm**: Fold the tablet rectangle and place it at the opening of one arm, positioned as if the arm is holding it against the body. Sew tablet to the end of the arm and tack it against the side of the body at chest level.

3. **Attach arms to body**:
   - Position the tablet arm at the left side of the body (statue's right), angled slightly downward and inward, at shoulder level (just below the neck).
   - Position the torch arm at the right side of the body (statue's left), angled upward at approximately 45 degrees, also at shoulder level.
   - Sew each arm securely to the body, using several stitches around the arm opening to ensure stability.

4. **Attach crown to head**:
   - Position the crown base on top of the head, centered.
   - Sew crown base to head using whip stitch around the edge.

5. **Attach crown spikes**:
   - Space the 7 spikes evenly around the outer edge of the crown base (approximately every 2-3 stitches).
   - Sew the base of each spike to the crown, angling them slightly outward.
   - The spikes should radiate outward like sun rays.

---

## FINISHING

- Weave in all remaining yarn ends securely.
- Check that all pieces are firmly attached and stuffing is distributed evenly.
- Optional: Use surface slip stitch with MC to add vertical lines down the robe for draping texture.
- Optional: Add a small smile or facial features with embroidery thread.
- For extra stability, you can add a small amount of plastic pellets or beans to the bottom of the pedestal before closing (ensure this is securely contained if the toy will be given to children).

---

## VARIATIONS

- **Keychain size**: Use DK weight yarn with 2.5mm hook and reduce increase rounds by 1-2 for each piece.
- **Larger display piece**: Use bulky yarn with 5.0mm hook for an 8-10" statue.
- **Color options**: Traditional oxidized copper green, or metallic copper for a "new statue" look, or even white/cream for a classical statue appearance.
- **Simplified beginner version**: Skip the tablet and crown spikes for an even simpler first project.

---

## CARE INSTRUCTIONS

Hand wash in cool water with mild detergent if needed. Reshape and lay flat to dry. Do not machine wash or dry.

---

**Pattern designed for beginner crocheters. Enjoy creating your own miniature Lady Liberty!** 🗽

---

*Pattern tested with Worsted weight acrylic yarn and 3.5mm hook for approximately 5" tall finished piece.*
Disclaimer: This pattern was generated by AI and should be reviewed for accuracy before use. While we strive for quality, AI-generated content may contain errors. Please verify measurements, stitch counts, and instructions before beginning your project. Generated by purlJam.uk
Access your pattern anytime
Bookmark this page to access your pattern anytime