Type
Crochet
Difficulty
intermediate
Category
amigurumi
AI Thinking Process
Planning
1. **Design Strategy**: Sleeping curled dragon amigurumi in bulky yarn for a ~20cm finished size. Designed as a low-sew pattern by working the body and tail as one continuous piece, and attaching small features (head, wings, spines) with minimal seaming. Curled pose achieved by shaping a tapered tail that wraps around the body naturally.
2. **Construction Plan**: Bottom-up seamless body-into-tail spiral, separate head joined at neck, low-sew wings and limbs attached with long tails; spines crocheted directly onto back via surface slip stitches.
3. **Quality Assurance**:
- Bulky yarn + 5mm hook = ~2 sc per inch; need to verify ~20cm curled diameter.
- Curl pose requires tail to be flexible — stuff lightly toward tip.
- Safety eyes placed before head closure; closed/sleeping eyes can be embroidered instead.
4. **Final Calculations**:
- Gauge: 14 sc x 16 rnds = 4" (10 cm) in sc with bulky #5 yarn, 5 mm hook.
- Body max round: 36 sts ≈ 9 cm diameter; coiled with tail ≈ 20 cm overall.
- Head max round: 24 sts ≈ 6 cm diameter.
- Tail tapers 18 → 4 sts over ~25 cm length when uncoiled.
Verification
1. **Completeness**: Head, body+tail, legs, wings, spines, assembly — all included.
2. **Consistency**: 36-st body at gauge = ~9 cm; coiled with head tucked + tail wrap = ~20 cm. ✓
3. **Constraints**: Low-sew (head only major seam; limbs/wings minimally attached); curled sleeping pose; ~20 cm; bulky yarn. ✓
4. **Safety**: Stitch counts verified per round; increase/decrease math consistent.
Pattern
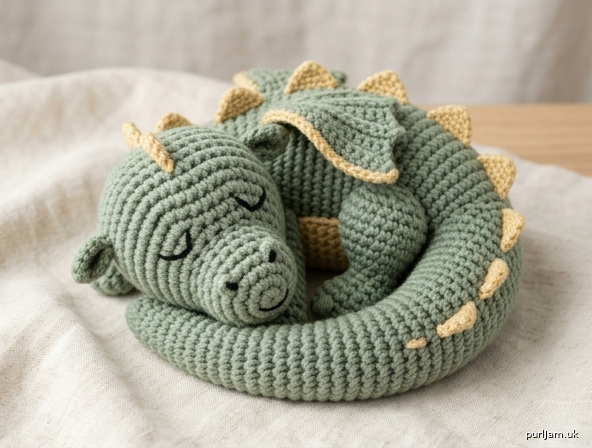
# Sleepy Curled Dragon — Crochet Amigurumi Pattern

**Skill Level:** Intermediate
**Finished Size:** Approximately 8 in (20 cm) across when curled
**Construction:** Low-sew — body and tail worked as one continuous piece; only the head requires significant sewing.

---

## Materials

- **Yarn:** Bulky weight (#5) yarn, approximately 100 g (110 yds / 100 m) in main dragon color (sage green, dusty blue, or lavender recommended)
- **Accent yarn:** Small amount (~20 g) in a contrast color for belly/wings (cream or pale gold)
- **Hook:** US H-8 / 5.0 mm (sized down from typical bulky recommendation for tight fabric)
- **Safety eyes:** 9 mm — OR skip and embroider closed "sleeping" eyes with black yarn (recommended for the sleeping look)
- **Fiberfill stuffing**
- **Yarn needle**
- **Stitch marker**
- **Scissors**
- Optional: small piece of black or pink felt + craft glue for nose/cheek detail

---

## Gauge

14 sc × 16 rnds = 4 in (10 cm) in single crochet, worked in continuous rounds.
Gauge is not critical, but tight stitches prevent stuffing show-through.

---

## Abbreviations (US Terms)

- **MR** – magic ring
- **ch** – chain
- **sc** – single crochet
- **hdc** – half double crochet
- **dc** – double crochet
- **sl st** – slip stitch
- **inc** – 2 sc in same stitch
- **dec** – invisible decrease (insert hook in front loops of next 2 sts, yo, pull through 2; yo, pull through 2)
- **BLO** – back loops only
- **FLO** – front loops only
- **st(s)** – stitch(es)
- **[ ]** – stitch count at end of round
- **( )×n** – repeat sequence n times

---

## Construction Notes

- Work in **continuous spiral rounds** — do NOT join unless instructed. Use a stitch marker.
- The **body and tail are one continuous piece** to eliminate seaming.
- The **head** is the only piece that must be sewn on.
- **Legs, wings, and back spines** are attached with minimal stitches using the long tails left after fastening off.
- For the **sleeping look**, embroider closed eyes (curved lines) instead of using safety eyes.

---

## HEAD
*Make 1 in main color.*

- **Rnd 1:** 6 sc in MR. **[6]**
- **Rnd 2:** inc in each st around. **[12]**  *(check: 6×2 = 12 ✓)*
- **Rnd 3:** (sc, inc) ×6. **[18]**  *(check: 6+6 = 18 ✓)*
- **Rnd 4:** (2 sc, inc) ×6. **[24]**  *(check: 12+6+6 = 24 ✓)*
- **Rnd 5–9:** sc in each st around (5 rnds even). **[24]**
- **Rnd 10:** (2 sc, dec) ×6. **[18]**  *(check: 12+6 = 18 ✓)*
- *(If using safety eyes, attach now between Rnds 7 and 8, about 6 sts apart. For sleeping dragon, skip — embroider later.)*
- **Rnd 11:** (sc, dec) ×6. **[12]**
- Begin stuffing firmly.
- **Rnd 12:** dec ×6. **[6]**

Fasten off, leaving a **long tail (approx. 20 in / 50 cm)** for sewing to body. Use yarn needle to weave through remaining 6 FLO sts and pull tight to close.

### Snout (optional small bump)
- **Rnd 1:** 5 sc in MR. **[5]**
- **Rnd 2:** inc in each st around. **[10]**
- **Rnd 3:** sc around. **[10]**

Fasten off, leaving long tail. Flatten slightly and sew to front of head between Rnds 5–8. Embroider two small nostril dots in black.

---

## BODY + TAIL (one continuous piece)
*Make 1 in main color. Begin at the rear/back of the body and work forward, then continue into the tail.*

### Body section:
- **Rnd 1:** 6 sc in MR. **[6]**
- **Rnd 2:** inc in each st. **[12]**
- **Rnd 3:** (sc, inc) ×6. **[18]**
- **Rnd 4:** (2 sc, inc) ×6. **[24]**
- **Rnd 5:** (3 sc, inc) ×6. **[30]**  *(check: 24+6 = 30 ✓)*
- **Rnd 6:** (4 sc, inc) ×6. **[36]**  *(check: 30+6 = 36 ✓)*
- **Rnd 7–12:** sc in each st around (6 rnds even). **[36]**
- **Rnd 13:** (4 sc, dec) ×6. **[30]**  *(check: 24+6 = 30 ✓)*
- **Rnd 14:** sc around. **[30]**
- **Rnd 15:** (3 sc, dec) ×6. **[24]**
- **Rnd 16:** sc around. **[24]**
- **Rnd 17:** (2 sc, dec) ×6. **[18]**

Stuff body firmly through opening as you continue. The tail will continue from here.

### Tail section (continues from Rnd 17):
- **Rnd 18:** sc around. **[18]**
- **Rnd 19:** (4 sc, dec) ×3. **[15]**  *(check: 12+3 = 15 ✓)*
- **Rnd 20–21:** sc around. **[15]**
- **Rnd 22:** (3 sc, dec) ×3. **[12]**
- **Rnd 23–24:** sc around. **[12]**
- **Rnd 25:** (2 sc, dec) ×3. **[9]**
- **Rnd 26–27:** sc around. **[9]**
- **Rnd 28:** (sc, dec) ×3. **[6]**
- **Rnd 29–32:** sc around. **[6]** *(4 rnds — gives a curling tip)*
- **Rnd 33:** dec ×3. **[3]**

Stuff body firmly; stuff tail very lightly (only the first few rounds) so it remains flexible enough to coil. Fasten off, leaving a 6 in (15 cm) tail. Pull through remaining sts and close.

---

## BELLY PATCH (optional, low-sew accent)
*Make 1 in accent color.*

- **Row 1:** ch 8, sc in 2nd ch from hook and across. Turn. **[7]**
- **Rows 2–10:** ch 1, sc across. Turn. **[7]**
- **Row 11:** ch 1, sc2tog, sc across to last 2 sts, sc2tog. Turn. **[5]**
- **Row 12:** ch 1, sc2tog, sc, sc2tog. **[3]**

Fasten off, leaving a long tail (~20 in / 50 cm). Sew flat to front/underside of body using whip stitch with the long tail.

---

## LEGS (make 4)
*Worked short and stubby — they tuck under the curled body.*

- **Rnd 1:** 6 sc in MR. **[6]**
- **Rnd 2:** inc in each st. **[12]**
- **Rnd 3:** sc in BLO around. **[12]**
- **Rnd 4–6:** sc around (3 rnds). **[12]**
- **Rnd 7:** (2 sc, dec) ×3. **[9]**

Stuff lightly. Flatten opening and **sc 4 across to close** (this creates a flat tab for sewing — no stuffing escapes, minimal sewing). Fasten off, leaving a 12 in (30 cm) tail.

---

## WINGS (make 2)
*Worked flat in two colors for a layered look. Small and tucked, suitable for a sleeping dragon.*

In main color:
- **Row 1:** ch 9, sc in 2nd ch from hook, sc, hdc 2, dc 2, hdc, sc. Turn. **[8]**
- **Row 2:** ch 1, sc across. Turn. **[8]**
- **Row 3:** ch 1, sc, hdc, dc 3, hdc, sc, sl st. Turn. **[8]**

Fasten off, leaving an 18 in (45 cm) tail for attaching.

*Optional:* edge with accent color by working sc evenly around the wing perimeter.

---

## BACK SPINES (low-sew method)
*Worked directly onto the body using surface slip stitches and chains — no sewing required.*

Once body+tail piece is complete and the head is attached, use accent color:

1. Insert hook into a stitch along the center back (just behind where the head meets the body).
2. Pull up a loop, then **ch 4, sl st in 2nd ch from hook, sc, hdc** to form a small triangular spine.
3. **Sl st** along the surface of the body 2 sts forward.
4. Repeat to create 6–8 spines, decreasing the chain length (4, 4, 3, 3, 2, 2) as you travel toward the tail tip.

Fasten off and weave in ends.

---

## ASSEMBLY (minimal sewing)

1. **Curl the body+tail:** Arrange the finished body so the tail wraps around the front like a sleeping cat's tail. The body should form a rough oval about 8 in (20 cm) across.
2. **Attach head:** Position the head at the front of the body, tilted slightly down as if resting on the tail. Use the long tail from the head to whip stitch around the base of the neck (approximately 12 sts of contact). This is the only major seam.
3. **Attach legs:** Tuck two front legs under the chin near the head; tuck two back legs under the body near the curl. Use the long tails to whip stitch each flat tab to the body — only ~6 sts per leg required.
4. **Attach wings:** Fold each wing slightly and place along the upper back, angled as if folded in sleep. Whip stitch the straight edge (Row 1) flat against the back. About 8 sts per wing.
5. **Belly patch (optional):** Sew flat to underside if desired.
6. **Add spines:** Work surface spines as described above.
7. **Embroider sleeping eyes:** Using black yarn, embroider two small curved lines (closed eyes, slight upward arc) on the front of the head, about 4 sts apart, between Rnds 6–7.
8. **Embroider mouth:** Optional — small upward curve below the snout for a contented sleeping smile.
9. **Final shaping:** Bend the tail tip gently to curl. Press into desired sleeping pose.

---

## Finished Measurements (verification)

- **Body diameter (uncurled):** 36 sts ÷ (14 sts / 4 in) = ~10.3 cm ✓
- **Body length (uncurled):** ~17 rnds × (4 in / 16 rnds) = ~10.8 cm
- **Tail length:** ~16 rnds tapering = ~10 cm
- **Total curled footprint:** body (~10 cm) + tail wrap (~8–10 cm) ≈ **20 cm across** ✓
- **Head diameter:** ~6 cm ✓ (proportional)

---

## Care

Hand wash cold, lay flat to dry. Do not machine wash — stuffing may shift.

Enjoy your sleeping dragon! 🐉💤
Disclaimer: This pattern was generated by AI and should be reviewed for accuracy before use. While we strive for quality, AI-generated content may contain errors. Please verify measurements, stitch counts, and instructions before beginning your project. Generated by purlJam.uk
Access your pattern anytime
Bookmark this page to access your pattern anytime