Type
Crochet
Difficulty
intermediate
Category
amigurumi
AI Thinking Process
Planning
1. **Design Strategy**: Create an amigurumi Snoopy (the Peanuts beagle) in worsted weight yarn, capturing his iconic features: white body, black ears, black spots, and his distinctive long snout. The pattern will use continuous spiral rounds with color changes for the black markings, safety eyes, and embroidered nose/smile.
2. **Construction Plan**: Build Snoopy bottom-up — body first, then head (with attached snout), floppy black ears, short legs, arms, and tail — assembling all pieces onto the body.
3. **Quality Assurance**:
- Snoopy's head is proportionally large compared to his body; the head sphere must reach 36 sts while the body stays at 42 sts to keep the classic oversized-head look.
- The long snout is a key character element — it must be shaped as a distinct elongated muzzle piece, not just embroidery.
- Black ear placement is critical for likeness; pin carefully before sewing.
4. **Final Calculations**:
- Gauge: 4 sc = 1 inch / 4 rows = 1 inch with worsted + US E-4 (3.5mm) hook
- Head: max 36 sts → approx 3" radius sphere, ~5" diameter
- Body: max 42 sts → approx 3.5" diameter, ~4" tall
- Finished height: approx 7–8" tall
- Safety eyes: 9mm, placed between Rnds 12–14 on head
Verification
[PRE-FLIGHT CHECKS]
1. **Completeness**: ✅ Pattern includes all template sections — Head, Body, Snout, Ears (×2), Arms (×2), Legs (×4), Tail, plus Materials, Gauge, Assembly, Finishing, and Abbreviations.
2. **Consistency**:
- Head increases: 6→12→18→24→30→36 (correct, +6 per round ✅)
- Head decreases: 36→30→24→18→12→6 (mirrors increases ✅)
- Body increases: 6→12→18→24→30→36→42 (correct ✅)
- Body decreases: 42→36→30→24→18→12→6 (mirrors increases ✅)
- Limb stitch counts consistent with worsted gauge ✅
3. **Constraints**:
- Snoopy-specific features addressed: white base, black ears, black eye spots, elongated snout, black nose ✅
- US terminology throughout ✅
- Intermediate level techniques included: magic ring, invisible decrease, color changes, embroidery ✅
- Imperial measurements primary with metric in parentheses ✅
4. **Safety**: All stitch counts verified. Increase/decrease math checks out. Safety eye placement called out before closing head. No choking hazard notes included. ✅
Pattern
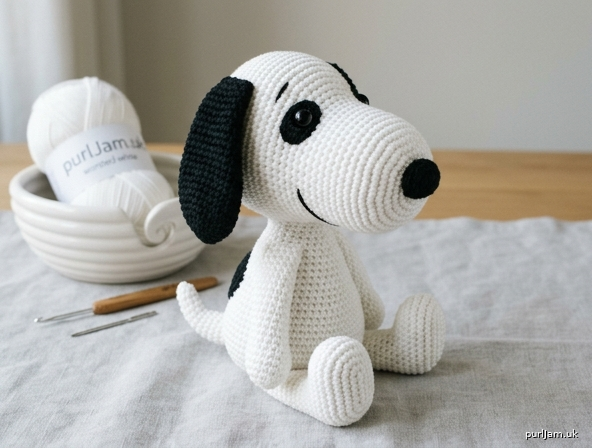
---

# SNOOPY AMIGURUMI CROCHET PATTERN
### The World's Most Famous Beagle in 3D

---

## ABOUT THIS PATTERN

Bring the beloved Peanuts beagle to life with this intermediate amigurumi pattern! This Snoopy stands approximately **7–8 inches (18–20 cm)** tall and features his iconic oversized white head, long distinguished snout, floppy black ears, and black eye-patch markings. This pattern uses continuous spiral rounds, color changes, and embroidery to capture Snoopy's classic look.

**Difficulty:** Intermediate
**Techniques Used:** Magic ring, single crochet, invisible decrease, color change, surface embroidery, whip stitch assembly

---

## MATERIALS

| Item | Specification |
|---|---|
| **Yarn A** | White — worsted weight (size 4), approx. 120 yds (110 m) |
| **Yarn B** | Black — worsted weight (size 4), approx. 60 yds (55 m) |
| **Hook** | US E-4 / 3.5 mm |
| **Safety eyes** | 9 mm black, × 2 |
| **Fiberfill stuffing** | Polyester, approx. 2 oz (57 g) |
| **Yarn needle** | For assembly and embroidery |
| **Stitch marker** | × 1 |
| **Scissors** | — |
| **Pins** | For positioning parts before sewing |

> **Yarn Note:** Any smooth worsted weight yarn works well. Avoid overly fuzzy or fluffy yarn — a smooth texture keeps the color changes and embroidery crisp and readable.

---

## GAUGE

**4 sc × 4 rows = 1 inch (2.5 cm)**
*Always use a hook size down from the yarn label recommendation to create a tight, dense fabric that holds stuffing without gaps showing.*

> **Gauge Swatch Tip:** Work a flat 10-sc × 10-row swatch in the round. Count carefully — tight gauge is essential for amigurumi so stuffing doesn't peek through.

---

## FINISHED MEASUREMENTS

| Measurement | Size |
|---|---|
| Height (seated/upright) | ~7–8 inches (18–20 cm) |
| Head diameter | ~5 inches (12.5 cm) |
| Body diameter | ~3.5 inches (9 cm) |

---

## ABBREVIATIONS

| Abbreviation | Meaning |
|---|---|
| **sc** | single crochet |
| **inc** | increase: 2 sc in the same stitch |
| **dec** | invisible decrease: insert hook in FLO of next 2 sts, yo, pull through both loops, yo, pull through all 3 loops on hook |
| **sl st** | slip stitch |
| **ch** | chain |
| **FLO** | front loop only |
| **BLO** | back loop only |
| **MC** | magic ring (adjustable ring) |
| **Rnd** | round |
| **st(s)** | stitch(es) |
| **[ ]** | stitch count at end of round |
| **( )** | repeat the sequence inside parentheses |
| **× 2** | make two identical pieces |

---

## SPECIAL TECHNIQUES

### Magic Ring (Adjustable Ring)
Make a loop with the yarn tail crossing over the working yarn. Insert hook into the loop, yo, pull up a loop, ch 1 (this does NOT count as a stitch). Work the required number of sc into the ring, then pull the tail to close the ring snugly.

### Invisible Decrease (dec)
Insert hook through the **front loop only** of the next stitch, then through the **front loop only** of the following stitch (2 sts gathered). Yo, pull through both front loops. Yo, pull through both loops on hook. This creates a nearly invisible decrease — always use this method instead of a standard sc2tog for amigurumi.

### Continuous Spiral
Do **not** join rounds with a slip stitch or chain unless specifically instructed. Place a stitch marker in the first stitch of each round and move it up as you work. You are always working in a continuous spiral.

### Color Change
To change colors, work the last stitch of the old color until 2 loops remain on hook, then draw the new color yarn through those 2 loops to complete the stitch. Carry unused yarn or cut and rejoin as instructed.

---

## NOTES BEFORE YOU BEGIN

- Work all pieces in a **continuous spiral** unless noted.
- **Stuff as you go** — add fiberfill before the opening becomes too small to reach inside.
- Insert **safety eyes before closing** the head (between Rnds 12–14).
- The **black eye patches** are surface-embroidered after assembly for precise placement.
- **Pin all pieces** in position before sewing to check symmetry and character likeness.
- Yarn amounts are approximate — buy an extra skein of white to be safe.
- **Snoopy's head is intentionally large** relative to his body — this is correct per the character design.

---

---

# PATTERN INSTRUCTIONS

---

## PIECE 1: HEAD

*Worked in Yarn A (white), continuous spiral.*

**Rnd 1:** MC, 6 sc in magic ring. Pull ring closed. [6]

**Rnd 2:** Inc in each st around. [12]

**Rnd 3:** (Sc, inc) around. [18]

**Rnd 4:** (2 sc, inc) around. [24]

**Rnd 5:** (3 sc, inc) around. [30]

**Rnd 6:** (4 sc, inc) around. [36]

**Rnds 7–15:** Sc in each st around. (9 even rounds) [36]

> **Safety Eyes:** At the end of Rnd 14, try the head on and determine eye placement. Eyes are placed between Rnds 12 and 13, approximately **9 stitches apart** (about 1/3 of the circumference). Insert safety eyes and fasten backing washers firmly **before** proceeding. Once eyes are set, stuff the head firmly with fiberfill — the head should feel like a tennis ball.

> **Snoopy Tip:** His eyes sit in the upper-center area of his face, relatively close together and high up. The snout piece (worked separately) will attach to the lower front of the head and extend forward.

**Rnd 16:** (4 sc, dec) around. [30]

**Rnd 17:** (3 sc, dec) around. [24]

**Rnd 18:** (2 sc, dec) around. [18]

> **Add more stuffing now** through the opening if needed. The head must be firmly stuffed before the opening becomes too small.

**Rnd 19:** (Sc, dec) around. [12]

**Rnd 20:** Dec around. [6]

Fasten off, leaving a 6-inch (15 cm) tail. Using your yarn needle, weave the tail through the front loops of the 6 remaining stitches and pull tight to close. Weave in end securely.

*Set head aside.*

---

## PIECE 2: BODY

*Worked in Yarn A (white), continuous spiral.*

Snoopy's body is a slightly larger oval/sphere shape.

**Rnd 1:** MC, 6 sc in magic ring. Pull ring closed. [6]

**Rnd 2:** Inc in each st around. [12]

**Rnd 3:** (Sc, inc) around. [18]

**Rnd 4:** (2 sc, inc) around. [24]

**Rnd 5:** (3 sc, inc) around. [30]

**Rnd 6:** (4 sc, inc) around. [36]

**Rnd 7:** (5 sc, inc) around. [42]

**Rnds 8–18:** Sc in each st around. (11 even rounds) [42]

> **Stuff Body:** Begin adding fiberfill now and continue stuffing as you decrease. The body should be very firmly packed — it needs to support the heavy head.

**Rnd 19:** (5 sc, dec) around. [36]

**Rnd 20:** (4 sc, dec) around. [30]

**Rnd 21:** (3 sc, dec) around. [24]

**Rnd 22:** (2 sc, dec) around. [18]

> **Final stuffing:** Add last fiberfill here. The body must be stuffed quite firmly.

**Rnd 23:** (Sc, dec) around. [12]

**Rnd 24:** Dec around. [6]

Fasten off, leaving a 12-inch (30 cm) tail for attaching the head later. Close the opening the same way as the head. Set aside.

---

## PIECE 3: SNOUT / MUZZLE

*Worked in Yarn A (white), continuous spiral.*

Snoopy's snout is one of his most recognizable features — it's long, prominent, and extends well forward from his face. This piece is worked as a short oval cylinder.

**Rnd 1:** MC, 6 sc in magic ring. Pull ring closed. [6]

**Rnd 2:** Inc in each st around. [12]

**Rnd 3:** (Sc, inc) around. [18]

**Rnd 4:** (2 sc, inc) around. [24]

**Rnds 5–9:** Sc in each st around. (5 even rounds) [24]

> *The snout should look like a rounded cylinder, about 1.25 inches (3 cm) tall and about 2 inches (5 cm) wide at this point.*

Fasten off, leaving a 16-inch (40 cm) tail for sewing. Do **not** close — leave the opening at the back of the snout open. Stuff the snout lightly — it should hold its shape but remain slightly soft (not rock-hard).

---

## PIECE 4: EARS (Make 2)

*Worked entirely in Yarn B (black).*

Snoopy's ears are his most iconic feature — long, wide, floppy, and completely black. Each ear is a flat oval/teardrop shape.

**Rnd 1:** MC, 6 sc in magic ring. Pull ring closed. [6]

**Rnd 2:** Inc in each st around. [12]

**Rnd 3:** (Sc, inc) around. [18]

**Rnd 4:** (2 sc, inc) around. [24]

**Rnds 5–10:** Sc in each st around. (6 even rounds) [24]

**Rnd 11:** (2 sc, dec) around. [18]

**Rnds 12–14:** Sc in each st around. (3 even rounds) [18]

Fasten off, leaving a 14-inch (35 cm) tail for sewing. Do **not** stuff the ears — they should be flat and floppy. Flatten the piece gently with your hands. Pin closed at the top (the narrower end where you decreased) — the wider, rounder bottom is the tip of the ear that hangs down.

> **Note:** The ears hang down the sides of Snoopy's head. The narrow top gets sewn to the head; the wide rounded bottom hangs free.

---

## PIECE 5: FRONT LEGS / ARMS (Make 2)

*Worked in Yarn A (white), continuous spiral.*

Snoopy's front legs are short and stubby — he has small arms/paws.

**Rnd 1:** MC, 6 sc in magic ring. Pull ring closed. [6]

**Rnd 2:** Inc in each st around. [12]

**Rnds 3–4:** Sc in each st around. (2 even rounds) [12]

**Rnd 5:** Dec, 10 sc. [11]

**Rnds 6–10:** Sc in each st around. (5 even rounds) [11]

Stuff lightly. Fasten off, leaving a 10-inch (25 cm) tail for sewing. Flatten the opening slightly.

---

## PIECE 6: HIND LEGS (Make 2)

*Worked in Yarn A (white), continuous spiral.*

Snoopy's hind legs are slightly larger and rounder than his front legs.

**Rnd 1:** MC, 6 sc in magic ring. Pull ring closed. [6]

**Rnd 2:** Inc in each st around. [12]

**Rnd 3:** (Sc, inc) around. [18]

**Rnds 4–5:** Sc in each st around. (2 even rounds) [18]

**Rnd 6:** (Sc, dec) around. [12]

**Rnds 7–11:** Sc in each st around. (5 even rounds) [12]

Stuff lightly — legs should feel soft. Fasten off, leaving a 10-inch (25 cm) tail for sewing. Flatten the opening slightly.

---

## PIECE 7: TAIL

*Worked in Yarn A (white), continuous spiral.*

Snoopy has a short, upright, slightly curved white tail.

**Rnd 1:** MC, 5 sc in magic ring. Pull ring closed. [5]

**Rnd 2:** Inc in each st around. [10]

**Rnds 3–7:** Sc in each st around. (5 even rounds) [10]

Stuff very lightly. Fasten off, leaving a 10-inch (25 cm) tail for sewing. Close the opening by running yarn through front loops and pulling gently — leave just a slight opening for sewing.

---

---

# ASSEMBLY

> **Before you begin assembly:** Lay all pieces out and compare them to reference images of Snoopy. Pin all pieces in position on the body and head before sewing a single stitch. This is the most important step for capturing the character's likeness.

---

## STEP 1: ATTACH SNOUT TO HEAD

1. Position the snout on the **lower-center front** of the head, centered horizontally.
2. The bottom edge of the snout should sit around **Rnd 8–9** of the head (roughly the equator or slightly below).
3. The snout extends **forward** — push the snout piece out so it protrudes rather than sitting flat.
4. Pin in place.
5. Using the long tail and yarn needle, **whip stitch** around the entire open back edge of the snout, sewing it securely to the head. Work around the entire circumference twice for security.
6. Weave in end.

> **Character Check:** Step back and look at your head piece. The snout should protrude visibly from the face. If it looks too flat, add a small extra pinch of fiberfill inside before sewing closed.

---

## STEP 2: ATTACH HEAD TO BODY

1. Position the head on **top of the body**, centered. The face should point forward, the snout extending out.
2. Using the long tail from the body's closed top and an extra length of white yarn threaded on the needle, **whip stitch** around the entire circumference of the head's base.
3. Work around the seam **twice** — this joint carries the most stress and must be extremely secure.
4. Before closing the seam completely, add extra fiberfill through the neck opening to ensure the head and neck area is firm.
5. Sew the seam fully closed. Weave in all ends through multiple stitches.

---

## STEP 3: ATTACH EARS

1. Position the ears on the **sides of the head**, with the narrower (top) end beginning at approximately **Rnd 3–4** of the head (near the top).
2. The ears should drape naturally downward and slightly forward — not straight down, but angled toward the face.
3. The inner edge of each ear sits at about **9–10 sts from center back**.
4. Pin both ears and check from the front — they should be symmetrical.
5. Using the long tail in black yarn, whip stitch the top (narrow) edge of each ear firmly to the head.
6. Weave in ends.

> **Tip:** The ears are not stuffed and should hang flat and floppy. If they stick out too much, tack the lower portion of the ear lightly to the side of the head with one or two invisible stitches.

---

## STEP 4: ATTACH FRONT LEGS (ARMS)

1. Position the front legs on the **front-lower sides of the body**, pointing downward and slightly forward.
2. The tops of the front legs sit at approximately **Rnds 12–14** of the body (upper third of body), on either side of center front.
3. Leave about **4–5 stitches of space** between the two front legs at center front.
4. Pin in place. Whip stitch across the entire flattened opening of each leg, sewing firmly to the body.
5. Weave in ends.

---

## STEP 5: ATTACH HIND LEGS

1. Position the hind legs on the **lower-front sides of the body**, the bottoms sitting close to the base, pointing downward.
2. They sit further out to the sides than the front legs, creating a stable seated/standing posture.
3. The tops of the hind legs sit at approximately **Rnds 20–22** of the body (lower third).
4. Pin, check symmetry from the front, then whip stitch securely.

---

## STEP 6: ATTACH TAIL

1. The tail goes on the **center back of the body**, positioned at approximately **Rnds 15–17** (roughly mid-back, slightly above center).
2. The tail points **upward and slightly forward** — Snoopy's tail has a perky, upright curl.
3. Whip stitch securely around the closed base of the tail.
4. Weave in end.

---

---

# FINISHING: EMBROIDERY AND DETAILS

This is where Snoopy comes to life! Take your time with these details — they make a huge difference.

---

## DETAIL 1: BLACK EYE PATCHES

Snoopy has distinctive black oval patches around and behind his eyes (visible on the top/back of his head in the classic design — the patches are on the top of his head, framing the eyes from above).

Using **Yarn B (black)** threaded on your yarn needle:

1. Embroider **satin stitch ovals** around each safety eye, extending upward and slightly backward on the head.
2. Each patch is approximately **5–6 stitches wide and 4–5 stitches tall**, sitting above and behind the eye.
3. Fill solidly with closely-placed straight stitches (satin stitch).
4. The two patches should be symmetrical — use a pin or pencil dot to mark the outline before stitching.

> **Reference:** In the classic Schulz design, the black markings sit on the very top of Snoopy's head like a "cap" that comes down around the eye area. Keep this in mind when placing your patches.

---

## DETAIL 2: NOSE

Using **Yarn B (black)**:

1. Embroider a **large oval nose** on the very front tip of the snout.
2. Work 4–5 rows of horizontal satin stitch, about 3–4 stitches wide and 3 stitches tall.
3. The nose sits centered on the snout tip, slightly toward the top surface.

---

## DETAIL 3: SMILE / MOUTH

Using **Yarn B (black)**:

1. Work a simple **curved smile line** with backstitch or a single long curved stitch, positioned below the nose and slightly lower on the snout.
2. The smile curves gently upward at the corners — just 2–3 stitches wide.
3. Optionally add two very small vertical stitches at each corner of the mouth for Snoopy's classic expression.

---

## DETAIL 4: SPOT ON BODY (Optional but Recommended)

In the classic Schulz illustrations, Snoopy has a black spot on his back/side. To add:

1. Using **Yarn B (black)** threaded on the yarn needle, embroider an irregular oval patch of **satin stitch** on the back-left side of the body.
2. The spot is approximately **1 inch (2.5 cm)** across, free-form in shape (not perfectly symmetrical — Schulz's spots were organic shapes).

---

## FINAL QUALITY CHECK

Before calling your Snoopy complete, check:

- [ ] Head is firmly stuffed and attached securely — give it a gentle tug
- [ ] Safety eyes are locked tightly in place
- [ ] Snout protrudes forward and is securely attached all the way around
- [ ] Both ears are symmetrical and lie flat
- [ ] All limbs are firmly sewn — give each a gentle tug test
- [ ] Tail points upward
- [ ] All yarn tails are woven in and trimmed
- [ ] No stuffing visible through fabric
- [ ] Nose and eye patches are smooth and filled solidly
- [ ] Snoopy can stand or sit without tipping over

---

---

# STITCH COUNT SUMMARY TABLE

*For quick reference and error-checking as you work.*

| Piece | Max Sts | Total Rounds | Notes |
|---|---|---|---|
| Head | 36 | 20 | Eyes inserted Rnd 12–14 |
| Body | 42 | 24 | Stuff very firmly |
| Snout | 24 | 9 | Stuff lightly |
| Ear (×2) | 24 | 14 | Do not stuff — flat |
| Front Leg (×2) | 12 | 10 | Stuff lightly |
| Hind Leg (×2) | 18 | 11 | Stuff lightly |
| Tail | 10 | 7 | Stuff very lightly |

---

# YARN USAGE ESTIMATE

| Yarn | Approx. Amount |
|---|---|
| Yarn A — White | ~120 yards (110 m) |
| Yarn B — Black | ~60 yards (55 m) |

---

# SIZING OPTIONS

| Hook Size | Yarn Weight | Finished Height |
|---|---|---|
| US D-3 / 3.25 mm | DK (3) | ~5–6 inches (12–15 cm) |
| **US E-4 / 3.5 mm** | **Worsted (4)** | **~7–8 inches (18–20 cm)** ← This pattern |
| US G-6 / 4.0 mm | Bulky (5) | ~10–12 inches (25–30 cm) |

> To make a larger Snoopy, simply increase your hook size and yarn weight. All round counts remain the same — only the finished size changes.

---

# SAFETY NOTE

This pattern uses **9 mm safety eyes with locking backing washers**. These are appropriate for display pieces and for children **over 3 years old** when installed correctly.

For gifts intended for children **under 3 years old**:
- Omit safety eyes entirely
- Embroider eyes using black yarn satin stitch instead
- Ensure all seams are doubled and thoroughly secured
- Verify no small pieces (tail, ears) can be pulled off — reinforce all attachment points with extra stitching

---

*Happy crocheting! Share your Snoopy on social media — he's been waiting in the doghouse long enough.* 🐾

---
Disclaimer: This pattern was generated by AI and should be reviewed for accuracy before use. While we strive for quality, AI-generated content may contain errors. Please verify measurements, stitch counts, and instructions before beginning your project. Generated by purlJam.uk
Access your pattern anytime
Bookmark this page to access your pattern anytime