Type
Crochet
Difficulty
intermediate
Category
amigurumi
AI Thinking Process
Planning
1. **Design Strategy**: Small amigurumi fish worked in continuous rounds using UK crochet terms (dc = US sc). Rounded teardrop body with separate tail fin, top fin, and two side fins. Safety eyes for a cute expression.
2. **Construction Plan**: Single-piece body worked head-first from magic ring in continuous spiral, stuffed firmly; flat fins worked separately and sewn on.
3. **Quality Assurance**:
- Track rounds with stitch marker (continuous spiral).
- Insert safety eyes before closing body.
- Keep tension tight so stuffing does not show.
4. **Final Calculations**: Tension 19 dc x 20 rnds = 10 cm with 3.5 mm hook. Max body circumference 30 sts (~16 cm around, ~8 cm tall). Finished fish ~10 cm long × 7 cm tall including tail.
Verification
1. **Completeness**: Body, fins (top, side x2, tail), eyes, assembly — all included.
2. **Consistency**: Increase sequence 6→12→18→24→30, even rounds, decrease 30→24→18→12→6 — symmetrical and mathematically sound.
3. **Constraints**: UK terms (dc/htr/tr), metric measurements first, worsted weight, intermediate level — all addressed.
4. **Safety**: Safety eyes noted as alternative (embroider for under 3s). Stitch counts verified.
Pattern
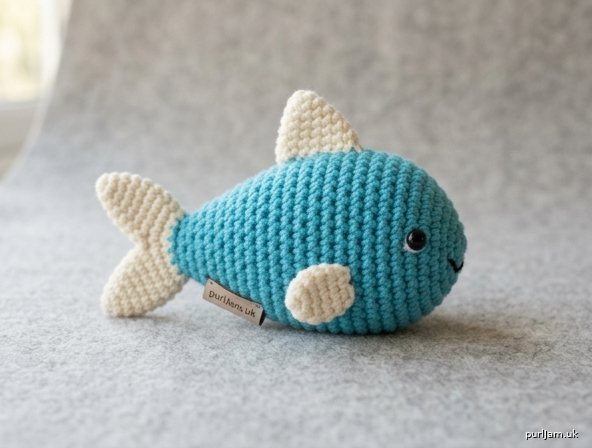
# Small Amigurumi Fish — Crochet Pattern

**Skill Level:** Intermediate
**Finished Size:** Approximately 10 cm long × 7 cm tall (4" × 2¾") including tail fin
**Technique:** Amigurumi worked in continuous rounds using UK crochet terminology

---

## Materials

- **Yarn:** Worsted weight (Aran) yarn in main colour (MC) — approx. 30 g
  Small amount of contrast colour (CC) for belly/fins — approx. 10 g
- **Hook:** 3.5 mm (UK 9 / US E-4) — one size smaller than ball band recommendation for tight fabric
- **Safety eyes:** 2 × 8 mm (or embroider with black yarn for children under 3)
- **Toy stuffing** (polyester fibrefill)
- **Yarn needle** for sewing
- **Stitch marker** to mark beginning of round
- **Scissors**

## Tension (Gauge)

19 dc × 20 rounds = 10 cm (4") worked in continuous rounds.
Exact tension is not critical, but fabric must be tight enough that stuffing does not show through.

## Abbreviations (UK Terms)

- **MR** — magic ring
- **ch** — chain
- **ss** — slip stitch
- **dc** — double crochet (= US single crochet)
- **htr** — half treble crochet (= US half double)
- **tr** — treble crochet (= US double crochet)
- **inc** — 2 dc in next stitch (increase)
- **dec** — invisible decrease: insert hook in front loop only of next 2 sts, yarn over, pull through both loops, yarn over, pull through both loops on hook
- **st(s)** — stitch(es)
- **rnd** — round
- **[ ]** — total stitch count at end of round
- **( ) × n** — repeat instructions in brackets n times

## Construction Notes

- Work in a **continuous spiral** — do not join or turn unless instructed.
- Move the stitch marker up at the start of every round.
- Stuff the body **firmly** as you go, before the opening becomes too small.
- Fins are worked flat in rows and sewn to the body.

---

## BODY (work in MC; make 1)

- **Rnd 1:** 6 dc in MR. **[6]**
- **Rnd 2:** inc in each st around. (6 × 2 = 12) **[12]**
- **Rnd 3:** (dc, inc) × 6. (6 + 6 = 12; 12 + 6 = 18) **[18]**
- **Rnd 4:** (2 dc, inc) × 6. (12 + 6 = 18; 18 + 6 = 24) **[24]**
- **Rnd 5:** (3 dc, inc) × 6. (18 + 6 = 24; 24 + 6 = 30) **[30]**
- **Rnds 6–10:** dc in each st around (5 rnds even). **[30]**

**Insert safety eyes** between Rnds 7 and 8, approximately 7 sts apart, centred on what will become the front of the head. Secure backs firmly.

- **Rnd 11:** (3 dc, dec) × 6. (18 + 6 = 24) **[24]**
- **Rnd 12:** dc in each st around. **[24]**
- **Rnd 13:** (2 dc, dec) × 6. (12 + 6 = 18) **[18]**
- **Rnd 14:** dc in each st around. **[18]**

Begin stuffing firmly.

- **Rnd 15:** (dc, dec) × 6. (6 + 6 = 12) **[12]**

Add more stuffing and shape body into a rounded teardrop.

- **Rnd 16:** dec × 6. **[6]**

Fasten off leaving a 15 cm tail. Thread through front loops of remaining 6 sts, pull tight to close. Weave end inside body.

**Maths check:** Increases 6 → 12 → 18 → 24 → 30 (5 inc rnds). Decreases 30 → 24 → 18 → 12 → 6 — symmetrical. ✓

---

## TAIL FIN (work in MC or CC; make 1)

Worked flat in rows.

- **Row 1:** ch 8, dc in 2nd ch from hook, dc in each of next 6 ch, turn. **[7]**
- **Row 2:** ch 1, inc, dc in next 5 sts, inc, turn. **[9]**
- **Row 3:** ch 1, inc, dc in next 7 sts, inc, turn. **[11]**
- **Row 4:** ch 1, dc in first 4 sts, (htr, tr, htr) in next st, dc in next 4 sts. (skip forming centre "V" — see below)

**Shape the forked tail:** At the outer edge (last row), work a second pass: ss into corner, ch 3, tr in same st, ch 1, tr in same st — this creates the forked look. Alternatively, cut tail into a V-shape when sewing by folding centre inward.

*Simpler alternative:* Work Rows 1–3 as above, then **Row 4:** ch 1, dc in first 4 sts, ss in next 3 sts (centre dip), dc in last 4 sts. **[11]** — creates a natural V.

Fasten off leaving a 20 cm tail for sewing.

---

## TOP (DORSAL) FIN (work in MC or CC; make 1)

- **Row 1:** ch 7, dc in 2nd ch from hook, dc in next 2 ch, htr in next ch, tr in next 2 ch. **[6]**
- **Row 2:** ch 1, turn, ss in first st, dc in next st, htr in next st, tr in next 3 sts. **[6]**

Fasten off leaving a 20 cm tail. This creates a triangular fin with a curved upper edge.

---

## SIDE FINS (work in MC or CC; make 2)

- **Rnd 1:** 6 dc in MR. **[6]**
- **Rnd 2:** (dc, inc) × 3. (3 + 3 = 6; 6 + 3 = 9) **[9]**
- **Rnd 3:** dc in each st around. **[9]**

Flatten and work 1 row across both layers:
- **Row 4:** ch 1, dc through both layers × 4, ss in last st.

Fasten off leaving a 20 cm tail. This creates a small flat oval fin.

---

## ASSEMBLY

1. **Pin tail fin** to the closed (back) end of the body. Sew in place using whip stitch all around the base of the tail, ensuring a secure join.
2. **Pin dorsal fin** along the top centre of the body, approximately over Rnds 8–12. Sew the straight edge to the body using ladder stitch.
3. **Pin side fins** on either side of the body, just below and slightly behind the eyes (around Rnds 9–11). Sew flat edge to body with whip stitch.
4. **Embroider a mouth** with a small curved stitch in black or dark yarn below the eyes, across 2–3 stitches.
5. **Optional:** Add small CC patches for cheeks or a belly stripe with duplicate stitch or embroidery.
6. Weave in all ends securely inside the body.

---

## Finishing Tips

- If using for a child under 3, **embroider eyes** rather than using safety eyes, and ensure all fins are attached with at least two rounds of stitching.
- A light brush over the body with a soft-bristled brush can give a slightly fuzzy, "fish scale" texture.
- For a shimmery look, hold a strand of metallic thread together with the MC when working the body.

**Finished dimensions:** approx. 10 cm nose-to-tail × 7 cm tall × 5 cm wide (4" × 2¾" × 2").

Happy hooking! 🐟
Disclaimer: This pattern was generated by AI and should be reviewed for accuracy before use. While we strive for quality, AI-generated content may contain errors. Please verify measurements, stitch counts, and instructions before beginning your project. Generated by purlJam.uk
Access your pattern anytime
Bookmark this page to access your pattern anytime