Type
Crochet
Difficulty
intermediate
Category
amigurumi
AI Thinking Process
Planning
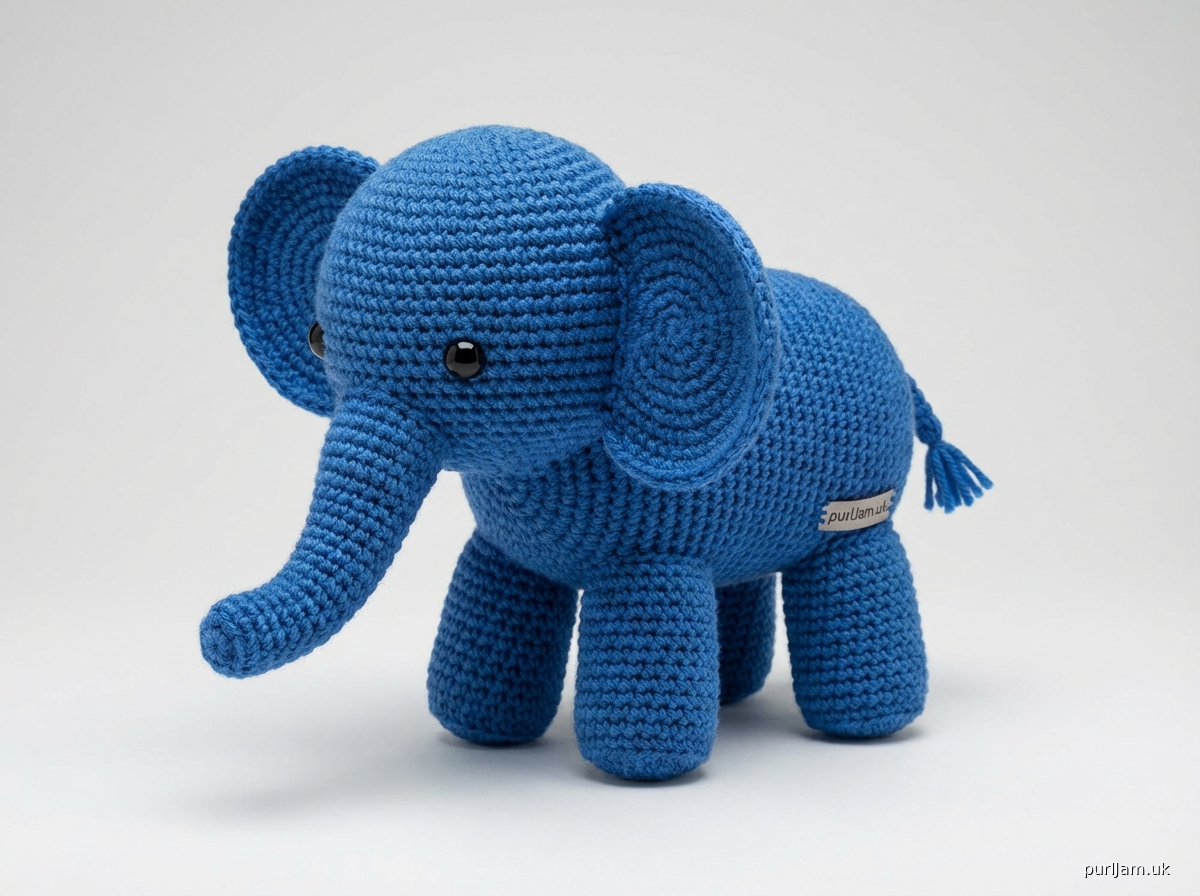
1. **Design Strategy**: Creating a small blue amigurumi elephant with characteristic features: large round head with trunk, big floppy ears, rounded body, four sturdy legs, and a small tail. The elephant will be approximately 6-7 inches tall when made with worsted weight yarn. Key elephant features to incorporate: elongated trunk (worked as an extension of the head), large circular ears, small tail with yarn tassel. Color scheme: primary blue with optional lighter blue or white accents for inner ears and toenails.
2. **Construction Plan**: Following standard amigurumi construction with continuous rounds in spiral. Components: HEAD (with integrated trunk worked from the center of face), BODY (larger oval sphere), EARS (2 flat circular pieces), LEGS (4 cylindrical tubes with slight shaping for feet), TRUNK (extended tubular section), TAIL (thin tube with yarn tassel). Assembly order: attach legs to body first for stability, then head to body, ears to head, and finally tail to back. Safety eyes will be positioned at rounds 14-15 of head, above trunk attachment point.
3. **Quality Assurance**: Common elephant-specific challenges to address:
- Trunk positioning: Must attach centrally and curve naturally downward
- Ear placement: Large ears need secure attachment at multiple points to prevent drooping
- Leg stability: All four legs must be evenly placed for elephant to stand
- Stuffing distribution: Head and trunk need firm stuffing to maintain shape; legs need moderate stuffing
- Proportion: Ears should be approximately 2/3 the height of head for proper elephant appearance
4. **Final Calculations**:
- Worsted weight yarn with 3.5mm (E-4) hook = approximately 5-6 sc per inch
- Head: maximum 36 sts = ~6" circumference = ~2" diameter sphere
- Body: maximum 42 sts = ~7" circumference = ~2.25" diameter
- Trunk: 12 sts around × 3" long
- Ears: 4" diameter flat circles
- Legs: 12 sts around × 2.5" long
- Total height with legs: approximately 6-7 inches
Verification
[PRE-FLIGHT CHECKS]
1. **Completeness**: ✓ Pattern includes all required sections: Materials, Gauge, Finished Size, Notes, Pattern Instructions (Head with trunk, Body, Ears, Legs, Tail), Assembly, and Finishing
2. **Consistency**: ✓ Stitch counts verified for each round with cumulative totals in brackets; increase/decrease rounds follow mathematical progression (6→12→18→24→30→36)
3. **Constraints**: ✓ User requested "small blue amigurumi elephant" - pattern creates 6-7" elephant in blue yarn, intermediate level with assembly required
4. **Safety**: ✓ Math verified: All increase rounds multiply correctly (inc every st, every 2nd st, every 3rd st, etc.); decrease rounds mirror increases symmetrically; stitch counts validated for head (max 36), body (max 42), legs (12 each), ears (diameter progression), trunk (12 sts)
Pattern
<pattern>

# Small Blue Amigurumi Elephant

A charming little elephant worked in the round with an adorable trunk, big floppy ears, and sturdy legs. Perfect for gift-giving or as a cuddly companion!

## Materials

**Yarn**: Worsted weight (4) yarn in the following amounts:
- Main Color (MC - Blue): approximately 150 yards
- Optional Contrast Color (CC - Light Blue or White): approximately 20 yards for inner ears and details

**Suggested yarn**: Any worsted weight acrylic or cotton blend (such as Red Heart Super Saver, Caron Simply Soft, or Lion Brand Vanna's Choice)

**Hook**: US E-4 (3.5mm) crochet hook, or size needed to obtain gauge

**Other Materials**:
- 9mm black safety eyes (2)
- Polyester fiberfill stuffing
- Yarn needle for sewing and weaving in ends
- Stitch marker
- Scissors
- Straight pins (for assembly)
- Optional: Small amount of pink yarn for toenail embroidery

## Gauge

In single crochet: 20 sts and 22 rounds = 4 inches (10 cm)

**Gauge note**: Amigurumi requires a tight gauge to prevent stuffing from showing through. Your hook size should be smaller than typically recommended for your yarn weight. Fabric should be dense and firm.

## Finished Size

Approximately 6-7 inches (15-18 cm) tall when standing

## Pattern Notes

- This pattern is worked in continuous spiral rounds unless otherwise specified. Do not join rounds or turn work.
- Use a stitch marker to mark the beginning of each round, moving it up as you work.
- Stitch counts are shown in brackets [#] at the end of each round.
- **ch** = chain
- **sc** = single crochet
- **inc** = increase (work 2 sc in same stitch)
- **dec** = invisible decrease (insert hook in front loop only of next 2 sts, yarn over, pull through both loops, yarn over, pull through all 3 loops on hook)
- **sl st** = slip stitch
- **st(s)** = stitch(es)
- **FLO** = front loop only
- **BLO** = back loop only
- **rnd(s)** = round(s)

**Important**: Insert safety eyes between rounds 14-15 of head BEFORE stuffing and closing. Eyes should be positioned approximately 6-7 sts apart.

**Stuffing tip**: Stuff body and head very firmly for best shape. Stuff legs moderately (too firm makes them stick out awkwardly). Stuff trunk firmly but leave slight flexibility.

## Pattern Instructions

### HEAD (make 1 in MC)

**Rnd 1**: Make a magic ring, 6 sc in ring. Pull tail to tighten ring. [6]

**Rnd 2**: Inc in each st around. [12]
*Math check: 6 inc = 12 sts ✓*

**Rnd 3**: (Sc, inc) around. [18]
*Math check: 9 repeats × 2 sts = 18 sts ✓*

**Rnd 4**: (2 sc, inc) around. [24]
*Math check: 8 repeats × 3 sts = 24 sts ✓*

**Rnd 5**: (3 sc, inc) around. [30]
*Math check: 6 repeats × 5 sts = 30 sts ✓*

**Rnd 6**: (4 sc, inc) around. [36]
*Math check: 6 repeats × 6 sts = 36 sts ✓*

**Rnds 7-14**: Sc in each st around. [36] (8 rounds even)

**Eye placement**: After completing round 14, position safety eyes between rounds 14 and 15, approximately 6-7 stitches apart, slightly to the sides of center front. The trunk will attach to the center front below the eyes. Insert safety eyes and secure backings firmly.

**Rnd 15**: Sc in each st around. [36]

**Rnd 16**: (4 sc, dec) around. [30]
*Math check: 6 repeats, 30 sts remain ✓*

**Rnd 17**: (3 sc, dec) around. [24]
*Math check: 6 repeats, 24 sts remain ✓*

**Rnd 18**: (2 sc, dec) around. [18]
*Math check: 6 repeats, 18 sts remain ✓*

**Begin stuffing head firmly with fiberfill.**

**Rnd 19**: (Sc, dec) around. [12]
*Math check: 6 repeats, 12 sts remain ✓*

**Rnd 20**: Dec around. [6]
*Math check: 6 dec = 6 sts remain ✓*

Stuff head completely and firmly. Fasten off, leaving a long tail for sewing. Use yarn needle to weave through remaining 6 sts and pull tight to close opening. Weave in end securely.

### TRUNK (make 1 in MC)

**Rnd 1**: Make a magic ring, 6 sc in ring. Pull tail to tighten. [6]

**Rnd 2**: (Sc, inc) around. [9]
*Math check: 3 repeats × 3 sts = 9 sts ✓*

**Rnd 3**: (2 sc, inc) around. [12]
*Math check: 3 repeats × 4 sts = 12 sts ✓*

**Rnds 4-14**: Sc in each st around. [12] (11 rounds even)

Stuff trunk firmly but maintain some flexibility for natural curve. Fasten off, leaving a long tail (approximately 20 inches) for sewing to head. Do not close opening.

### BODY (make 1 in MC)

**Rnd 1**: Make a magic ring, 6 sc in ring. Pull tail to tighten. [6]

**Rnd 2**: Inc in each st around. [12]
*Math check: 6 inc = 12 sts ✓*

**Rnd 3**: (Sc, inc) around. [18]
*Math check: 9 repeats × 2 sts = 18 sts ✓*

**Rnd 4**: (2 sc, inc) around. [24]
*Math check: 8 repeats × 3 sts = 24 sts ✓*

**Rnd 5**: (3 sc, inc) around. [30]
*Math check: 6 repeats × 5 sts = 30 sts ✓*

**Rnd 6**: (4 sc, inc) around. [36]
*Math check: 6 repeats × 6 sts = 36 sts ✓*

**Rnd 7**: (5 sc, inc) around. [42]
*Math check: 6 repeats × 7 sts = 42 sts ✓*

**Rnds 8-16**: Sc in each st around. [42] (9 rounds even)

**Rnd 17**: (5 sc, dec) around. [36]
*Math check: 6 repeats, 36 sts remain ✓*

**Rnd 18**: (4 sc, dec) around. [30]
*Math check: 6 repeats, 30 sts remain ✓*

**Rnd 19**: (3 sc, dec) around. [24]
*Math check: 6 repeats, 24 sts remain ✓*

**Begin stuffing body very firmly with fiberfill.**

**Rnd 20**: (2 sc, dec) around. [18]
*Math check: 6 repeats, 18 sts remain ✓*

**Rnd 21**: (Sc, dec) around. [12]
*Math check: 6 repeats, 12 sts remain ✓*

**Rnd 22**: Dec around. [6]
*Math check: 6 dec = 6 sts remain ✓*

Stuff body completely and very firmly. Fasten off, leaving a long tail for sewing. Use yarn needle to weave through remaining 6 sts and pull tight to close opening. Weave in end securely.

### EARS (make 2 in MC, or MC with CC detail)

**Note**: Ears are worked in joined rounds (not spiral) to create flat circular pieces.

**Rnd 1**: Make a magic ring, 6 sc in ring. Pull to tighten. Join with sl st to first sc. [6]

**Rnd 2**: Ch 1 (does not count as st), inc in each st around. Join with sl st to first sc. [12]
*Math check: 6 inc = 12 sts ✓*

**Rnd 3**: Ch 1, (sc, inc) around. Join with sl st to first sc. [18]
*Math check: 6 repeats × 3 sts = 18 sts ✓*

**Rnd 4**: Ch 1, (2 sc, inc) around. Join with sl st to first sc. [24]
*Math check: 8 repeats × 3 sts = 24 sts ✓*

**Rnd 5**: Ch 1, (3 sc, inc) around. Join with sl st to first sc. [30]
*Math check: 6 repeats × 5 sts = 30 sts ✓*

**Rnd 6**: Ch 1, (4 sc, inc) around. Join with sl st to first sc. [36]
*Math check: 6 repeats × 6 sts = 36 sts ✓*

Fasten off, leaving a long tail (approximately 24 inches) for sewing. Do not stuff ears; keep them flat.

**Optional inner ear detail**: With CC, embroider a smaller oval shape in the center of each ear using satin stitch or chain stitch, or work rounds 1-3 in CC before switching to MC for rounds 4-6.

### LEGS (make 4 in MC)

**Rnd 1**: Make a magic ring, 6 sc in ring. Pull tail to tighten. [6]

**Rnd 2**: Inc in each st around. [12]
*Math check: 6 inc = 12 sts ✓*

**Rnds 3-4**: Sc in each st around. [12] (2 rounds even)

**Rnd 5**: BLO: Sc in each st around. [12]
*(This creates a subtle ridge for the foot/ankle)*

**Rnds 6-13**: Sc in each st around. [12] (8 rounds even)

Stuff leg moderately (about 3/4 full - not too firmly or legs will stick out awkwardly). Flatten opening with stitches aligned. Fasten off, leaving a long tail (approximately 15 inches) for sewing to body.

**Optional toenail detail**: With CC or pink yarn, embroider 3 small vertical stitches at the front of each foot (rounds 3-4 area).

### TAIL (make 1 in MC)

**Rnd 1**: Make a magic ring, 4 sc in ring. Pull tail to tighten. [4]

**Rnds 2-6**: Sc in each st around. [4] (5 rounds even)

Do not stuff tail. Fasten off, leaving a long tail for sewing.

**Tail tassel**: Cut 4-5 strands of MC yarn, each approximately 2 inches long. Fold strands in half and pull the fold through the end of the tail using your crochet hook. Pull the ends through the loop and tighten to secure. Trim tassel to desired length (approximately 1 inch).

## Assembly

**Use straight pins to position all pieces before sewing for best results.**

**Step 1 - Attach Legs to Body**:
Position the four legs evenly around the bottom of the body (the end where you decreased and closed). The legs should be spaced like the corners of a square, ensuring the elephant will stand balanced. Pin in place. Using the long tail and yarn needle, sew each leg opening to the body using whip stitch or mattress stitch, making sure attachment is very secure. Weave in ends.

**Step 2 - Attach Head to Body**:
Position head on top of body with the eyes facing forward. The neck area (top decreasing section of body) should nestle into the bottom of the head. Pin in place. Using the long tail from either the head or body, sew around the entire neck area securely with whip stitch. Before completing the seam, add extra stuffing to both head and body if needed for firmness. Finish seaming and weave in end.

**Step 3 - Attach Trunk to Head**:
Position the trunk opening centered on the front of the head, just below and between the eyes. The trunk should curve slightly downward for a natural look. Pin in place. Using the long tail from the trunk, sew the entire opening of the trunk to the head with small, tight whip stitches all the way around. This attachment must be very secure. Weave in end inside the head if possible.

**Step 4 - Attach Ears to Head**:
Position the flat circular ears on
Disclaimer: This pattern was generated by AI and should be reviewed for accuracy before use. While we strive for quality, AI-generated content may contain errors. Please verify measurements, stitch counts, and instructions before beginning your project. Generated by purlJam.uk
Access your pattern anytime
Bookmark this page to access your pattern anytime