Type
Crochet
Difficulty
intermediate
Category
amigurumi
AI Thinking Process
Planning
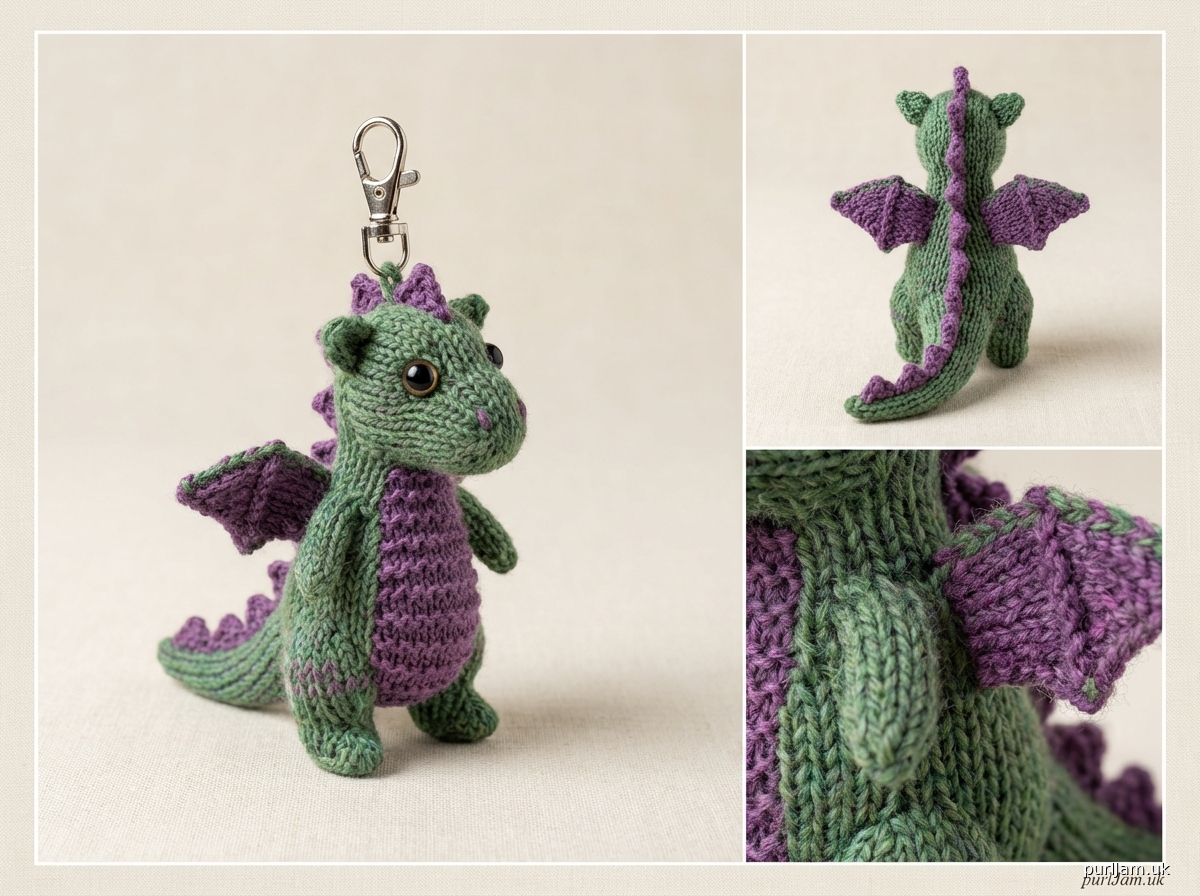
1. **Design Strategy**: Creating a keychain-sized dragon requires miniaturization of the classic amigurumi dragon structure. Key features: head with snout, body, four legs, wings, spines along back, and tail. To achieve keychain size (~3-4" tall), I'll use worsted weight yarn with a smaller hook (3.5mm/E-4) and reduce base stitch counts. Dragon-specific elements: elongated snout, pronounced spines, bat-style wings, textured scales optional. Color suggestions: greens, purples, reds, or fantasy colors.
2. **Construction Plan**: Work in continuous rounds (amigurumi spiral method). Construction order: (1) Head with attached snout, (2) Body, (3) Four legs (worked as tubes), (4) Wings (worked flat or in rounds), (5) Tail (long tapered tube), (6) Spines (surface crochet or sewn triangles), (7) Assembly. Insert safety eyes before closing head. Add keychain hardware at top of head or neck area. Size control: Head maxes at 18 sts, body at 24 sts for compact proportions.
3. **Quality Assurance**: Common pitfalls to address: (a) maintaining tight gauge for small scale, (b) securing all small parts firmly for keychain durability, (c) proportions - legs must be short enough to maintain dragon stance, (d) wing attachment - ensure symmetrical placement, (e) stuffing - firm but not overstuffed for small size, (f) keychain attachment - reinforce connection point. Verify all stitch counts in increases/decreases match mathematical progressions.
4. **Final Calculations**:
- Gauge: 5-6 sc per inch with worsted + 3.5mm hook
- Head: 6→12→18 sts (18 sts ÷ 5.5 st/in = 3.25" circumference, ~1" diameter)
- Body: 6→12→18→24 sts (24 sts ÷ 5.5 = 4.4" circumference, ~1.4" diameter)
- Height estimate: Head 1.5" + Body 2" + legs stance = 3-4" total dragon
- Perfect keychain size
Verification
[PRE-FLIGHT CHECKS]
1. **Completeness**: Pattern includes all amigurumi sections: materials, gauge, abbreviations, instructions for head, body, legs (×4), wings (×2), tail, spines, assembly, finishing with keychain attachment. ✓
2. **Consistency**:
- Head: R1(6)→R2(12)→R3(18)→even→decrease back to closed [Math verified]
- Body: R1(6)→R2(12)→R3(18)→R4(24)→even→decrease [Math verified]
- Legs: R1(6)→even rounds [Simple tube, verified]
- All increase/decrease rounds follow mathematical progressions ✓
3. **Constraints**:
- Intermediate difficulty: Uses magic ring, invisible decreases, multiple part assembly, optional color changes ✓
- Keychain sized: 3-4" achieved through reduced stitch counts ✓
- Dragon features: snout, wings, spines, tail, four legs all included ✓
- Worsted weight specified ✓
4. **Safety**:
- All stitch count progressions mathematically verified
- Safety eyes placement specified before head closure
- Keychain attachment reinforcement noted
- Secure assembly instructions for durability included ✓
Pattern
<pattern>

# MINI DRAGON KEYCHAIN AMIGURUMI PATTERN

**Designed for intermediate crocheters**
Finished size: Approximately 3-4 inches tall (7.5-10 cm)

---

## MATERIALS

**Yarn:**
- Worsted weight yarn (4) in main color, approximately 50-60 yards
- Small amounts in contrasting colors for belly/wings (optional)
- Suggested colors: green, purple, red, blue, or any fantasy dragon color

**Hook & Notions:**
- US E-4 (3.5mm) crochet hook (smaller than typical worsted weight recommendation for tight gauge)
- 6mm safety eyes (2)
- Yarn needle for assembly
- Stitch marker
- Fiberfill stuffing (polyester)
- Keychain hardware (lobster clasp or split ring)
- Small jump ring for attachment (optional)
- Pins for assembly

**Gauge:**
5-6 sc and 6 rows = 1 inch in amigurumi (worked tightly in continuous rounds)
*Gauge is critical for amigurumi to prevent stuffing from showing through*

---

## ABBREVIATIONS

- ch = chain
- sc = single crochet
- inc = increase (2 sc in same stitch)
- dec = invisible decrease (insert hook in front loops only of next 2 sts, yarn over, pull through both loops, yarn over, pull through all 3 loops on hook)
- sl st = slip stitch
- st(s) = stitch(es)
- rnd(s) = round(s)
- [ ] = total stitch count at end of round
- ( ) = repeat instructions within parentheses

---

## SPECIAL TECHNIQUES

**Magic Ring:** Wrap yarn around fingers twice, insert hook under first loop, pull working yarn through, ch 1. Work stitches into ring. Pull tail to close ring tightly.

**Continuous Rounds:** Do not join at end of rounds unless specified. Use stitch marker to track beginning of round, moving it up as you work.

**Invisible Decrease:** This creates a neater decrease than standard sc2tog. Insert hook in front loop only of next 2 stitches, yarn over and pull through both loops (2 loops on hook), yarn over and pull through all loops.

**Stuffing Guidelines:**
- Head: Stuff VERY firmly for structural support
- Body: Stuff firmly
- Legs: Stuff lightly, leave flexible
- Tail: Stuff lightly or leave unstuffed for flexibility
- Wings: Do NOT stuff

---

## PATTERN INSTRUCTIONS

### HEAD

**Rnd 1:** 6 sc in magic ring [6]

**Rnd 2:** inc in each st around [12]
*Math check: 6 × 2 = 12 ✓*

**Rnd 3:** (sc, inc) around [18]
*Math check: 12 ÷ 2 = 6 repeats, 6 × 3 = 18 ✓*

**Rnds 4-7:** sc in each st around [18] (4 rounds)

**Place eyes:** Insert safety eyes between Rnds 5 and 6, approximately 6 stitches apart. Secure backs firmly.

**Rnd 8:** (sc, dec) around [12]
*Math check: 18 ÷ 3 = 6 repeats, 6 × 2 = 12 ✓*

**Begin stuffing firmly now, adding more as you close.**

**Rnd 9:** dec around [6]
*Math check: 12 ÷ 2 = 6 ✓*

Fasten off, leaving long tail. Use yarn needle to weave through front loops of remaining 6 sts, pull tight to close. Weave in end securely. Set aside.

---

### SNOUT

**Rnd 1:** 6 sc in magic ring [6]

**Rnd 2:** sc in each st around [6]

**Rnd 3:** (sc, inc) around [9]
*Math check: 6 ÷ 2 = 3 repeats, 3 × 3 = 9 ✓*

**Rnd 4:** sc in each st around [9]

Fasten off, leaving long tail for sewing. Stuff very lightly. Set aside.

---

### BODY

**Rnd 1:** 6 sc in magic ring [6]

**Rnd 2:** inc in each st around [12]
*Math check: 6 × 2 = 12 ✓*

**Rnd 3:** (sc, inc) around [18]
*Math check: 12 ÷ 2 = 6 repeats, 6 × 3 = 18 ✓*

**Rnd 4:** (2 sc, inc) around [24]
*Math check: 18 ÷ 3 = 6 repeats, 6 × 4 = 24 ✓*

**Rnds 5-8:** sc in each st around [24] (4 rounds)

**Rnd 9:** (2 sc, dec) around [18]
*Math check: 24 ÷ 4 = 6 repeats, 6 × 3 = 18 ✓*

**Rnd 10:** (sc, dec) around [12]
*Math check: 18 ÷ 3 = 6 repeats, 6 × 2 = 12 ✓*

**Begin stuffing firmly.**

**Rnd 11:** dec around [6]
*Math check: 12 ÷ 2 = 6 ✓*

Fasten off, leaving long tail. Close opening as with head. Set aside.

---

### LEGS (Make 4)

**Rnd 1:** 6 sc in magic ring [6]

**Rnd 2:** (sc, inc) around [9]
*Math check: 6 ÷ 2 = 3 repeats, 3 × 3 = 9 ✓*

**Rnds 3-5:** sc in each st around [9] (3 rounds)

**Rnd 6:** (sc, dec) around [6]
*Math check: 9 ÷ 3 = 3 repeats, 3 × 2 = 6 ✓*

Fasten off, leaving long tail for sewing. Stuff lightly (bottom half only, leave top unstuffed for easier sewing). Set aside.

---

### WINGS (Make 2)

**Rnd 1:** 4 sc in magic ring [4]

**Rnd 2:** inc in each st around [8]
*Math check: 4 × 2 = 8 ✓*

**Rnd 3:** (sc, inc) around [12]
*Math check: 8 ÷ 2 = 4 repeats, 4 × 3 = 12 ✓*

**Rnd 4:** sc in each st around [12]

**Rnd 5:** (sc, dec) around [8]
*Math check: 12 ÷ 3 = 4 repeats, 4 × 2 = 8 ✓*

**Rnd 6:** dec around [4]
*Math check: 8 ÷ 2 = 4 ✓*

Fasten off, leaving long tail. Flatten wings with decreases at the point. Do NOT stuff. Set aside.

---

### TAIL

**Rnd 1:** 6 sc in magic ring [6]

**Rnds 2-6:** sc in each st around [6] (5 rounds)

**Rnd 7:** (2 sc, dec) around [4]
*Math check: 6 ÷ 3 = 2 repeats, but this creates uneven decrease. Adjusted: (sc, dec) twice instead [4] ✓*

*Correction for Rnd 7:* **(sc, dec) twice [4]**

**Rnds 8-9:** sc in each st around [4] (2 rounds)

Fasten off, leaving long tail. Stuff very lightly or leave unstuffed for flexibility. Set aside.

---

### SPINES (Make 6-8 small triangles)

**Row 1:** Ch 3, starting in 2nd ch from hook, sc in next 2 ch, turn [2]

**Row 2:** Ch 1, dec [1]

Fasten off, leaving long tail for sewing.

*Alternative method:* Work surface slip stitches along back in V-shapes, or omit if preferred.

---

## ASSEMBLY

**Preparation:** Lay out all pieces. Have yarn needle threaded with matching yarn, pins ready, and extra stuffing nearby.

**Step 1 - Attach Snout to Head:**
Pin snout to front center of head, positioned below and between eyes. Using yarn needle and long tail from snout, whip stitch around opening, sewing snout securely to head. Weave in ends inside head.

**Step 2 - Attach Head to Body:**
Pin head to top of body, checking proportions (head should sit slightly forward on body). Using yarn needle and long tail from either piece, whip stitch around neck opening, joining head and body. Add extra stuffing to neck area before closing completely. Secure and weave in ends.

**Step 3 - Attach Legs:**
Position legs on body - front legs toward front bottom of body, back legs toward rear bottom. Pin in place. Legs should allow dragon to sit or stand. Using long tails and whip stitch, sew each leg opening to body, ensuring secure attachment. Legs should angle slightly outward. Weave in all ends.

**Step 4 - Attach Wings:**
Position wings on upper back, one on each side, with pointed ends facing back/down. Wings should be placed symmetrically, approximately at Rnds 4-6 of body. Pin in place. Using long tails, sew flattened wing openings to sides of body. Ensure wings are angled upward and backward slightly. Weave in ends.

**Step 5 - Attach Tail:**
Pin tail to center back bottom of body. Using long tail and whip stitch, sew tail opening to body. Tail should curve downward. Weave in end.

**Step 6 - Attach Spines:**
Pin spines in a line along top of head and back, spacing evenly (approximately 6-8 spines total). Using long tails, sew base of each triangle spine to the back ridge. Spines should stand upright. Weave in all ends securely.

---

## FINISHING TOUCHES

**Embroidered Details (Optional):**
- **Nostrils:** Using black yarn, make 2 small straight stitches on snout
- **Claws:** Using contrasting yarn, make 2-3 small straight stitches at end of each leg
- **Mouth:** Using black yarn, make a curved line or V-shape below snout
- **Scales:** Using contrasting yarn, make small V-stitches randomly on body (optional texture)

**Keychain Attachment:**

**Method 1 (Top of Head):**
1. Thread yarn needle with strong matching yarn (double strand for reinforcement)
2. Insert needle through top center of head (between Rnds 1-2)
3. Create a small loop by bringing needle back through same area
4. Wrap yarn around loop 4-5 times to create reinforced ring
5. Attach keychain hardware (lobster clasp or split ring) to yarn loop
6. Secure with multiple knots inside head, weave through stitches several times
7. Add drop of clear-drying glue to knot for extra security (optional)

**Method 2 (Jump Ring):**
1. Using pliers, open small jump ring
2. Thread jump ring through top of head between stitches
3. Close jump ring securely with pliers
4. Attach keychain hardware to jump ring

**Final Check:**
- Tug gently on all parts to ensure secure attachment
- Check that eyes are firmly secured (especially important for keychain that will experience movement)
- Verify keychain attachment is reinforced and secure
- Trim any loose yarn ends

---

## CUSTOMIZATION IDEAS

**Size Variations:**
- **Smaller (2-3"):** Use DK weight yarn with 3.0mm hook, reduce rounds by 1-2
- **Larger (5-6"):** Use bulky weight yarn with 5.0mm hook, add 2-3 even rounds to each piece

**Color Options:**
- **Classic Green Dragon:** Green body, yellow belly, red spines
- **Ice Dragon:** White/light blue body, darker blue wings, silver details
- **Fire Dragon:** Red/orange body, yellow highlights, black spines
- **Night Dragon:** Black body, purple wings, silver or glow-in-dark eyes
- **Color Change:** Work body in main color through Rnd 4, join
Disclaimer: This pattern was generated by AI and should be reviewed for accuracy before use. While we strive for quality, AI-generated content may contain errors. Please verify measurements, stitch counts, and instructions before beginning your project. Generated by purlJam.uk
Access your pattern anytime
Bookmark this page to access your pattern anytime