Type
Crochet
Difficulty
advanced
Category
amigurumi
Pattern
# Mini Pixie Amigurumi — Advanced Crochet Pattern

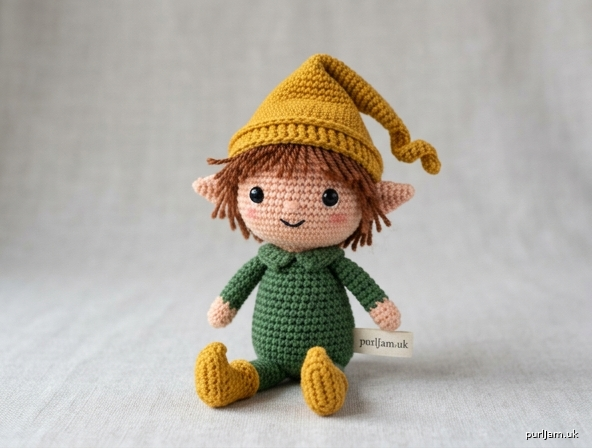
A whimsical 5-inch pixie with a pointed curled hat, pointed elf ears, and a sweet embroidered face. Worked seamlessly head-to-body in continuous spiral rounds.

---

## Finished Size
Approximately **5 inches (12.5 cm) tall**, seated/standing.

## Materials

- **Yarn (worsted weight #4):**
  - Skin color (peach/tan): ~30 yds (MC)
  - Outfit color (forest green): ~25 yds (CC1)
  - Hat color (mustard or red): ~15 yds (CC2)
  - Hair color (brown/auburn): ~10 yds (CC3)
- **Hook:** US E-4 / 3.5 mm
- **Safety eyes:** 8 mm black, pair
- **Fiberfill stuffing**
- **Stitch marker**
- **Yarn needle**
- **Black embroidery floss** (mouth)
- **Pink embroidery floss or blush** (cheeks)
- **Optional:** floral wire for hat curl

## Gauge
6 sc × 7 rows = 1 inch (2.5 cm) in single crochet, worked tightly.
Gauge is not critical for fit but affects finished size and stuffing visibility.

## Abbreviations (US terms)
- **MR** – magic ring
- **sc** – single crochet
- **inc** – 2 sc in same st
- **dec** – invisible decrease (FLO of next 2 sts)
- **st(s)** – stitch(es)
- **sl st** – slip stitch
- **FLO** – front loop only
- **BLO** – back loop only
- **[ ]** – total stitch count at end of round
- **( ) x N** – repeat instructions inside N times

**Note:** Work in continuous spiral. Use stitch marker. Do NOT join unless instructed.

---

## HEAD & BODY (worked as one piece, starting at top of head)

**With MC (skin color):**

- **Rnd 1:** 6 sc in MR. **[6]**
- **Rnd 2:** inc in each st around. **[12]** ✓ (6×2=12)
- **Rnd 3:** (sc, inc) x 6. **[18]** ✓ (12+6=18)
- **Rnd 4:** (2 sc, inc) x 6. **[24]** ✓ (18+6=24)
- **Rnd 5:** (3 sc, inc) x 6. **[30]** ✓ (24+6=30)
- **Rnds 6–11:** sc in each st around (6 rounds even). **[30]**

**Insert 8 mm safety eyes** between Rnds 8 and 9, approximately 6 sts apart. Secure backings.

- **Rnd 12:** (3 sc, dec) x 6. **[24]** ✓ (30−6=24)
- **Rnd 13:** (2 sc, dec) x 6. **[18]** ✓
- **Rnd 14:** (sc, dec) x 6. **[12]** ✓

**Stuff head firmly.** Shape into a smooth round.

**Neck shaping (continue with MC):**
- **Rnd 15:** sc in each st around. **[12]**
- **Rnd 16:** (sc, inc) x 6. **[18]** ✓

**Change to CC1 (outfit color)** at the start of Rnd 17. To color change cleanly: in last st of Rnd 16, draw new color through final 2 loops.

**BODY:**
- **Rnd 17 (CC1):** working in **BLO**, sc in each st around. **[18]** *(BLO creates a clean color-change ridge — the collar)*
- **Rnd 18:** (2 sc, inc) x 6. **[24]** ✓
- **Rnd 19:** (3 sc, inc) x 6. **[30]** ✓
- **Rnds 20–25:** sc in each st around (6 rounds even). **[30]**

**Begin stuffing body firmly as you decrease.**

- **Rnd 26:** (3 sc, dec) x 6. **[24]** ✓
- **Rnd 27:** (2 sc, dec) x 6. **[18]** ✓
- **Rnd 28:** (sc, dec) x 6. **[12]** ✓
- **Rnd 29:** dec x 6. **[6]** ✓

Finish stuffing. Fasten off, leaving a 6-inch tail. Use yarn needle to close remaining hole with FLO cinch method. Weave in end.

---

## ARMS (make 2)

**With MC:**
- **Rnd 1:** 6 sc in MR. **[6]**
- **Rnd 2:** inc in each st. **[12]** ✓
- **Rnd 3:** sc in each st around. **[12]** *(this forms the hand)*
- **Rnd 4:** (2 sc, dec) x 3. **[9]** ✓ (12−3=9)

**Change to CC1** at end of Rnd 4.

- **Rnds 5–10:** sc in each st around (6 rounds even). **[9]**

Lightly stuff hand only. Flatten top opening. Fasten off, leaving 8-inch tail for sewing.

---

## LEGS (make 2)

**With CC2 (boot color — use hat color for matching boots):**
- **Rnd 1:** 6 sc in MR. **[6]**
- **Rnd 2:** inc in each st. **[12]** ✓
- **Rnd 3:** sc in BLO around. **[12]**
- **Rnd 4:** 3 sc, dec x 3, 3 sc. **[9]** ✓ (12−3=9) *(shapes the foot toward heel)*

**Change to CC1** at end of Rnd 4.

- **Rnds 5–9:** sc in each st around (5 rounds even). **[9]**

Stuff foot firmly, leg lightly. Flatten and fasten off, leaving 8-inch tail.

---

## EARS (make 2) — pointed pixie ears

**With MC:**
- **Rnd 1:** 4 sc in MR. **[4]**
- **Rnd 2:** inc, 2 sc, inc. **[6]** ✓ (4+2=6)
- **Rnd 3:** sc in each st around. **[6]**
- **Rnd 4:** sc, inc, 2 sc, inc, sc. **[8]** ✓ (6+2=8)

Flatten without stuffing. Fasten off, leaving 6-inch tail.

---

## HAT (pointed pixie hat with curled tip)

**With CC2:**
- **Rnd 1:** 4 sc in MR. **[4]**
- **Rnd 2:** sc in each st around. **[4]**
- **Rnd 3:** inc, 3 sc. **[5]** ✓
- **Rnd 4:** sc in each st around. **[5]**
- **Rnd 5:** inc, 4 sc. **[6]** ✓
- **Rnd 6:** sc in each st around. **[6]**
- **Rnd 7:** (2 sc, inc) x 2. **[8]** ✓ (6+2=8)
- **Rnd 8:** sc in each st around. **[8]**
- **Rnd 9:** (3 sc, inc) x 2. **[10]** ✓
- **Rnd 10:** sc in each st around. **[10]**
- **Rnd 11:** (1 sc, inc) x 5. **[15]** ✓ (10+5=15)
- **Rnd 12:** sc in each st around. **[15]**
- **Rnd 13:** (2 sc, inc) x 5. **[20]** ✓
- **Rnd 14:** sc in each st around. **[20]**
- **Rnd 15:** (3 sc, inc) x 5. **[25]** ✓
- **Rnd 16:** sc in each st around. **[25]**
- **Rnd 17:** (4 sc, inc) x 5. **[30]** ✓ *(brim now matches head circumference)*
- **Rnd 18:** sc in BLO around. **[30]** *(creates folded brim line)*

Sl st to next st, fasten off, leaving 18-inch tail for sewing.

**Hat tip curl:** Insert a 3-inch piece of floral wire up through the tip (optional). Bend tip into a soft curl or coil.

---

## HAIR (simple fringe)

**With CC3:** Cut 8–10 strands of 3-inch yarn. Fold each in half and use crochet hook to latch-hook through stitches at hairline (around Rnds 5–7 of head), creating bangs and side wisps. Trim to shape after hat is placed.

---

## ASSEMBLY

1. **Pin all pieces** before sewing to check placement and proportions.
2. **Ears:** Attach to sides of head at Rnd 8 level (eye line), angled slightly upward. Whip stitch around base. The points should stick out and slightly up.
3. **Arms:** Pin to sides of body at Rnd 17–18 (just below collar). Whip stitch closed/attached using flat seam.
4. **Legs:** Pin to bottom of body, splayed slightly forward. Sew flat seam across each leg top to Rnds 27–28 of body. For a seated pose, attach legs angled forward; for standing, attach to underside.
5. **Hair:** Add fringe latch-hooks before fitting hat.
6. **Hat:** Place over head, brim sitting just above eyes and ears. The folded BLO ridge (Rnd 18) forms the brim — fold it up if desired. Whip stitch all around the brim through hat and head stitches. Position curled tip flopping to one side.

---

## FACIAL DETAILS (embroider AFTER assembly)

- **Mouth:** With black floss, embroider a small smile 2 rounds below eyes, spanning 2 sts wide. A simple curved backstitch works well.
- **Cheeks:** With pink floss, embroider small satin-stitch ovals under each eye, OR apply powdered blush with a cotton swab.
- **Eyebrows (optional):** Tiny straight stitches in CC3 above each eye.
- **Nose (optional):** A single French knot in MC slightly darker, or skip for a cleaner pixie look.

---

## FINISHING

- Weave in all ends inside the body.
- Steam lightly if shape needs adjusting (avoid acrylic with high heat).
- Shape hat curl by hand.

---

## Math Validation Summary

| Section | Start | Peak | End | Verified |
|---|---|---|---|---|
| Head | 6 | 30 (Rnd 5) | 12 (Rnd 14) | ✓ symmetric inc/dec |
| Neck→Body | 12 | 30 (Rnd 19) | 6 (Rnd 29) | ✓ closes cleanly |
| Arm | 6 | 12 (hand) | 9 | ✓ |
| Leg | 6 | 12 (foot) | 9 | ✓ |
| Ear | 4 | 8 | 8 | ✓ |
| Hat brim | 4 | 30 | 30 | ✓ matches head Rnd 5–11 (30) |

**Proportion check:** Hat brim (30 sts) = head circumference (30 sts) ✓. Arms/legs (9 sts each) ≈ 30% of body width ✓ appropriately scaled for a mini figure.

Enjoy your tiny mischievous pixie! 🧚
Disclaimer: This pattern was generated by AI and should be reviewed for accuracy before use. While we strive for quality, AI-generated content may contain errors. Please verify measurements, stitch counts, and instructions before beginning your project. Generated by purlJam.uk
Access your pattern anytime
Bookmark this page to access your pattern anytime