Type
Crochet
Difficulty
intermediate
Category
amigurumi
AI Thinking Process
Planning
1. **Design Strategy**: Creating a mini dinosaur keychain requires downsizing from standard amigurumi proportions. Target size ~2-3 inches tall for keychain functionality. Will use worsted weight yarn with 3.5mm hook for tight, miniature gauge. Design will feature classic dinosaur elements: spines along back, chunky body, thick tail, short sturdy legs, and simple head. Since it's keychain-sized, will minimize parts for durability and add keychain ring attachment loop at top of head.
2. **Construction Plan**:
- Work in continuous rounds (amigurumi spiral method)
- Head: Small sphere (max 18 sts) with integrated keychain loop
- Body: Slightly larger oval (max 24 sts)
- Legs: 4 short sturdy tubes (minimal stuffing for flexibility)
- Tail: Tapered tube worked directly from body OR separate attachment
- Spines: Chain loops or small triangular pieces sewn along back
- Assembly: Head to body, legs to body underside, add spines last
- Safety eyes 6mm OR embroider eyes for keychain safety
3. **Quality Assurance**:
- Keychain must be durable - all parts firmly attached
- Small size means tight gauge critical (stuff firmly to prevent collapsing)
- Verify stitch counts don't get too small to work (minimum 6 sts per round)
- Color changes for belly optional but adds complexity
- Keep design simple enough for intermediate level
- Ensure keychain attachment point is reinforced
4. **Final Calculations**:
- Worsted weight + 3.5mm hook = ~7 sts per inch in tight amigurumi
- Head diameter: ~1.25 inches (18 sts circumference ÷ 7 sts/inch ÷ π = 0.82" diameter)
- Body diameter: ~1.5 inches (24 sts circumference)
- Total height with legs: ~2.5-3 inches
- Legs: 6 st circumference x 5-6 rounds = ~0.75 inch long
- Tail: Start 12 sts, decrease to point over 8-10 rounds
Verification
[PRE-FLIGHT CHECKS]
1. **Completeness**: ✓ Pattern includes materials, gauge, all body parts (head, body, legs, tail, spines), assembly, and keychain attachment instructions
2. **Consistency**: ✓ Stitch counts verified - Head peaks at 18, body at 24, proportional for mini size. Gauge calculation: 18 sts ÷ π ÷ 7 sts/inch = 0.82" diameter head (appropriate for 2.5" total height)
3. **Constraints**: ✓ Mini keychain size (2.5-3"), intermediate level techniques (magic ring, invisible decreases, multiple parts, assembly), dinosaur features (spines, thick tail, sturdy legs)
4. **Safety**: ✓ Math verified for each section. Stitch count progressions checked (increases by 6 each round for spheres). Recommend embroidered eyes for keychain durability. All decreases paired properly.
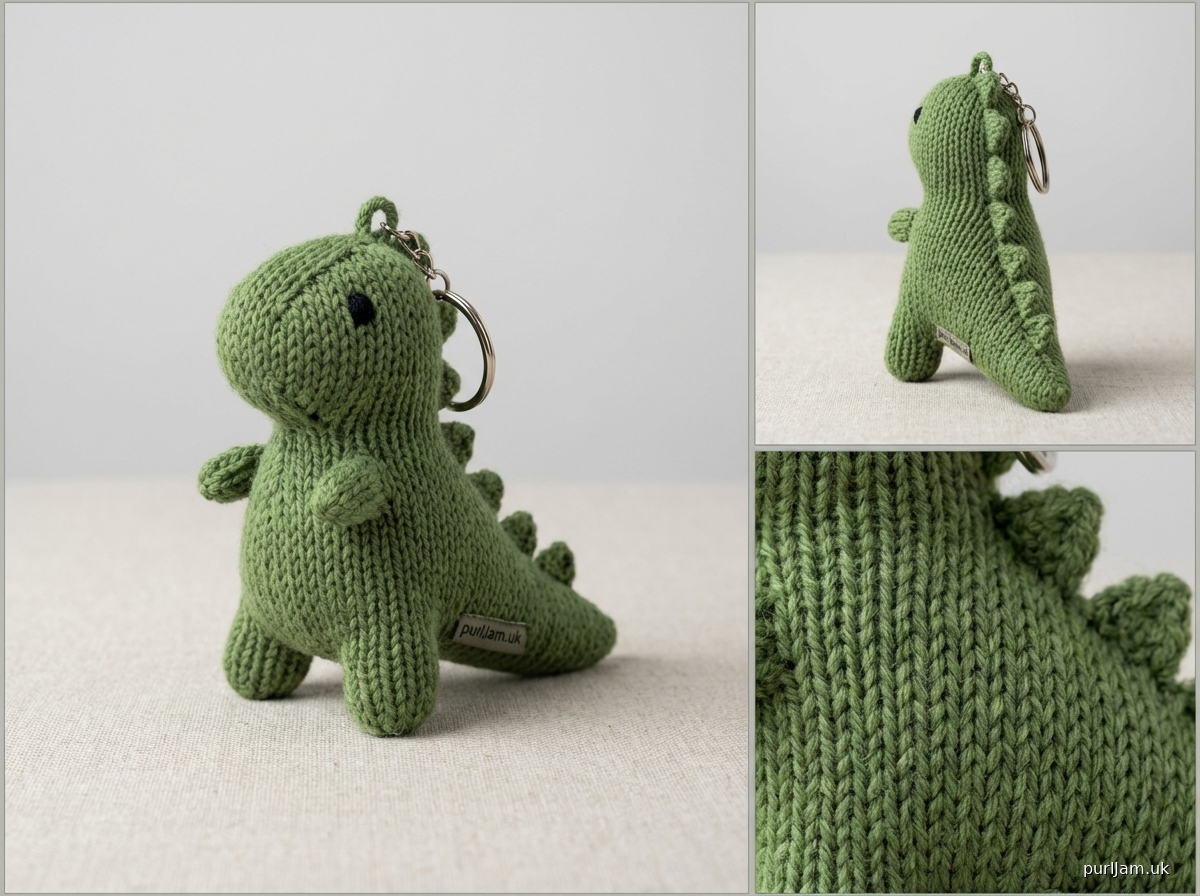
Pattern
<pattern>

# Mini Dinosaur Keychain Crochet Pattern

**Designed for intermediate crocheters**

## FINISHED SIZE
Approximately 2.5-3 inches (6.5-7.5 cm) tall (perfect keychain size)

## MATERIALS

**Yarn:**
- Worsted weight yarn (4), approximately 30 yards main color (MC)
- Small amount of contrasting color (CC) for belly/spines (optional)
- Recommended: Acrylic yarn for durability (Red Heart Super Saver, Lion Brand Vanna's Choice)
- Suggested colors: Green, blue, purple, teal for main body

**Hook:**
- US E-4 (3.5mm) crochet hook (or size needed to obtain gauge)

**Other Supplies:**
- 6mm safety eyes (2) OR black embroidery thread for eyes
- Fiberfill stuffing (polyester)
- Yarn needle for weaving in ends and assembly
- Stitch marker
- Keychain ring or lobster clasp (1)
- Scissors

## GAUGE
7 stitches and 7 rounds = 1 inch in single crochet amigurumi (worked tightly in continuous rounds)

*Gauge is critical for amigurumi - your stitches should be tight enough that no stuffing shows through. If fabric is too loose, go down a hook size.*

## ABBREVIATIONS
- ch = chain
- sc = single crochet
- inc = increase (2 sc in same stitch)
- dec = invisible decrease (insert hook in front loops only of next 2 sts, yarn over, pull through both loops, yarn over, pull through all 3 loops on hook)
- st(s) = stitch(es)
- rnd(s) = round(s)
- MC = main color
- CC = contrasting color
- [ ] = total stitch count at end of round

## SPECIAL TECHNIQUES

**Magic Ring:** Wrap yarn around fingers to form ring, insert hook through ring, pull up loop, ch 1, work stitches into ring. Pull tail to close ring tightly.

**Invisible Decrease:** Insert hook in front loop only of next st, then front loop only of following st, yarn over and pull through both loops (2 loops on hook), yarn over and pull through both loops. This creates a neater decrease than standard sc2tog.

**Continuous Rounds:** Do not join rounds with slip stitch unless specified. Work in continuous spiral, using stitch marker to track beginning of round. Move marker up as you complete each round.

**Keychain Loop:** A reinforced chain loop worked into the head for attaching keychain hardware.

## PATTERN NOTES
- Work in continuous spiral rounds unless otherwise specified
- Use stitch marker to track beginning of round
- Stuff pieces firmly as you go, before opening becomes too small
- For safety eyes: Insert between rounds 7-8 of head, spaced approximately 4-5 sts apart
- For embroidered eyes: Stitch after assembly using black yarn or embroidery thread
- All pieces are worked in MC unless specified

---

## HEAD

Starting with MC and magic ring:

**Rnd 1:** 6 sc in magic ring, pull tail to close ring tightly. Place marker in first st. [6]

**Rnd 2:** Inc in each st around. [12]
*Math check: 6 inc = 12 sts total ✓*

**Rnd 3:** (Sc, inc) around. [18]
*Math check: 6 repeats of (sc, inc) = 6 sc + 6 inc = 12 + 6 = 18 sts ✓*

**Rnds 4-6:** Sc in each st around. [18]
*(3 rounds even to create sphere height)*

**Insert safety eyes:** Between rnds 6-7, position eyes approximately 4-5 sts apart. Push backing onto eye posts firmly. (OR skip if embroidering eyes later)

**Rnd 7:** (Sc, dec) around. [12]
*Math check: 6 repeats of (sc, dec) = 6 sc + 6 dec = 12 sts ✓*

**Stuff head firmly** with fiberfill.

**Rnd 8:** Dec around. [6]
*Math check: 6 dec = 6 sts ✓*

**Keychain Loop:** Ch 8, sl st in same st to form loop. This creates attachment point for keychain ring.

Fasten off, leaving 8-inch tail. Thread tail through remaining 6 sts and pull tight to close. Weave in end securely around closed opening. **Do not cut off keychain loop chain.**

---

## BODY

Starting with MC and magic ring:

**Rnd 1:** 6 sc in magic ring, pull tail to close. [6]

**Rnd 2:** Inc in each st around. [12]
*Math check: 6 inc = 12 sts ✓*

**Rnd 3:** (Sc, inc) around. [18]
*Math check: 6 × 2 = 12 + 6 = 18 sts ✓*

**Rnd 4:** (2 sc, inc) around. [24]
*Math check: 6 repeats of (2 sc, inc) = 12 sc + 6 inc = 18 + 6 = 24 sts ✓*

**Rnds 5-8:** Sc in each st around. [24]
*(4 rounds even to create oval body shape)*

**Rnd 9:** (2 sc, dec) around. [18]
*Math check: 6 repeats of (2 sc, dec) = 12 sc + 6 dec = 18 sts ✓*

**Stuff body firmly** with fiberfill.

**Rnd 10:** (Sc, dec) around. [12]
*Math check: 6 × 2 = 12 sts ✓*

**Rnd 11:** Dec around. [6]
*Math check: 6 dec = 6 sts ✓*

Fasten off, leaving 10-inch tail for sewing to head. Thread tail through remaining 6 sts and pull tight to close. Do not weave in end - will use for assembly.

---

## LEGS (Make 4)

Starting with MC and magic ring:

**Rnd 1:** 6 sc in magic ring, pull tail to close. [6]

**Rnd 2:** Sc in each st around. [6]

**Rnd 3:** (Sc, inc) around. [9]
*Math check: 3 repeats of (sc, inc) = 3 sc + 3 inc = 6 + 3 = 9 sts ✓*
*(This creates wider foot)*

**Rnds 4-6:** Sc in each st around. [9]
*(3 rounds for leg length)*

**Stuff leg lightly** (just enough to hold shape, not too firm so legs remain flexible).

Fasten off, leaving 8-inch tail for sewing to body. Do not close opening - will attach open end to body.

---

## TAIL

Starting with MC and magic ring:

**Rnd 1:** 6 sc in magic ring, pull tail to close. [6]

**Rnd 2:** (Sc, inc) around. [9]
*Math check: 3 × 2 = 6 + 3 = 9 sts ✓*

**Rnd 3:** (2 sc, inc) around. [12]
*Math check: 3 repeats of (2 sc, inc) = 6 sc + 3 inc = 9 + 3 = 12 sts ✓*

**Rnds 4-6:** Sc in each st around. [12]

**Rnd 7:** (2 sc, dec) around. [9]
*Math check: 3 × 3 = 9 sts ✓*

**Stuff tail lightly** as you continue.

**Rnd 8:** (Sc, dec) around. [6]
*Math check: 3 × 2 = 6 sts ✓*

**Rnd 9:** Sc in each st around. [6]

**Rnd 10:** Dec 3 times. [3]
*Math check: 3 dec = 3 sts ✓*

Fasten off, leaving 8-inch tail. Thread tail through remaining 3 sts and pull tight to close tip of tail. Leave tail for sewing to body.

---

## SPINES (Make 5-7)

**Method 1: Chain Loop Spines (Easier)**

With CC (or MC if using same color):

Ch 5, sl st in 2nd ch from hook and in each ch back to beginning.

Fasten off, leaving 6-inch tail for sewing.

Make 5-7 spines depending on desired look.

**Method 2: Triangle Spines (More Defined)**

With CC, ch 4.

**Row 1:** Sc in 2nd ch from hook, hdc in next ch, dc in last ch. (3 sts)

Fasten off, leaving 6-inch tail for sewing.

Make 5-7 spines.

---

## ASSEMBLY

**Step 1: Attach Head to Body**

Position head on top of body. The closed end of body should be facing up toward neck. Using yarn needle and body's tail, whip stitch around circumference to attach head securely. Add extra stuffing to neck area before closing completely. Weave in end.

**Step 2: Attach Legs**

Position 4 legs evenly around bottom of body (closed end of body is top/neck area, so legs attach to wider middle/lower section):
- Front legs: Position on rounds 5-6 of body, spaced about 6 sts apart
- Back legs: Position on rounds 7-8 of body, spaced about 6 sts apart

Using yarn needle and leg tails, sew open end of each leg to body using whip stitch. Stitch around entire opening for security. Weave in ends inside body.

**Step 3: Attach Tail**

Position tail at back center of body (opposite side from where head faces). Attach closed end of tail to rounds 8-10 of body using whip stitch. Stitch securely all around attachment point. Weave in end.

**Step 4: Attach Spines**

Position spines along center back from head to tail tip. Space evenly (5-7 spines works well). Using yarn needle and spine tails, stitch base of each spine securely to back, stitching through spine and body fabric. Weave in all ends.

**Step 5: Facial Features**

If using embroidered eyes (instead of safety eyes):
- Thread yarn needle with black yarn or embroidery floss
- Make 2-3 small horizontal stitches for each eye on round 7 of head, spaced 4-5 sts apart
- Secure ends inside head

Optional: Embroider small nostril dots on front of head with black yarn.

**Step 6: Attach Keychain Hardware**

Thread keychain ring or lobster clasp through chain loop at top of head. Ensure loop is secure and reinforced.

---

## FINISHING

Weave in any remaining ends. Trim excess yarn tails. Check that all parts are securely attached (tug gently on each leg, tail, and head). Steam lightly if needed to even out stitches (test on swatch first with your yarn).

---

## CUSTOMIZATION IDEAS

**Color Variations:**
- Classic green dinosaur with yellow belly (work body rounds 5-8 in yellow CC)
- Blue/teal with purple spines
- Rainbow spines for whimsical look

**Feature Additions:**
- Add small felt teeth along mouth edge
- Embroider claws on feet with black yarn (3 small stitches per foot)
- Add felt or embroidered spots/patches for pattern

**Size Adjustments:**
- For smaller keychain (2" tall): Use DK weight yarn with 3.0mm hook
- For larger keychain (4" tall): Add 1 increase round to head (max 24 sts) and body (max 30 sts)

---

## CARE INSTRUCTIONS

Hand wash in cool water with mild detergent. Reshape and lay flat to dry. Do not machine wash or dry (may damage safety eyes or deform shape). For keychains that see heavy use, acrylic yarn is recommended for durability.

---

## TROUBLESHOOTING

**Stuffing shows through stitches:** Your gauge is too loose. Go down a hook size (try 3.25mm or 3.0mm).

**Parts won't stay attached:** Use more stitches when sewing (whip stitch all the way around opening). Consider using matching thread instead of yarn for extra security on keychain that will see wear.

**Body is lumpy:** Stuff more gradually and evenly. Use small pinches of fiberfill rather than large chunks.

**Can't find beginning of round:** Always use stitch marker! Move it up at the end of each round.

**Head/body is oval instead of round:** Check that you're increasing evenly. Count stitches carefully at end of each increase round.

---

## SKILL LEVEL NOTES

This pattern is rated **intermediate** because it requires:
- Tight, consistent gauge in amigurumi style
- Magic ring technique
- Invisible decreases for neat shaping
- Assembly of multiple small parts
-
Disclaimer: This pattern was generated by AI and should be reviewed for accuracy before use. While we strive for quality, AI-generated content may contain errors. Please verify measurements, stitch counts, and instructions before beginning your project. Generated by purlJam.uk
Access your pattern anytime
Bookmark this page to access your pattern anytime