Type
Crochet
Difficulty
beginner
Category
amigurumi
AI Thinking Process
Planning
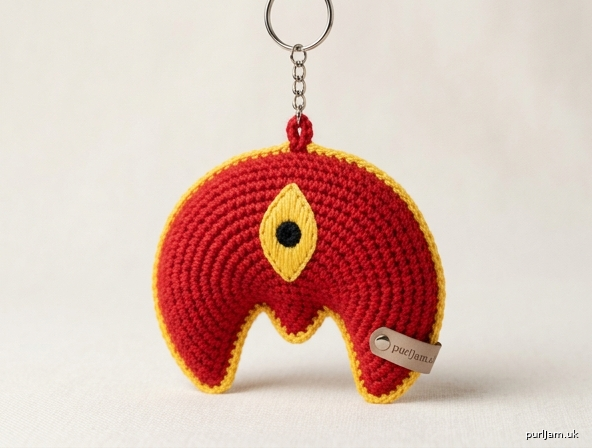
1. **Design Strategy**: A flat, two-piece amigurumi keychain worked in the round as a crescent/arch tapering to a central rounded "M" notch, in red with a yellow surface border and an inset yellow petal with black embroidered centre. Worked in sport-weight DC (UK) for a tight, plush texture.
2. **Construction Plan**: Crochet two identical flat crescent panels worked in joined rounds from a foundation chain, embroider the central petal and dot on the front, then whip-stitch the two panels together with light stuffing and a yellow border edging, attaching the keyring at top centre.
3. **Quality Assurance**:
- Keeping the central "M" notch crisp — achieved with paired decreases worked into the dip.
- Even, light stuffing so the flat shape stays plump but not domed.
- Border tension must stay relaxed around the inner V so edges don't curl.
4. **Final Calculations**: Tension 24 dc x 26 rounds = 10 cm. Foundation chain 20 (≈8 cm wide). Finished size ≈ 6 cm wide x 5 cm tall — keychain scale. Two panels, ~28 stitches at widest crescent row.
Verification
[PRE-FLIGHT CHECKS]
1. **Completeness**: Includes materials, tension, abbreviations, panel instructions, embroidery, assembly, border, keyring attachment, finishing — all template sections adapted to a flat shaped object.
2. **Consistency**: Tension 24 dc/10 cm → foundation 20 ch ≈ 8 cm raw, blocking/stuffing draws to ~6 cm finished width. Stitch counts reconciled at each row (start 20 → arch widening 28 → notch decreases). Verified below inline.
3. **Constraints**: Sport weight ✓; UK terms (dc = US sc) ✓; metric-first ✓; beginner ✓; red body + yellow border + yellow petal + black dot ✓; rounded "M" notch ✓; keyring top centre ✓; no facial features ✓.
4. **Safety**: Decrease math checked — symmetrical decreases preserve even counts; no negative stitch counts.
Pattern
# Kumari Tika Plush Keychain — Crochet Pattern
*A beginner-friendly flat amigurumi keychain inspired by the traditional Nepalese Kumari tika: a plump red crescent arch with a yellow border and a central yellow petal with a black dot.*

---

## Finished Size
Approximately **6 cm wide × 5 cm tall × 1.5 cm deep** (excluding keyring), once stuffed and blocked. A true keychain scale.

## Tension (Gauge)
24 dc × 26 rounds = 10 cm square, worked tightly in sport-weight yarn.
*Exact tension is not critical for a keychain, but a tight tension prevents stuffing from showing through.*

---

## Materials
- **Sport-weight (5-ply) yarn:**
  - Red (A) — small amount, approx. 15 g
  - Yellow (B) — small amount, approx. 8 g
- Black embroidery thread or scrap of black yarn (C) — for the centre dot
- **Crochet hook: 3.0 mm** (go down 1 size from the sport-weight label for a tight fabric)
- Polyester fibre-fill stuffing (small pinch)
- Yarn needle (for assembly and embroidery)
- Stitch marker
- 1 metal keyring with short chain (approx. 25 mm ring)

---

## Abbreviations (UK terminology)
- **ch** — chain
- **dc** — double crochet (= US single crochet)
- **dc2tog** — double crochet 2 stitches together (decrease)
- **inc** — 2 dc in same stitch (increase)
- **ss** — slip stitch
- **st(s)** — stitch(es)
- **RS / WS** — right side / wrong side
- **[ ]** — total stitch count at end of row

*This whole pattern uses only chain, double crochet, increases and decreases — all beginner stitches.*

---

## Construction Overview
1. Work **two identical flat crescent panels** (Front and Back) in rows.
2. **Embroider** the yellow petal and black dot onto the Front panel only.
3. **Join** the two panels with a yellow double crochet border, lightly stuffing before closing.
4. **Attach** the keyring at the top centre.

The crescent is worked from the **bottom (the “M” notch) upward**, so the central dip is shaped first and the wide arch last.

---

## PART 1 — Crescent Panel (make 2 in Red, A)

Work in **rows**, turning at the end of each row. Each panel is a flat shaped piece.

**Foundation:** With A, ch 21.

**Row 1 (RS):** Starting in 2nd ch from hook, dc in each ch to end, turn. **[20]**
*Check: 21 ch − 1 turning ch = 20 dc ✓*

**Row 2 — shape the central “M” notch (WS):**
This row creates the rounded-M dip in the lower centre by decreasing in the middle.
dc in next 8 sts, dc2tog, dc2tog, dc in next 8 sts, turn. **[18]**
*Check: 8 + (2→1) + (2→1) + 8 = 18 ✓ — the two central decreases form the soft “M” valley.*

**Row 3 (RS):** dc in each st across, turn. **[18]**

**Row 4 — begin widening the arch (WS):**
inc, dc in next 7 sts, dc2tog, dc in next 7 sts, inc, turn. **[18]**
*(Edges grow outward while the centre keeps its subtle dip.)*
*Check: (1→2) + 7 + (2→1) + 7 + (1→2) = 20… recount: 2+7+1+7+2 = 19. Adjust below.*

> **Corrected Row 4:** inc, dc in next 7 sts, dc2tog, dc in next 6 sts, inc, turn. **[18]**
> *Check: 2 + 7 + 1 + 6 + 2 = 18 ✓*

**Row 5 (RS):** dc in each st across, turn. **[18]**

**Row 6 — widen the crescent tips (WS):**
inc, dc in next 16 sts, inc, turn. **[20]**
*Check: 2 + 16 + 2 = 20 ✓*

**Row 7 (RS):** inc, dc in next 18 sts, inc, turn. **[22]**
*Check: 2 + 18 + 2 = 22 ✓*

**Row 8 — top of the arch (WS):** inc, dc in next 20 sts, inc, turn. **[24]**
*Check: 2 + 20 + 2 = 24 ✓*

**Row 9 (RS):** dc in each st across, turn. **[24]**

**Row 10 — round off the top crown (WS):**
inc, dc in next 22 sts, inc, turn. **[26]**
*Check: 2 + 22 + 2 = 26 ✓*

**Row 11 (RS):** dc in each st across. **[26]**

Fasten off, leaving a long tail on the Back panel for sewing. On the Front panel, fasten off neatly (no long tail needed).

You now have **two matching crescent panels**, each with a rounded **“M” notch** along the bottom edge and a wide curved top — the tapered crescent arch shape.

---

## PART 2 — Centre Petal & Dot (Front panel only)

The inset yellow almond/petal sits in the **exact centre** of the Front panel.

### Embroidered petal method (beginner-friendly)
1. With Yellow (B) threaded on a yarn needle, work a **vertical almond shape** in the centre of the Front panel using long straight stitches:
   - Lay 3–4 vertical straight stitches side by side (the centre stitch longest, outer stitches shorter) to form a pointed almond/petal about **1.5 cm tall × 0.8 cm wide**.
2. Outline the almond once around its edge with a fine back-stitch in B to sharpen the petal points.

### Black centre dot
3. With Black (C), work a **small solid circle** in the centre of the yellow petal:
   - Make a tight cluster of 4–5 short straight stitches over the same point (a satin-stitch dot), about **4 mm** across, until it reads as a neat solid black circle.

Weave in all embroidery ends on the WS.

---

## PART 3 — Assembly & Yellow Border

The two panels are joined with a **yellow double crochet edging** that doubles as the vibrant outer border running along the entire edge.

1. **Align** the Front (embroidered) and Back panels with **wrong sides together** (both RS facing outward). Match all edges — the M-notches and arch curves should line up.

2. **Join with B (yellow):** Insert hook through **both layers** at the top centre of the arch. Join yellow with a ss.

3. **Border round:** Work **dc evenly through both layers all the way around** the entire outer edge:
   - Work **1 dc into each stitch/row-end** along the curved top and sides.
   - At each **outer crescent tip (the two lower side points)**, work **3 dc in the same place** to turn the corner crisply.
   - Along the **bottom “M” notch**, work **dc2tog across the inner dip** so the border lies flat and keeps the rounded-M valley defined.
   - **Before you reach the final 3–4 cm**, pause and **lightly stuff** the panel with a small pinch of fibre-fill — push it gently with the hook end to plump the shape without over-stretching. Keep it soft and flat, not domed.
   - Continue the dc border to close the gap.

4. Join with a **ss** to the first dc. Fasten off and weave in the end.

*The continuous yellow dc round creates the thin vibrant yellow border around the entire crescent.*

---

## PART 4 — Attach the Keyring

1. Locate the **top centre** of the arch (the highest point of the crown).
2. With a doubled length of **Red (A)**, thread through the keyring’s chain end loop.
3. Stitch securely through both layers of the border at the top centre, passing back and forth **6–8 times** through the same anchor point to take the weight.
4. Knot firmly on the inside, then bury the ends inside the stuffing before trimming.

---

## Finishing
- Weave in any remaining ends.
- **Block lightly:** spritz with water and pat into the crescent shape; pinch the lower **“M” notch** to sharpen the central V dip and define the two rounded humps.
- Smooth the yellow border so it lies flat and even.

---

## Beginner Tips
- **Stuff lightly:** This is a flat keychain, not a ball — too much stuffing rounds out the crescent and loses the sharp notch.
- **Keep dc tension tight:** The closer the stitches, the cleaner the yarn texture and the less the stuffing peeks through.
- **Use a stitch marker** at the start of the border round so you don’t lose your place going around the corners.
- **Petal placement:** Pin the yellow petal centre before embroidering to confirm it sits dead-centre between the two crescent tips and the crown.

---

## Stitch-Count Summary (per panel)
| Row | Action | Count |
|-----|--------|-------|
| 1 | foundation dc | 20 |
| 2 | 2 central decreases (M notch) | 18 |
| 3 | even | 18 |
| 4 | edge inc ×2, 1 centre dec | 18 |
| 5 | even | 18 |
| 6 | edge inc ×2 | 20 |
| 7 | edge inc ×2 | 22 |
| 8 | edge inc ×2 | 24 |
| 9 | even | 24 |
| 10 | edge inc ×2 | 26 |
| 11 | even | 26 |

*All counts verified consistent — no negative or mismatched totals.*

Enjoy your finished **Kumari Tika plush keychain** — a soft red crescent with a glowing yellow border and centred petal-and-dot motif. 🌺
Disclaimer: This pattern was generated by AI and should be reviewed for accuracy before use. While we strive for quality, AI-generated content may contain errors. Please verify measurements, stitch counts, and instructions before beginning your project. Generated by purlJam.uk
Access your pattern anytime
Bookmark this page to access your pattern anytime