Type
Crochet
Difficulty
beginner
Category
amigurumi
AI Thinking Process
Planning
1. **Design Strategy**: Creating a cute, simplified plush chicken suitable for beginners. The chicken will feature a spherical body, small sphere head, simple cone beak, teardrop-shaped wings, and a triangular comb. Using worsted weight yarn in white/cream for body, yellow/orange for beak and feet, red for comb. All pieces use basic increases and decreases - no complex shaping required.
2. **Construction Plan**: Each component will be worked separately in the round using amigurumi technique, then assembled. Body: enlarged sphere (increase to 36 sts). Head: medium sphere (increase to 24 sts). Wings: oval shapes worked flat or as flattened spheres (2 pieces). Beak: small cone. Comb: worked flat with sc clusters. Feet: simple chain loops or small ovals. Safety eyes will be inserted before closing head. All pieces stuffed except wings (light stuffing only).
3. **Quality Assurance**: Key concerns for beginners - clear stitch counts in brackets, emphasis on stuffing timing, invisible decrease instructions for smooth finish, detailed assembly instructions with visual cues for placement. Will include tip about working tightly to prevent stuffing show-through. Clear color change instructions. Simple embellishment options.
4. **Final Calculations**: Worsted weight with 3.5mm hook creates approximately 4-5" tall chicken. Body sphere at 36 sts = ~3" diameter. Head at 24 sts = ~2" diameter. Proportions: body slightly larger than head for cute aesthetic. Total height with comb: ~5 inches. Gauge: approximately 6 sts = 1" in sc (standard amigurumi tension).
Verification
[PRE-FLIGHT CHECKS]
1. **Completeness**: Pattern includes materials, abbreviations, gauge, all body parts (body, head, wings, beak, comb, feet), assembly instructions, and finishing details. ✓
2. **Consistency**: Body increases to 36 sts (6→12→18→24→30→36), maintains for several rounds, then decreases symmetrically. Head increases to 24 sts (6→12→18→24), maintains, decreases. Math verified. ✓
3. **Constraints**: Beginner-friendly using only sc, inc, dec. Simple shapes. Worsted weight specified. US terminology. ✓
4. **Safety**: All stitch counts verified in brackets. Increase/decrease rounds calculated correctly (multiples maintained). Assembly order logical. ✓
Pattern
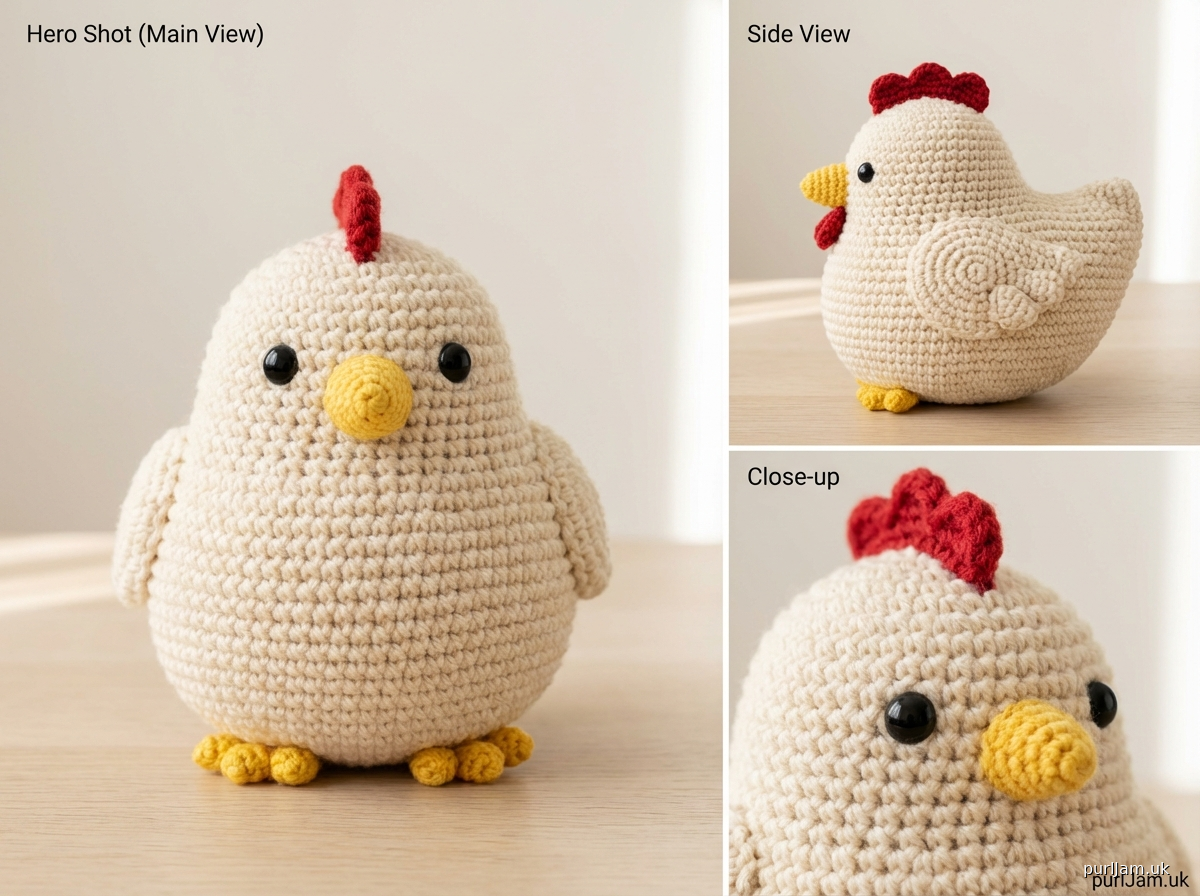
# Plush Chicken Crochet Pattern

**Designed for beginners | Finished size: Approximately 5 inches tall**

---

## MATERIALS

**Yarn:**
- Worsted weight (4) yarn in the following colors:
  - White or Cream (body and head): approximately 80 yards
  - Yellow or Orange (beak and feet): approximately 10 yards
  - Red (comb and wattle): approximately 5 yards
  - Small amount of black for embroidered details (optional)

**Suggested yarns:** Red Heart Super Saver, Lion Brand Vanna's Choice, or any worsted weight acrylic

**Hook & Notions:**
- US E-4 (3.5mm) crochet hook
- 9mm or 10mm black safety eyes (2)
- Fiberfill stuffing (polyester)
- Yarn needle for weaving and assembly
- Stitch marker
- Scissors
- Pins for assembly (optional but helpful)

---

## ABBREVIATIONS
- ch = chain
- sc = single crochet
- inc = increase (2 sc in same stitch)
- dec = invisible decrease (insert hook in front loops of next 2 sts, yo, pull through both, yo, pull through 2 loops)
- st(s) = stitch(es)
- rnd(s) = round(s)
- [ ] = total stitch count at end of round

---

## GAUGE
Approximately 6 sts and 6 rows = 1 inch in sc (worked in continuous rounds)

*Gauge is not critical for this project, but working tightly is important to prevent stuffing from showing through.*

---

## PATTERN NOTES
- Work in continuous rounds (spiral) unless otherwise stated. Use stitch marker to track beginning of round.
- Do not join or turn unless instructed.
- Stuff pieces firmly as you go - it's difficult to add stuffing after closing.
- Use invisible decrease method for smoothest finish.
- When pattern says "sc around," work 1 sc in each st around.

---

## INSTRUCTIONS

### BODY (White/Cream)

**Rnd 1:** 6 sc in magic ring [6]

**Rnd 2:** inc in each st around [12]
*Math check: 6 × 2 = 12 ✓*

**Rnd 3:** (sc, inc) around [18]
*Math check: 12 ÷ 2 = 6 repeats, 6 × 3 = 18 ✓*

**Rnd 4:** (2 sc, inc) around [24]
*Math check: 18 ÷ 3 = 6 repeats, 6 × 4 = 24 ✓*

**Rnd 5:** (3 sc, inc) around [30]
*Math check: 24 ÷ 4 = 6 repeats, 6 × 5 = 30 ✓*

**Rnd 6:** (4 sc, inc) around [36]
*Math check: 30 ÷ 5 = 6 repeats, 6 × 6 = 36 ✓*

**Rnds 7-12:** sc around [36]
*(6 rounds even - this creates the main body)*

**Rnd 13:** (4 sc, dec) around [30]
*Math check: 36 ÷ 6 = 6 repeats, 6 × 5 = 30 ✓*

**Rnd 14:** (3 sc, dec) around [24]
*Math check: 30 ÷ 5 = 6 repeats, 6 × 4 = 24 ✓*

**BEGIN STUFFING FIRMLY NOW**

**Rnd 15:** (2 sc, dec) around [18]
*Math check: 24 ÷ 4 = 6 repeats, 6 × 3 = 18 ✓*

**Rnd 16:** (sc, dec) around [12]
*Math check: 18 ÷ 3 = 6 repeats, 6 × 2 = 12 ✓*

**ADD MORE STUFFING - should be very firm**

**Rnd 17:** dec around [6]
*Math check: 12 ÷ 2 = 6 ✓*

Fasten off, leaving long tail. Use yarn needle to weave through remaining 6 sts and pull tight to close. Weave in end securely.

---

### HEAD (White/Cream)

**Rnd 1:** 6 sc in magic ring [6]

**Rnd 2:** inc in each st around [12]
*Math check: 6 × 2 = 12 ✓*

**Rnd 3:** (sc, inc) around [18]
*Math check: 12 ÷ 2 = 6 repeats, 6 × 3 = 18 ✓*

**Rnd 4:** (2 sc, inc) around [24]
*Math check: 18 ÷ 3 = 6 repeats, 6 × 4 = 24 ✓*

**Rnds 5-9:** sc around [24]
*(5 rounds even)*

**Insert safety eyes between Rnds 7 and 8, approximately 6 stitches apart**

**Rnd 10:** (2 sc, dec) around [18]
*Math check: 24 ÷ 4 = 6 repeats, 6 × 3 = 18 ✓*

**BEGIN STUFFING FIRMLY**

**Rnd 11:** (sc, dec) around [12]
*Math check: 18 ÷ 3 = 6 repeats, 6 × 2 = 12 ✓*

**ADD MORE STUFFING**

**Rnd 12:** dec around [6]
*Math check: 12 ÷ 2 = 6 ✓*

Fasten off, leaving long tail for sewing to body. Close the 6-st hole with yarn needle.

---

### BEAK (Yellow/Orange)

**Rnd 1:** 4 sc in magic ring [4]

**Rnd 2:** (sc, inc) around [6]
*Math check: 4 ÷ 2 = 2 repeats, 2 × 3 = 6 ✓*

**Rnd 3:** sc around [6]

**Rnd 4:** sc around [6]

Fasten off, leaving long tail for sewing. Stuff very lightly (or leave unstuffed for flatter beak). Pinch opening flat and sew closed, then sew to face.

---

### WINGS (White/Cream) - Make 2

**Rnd 1:** 6 sc in magic ring [6]

**Rnd 2:** inc in each st around [12]
*Math check: 6 × 2 = 12 ✓*

**Rnd 3:** (sc, inc) around [18]
*Math check: 12 ÷ 2 = 6 repeats, 6 × 3 = 18 ✓*

**Rnds 4-5:** sc around [18]

**Rnd 6:** (sc, dec) around [12]
*Math check: 18 ÷ 3 = 6 repeats, 6 × 2 = 12 ✓*

Fasten off, leaving long tail for sewing. Stuff VERY lightly (wings should be mostly flat). Flatten wing and sew opening closed. The wing will have a teardrop/leaf shape.

---

### COMB (Red)

*Worked in rows*

**Row 1:** Ch 7, sc in 2nd ch from hook and across [6 sc]

**Row 2:** Ch 1, turn, sc in each st across [6]

**Row 3 (adding points):** Ch 1, turn, (sc, ch 2, sc in 2nd ch from hook) in first st, sc in next 4 sts, (sc, ch 2, sc in 2nd ch from hook) in last st

Fasten off, leaving long tail for sewing. This creates a simple wavy comb shape.

**Alternative simple comb:** Ch 8, (sc, ch 2, sl st in 2nd ch from hook) in 2nd ch from hook, skip next ch, sl st in next ch; repeat across for small bumpy comb.

---

### WATTLE (Red) - Optional

**Make a small teardrop:**

**Rnd 1:** 4 sc in magic ring [4]

**Rnd 2:** inc in each st around [8]
*Math check: 4 × 2 = 8 ✓*

**Rnd 3:** sc around [8]

Fasten off, leaving long tail. Stuff very lightly and sew to underside of beak.

---

### FEET (Yellow/Orange) - Make 2

**Simple method - Chain loops:**

Ch 8, sl st in first ch to form ring (this is one toe)

Ch 6, sl st to same starting point (second toe)

Ch 6, sl st to same starting point (third toe)

Fasten off, leaving long tail for sewing to bottom of body.

**Alternative - Flat feet:**

Ch 6, sc in 2nd ch from hook and across [5], ch 4, sl st in 2nd ch from hook, sc in next 2 ch (this makes a toe), sl st back to main foot. Repeat for 2-3 toes.

---

## ASSEMBLY

**Assembly order is important for best results!**

1. **Attach head to body:** Position head on top of body, slightly toward front. Pin in place. Using the long tail from head and yarn needle, whip stitch head securely to body all around the neck. Make sure connection is firm.

2. **Attach beak:** Position beak centered on face, below and between the safety eyes (approximately at Rnd 8 of head). Sew securely all around the base of the beak.

3. **Attach comb:** Position comb on top of head, centered between eyes. Sew along the bottom edge of the comb piece to secure to head.

4. **Attach wattle (optional):** Position small wattle piece just below and behind beak, centered under chin area. Sew in place.

5. **Attach wings:** Position wings on sides of body, approximately at Rnds 4-5 of body (upper sides). Flatten wings and sew along the narrow (closed) end to body, letting the wider end point downward and slightly back. Wings should angle slightly upward.

6. **Attach feet:** Position feet at bottom of body toward front. Sew the center point of the chain-loop feet securely to the bottom, arranging toes to spread naturally.

7. **Optional embroidery:** Using black yarn or embroidery floss, you can add a small curved line above each eye for "eyebrows" or stitch lines on wings for feather detail.

---

## FINISHING

- Weave in all remaining ends securely.
- Gently shape the chicken, adjusting wings and feet as needed.
- If desired, lightly brush white fuzzy yarn to create texture (only for appropriate yarn types).

---

## CUSTOMIZATION IDEAS

**Size variations:**
- **Smaller chicken (3-4"):** Use sport weight yarn with 3.0mm hook, increase body to only 30 sts
- **Larger chicken (7-8"):** Use bulky yarn with 5.0mm hook, add 2 more increase rounds to body (to 42 sts)

**Color options:**
- Brown chicken: Use tan/brown for body
- Easter chick: Bright yellow throughout
- Spotted chicken: Use variegated yarn or add felt spots

**Expression variations:**
- Sleepy chicken: Use oval felt pieces instead of safety eyes
- Happy chicken: Embroider small curved line under beak for smile
- Fancy chicken: Add small bow between comb and head

**Detail additions:**
- Embroidered feather texture on wings using backstitch
- Felt tail feathers sewn to back of body
- Tiny pompom at wing tips
- French knot details on body

---

## CARE INSTRUCTIONS

- Spot clean only or hand wash gently in cool water
- Air dry flat, reshape while damp
- Do not machine wash or dry (safety eyes may come loose)
- Not suitable for children under 3 if using safety eyes

---

## TROUBLESHOOTING

**Stuffing shows through:** Work more tightly, use smaller hook, or double-strand yarn

**Pieces won't stay attached:** Use longer tails for sewing (at least 12 inches), sew around twice

**Lopsided body:** Make sure increases are evenly distributed, use stitch marker consistently

**Flat-looking chicken:** Stuff more firmly! Amigurumi should be stuffed very full

---

## SKILL TECHNIQUES USED

This pattern is perfect for beginners learning:
- Magic ring
- Working in continuous rounds
- Basic increases and decreases
- Stuffing techniques
- Simple assembly and sewing

---

*Pattern designed for personal use and gift-giving. Please do not sell this pattern, but feel free to sell finished chickens made from this pattern with credit.*

**Happy Crocheting! 🐔**
Disclaimer: This pattern was generated by AI and should be reviewed for accuracy before use. While we strive for quality, AI-generated content may contain errors. Please verify measurements, stitch counts, and instructions before beginning your project. Generated by purlJam.uk
Access your pattern anytime
Bookmark this page to access your pattern anytime