Type
Crochet
Difficulty
beginner
Category
amigurumi
Pattern
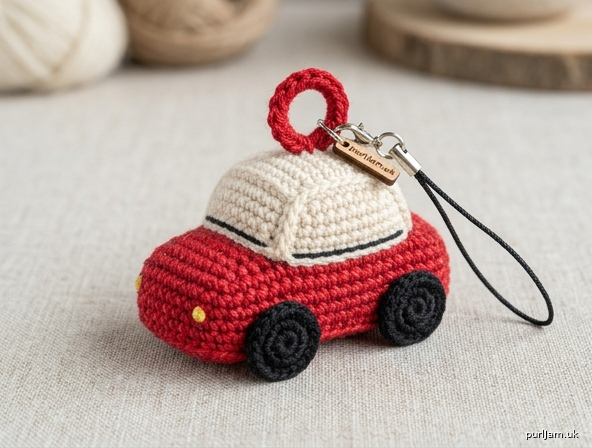
# Mini Crochet Car — Phone Strap Charm

A teeny chunky car charm perfect for clipping onto your phone strap, bag zip, or keys. Worked in simple ovals and circles using only basic stitches — ideal for beginners!

**Finished size:** approx. 5 cm long × 3 cm tall × 2.5 cm wide (2" × 1¼" × 1")

---

## Materials

- **Yarn:** Worsted weight (Aran) yarn in small amounts of:
  - Main colour (MC) — car body, e.g. red, blue, or pastel (~5 g)
  - Contrast colour (CC) — windows/cab, e.g. light grey or cream (~2 g)
  - Black — wheels (~2 g)
  - Optional: small scrap of yellow for headlights
- **Hook:** 3.0 mm (UK 11 / US C-2 or D-3) — going down from the yarn label to keep stitches tight
- **Notions:**
  - Yarn needle (for sewing up)
  - Stitch marker
  - Polyester toy stuffing (small amount)
  - Phone strap finding with split ring/lobster clasp
  - Optional: 5 cm length of cord or jump ring for attaching strap

## Tension (Gauge)

Tension is not critical, but aim for approximately **5 dc and 5 rounds = 2.5 cm (1")** worked tightly so stuffing does not show through.

## Abbreviations (UK terms)

- **ch** — chain
- **dc** — double crochet (US: sc)
- **dc2tog** — double crochet 2 stitches together (decrease)
- **inc** — 2 dc in same stitch (increase)
- **sl st** — slip stitch
- **st(s)** — stitch(es)
- **rnd** — round
- **MR** — magic ring
- **[ ]** — total stitch count at end of round
- **( ) x N** — repeat instructions in brackets N times

**Note:** Work in continuous spirals (do not join) unless told otherwise. Use a stitch marker to track the start of each round.

---

## Pattern

### CAR BODY (make 1, in MC)

Worked as a small oval, starting with a foundation chain.

**Foundation:** Ch 6 in MC.

**Rnd 1:** Working into the chain: 2 dc in 2nd ch from hook, 1 dc in next 3 ch, 3 dc in last ch; rotate to work along opposite side of chain: 1 dc in next 3 ch, 1 dc in same st as starting 2 dc (i.e. join to first st area). **[10 sts]**
*Check: 2 + 3 + 3 + 3 − 1 overlap setup = 10 ✓*

**Rnd 2:** Inc, 3 dc, (inc) x2, 3 dc, inc. **[14 sts]**
*Check: 2 + 3 + 2 + 2 + 3 + 2 = 14 ✓*

**Rnd 3:** Inc, 5 dc, (inc) x2, 5 dc, inc. **[18 sts]**
*Check: 2 + 5 + 2 + 2 + 5 + 2 = 18 ✓*

**Rnds 4–6:** Dc in each st around. **[18 sts]** (3 rounds)

This forms the lower body of the car. Do not fasten off — continue to shape the top.

**Rnd 7:** Dc in each st around, working through back loops only (this creates a subtle ridge where the cab will sit). **[18 sts]**

**Rnd 8:** Dc in each st around. **[18 sts]**

**Rnd 9:** (1 dc, dc2tog) x6. **[12 sts]**
*Check: 6 × 2 = 12 ✓*

Stuff the body firmly.

**Rnd 10:** (dc2tog) x6. **[6 sts]**

Fasten off, leaving a 15 cm tail. Use the tail to close the remaining hole and weave in.

> 💡 *Tip: Shape the body gently with your fingers into a flat-bottomed oval before sewing on the cab.*

---

### CAB / WINDOWS (make 1, in CC)

A smaller oval to sit on top of the body as the windscreen/cabin.

**Foundation:** Ch 4 in CC.

**Rnd 1:** 2 dc in 2nd ch from hook, 1 dc in next ch, 3 dc in last ch; working along opposite side: 1 dc in next ch, 1 dc in same st as start. **[6 sts]**

**Rnd 2:** Inc, 1 dc, (inc) x2, 1 dc, inc. **[10 sts]**
*Check: 2 + 1 + 2 + 2 + 1 + 2 = 10 ✓*

**Rnd 3:** Dc in each st around. **[10 sts]**

Sl st to next st to even out, fasten off leaving a 25 cm tail for sewing.

Do not stuff — leave flat/slightly domed.

---

### WHEELS (make 4, in Black)

Small flat discs.

**Rnd 1:** 6 dc in MR. **[6 sts]**

**Rnd 2:** Inc in each st around. **[12 sts]**

Sl st to next st to close, fasten off leaving a 20 cm tail.

Flatten the disc — do not stuff.

---

### STRAP LOOP

**Ch 12.** Sl st to first ch to form a ring. Fasten off leaving a 15 cm tail.

---

## Assembly

1. **Position the cab:** Place the CC oval on top of the body, centred between rounds 7–9 (the back-loop ridge from Rnd 7 acts as a helpful guide). Pin in place.
2. **Sew the cab** to the body all the way around using the long tail and a whip stitch through both layers. Weave in ends.
3. **Position the wheels:** Pin 2 wheels on each side of the car body, near the bottom edge, approximately 1 cm in from each end. Check symmetry by viewing from above.
4. **Sew the wheels** to the body using whip stitch around each disc edge. Weave in ends.
5. **Attach strap loop:** Sew the chain ring securely to the top centre of the cab (or to the back/roof, depending on how you'd like it to hang). Stitch through the loop several times to reinforce.
6. **Add phone strap finding:** Thread your phone strap, lobster clasp, or jump ring through the chain loop.

### Optional details

- **Headlights:** Embroider two small yellow French knots on the front of the car.
- **Windows:** Add a horizontal line of black surface slip stitch across the middle of the cab to suggest a window divider.
- **Door line:** A short vertical line of surface slip stitch in a darker shade of MC on each side.
- **Number plate:** A tiny rectangle of white felt glued to the front/back.

---

## Care

Hand wash gently in cool water. Reshape and air dry flat. Avoid heavy tumbling as the strap finding may scratch other items.

---

## Quick Stitch-Count Summary

| Piece | Final stitch count | Notes |
|---|---|---|
| Body | 18 sts max, closed to 6 | Stuff firmly |
| Cab | 10 sts | Flat, unstuffed |
| Wheels (×4) | 12 sts each | Flat discs |
| Strap loop | 12 ch | Joined ring |

Enjoy your tiny crochet car charm! 🚗
Disclaimer: This pattern was generated by AI and should be reviewed for accuracy before use. While we strive for quality, AI-generated content may contain errors. Please verify measurements, stitch counts, and instructions before beginning your project. Generated by purlJam.uk
Access your pattern anytime
Bookmark this page to access your pattern anytime