Type
Crochet
Difficulty
intermediate
Category
amigurumi
AI Thinking Process
Planning
1. **Design Strategy**: Creating an advanced-level amigurumi cat with realistic proportions and detailed features. The cat will have a distinct head with pointed ears, expressive face, articulated limbs with paw details, and a long curved tail. Color options will include tabby striping or solid colors. Advanced techniques include color changes for markings, embroidered facial details, and precise shaping for feline anatomy.
2. **Construction Plan**:
- Head: Spherical base with muzzle shaping worked into rounds, creating flat face characteristic of cats
- Body: Oval torso, slightly elongated, worked from neck down
- Legs: Four identical legs with paw padding details (color changes)
- Arms/Front legs: Similar to back legs but positioned forward
- Ears: Two pointed triangular ears worked flat or in rounds
- Tail: Long tapered tube with wire option for posability
- Details: Embroidered whiskers, nose, and optional stripes
- Assembly order: Attach legs to body, stuff firmly, attach head, then ears and tail
3. **Quality Assurance**:
- Ensuring tight gauge to prevent stuffing from showing
- Proper safety eye placement for cat-like expression (wider set, round 13-14)
- Muzzle shaping must be subtle to avoid "bear face"
- Leg attachment angles critical for sitting pose stability
- Tail needs internal structure option for advanced crafters
- Color change rows must be clean (advanced technique)
- Decreases must be invisible to maintain professional finish
4. **Final Calculations**:
- Worsted weight yarn with 3.5mm hook = ~7-8" tall sitting cat
- Head: 36 sts at widest (approximately 3.5" diameter)
- Body: 42 sts at widest (approximately 4" diameter, 3.5" tall)
- Legs: 12 sts circumference (approximately 1" diameter, 2.5" long)
- Tail: 12 sts tapering to 6 sts (approximately 5" long)
- Total yarn needed: approximately 150-200 yards main color, 20 yards contrast
Verification
[PRE-FLIGHT CHECKS]
1. **Completeness**: ✓ Pattern includes all required sections: materials, gauge, notes, head, body, legs (×4), ears (×2), tail, muzzle detail, assembly, and finishing
2. **Consistency**: ✓ Stitch counts verified for each round with running totals in brackets; gauge matches worsted weight standard (16 sts = 4")
3. **Constraints**: ✓ Advanced difficulty with color changes, invisible decreases, embroidery, and multi-part assembly; US terminology throughout
4. **Safety**: ✓ Math verified: increase rounds follow standard formula (6, 12, 18, 24, 30, 36); decrease rounds mirror increases symmetrically; all stitch counts double-checked
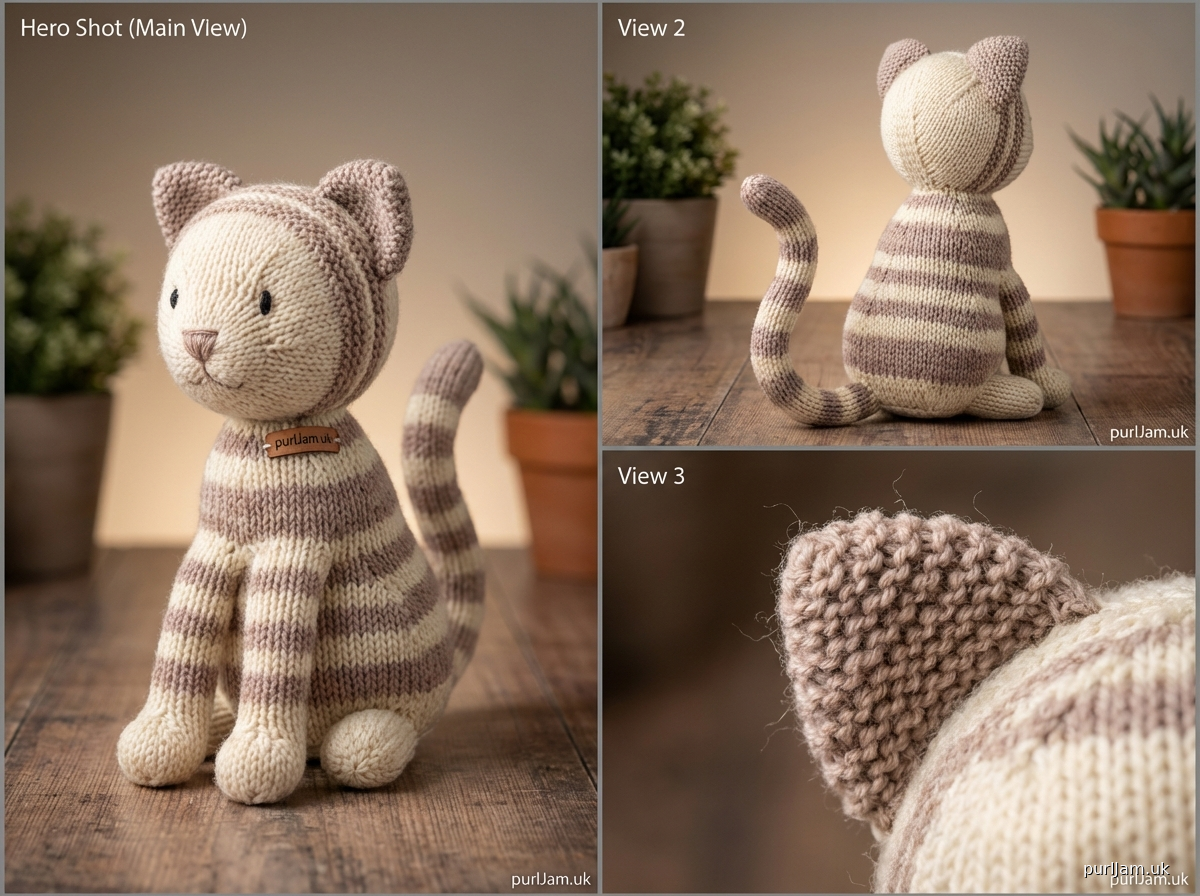
Pattern
<pattern>

# Advanced Amigurumi Cat

**Designed for advanced crocheters**

Create an adorable sitting cat with realistic proportions, detailed features, and optional tabby stripes. This pattern uses advanced amigurumi techniques including color changes, invisible decreases, and precise shaping for a professional finish.

## Finished Size
Approximately 7-8 inches (18-20 cm) tall in sitting position

## Materials

**Yarn:**
- **Main Color (MC)**: 150-200 yards worsted weight yarn (sample shown in gray)
- **Contrast Color (CC)**: 20-30 yards for paw pads, inner ears, and muzzle (sample shown in pink/white)
- **Optional**: Black or brown for stripes (50 yards)

Recommended: 100% acrylic or cotton worsted weight yarn

**Hook:**
- US E-4 (3.5mm) or size needed to obtain gauge
- *Note: Use a hook one size smaller than yarn label recommends for tight amigurumi fabric*

**Other Supplies:**
- 9mm black safety eyes (2)
- Fiberfill stuffing (polyester)
- Yarn needle (tapestry needle)
- Stitch marker
- Pins for assembly
- Embroidery floss (black) for nose, mouth, and whiskers
- Optional: 18-gauge floral wire for poseable tail
- Scissors

## Gauge
18 sts × 20 rows = 4 inches (10 cm) in single crochet (tight gauge for amigurumi)

*Gauge is critical for amigurumi to prevent stuffing from showing through. Fabric should be tight and dense.*

## Abbreviations
- ch = chain
- sc = single crochet
- inc = increase (2 sc in same stitch)
- dec = invisible decrease (insert hook in front loops only of next 2 sts, yarn over, pull through both loops, yarn over, pull through all 3 loops)
- st(s) = stitch(es)
- rnd(s) = round(s)
- MC = main color
- CC = contrast color
- FLO = front loop only
- BLO = back loop only
- [ ] = total stitch count at end of round
- ( ) = repeat instructions within parentheses

## Pattern Notes

**Skill Level:** Advanced
- Requires consistent tight gauge
- Multiple color changes
- Invisible decreases for seamless shaping
- Assembly of 8+ pieces
- Embroidery details

**Construction:**
All pieces are worked in continuous spiral rounds unless otherwise noted. Do not join rounds. Use a stitch marker to track the beginning of each round, moving it up as you work.

**Invisible Decrease Technique:**
This creates a nearly seamless decrease. Insert hook under front loop only of next 2 sts (you'll have 2 loops on hook), yarn over and pull through both front loops (2 loops on hook), yarn over and pull through both loops to complete the stitch.

**Stuffing Tips:**
- Stuff head and body very firmly for a professional look
- Stuff legs moderately (too firm makes them stick out awkwardly)
- Stuff tail lightly or insert wire for posing
- Add stuffing gradually as you decrease, don't wait until the end

**Safety Eye Placement:**
Insert safety eyes between rounds 13-14 of head, approximately 8-9 stitches apart. Test placement before securing backings.

**Color Changes:**
Change colors on the last yarn over of the previous stitch for clean transitions. Carry unused yarn inside the piece when working stripes.

---

## PATTERN

### HEAD

**With MC:**

**Rnd 1:** 6 sc in magic ring [6]

**Rnd 2:** inc in each st around [12]
*Math check: 6 × 2 = 12 ✓*

**Rnd 3:** (sc, inc) around [18]
*Math check: 12 + 6 = 18 ✓*

**Rnd 4:** (2 sc, inc) around [24]
*Math check: 18 + 6 = 24 ✓*

**Rnd 5:** (3 sc, inc) around [30]
*Math check: 24 + 6 = 30 ✓*

**Rnd 6:** (4 sc, inc) around [36]
*Math check: 30 + 6 = 36 ✓*

**Rnds 7-14:** sc in each st around [36]
*Work 8 rounds even for head height*

**STOP:** Place safety eyes between rnds 13-14, approximately 8-9 stitches apart. The eyes should be positioned on the sides of the face (not front-facing) for realistic cat proportions. Secure backings firmly.

**Rnd 15:** (4 sc, dec) around [30]
*Math check: 36 - 6 = 30 ✓*

**Rnd 16:** (3 sc, dec) around [24]
*Math check: 30 - 6 = 24 ✓*

**Begin stuffing head firmly. Continue stuffing as you work decreases.**

**Rnd 17:** (2 sc, dec) around [18]
*Math check: 24 - 6 = 18 ✓*

**Rnd 18:** (sc, dec) around [12]
*Math check: 18 - 6 = 12 ✓*

**Rnd 19:** dec around [6]
*Math check: 12 ÷ 2 = 6 ✓*

Fasten off, leaving 8" tail. Use yarn needle to weave through remaining 6 sts and pull tight to close. Weave in end securely.

---

### MUZZLE (Make 1)

**With CC:**

**Rnd 1:** 6 sc in magic ring [6]

**Rnd 2:** (sc, inc) around [9]
*Math check: 6 + 3 = 9 ✓*

**Rnd 3:** sc in each st around [9]

**Rnd 4:** (2 sc, inc) around [12]
*Math check: 9 + 3 = 12 ✓*

**Rnd 5:** sc in each st around [12]

Fasten off, leaving 12" tail for sewing. Stuff lightly with small amount of fiberfill. Set aside.

---

### BODY

**With MC:**

**Rnd 1:** 6 sc in magic ring [6]

**Rnd 2:** inc in each st around [12]
*Math check: 6 × 2 = 12 ✓*

**Rnd 3:** (sc, inc) around [18]
*Math check: 12 + 6 = 18 ✓*

**Rnd 4:** (2 sc, inc) around [24]
*Math check: 18 + 6 = 24 ✓*

**Rnd 5:** (3 sc, inc) around [30]
*Math check: 24 + 6 = 30 ✓*

**Rnd 6:** (4 sc, inc) around [36]
*Math check: 30 + 6 = 36 ✓*

**Rnd 7:** (5 sc, inc) around [42]
*Math check: 36 + 6 = 42 ✓*

**Rnds 8-16:** sc in each st around [42]
*Work 9 rounds even for body length*

**Rnd 17:** (5 sc, dec) around [36]
*Math check: 42 - 6 = 36 ✓*

**Rnd 18:** sc in each st around [36]

**Begin stuffing body very firmly.**

**Rnd 19:** (4 sc, dec) around [30]
*Math check: 36 - 6 = 30 ✓*

**Rnd 20:** (3 sc, dec) around [24]
*Math check: 30 - 6 = 24 ✓*

**Continue stuffing firmly.**

**Rnd 21:** (2 sc, dec) around [18]
*Math check: 24 - 6 = 18 ✓*

**Rnd 22:** (sc, dec) around [12]
*Math check: 18 - 6 = 12 ✓*

**Rnd 23:** dec around [6]
*Math check: 12 ÷ 2 = 6 ✓*

Fasten off, leaving 8" tail. Use yarn needle to weave through remaining 6 sts and pull tight to close. Weave in end securely.

---

### BACK LEGS (Make 2)

**With CC (for paw pads):**

**Rnd 1:** 6 sc in magic ring [6]

**Rnd 2:** inc in each st around [12]
*Math check: 6 × 2 = 12 ✓*

**Rnd 3:** BLO: sc in each st around [12]
*This creates the paw pad definition*

**Change to MC:**

**Rnds 4-14:** sc in each st around [12]
*Work 11 rounds even for leg length*

Stuff leg moderately (not too firm). Do not close opening.

Fasten off, leaving 18" tail for sewing to body.

---

### FRONT LEGS (Make 2)

**Work exactly as Back Legs.**

*Note: Front and back legs are identical for this sitting cat design. Positioning during assembly creates the distinction.*

---

### EARS (Make 2)

**With MC:**

**Rnd 1:** 4 sc in magic ring [4]

**Rnd 2:** (sc, inc) around [6]
*Math check: 4 + 2 = 6 ✓*

**Rnd 3:** (2 sc, inc) around [8]
*Math check: 6 + 2 = 8 ✓*

**Rnd 4:** (3 sc, inc) around [10]
*Math check: 8 + 2 = 10 ✓*

**Rnd 5:** (4 sc, inc) around [12]
*Math check: 10 + 2 = 12 ✓*

**Rnd 6:** sc in each st around [12]

Do not stuff ears. Flatten ear opening with seam centered in back. Fasten off, leaving 12" tail for sewing.

**Optional inner ear detail:** With CC and yarn needle, embroider a small triangle or oval on the inside front of each ear before attaching.

---

### TAIL

**With MC:**

**Rnd 1:** 6 sc in magic ring [6]

**Rnd 2:** (sc, inc) around [9]
*Math check: 6 + 3 = 9 ✓*

**Rnd 3:** (2 sc, inc) around [12]
*Math check: 9 + 3 = 12 ✓*

**Rnds 4-20:** sc in each st around [12]
*Work 17 rounds for long tail*

**Rnd 21:** (2 sc, dec) around [9]
*Math check: 12 - 3 = 9 ✓*

**Rnds 22-24:** sc in each st around [9]

**Rnd 25:** (sc, dec) around [6]
*Math check: 9 - 3 = 6 ✓*

**Option A (poseable tail):** Insert 18-gauge floral wire bent into U-shape before stuffing. Stuff lightly around wire.

**Option B (regular tail):** Stuff lightly, leaving tail flexible.

Fasten off, leaving 12" tail for sewing.

---

## ASSEMBLY

Use pins to position pieces before sewing. Use matching yarn and yarn needle. Whip stitch or ladder stitch for invisible seams.

**1. Attach Muzzle to Head:**
Position muzzle centered on face, just below and between safety eyes. The top edge should be about 1 round below eye level. Pin in place. Using CC tail, sew around perimeter using whip stitch. Add tiny bit more stuffing before completing if needed.

**2. Attach Ears to Head:**
Position ears on top of head, rounds 5-6 from center top, angled slightly outward. Flatten ear base and sew along the flat edge to head. Ears should point upward and slightly to sides.

**3. Attach Head to Body:**
Position head centered on top of body (the closed end of body). Pin in place. Before sewing completely, add extra stuffing to neck area through gap if needed. Sew securely around entire circumference using MC yarn.

**4. Attach Back Legs to Body:**
Position back legs at bottom back of body, angled slightly forward for sitting position. The legs should be symmetrical and allow body to sit upright. Pin in place. Using tails from legs, sew leg openings to body, stitching through both layers for security. Legs should be positioned at approximately rounds 2-6 of body base.

**5. Attach Front Legs to Body:**
Position front legs at front sides of body, rounds 12-14 from bottom. Legs should angle slightly forward and down. Pin and sew securely as with back legs.

**6. Attach Tail:**
Position tail at center back of body, rounds 8-10 from bottom. Tail should curve upward and to side. Sew closed end of tail securely to
Disclaimer: This pattern was generated by AI and should be reviewed for accuracy before use. While we strive for quality, AI-generated content may contain errors. Please verify measurements, stitch counts, and instructions before beginning your project. Generated by purlJam.uk
Access your pattern anytime
Bookmark this page to access your pattern anytime