Type
Crochet
Difficulty
intermediate
Category
amigurumi
AI Thinking Process
Planning
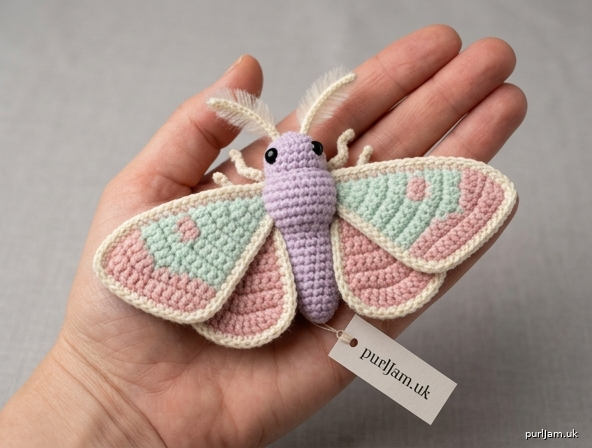
1. **Design Strategy**: Pastel palm-sized moth amigurumi in bulky yarn for plush, soft look. Construction features a fuzzy rounded body, feathery antennae, and four separately-made wings (two large forewings, two smaller hindwings) sewn flat to the back. Advanced level due to multi-piece wing assembly, color-changed wing patterning, and precise symmetrical placement.
2. **Construction Plan**: Body worked seamlessly in continuous rounds from head through thorax to abdomen; wings worked flat in joined rounds with color changes; antennae and legs as small appendages; all assembled with whip stitch.
3. **Quality Assurance**:
- Wing symmetry: make wings in matched pairs, block flat before sewing
- Body must lay flat-ish on palm — slightly flatten when stuffing
- Wing attachment line: along center back, angled outward for natural moth pose
4. **Final Calculations**: Bulky yarn (weight 5) + US H-8 (5.0 mm) hook. Gauge: 14 sc × 16 rows = 4" (10 cm). Finished size: body ~4" long, wingspan ~5.5" — fits adult palm (~4"). Body max round = 24 sts; large wing widest row = 14 sts; small wing widest row = 10 sts.
Verification
1. **Completeness**: Includes materials, gauge, abbreviations, body, wings (×2 pairs), antennae, legs, assembly, finishing. ✓
2. **Consistency**: Body 6→12→18→24 sts increase math verified; decrease 24→18→12→6 verified. Wing rows symmetric. ✓
3. **Constraints**: Pastel palette (lilac, mint, blush, cream), palm-sized (~4" body / 5.5" wingspan), bulky yarn, advanced techniques (color change, flat shaping, multi-piece assembly). ✓
4. **Safety**: All math sums verified; safety eyes 6mm appropriate for small head area. ✓
Pattern
# Pastel Palm Moth — Advanced Amigurumi Crochet Pattern

A dreamy little moth sized to nestle in an adult palm, worked in soft pastels with patterned wings, fluffy antennae, and six tiny legs. Designed for confident crocheters comfortable with color changes, flat shaping, and multi-piece assembly.

---

## Finished Size
- **Body length:** approx. 4 in (10 cm)
- **Wingspan (tip to tip):** approx. 5.5 in (14 cm)
- **Body height:** approx. 1.75 in (4.5 cm) — slightly flattened for palm-resting

## Gauge
14 sc × 16 rows = 4 in (10 cm) in single crochet, worked tightly in the round.
Gauge is not critical for fit but affects final size and stuffing visibility — aim for a dense fabric.

## Materials
- **Bulky weight yarn (weight 5)** in 4 pastel colors, approx. 30–40 yds each:
  - **MC** — Soft Lilac (body & head)
  - **CC1** — Mint Cream (forewing base + body underside accent)
  - **CC2** — Blush Pink (hindwings + wing spots)
  - **CC3** — Cream/Ivory (wing edging, antennae, legs)
- **US H-8 hook (5.0 mm)** — one size smaller than yarn label recommends, for tight gauge
- **Two 6 mm black safety eyes**
- **Polyester fiberfill stuffing**
- **Stitch marker**
- **Yarn needle** (blunt tapestry needle)
- **Sharp scissors**
- **Optional:** small amount of black embroidery floss for face detail; pins for blocking wings

## Abbreviations (US terms)
- **MR** — magic ring
- **ch** — chain
- **st(s)** — stitch(es)
- **sl st** — slip stitch
- **sc** — single crochet
- **hdc** — half double crochet
- **dc** — double crochet
- **tr** — treble crochet
- **inc** — 2 sc in same st
- **dec** — invisible decrease (FLO of next 2 sts, yo, pull through both, yo, pull through all)
- **BLO/FLO** — back/front loop only
- **[ ]** — total st count at end of round
- **( ) x N** — repeat instructions in parentheses N times

## Notes
- Body is worked in continuous spiral; **do not join** unless instructed. Move marker each round.
- Wings are worked **flat in turned rows** for crisp edges and symmetry.
- Stuff body firmly but compress slightly when closing to achieve a flatter palm-friendly silhouette.
- Make wings in mirrored pairs — read the pattern carefully for left vs. right shaping notes.

---

## BODY (Head + Thorax + Abdomen — worked as one piece)
With **MC (Soft Lilac)**:

- **Rnd 1:** 6 sc in MR. **[6]**
- **Rnd 2:** inc in each st around. **[12]** ✓ (6×2=12)
- **Rnd 3:** (sc, inc) x 6. **[18]** ✓ (12+6=18)
- **Rnd 4:** (2 sc, inc) x 6. **[24]** ✓ (18+6=24)
- **Rnds 5–7:** sc in each st around (3 rounds even). **[24]**

*This forms the rounded head. Insert **6 mm safety eyes between Rnds 5 and 6**, approximately 5 sts apart, centered on the front. Begin stuffing firmly.*

- **Rnd 8:** (2 sc, dec) x 6. **[18]** ✓ (24−6=18) — *neck cinch between head and thorax*
- **Rnd 9:** (sc, inc) x 6. **[24]** ✓ — *thorax expands*
- **Rnds 10–12:** sc in each st around (3 rounds even). **[24]**

*Continue stuffing the thorax firmly. This is the area where wings will attach.*

- **Rnd 13:** (2 sc, dec) x 6. **[18]** ✓ — *transition to abdomen*
- **Rnd 14:** sc in each st around. **[18]**
- **Rnd 15:** (sc, dec) x 6. **[12]** ✓ (18−6=12)
- **Rnd 16:** sc in each st around. **[12]**
- **Rnd 17:** dec x 6. **[6]** ✓ (12−6=6)

Stuff abdomen lightly (so it tapers and softens). Cut yarn leaving a 6 in tail. Thread through remaining 6 sts and pull closed. Weave in.

**Body math check:** Increases total +18 (6+6+6+6−6+6), decreases total −18 (6+6+6+6+6) = balanced. ✓

---

## FOREWINGS (large upper wings — make 2, mirrored)
Worked flat in turned rows. Begin with **CC1 (Mint Cream)**.

### Right Forewing
Ch 3.

- **Row 1 (RS):** 2 sc in 2nd ch from hook, 2 sc in last ch. Turn. **[4]**
- **Row 2:** ch 1, inc, sc, sc, inc. Turn. **[6]** ✓ (4+2=6)
- **Row 3:** ch 1, inc, sc in each st to last st, inc. Turn. **[8]** ✓
- **Row 4:** ch 1, inc, sc to last st, inc. Turn. **[10]** ✓
- **Row 5:** ch 1, sc across. Turn. **[10]**
- **Row 6:** ch 1, inc, sc to last st, inc. Turn. **[12]** ✓
- **Row 7:** ch 1, sc across. Turn. **[12]**
- **Row 8:** ch 1, inc, sc to last st, inc. Turn. **[14]** ✓ — *widest point*
- **Rows 9–10:** ch 1, sc across. Turn. **[14]**

*Switch to CC2 (Blush Pink) at the start of Row 11 for the spotted outer edge.*

- **Row 11:** ch 1, sc across in CC2. Turn. **[14]**
- **Row 12:** ch 1, dec, sc to last 2 sts, dec. Turn. **[12]** ✓
- **Row 13:** ch 1, dec, sc to last 2 sts, dec. Turn. **[10]** ✓
- **Row 14 (shape outer tip — right wing leans right):** ch 1, sc 4, dec, dec, sc 2. Turn. **[8]** ✓ (10−2=8)
- **Row 15:** ch 1, dec, sc to last 2 sts, dec. Turn. **[6]** ✓
- **Row 16:** ch 1, dec, sc 2, dec. Turn. **[4]** ✓
- **Row 17:** ch 1, dec, dec. **[2]** ✓
- Fasten off, leaving a long (12 in) tail for sewing.

**Edging:** With **CC3 (Cream)**, sc evenly around the entire wing perimeter, working approx. 1 sc per row-end and 1 sc per st along the chain edge, with 2 sc in each corner. Sl st to first sc to close. Fasten off; weave in CC3 ends.

### Left Forewing
Work exactly as Right Forewing **except Row 14**:
- **Row 14 (left wing leans left):** ch 1, sc 2, dec, dec, sc 4. Turn. **[8]** ✓

This mirrors the outer tip placement. Continue with Rows 15–17 and edging as for Right Forewing.

---

## HINDWINGS (smaller lower wings — make 2, mirrored)
With **CC2 (Blush Pink)**. Ch 3.

- **Row 1 (RS):** 2 sc in 2nd ch from hook, 2 sc in last ch. Turn. **[4]**
- **Row 2:** ch 1, inc, sc, sc, inc. Turn. **[6]** ✓
- **Row 3:** ch 1, inc, sc to last st, inc. Turn. **[8]** ✓
- **Row 4:** ch 1, inc, sc to last st, inc. Turn. **[10]** ✓ — *widest point*
- **Rows 5–6:** ch 1, sc across. Turn. **[10]**
- **Row 7:** ch 1, dec, sc to last 2 sts, dec. Turn. **[8]** ✓
- **Row 8 (Right hindwing tapers right):** ch 1, sc 3, dec, sc 3. Turn. **[7]** ✓
  *(For Left hindwing: ch 1, sc 3, dec, sc 3 — symmetrical, but on the mirrored RS so place accordingly.)*
- **Row 9:** ch 1, dec, sc to last 2 sts, dec. Turn. **[5]** ✓
- **Row 10:** ch 1, dec, sc, dec. **[3]** ✓
- Fasten off, leaving a 10 in tail.

**Edging:** With **CC3 (Cream)**, sc around perimeter as for forewings. Fasten off.

---

## ANTENNAE (make 2)
With **CC3 (Cream)**:

- Ch 8.
- Starting in 2nd ch from hook, sl st in next 6 chs. **[7 sl st]**
- At the final ch, work **(sc, hdc, sc) in same ch** to form a tiny feathered tip.
- Fasten off, leaving a 6 in tail.

*Optional fluff:* gently brush the antenna with a needle to feather the fibers.

---

## LEGS (make 6)
With **CC3 (Cream)**:

- Ch 5.
- Starting in 2nd ch from hook, sl st in each ch across. **[4 sl st]**
- Fasten off, leaving a 5 in tail.

---

## ASSEMBLY

**1. Block the wings.** Lightly mist all four wings with water, pin flat to a towel or foam board in their final shape, and let dry fully. This is essential for crisp moth wing geometry.

**2. Mark wing placement.** Lay the body on its belly. Identify the **thorax (Rnds 9–12)** as the wing attachment zone. Use pins to mark a center line down the back.

**3. Attach forewings.**
- Position each forewing so the narrow base sits at Rnd 10, angled outward and slightly forward.
- The two forewing bases should nearly touch at the center back.
- Using the long CC1 tail and a yarn needle, whip stitch the base edge (approx. 4 sts wide) firmly to the thorax. Repeat for the second forewing, mirrored.

**4. Attach hindwings.**
- Tuck the hindwing bases **underneath and slightly behind** the forewings, attaching at approximately Rnd 11–12.
- The hindwings should peek out below and behind the forewings, like a real moth at rest.
- Whip stitch securely with the CC2 tails.

**5. Attach antennae.**
- Insert the starting-chain end of each antenna into the top of the head between Rnds 2–3, approximately 2 sts apart.
- Use the cream tail to stitch the base firmly to the head. Curl antennae slightly outward.

**6. Attach legs.**
- Position 6 legs along the underside of the body: **2 pairs on the thorax** (Rnds 10 and 12) and **1 pair on the head/thorax junction** (Rnd 8).
- Whip stitch the chain base to the body; let the rest of the leg dangle freely or curl slightly.

**7. Face details (optional).**
- With black embroidery floss, add 2–3 small straight stitches between the eyes for a tiny mouth/nose, or leave plain for a serene moth expression.

**8. Final shaping.**
- Gently compress the body between your palms to flatten slightly so the moth rests naturally palm-down with wings spread.
- Steam-block the assembled moth lightly if desired to set the wings open.

---

## Care
Hand wash in cool water with mild soap. Reshape wings while damp and lay flat to dry. Do not machine dry — stuffing may shift.

## Customization Ideas
- Swap CC2 for a deeper dusty rose for a luna moth feel
- Add tiny seed-bead "eye spots" on the wings (adult-only decoration)
- Use sparkle/iridescent thread held with CC3 for the edging
- For a larger moth, go up to a US J-10 (6.0 mm) hook with the same yarn — finished size will scale to approx. 5" body / 7" wingspan

Enjoy your handful of pastel moth magic! 🌙
Disclaimer: This pattern was generated by AI and should be reviewed for accuracy before use. While we strive for quality, AI-generated content may contain errors. Please verify measurements, stitch counts, and instructions before beginning your project. Generated by purlJam.uk
Access your pattern anytime
Bookmark this page to access your pattern anytime