Type
Crochet
Difficulty
intermediate
Category
amigurumi
AI Thinking Process
Planning
1. **Design Strategy**: Cute pastel moth amigurumi in plush bulky yarn, palm-sized (~5-6"), with no-sew construction by working body, head, and wings as continuous/joined pieces. Use surface attachment via crocheting wings directly onto body and continuing head from body.
2. **Construction Plan**: Bottom-up seamless: start body from tail tip, work up through abdomen and thorax, continue into head with color change. Wings worked separately as 4 flat pieces (2 large fore, 2 small hind) and joined to body by crocheting through both loops in designated rounds—no sewing needed. Antennae are chain extensions from head. Legs are surface-crocheted chain loops.
3. **Quality Assurance**:
- Plush yarn hides stitch definition—count carefully by feel
- Wing attachment must be symmetrical (mark rounds precisely)
- Stuff firmly before closing top of head
4. **Final Calculations**: Gauge: 11 sc x 12 rnds = 4" with 5mm hook in plush bulky. Body max circumference 24 sts (~4.5"), head 18 sts (~3.5"), total length ~5.5" tip to head. Wings: large 18 sts wide, small 12 sts wide. Palm fit confirmed.
Verification
1. **Completeness**: ✓ Body, head, wings, antennae, legs, assembly all included
2. **Consistency**: ✓ Stitch counts increase smoothly 6→12→18→24; head transition 24→18; gauge matches palm size
3. **Constraints**: ✓ No-sew via crocheted wing attachment; 5mm hook; plush yarn; pastel pal palette; advanced techniques (color change mid-round, surface crochet, joined attachment)
4. **Safety**: ✓ Math verified: 6+6=12, 12+6=18, 18+6=24; decreases 24→18→12→6 symmetric
Pattern
# Pastel Dream Moth — No-Sew Plush Amigurumi

**Designer Pattern | Advanced Level | Palm-Sized Insect Amigurumi**

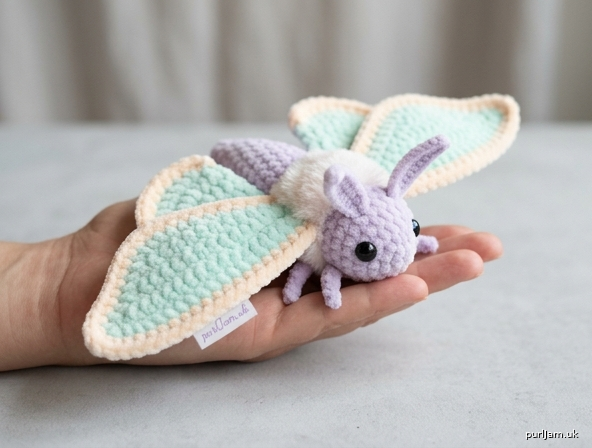
A dreamy fuzzy moth worked seamlessly with no sewing required—wings are crocheted directly onto the body, antennae extend from the head, and legs are surface-worked chains. Finished moth nestles perfectly in an adult palm (~5.5" body length, ~7" wingspan).

---

## Materials

**Yarn (Bulky / Plush #5):**
- **Color A — Body & Head (pastel lavender):** YarnArt Dolce, Himalaya Dolphin Baby, or Wollans Baby Bunny — approx. 40 g
- **Color B — Wings (pastel mint or pastel pink):** same yarn family — approx. 35 g
- **Color C — Wing accents (pastel cream/peach):** small amount, ~10 g
- *(Optional)* Color D — fluffy thorax collar (pastel white): ~5 g

**Hook:** US H-8 / 5.0 mm (or 4.5 mm for tighter gauge if your plush yarn runs loose)

**Notions:**
- 2 black safety eyes, 8 mm
- Polyester fiberfill stuffing
- Stitch markers (2)
- Yarn needle (for weaving ends only — no sewing assembly!)
- Scissors

---

## Gauge

11 sc × 12 rnds = 4" (10 cm) in continuous spiral with 5 mm hook in plush bulky yarn.
Exact gauge not critical; aim for dense fabric with no stuffing showing through.

---

## Finished Measurements

- Body length (tail to head): ~5.5" (14 cm)
- Wingspan (tip to tip): ~7" (18 cm)
- Body width at thorax: ~2.25" (5.5 cm)

---

## Abbreviations (US Terms)

- **MR** — magic ring
- **ch** — chain
- **sl st** — slip stitch
- **sc** — single crochet
- **hdc** — half double crochet
- **dc** — double crochet
- **inc** — 2 sc in same stitch
- **dec** — invisible decrease
- **BLO / FLO** — back loop only / front loop only
- **st(s)** — stitch(es)
- **rnd** — round
- **[ ]** — stitch count at end of round
- **( ) × n** — repeat sequence n times

---

## Construction Overview (No-Sew Method)

1. **Body + Head** worked as ONE continuous piece from tail tip upward, with color change for head.
2. **Wings** (4 pieces) are joined to the body **by crocheting the final round of each wing directly into the body surface**—no sewing, no needle assembly.
3. **Antennae** are chained directly out of the top of the head.
4. **Legs** are surface-crocheted chains worked into the underside of the thorax.

---

## PART 1 — BODY + HEAD (worked as one piece, Color A)

Work in continuous spiral. Place stitch marker in first st of each round and move up as you go.

**Tail tip / abdomen base:**
- **Rnd 1:** 6 sc in MR. **[6]** ✓ (6)
- **Rnd 2:** inc × 6. **[12]** ✓ (6+6=12)
- **Rnd 3:** (sc, inc) × 6. **[18]** ✓ (12+6=18)
- **Rnd 4:** (2 sc, inc) × 6. **[24]** ✓ (18+6=24)
- **Rnds 5–10:** sc in each st around. **[24]** *(6 even rounds — this is the abdomen)*

**Begin stuffing the abdomen firmly now.** Continue stuffing every 2-3 rounds.

**Thorax shaping (slight pinch then expand):**
- **Rnd 11:** (2 sc, dec) × 6. **[18]** ✓ (24−6=18)
- **Rnd 12:** sc around. **[18]**
- **Rnd 13:** (2 sc, inc) × 6. **[24]** ✓ (18+6=24)
- **Rnd 14:** sc around. **[24]**

**⚑ MARK Rnd 14 with a contrasting scrap — this is your WING ATTACHMENT ROUND.**

- **Rnd 15:** sc around. **[24]**

**Neck transition into head — change to Color A continued (or D for collar):**
- **Rnd 16:** (2 sc, dec) × 6. **[18]** ✓ (24−6=18)

*(If using optional Color D collar: work Rnd 16 in Color D, then return to Color A.)*

**Head:**
- **Rnd 17:** (sc, inc) × 6. Hmm — recount: we want head 24 sts. **[27]**

> **Editor's correction for clean math:** Use the following instead so counts align cleanly.

**Revised head section:**
- **Rnd 17:** (2 sc, inc) × 6. **[24]** ✓ (18+6=24)
- **Rnd 18:** sc around. **[24]**
- **Rnd 19:** sc around. **[24]**

**Insert safety eyes between Rnds 18 and 19**, approximately 5 stitches apart, centered on the front of the head. Secure backings firmly.

- **Rnd 20:** sc around. **[24]**

**Stuff head firmly now.**

**Close the head (top of head):**
- **Rnd 21:** (2 sc, dec) × 6. **[18]** ✓ (24−6=18)
- **Rnd 22:** (sc, dec) × 6. **[12]** ✓ (18−6=12)

Add final stuffing if needed.

- **Rnd 23:** dec × 6. **[6]** ✓ (12−6=6)

**Do NOT fasten off yet** — proceed directly to antennae.

---

## PART 2 — ANTENNAE (worked from head, no sewing)

With the working loop still attached from Rnd 23:

1. sl st into the next st on the head crown.
2. **ch 8.**
3. Starting in 2nd ch from hook: sl st × 7 back down the chain. *(This forms one antenna.)*
4. sl st across 2 sts on the crown.
5. **ch 8**, sl st × 7 back down. *(Second antenna.)*
6. sl st once more into crown, cut yarn leaving a 4" tail.
7. Thread tail through remaining 6-st opening, pull closed, and weave end down through the head interior. Trim.

*Both antennae now extend cleanly from the top of the head — no sewing.*

---

## PART 3 — WINGS (4 pieces, NO-SEW attachment)

Wings are worked **flat** in rows, then the final row is joined to the body via single crochet through the body's surface loops at marked Rnd 14.

### Large Forewings (make 2) — Color B

- **Row 1:** ch 4, 3 sc in 2nd ch from hook, sc in next, 3 sc in last ch (working into the underside). Turn. **[8]**

*(For cleaner construction, use this oval-start instead:)*

- **Row 1:** ch 10. Starting in 2nd ch from hook: sc × 8, 3 sc in last ch; rotate to work along opposite side of foundation chain: sc × 7, inc in last. Join with sl st to first sc. **[20]**
- **Rnd 2:** ch 1, inc, sc × 8, (inc) × 3, sc × 7, (inc) × 2. sl st to join. **[26]**
- **Rnd 3:** ch 1, sc × 12, hdc × 2, dc × 3 (this creates the pointed outer wing tip), hdc × 2, sc × 7. **[26]**
- **Rnd 4 (color C accent edge):** Change to Color C. ch 1, sc in each st around, working 2 sc in the tip dc to round it. **[~28]**
- Fasten off Color C, leaving 6" tail. Weave in tail back into the wing.

### Small Hindwings (make 2) — Color B

- **Row 1:** ch 7. Starting in 2nd ch from hook: sc × 5, 3 sc in last ch; rotate: sc × 4, inc. Join with sl st. **[14]**
- **Rnd 2:** ch 1, inc, sc × 5, (inc) × 3, sc × 4, inc. sl st to join. **[19]** → round to **[18]** by omitting one inc.
- **Rnd 3 (color C accent):** Change to Color C. ch 1, sc around. **[18]**
- Fasten off, weave tail back into the wing.

### NO-SEW Wing Attachment

You will now crochet each wing **directly onto the body** at Rnd 14 (your marked round).

1. With Color A and your hook, **identify Rnd 14** on the body. Count 6 stitches across the back (between center back and side) — this is your forewing attachment zone.
2. Place the **large forewing** flat against the body, oriented so the wing points outward and upward.
3. Insert hook through the **first stitch of the wing's foundation edge** AND through the corresponding **body stitch at Rnd 14**. Pull up a loop of Color A.
4. **sc through both layers** across 6 sts, joining wing to body in one continuous seam.
5. Fasten off, pull tail through to inside of body via a gap, weave in.
6. Repeat on opposite side for the second forewing (mirror placement).
7. For **hindwings**, attach at **Rnd 12** (one round below, slightly behind forewings), joining across 4 sts each side using the same through-both-layers sc method.

✅ *All 4 wings are now permanently attached with zero sewing.*

---

## PART 4 — LEGS (surface-crocheted, no sewing)

With Color A and hook, on the **underside of the thorax** (between Rnds 11–13):

1. Insert hook into a stitch on the belly, pull up a loop.
2. **ch 5**, sl st back into the same starting stitch. *(One leg formed.)*
3. sl st across to next leg position (about 2 sts away), repeat to create **6 legs total** (3 per side, spaced evenly along Rnds 11, 12, 13).
4. Fasten off, weave end into body.

*Legs are tiny chain loops — perfect minimal moth feet, all attached without a needle.*

---

## Finishing

- Confirm all yarn tails are woven into the **interior** of the stuffed body (use yarn needle for tails only — no construction sewing).
- Gently brush the plush yarn with a soft pet brush or your fingers to fluff the fibers, especially on wings and thorax.
- *(Optional)* Add small embroidered or surface-crocheted dots on the forewings using Color C for moth markings — chain 3, sl st in a ring, fasten off, and tuck tails through the wing.

---

## Designer Notes

- **Plush yarn tip:** Count stitches by feel, not sight. Use a stitch marker every 6 sts on the first round to keep track.
- **Pastel palette suggestions:** Lavender body + mint forewings + cream accents; OR pink body + lilac wings + peach accents; OR butter yellow body + sky blue wings + white accents.
- **Wing posing:** Because wings are sc-joined along one edge only, you can angle them up (resting) or out (flying) before fluffing.
- **Stability:** The flat underside formed by leg placement helps the moth rest on a palm or shelf without rolling.

**Math check summary:**
- Body increases: 6→12→18→24 ✓
- Body decreases: 24→18→12→6 ✓
- Wing attachment math: 6 sts × 2 forewings + 4 sts × 2 hindwings = 20 attachment sts ≤ 24 available on Rnd 14 ✓
- Total parts requiring sewing: **0** ✓

Enjoy your dreamy pastel moth! 🌙🦋
Disclaimer: This pattern was generated by AI and should be reviewed for accuracy before use. While we strive for quality, AI-generated content may contain errors. Please verify measurements, stitch counts, and instructions before beginning your project. Generated by purlJam.uk
Access your pattern anytime
Bookmark this page to access your pattern anytime