Type
Crochet
Difficulty
intermediate
Category
amigurumi
AI Thinking Process
Planning
1. **Design Strategy**: Cute amigurumi Erlenmeyer flask shape — wide conical/triangular base tapering to a narrow cylindrical neck with a flat rim. Worked in continuous rounds from bottom up; safety eyes on the front of the flask body; tiny arms sewn at sides to hold a customer-supplied paper/quote.
2. **Construction Plan**: Bottom-up seamless body (flat circular base → angled increase rounds for cone → straight neck → rim flare), with separate small arms and an optional "liquid splash" top accent sewn on.
3. **Quality Assurance**:
- Cone shape requires steady, even increases — flask must sit flat (firm base).
- Neck transition (sharp decrease from 42→18) needs even spacing to look like glassware.
- Arms must be placed where they can clasp a sign — symmetric and forward-angled.
4. **Final Calculations**: Worsted + 3.75 mm hook, gauge ~ 4 sc/inch. Base 42 sts (~6.5" wide flask base). Final height ~7 inches. Arms 6 sts, ~1.5" long. Sign loop optional.
Verification
1. **Completeness**: Includes materials, gauge, abbreviations, body, neck, rim, arms, assembly, customization notes. ✓
2. **Consistency**: Base round increases 6→12→18→24→30→36→42 (7 rounds, +6 each) ✓. Decrease to neck: 42→36→30→24→18 (4 dec rounds, -6 each) ✓. Rim flare 18→24 ✓.
3. **Constraints**: Safety eyes ✓, hands that can hold customizable item ✓, Erlenmeyer (conical) shape ✓.
4. **Safety**: Math verified; all stitch counts add up.
Pattern
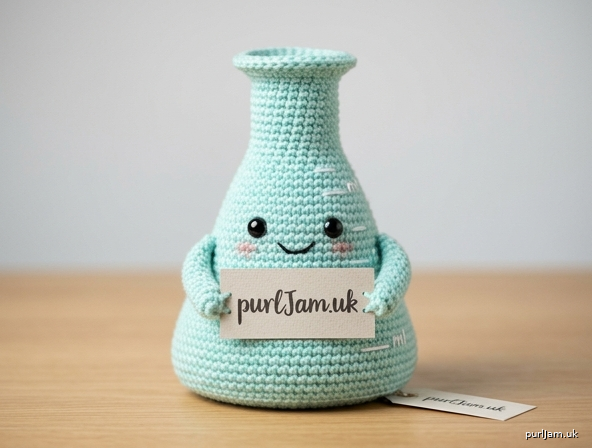
# Amigurumi Erlenmeyer Flask — "Lab Buddy"

A cute conical science-flask amigurumi with a flat base, tapered shoulders, narrow neck, flared rim, and tiny arms designed to hold a paper quote, mini photo, or any custom message. Perfect for teachers, scientists, lab partners, graduations, and gift personalization.

**Finished size:** Approximately 7 in (18 cm) tall × 6.5 in (16.5 cm) wide at base
**Skill level:** Intermediate

---

## Materials

- **Yarn (worsted weight / #4):**
  - Main Color (MC) — light aqua, mint, or clear-glass blue: ~80 yds
  - Accent Color (AC) — optional, for "liquid" or splash on top: ~15 yds
  - Skin/peach or MC — for arms: ~10 yds (use MC if you want glove-style hands, or skin tone for character hands)
- **Hook:** US F-5 (3.75 mm)
- **Safety eyes:** 9 mm (1 pair)
- **Fiberfill stuffing**
- **Yarn needle**
- **Stitch marker**
- **Optional:** small piece of cardboard cut to a 5.5 in (14 cm) circle to stiffen the base
- **Optional:** small clip, thread, or dab of glue to secure the customer's paper/quote

---

## Gauge

4 sc × 4 rows = 1 in (2.5 cm) in single crochet, worked in the round.
Exact gauge is not critical, but tight stitches are essential — stuffing should not show through.

---

## Abbreviations (US Terms)

- **ch** — chain
- **sc** — single crochet
- **sl st** — slip stitch
- **st(s)** — stitch(es)
- **inc** — 2 sc in same st
- **dec** — invisible decrease (FLO of next 2 sts, yo, pull through both, yo, pull through all)
- **MR** — magic ring
- **BLO** — back loop only
- **FLO** — front loop only
- **[ ]** — total stitch count at end of round
- **( ) x N** — repeat sequence N times

Work in continuous spiral rounds. Use stitch marker to track beginning of round. Do **not** join unless instructed.

---

## FLASK BODY (make 1, in MC)

The body is worked from the **bottom up**: flat round base → angled cone shoulders → straight neck → flared rim.

### Flat Base

- **Rnd 1:** 6 sc in MR. **[6]**
- **Rnd 2:** inc in each st around. **[12]** ✓ (6 + 6 = 12)
- **Rnd 3:** (sc, inc) x 6. **[18]** ✓ (12 + 6 = 18)
- **Rnd 4:** (2 sc, inc) x 6. **[24]** ✓ (18 + 6 = 24)
- **Rnd 5:** (3 sc, inc) x 6. **[30]** ✓ (24 + 6 = 30)
- **Rnd 6:** (4 sc, inc) x 6. **[36]** ✓ (30 + 6 = 36)
- **Rnd 7:** (5 sc, inc) x 6. **[42]** ✓ (36 + 6 = 42)

The base should now measure approximately 6.5 in (16.5 cm) across and lie completely flat. If it cups, your tension is too tight; if it ruffles, too loose.

### Sidewall — Define the Bottom Edge

- **Rnd 8:** sc in BLO of each st around. **[42]**
  *(This creates a crisp 90° edge where the base meets the side.)*
- **Rnds 9–12:** sc in each st around. **[42]** (4 rounds)

### Conical Shoulder Decreases (the iconic Erlenmeyer slope)

- **Rnd 13:** (5 sc, dec) x 6. **[36]** ✓ (42 − 6 = 36)
- **Rnd 14:** sc in each st around. **[36]**
- **Rnd 15:** (4 sc, dec) x 6. **[30]** ✓
- **Rnd 16:** sc in each st around. **[30]**
- **Rnd 17:** (3 sc, dec) x 6. **[24]** ✓
- **Rnd 18:** sc in each st around. **[24]**
- **Rnd 19:** (2 sc, dec) x 6. **[18]** ✓ (24 − 6 = 18)

**>> INSERT SAFETY EYES** between Rnds 16 and 17, approximately 5 sts apart, centered on the front of the flask. Look at your work and choose the cutest position before securing.

**>> Begin stuffing firmly.** Pack stuffing into the cone — the base should be solid and the body shape should hold. Optional: insert a 5.5 in cardboard disc into the base before stuffing for extra stability.

### Neck (straight cylinder)

- **Rnds 20–24:** sc in each st around. **[18]** (5 rounds — about 1.25 in / 3 cm tall)

Continue stuffing the neck lightly (do not overfill — keep it cylindrical, not bulging).

### Rim Flare (top opening)

- **Rnd 25:** (2 sc, inc) x 6. **[24]** ✓ (18 + 6 = 24)
- **Rnd 26:** sc in BLO of each st around. **[24]**
  *(BLO creates a defined lip at the top.)*
- **Rnd 27:** sc in each st around. **[24]**

Add a final small amount of stuffing if needed to keep the rim open and round.

**Finishing the rim:** sl st in next st. Fasten off, leaving a 6 in tail. Weave in end inside the neck.

*Note: leave the top open — this looks like a real flask opening. If desired, you can crochet an "AC liquid" cap (instructions below) and sew it inside the rim.*

---

## OPTIONAL: "LIQUID" TOP / SPLASH (in AC)

- **Rnd 1:** 6 sc in MR. **[6]**
- **Rnd 2:** inc in each st around. **[12]**
- **Rnd 3:** (sc, inc) x 6. **[18]**
- **Rnd 4:** (2 sc, inc) x 6. **[24]**
- **Rnd 5:** sc in BLO of each st. **[24]**
- **Rnd 6:** for a bubbly/splash edge: (sc, hdc, 2 dc in next st, hdc, sc, sl st) repeated around the edge — freeform; aim for 4–6 "bubble" peaks.

Fasten off, leaving a 12 in tail. Insert into the flask rim and whip stitch the BLO edge from Rnd 5 to the inside lip of Rnd 26 of the body.

---

## ARMS (make 2, in MC or skin color)

Tiny stubby arms positioned to hold a sign between them.

- **Rnd 1:** 6 sc in MR. **[6]**
- **Rnd 2:** inc in each st around. **[12]** ✓
- **Rnd 3:** sc in each st around. **[12]**
- **Rnd 4:** (2 sc, dec) x 3. **[9]** ✓ (12 − 3 = 9)
- **Rnds 5–7:** sc in each st around. **[9]** (3 rounds)

Lightly stuff only the hand (Rnds 1–3). Leave the upper arm flat and unstuffed for easier sewing.

Fasten off, leaving an 8 in tail for sewing.

---

## ASSEMBLY

1. **Confirm safety eyes are locked.** Tug to check.
2. **Position arms:** pin each arm to the side of the flask at approximately Rnd 14–15 (the upper shoulder slope), angled slightly forward so the hands can meet at the front.
3. **Sew arms** using the long tail and a whip stitch around the open end. Sew through 6–8 sts of the body to anchor securely.
4. **Test the hold:** the hands should naturally come together at the front of the flask, around the safety eyes' level (a little below or beside the face).
5. **Weave in all ends.**

---

## CUSTOMIZING THE HELD ITEM (the main feature!)

The arms are designed to hold any small flat object — this is what makes the flask a personalized gift.

**Options for the customer's quote / image / message:**

- **Paper sign:** print or write a quote on cardstock (recommend approx. 2 × 1.5 in / 5 × 4 cm). Insert between the two hands; hands can be tacked together with 2–3 small stitches OR with a tiny dab of removable glue on the back of the paper.
- **Mini photo / Polaroid:** trim to fit and slip between hands.
- **Tiny chalkboard or wood plaque:** glue to the front of the joined hands.
- **Removable clip method:** sew a small clothespin or bulldog clip to the inside of one hand so signs can be swapped.
- **Fabric banner:** crochet a small chain banner and have the hands grip the ends.

**To make the hands "grip":** after assembly, use the remaining yarn tails to make 2–3 anchor stitches between the two hands at the desired width — this creates a permanent slot that holds the paper securely without glue.

---

## FINISHING TOUCHES (optional)

- **Embroider a smile** below the safety eyes using black yarn or embroidery floss — 2 small straight stitches in a "v" shape, or a simple curved smile across 3–4 stitches.
- **Cheek blush:** lightly rub a pink colored pencil on each cheek.
- **Measurement lines:** with white or black yarn, embroider 3–4 short horizontal "ml" lines on the side of the flask body to mimic graduated markings. Place at Rnds 10, 13, 16 — about 4 sts wide each.
- **Label patch:** crochet or embroider a tiny rectangle on the front (below the eyes) for a "specimen" label.

---

## CARE

Spot clean only. Hand wash gently if needed and air dry flat. Do not machine wash with safety eyes installed.

---

**Stitch count summary (verification):**
Base: 6→12→18→24→30→36→42 ✓
Side: 42 (5 rnds) ✓
Cone: 42→36→30→24→18 ✓
Neck: 18 (5 rnds) ✓
Rim: 18→24 (3 rnds) ✓
Arms: 6→12→9 (5 rnds) ✓

Enjoy your Lab Buddy — the perfect "I appreciate you to a chemically significant degree" gift! 🧪
Disclaimer: This pattern was generated by AI and should be reviewed for accuracy before use. While we strive for quality, AI-generated content may contain errors. Please verify measurements, stitch counts, and instructions before beginning your project. Generated by purlJam.uk
Access your pattern anytime
Bookmark this page to access your pattern anytime