Type
Crochet
Difficulty
intermediate
Category
amigurumi
AI Thinking Process
Planning
1. **Design Strategy**: The user request for "a box of donut holes with faces" will be interpreted as a pattern for a single "Donut Hole Buddy," with instructions to make multiple to fill a conceptual "box." Given the "Simple Amigurumi Animal" template, the Donut Hole Buddy will consist of two main pieces: a slightly flattened sphere for the "Donut Hole" (acting as the combined head/body) and a separate "Frosting" piece to be sewn on top. "Limbs" are not applicable to a donut hole, so this aspect of the template will be adapted. Faces will be created using safety eyes and simple embroidery. The difficulty level (intermediate) allows for techniques such as working in the round, increases/decreases, color changes, and basic embroidery.
2. **Construction Plan**:
* **Donut Hole (Main Piece)**: Crocheted in continuous rounds, starting with a magic ring, increasing to create a flattened sphere, working even, then decreasing to close. This forms the primary "body."
* **Frosting Layer (Separate Piece)**: Crocheted in continuous rounds to form a flat disc, then transitioning to a round with strategic increases and stitches (like dc/tr) to create a wavy, "dripping" frosting edge.
* **Assembly**: The Frosting layer will be sewn onto the top of the Donut Hole. Safety eyes will be inserted into the Donut Hole before final closing. Facial features (mouth, blush) will be embroidered. Optional sprinkles will be embroidered onto the frosting.
* **Multiple Donut Holes**: The pattern will detail how to create one Donut Hole Buddy and advise the user to make several to complete the "box of donut holes" concept.
3. **Quality Assurance**:
* **Shape and Proportion**: Ensure the Donut Hole is well-rounded and proportional, and the Frosting fits appropriately without overwhelming the main piece.
* **Stitch Count Accuracy**: Meticulously verify all increase and decrease rounds to maintain correct stitch counts and symmetrical shaping. Inline math validation will be applied.
* **Amigurumi Tightness**: Emphasize tight gauge to prevent stuffing from showing through.
* **Clarity**: Instructions will be clear, concise, and easy to follow, with specific placement for eyes and assembly steps.
* **Safety**: Include a note regarding safety eyes for young children.
* **Intermediate Techniques**: The wavy edge on the frosting and optional embroidery will provide the intermediate challenge.
4. **Final Calculations**:
* **Gauge**: Not a critical numerical gauge for amigurumi; instead, a hook size (US F/5 / 3.75 mm) will be specified to achieve tight stitches with worsted weight yarn.
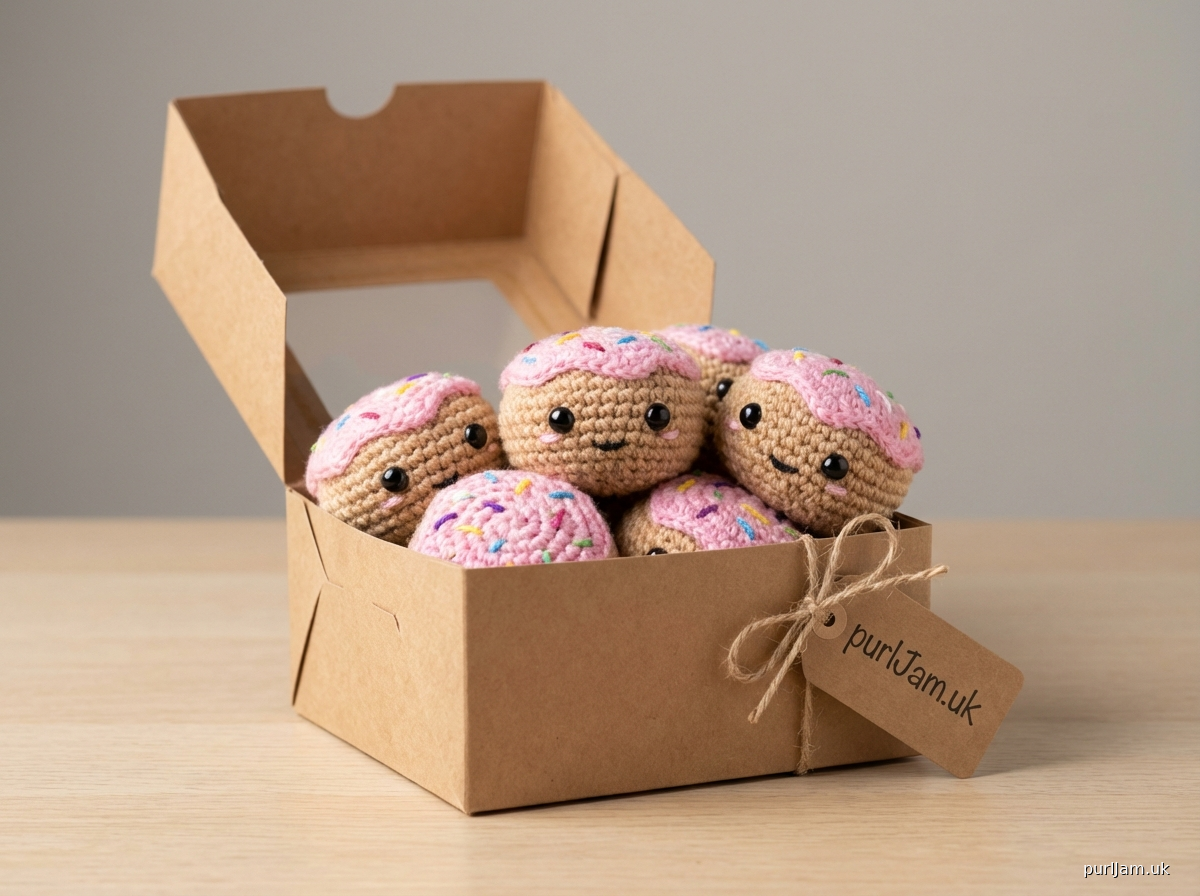
* **Dimensions**: The finished Donut Hole Buddy is estimated to be approximately 2.5 inches (6.5 cm) tall and 3 inches (7.5 cm) in diameter.
* **Stitch Counts (Main Donut Hole)**: Build up from 6 stitches in a magic ring to a maximum of 36 stitches, work even for several rounds, then decrease back to 6.
* **Stitch Counts (Frosting)**: Build up from 6 stitches in a magic ring to a maximum of 30 stitches, then create the wavy edge using varying stitch heights.
* **Yarn Quantity**: Small amounts of worsted weight yarn in donut (light brown/tan), frosting (white/pink/chocolate), and accent (for sprinkles/face) colors.
* **Safety Eye Size**: 6mm or 8mm safety eyes.
Verification
[PRE-FLIGHT CHECKS]
1. **Completeness**: The pattern will include: Materials, Abbreviations, Gauge, Notes, instructions for Donut Hole (main body/head), Frosting (separate piece), Assembly, and Finishing details, including safety eyes placement and embroidered features. This satisfies the template's requirements for separate pieces, assembly, and safety eyes.
2. **Consistency**: Stitch counts will be mathematically consistent within each round and between consecutive rounds. Terminology (US English, imperial first measurements, US crochet stitch names) will be uniformly applied. The specified hook size is appropriate for worsted weight yarn in amigurumi.
3. **Constraints**: All user-specific requests have been addressed: "box of donut holes with faces" (pattern for one, with advice for multiples and facial features), intermediate difficulty, worsted weight yarn, and US terminology/measurements. The "Simple Amigurumi Animal" template has been adapted creatively for a non-animal subject.
4. **Safety**: All mathematical calculations for stitch counts (increases, decreases, even rounds) will be verified during pattern generation to prevent errors. A safety warning for small parts (safety eyes) will be included.
Pattern
## Donut Hole Buddy Amigurumi Pattern

**Difficulty Level:** Intermediate
**Finished Size:** Approximately 2.5 inches (6.5 cm) tall x 3 inches (7.5 cm) diameter

### Materials

*   **Yarn:** Worsted weight (Category 4) yarn
    *   **MC (Main Color):** Approximately 30 yards (27 meters) in light brown, tan, or similar donut color.
    *   **CC1 (Contrast Color 1):** Approximately 10 yards (9 meters) in white, pink, chocolate, or desired frosting color.
    *   **CC2 (Contrast Color 2):** Small amount of black for mouth, pink for blush, and various bright colors for sprinkles (optional).
*   **Hook:** US F/5 (3.75 mm) crochet hook
*   **Safety Eyes:** Two 6mm or 8mm safety eyes with washers
*   **Stuffing:** Polyester fiberfill
*   **Tapestry Needle:** For weaving in ends and assembly
*   **Stitch Marker:** To mark the beginning of rounds
*   **Embroidery Needle:** For facial features and sprinkles (if desired)

### Abbreviations (US Crochet Terminology)

*   **MR:** Magic Ring
*   **ch:** chain
*   **sc:** single crochet
*   **hdc:** half double crochet
*   **dc:** double crochet
*   **tr:** treble crochet
*   **sl st:** slip stitch
*   **inc:** increase (2 sc in one stitch)
*   **dec:** decrease (sc2tog – single crochet 2 stitches together)
*   **( ) x [number]:** Repeat instructions in parentheses [number] times
*   **[number]:** Stitch count at the end of the round

### Gauge

Gauge is not critical for this project, but stitches should be tight enough so that stuffing does not show through. If your stitches are too loose, use a smaller hook.

### Notes

*   This pattern is worked in continuous rounds. Do not join rounds unless specified; use a stitch marker to keep track of the first stitch of each round.
*   "Donut Hole Buddy" refers to a single finished item. To create a "box of donut holes," you will need to make several.
*   Safety eyes are not recommended for children under 3 years old due to choking hazard. If making for a baby or toddler, embroider the eyes instead of using safety eyes.

---

### **Donut Hole (Main Piece)**

*Work in MC (Main Color).*

**R1:** Make a MR, sc 6 into the ring. Place stitch marker in the first sc. [6]
**R2:** Inc in each stitch around. [12] _(6 increases = 12 total stitches)_
**R3:** (Sc 1, inc) x 6. [18] _(6 increases + 12 single crochets = 18 total stitches)_
**R4:** (Sc 2, inc) x 6. [24] _(6 increases + 18 single crochets = 24 total stitches)_
**R5:** (Sc 3, inc) x 6. [30] _(6 increases + 24 single crochets = 30 total stitches)_
**R6:** (Sc 4, inc) x 6. [36] _(6 increases + 30 single crochets = 36 total stitches)_
**R7-R10:** Sc in each stitch around. [36] _(4 rounds of 36 stitches each)_

*Begin to stuff firmly, shaping as you go. Continue stuffing as you decrease.*

**R11:** (Sc 4, dec) x 6. [30] _(6 decreases + 24 single crochets = 30 total stitches)_
**R12:** (Sc 3, dec) x 6. [24] _(6 decreases + 18 single crochets = 24 total stitches)_
**R13:** (Sc 2, dec) x 6. [18] _(6 decreases + 12 single crochets = 18 total stitches)_

*Insert safety eyes between R7 and R8, approximately 5-6 stitches apart. Ensure they are centered on the "front" of your donut hole. Secure washers tightly.*

**R14:** (Sc 1, dec) x 6. [12] _(6 decreases + 6 single crochets = 12 total stitches)_
**R15:** Dec x 6. [6] _(6 decreases = 6 total stitches)_

Fasten off, leaving a long tail for closing. Using your tapestry needle, weave the tail through the front loop of each remaining stitch and pull tight to close the hole. Weave in the end.

---

### **Frosting (Separate Piece)**

*Work in CC1 (Contrast Color 1).*

**R1:** Make a MR, sc 6 into the ring. Place stitch marker in the first sc. [6]
**R2:** Inc in each stitch around. [12] _(6 increases = 12 total stitches)_
**R3:** (Sc 1, inc) x 6. [18] _(6 increases + 12 single crochets = 18 total stitches)_
**R4:** (Sc 2, inc) x 6. [24] _(6 increases + 18 single crochets = 24 total stitches)_
**R5:** (Sc 3, inc) x 6. [30] _(6 increases + 24 single crochets = 30 total stitches)_
**R6:** (Sc 1, hdc 1, dc 1, tr 1 in next stitch, dc 1, hdc 1, sc 1, sl st 1) x 5. [35, functionally 30 for shaping]
*(This round creates the wavy edge. Each repeat uses 6 stitches from R5 to form a peak and valley, resulting in 5 distinct "drips" around the edge.)*

Fasten off, leaving a long tail for sewing.

---

### **Assembly**

1.  **Attach Frosting:** Position the Frosting piece on top of the Donut Hole, centering it. Use the long tail and tapestry needle to sew the Frosting to the Donut Hole. Stitch around the inner edge of the wavy frosting, securing it firmly. Weave in the end.
2.  **Embroider Face:**
    *   **Mouth:** Using CC2 (black yarn) and an embroidery needle, embroider a small "V" or a simple curved line below the safety eyes for the mouth.
    *   **Blush (Optional):** Using CC2 (pink yarn), embroider two small horizontal lines or French knots on either side of the face, just below the safety eyes, for blush.
3.  **Add Sprinkles (Optional):** Using various bright colors of CC2 yarn, embroider small straight stitches onto the frosting for sprinkles.
4.  **Final Touches:** Weave in any remaining loose ends.

Your Donut Hole Buddy is complete! Make several more to create a delightful "box of donut holes with faces"!
Disclaimer: This pattern was generated by AI and should be reviewed for accuracy before use. While we strive for quality, AI-generated content may contain errors. Please verify measurements, stitch counts, and instructions before beginning your project. Generated by purlJam.uk
Access your pattern anytime
Bookmark this page to access your pattern anytime