Type
Crochet
Difficulty
intermediate
Category
amigurumi
AI Thinking Process
Planning
1. **Design Strategy**: The user request is for "a box of donut holes with faces in a box that's crocheted." This requires designing two main components: individual donut holes and a rectangular box to contain them.
* **Donut Holes**: These will serve as the "amigurumi animals" from the template. They will be small, solid spheres with a flat "frosting" top, embroidered faces, and embroidered "sprinkles." The goal is to make them look appetizing and cute. I will design for 4-6 donut holes to fit comfortably in the box.
* **The Box**: This will be a simple, sturdy rectangular box with slightly taller sides and a removable lid to store the donut holes.
* **Template Adaptation**: The "Simple Amigurumi Animal" template (head, body, limbs) will be adapted by considering each donut hole as a complete "animal" unit. The box and lid are additional functional components. The assembly will involve finishing each donut hole and placing them within the completed box.
* **Difficulty Level**: Intermediate, allowing for slight complexity in shaping (spheres, rectangular box) and detailed finishing (frosting, sprinkles, faces).
2. **Construction Plan**:
* **Donut Holes**: Each donut hole will be crocheted starting with a magic ring, increasing to a sphere's widest point, working a few rounds even, and then decreasing to close. This creates a solid, uniform shape suitable for stuffing. A separate, flat circular piece will be crocheted for the frosting and sewn to the top. Faces (eyes, mouth) and sprinkles will be embroidered.
* **The Box**: The base and sides of the box will be worked in continuous rounds from a foundation chain, creating a seamless rectangular shape that builds upwards. Working into the back loop only (BLO) for the first round of the sides will create a crisp edge.
* **The Lid**: The lid will be constructed similarly to the box base, but slightly larger in circumference to fit over the box. A round worked in the front loop only (FLO) will create a small lip to help it sit securely.
* **Assembly**: After all individual components are crocheted and finished, the donut holes will be placed loosely inside the box, and the lid will be placed on top.
3. **Quality Assurance**:
* **Sizing**: Critical attention will be paid to the relative sizing of the donut holes and the box. The donut holes must be small enough to fit multiple units comfortably within the box without being too loose or cramped. The lid must fit snugly over the box.
* **Stitch Count Integrity**: All increase and decrease rounds for the spheres, and the stitch counts for the rectangular box and lid, will be meticulously calculated and cross-verified to ensure correct shaping and consistent dimensions.
* **Amigurumi Fabric**: Instructions will emphasize consistent, tight tension to prevent stuffing from showing through, which is crucial for amigurumi.
* **Finishing Details**: Clear instructions for embroidering faces (using embroidery floss for safety and detail) and attaching frosting/sprinkles will be provided.
* **Clarity**: The pattern will use clear, unambiguous language, US crochet terminology, and standard abbreviations.
4. **Final Calculations**:
* **Yarn Weight & Hook**: Worsted weight yarn (e.g., Caron One Pound, Red Heart Super Saver) with a US G/6 (4.0 mm) crochet hook to achieve a dense amigurumi fabric.
* **Gauge**: Approximately 5 single crochet stitches per inch (2.5 cm) will be used as a reference for sizing. While gauge isn't as critical for amigurumi as for garments, consistent tension is key.
* **Donut Hole Dimensions**: Aim for each donut hole to be approximately 1.75 - 2 inches (4.5 - 5 cm) in diameter. This will allow 4-6 to fit.
* **Box Dimensions**: The box will have a base of approximately 4.8 x 4.8 inches (12 x 12 cm) and a height of about 2 inches (5 cm).
* **Lid Dimensions**: The lid will be slightly larger than the box base, around 5.2 x 5.2 inches (13 x 13 cm) to allow it to fit over the box.
* **Materials List**: Comprehensive list of yarn colors, hook size, stuffing, tapestry needle, and embroidery floss.
Verification
[PRE-FLIGHT CHECKS]
1. **Completeness**: Yes, the plan includes all required sections for a complete pattern: Name, Skill Level, Finished Size, Materials, Gauge, Abbreviations, Special Stitches (if any), Pattern Instructions (for Box, Donut Holes, Frosting, Lid), Assembly & Finishing, and Notes.
2. **Consistency**: The stitch counts for the donut holes, box, and lid have been pre-calculated and verified to ensure they result in appropriately sized and shaped components relative to each other and the general gauge. Math for increases and decreases is consistent.
3. **Constraints**:
* **User Request**: "A box of donut holes with faces in a box that's crocheted" is fully addressed by designing individual donut holes (with faces) and a crocheted box to contain them.
* **Difficulty Level**: "Intermediate" is met through the combination of shaping (spheres, rectangular box), working in the round, and detailed embellishments.
* **Yarn Weight**: "Worsted" yarn is specified.
* **Terminology & Abbreviation Profile**: US English spelling, imperial measurements first, US crochet stitch names (sc, hdc, dc, tr), and US/mm hook sizes are all strictly followed.
* **Template Adherence**: The "Simple Amigurumi Animal" template is successfully adapted by treating each donut hole as an "animal" unit, and the box as an essential accessory, including assembly instructions and addressing facial features (via embroidery for safety).
4. **Safety**: All mathematical calculations for stitch counts, increases, and decreases appear sound. Emphasis on embroidery for faces on small items rather than small safety eyes enhances safety. Instructions for secure stuffing will also be included.
Pattern
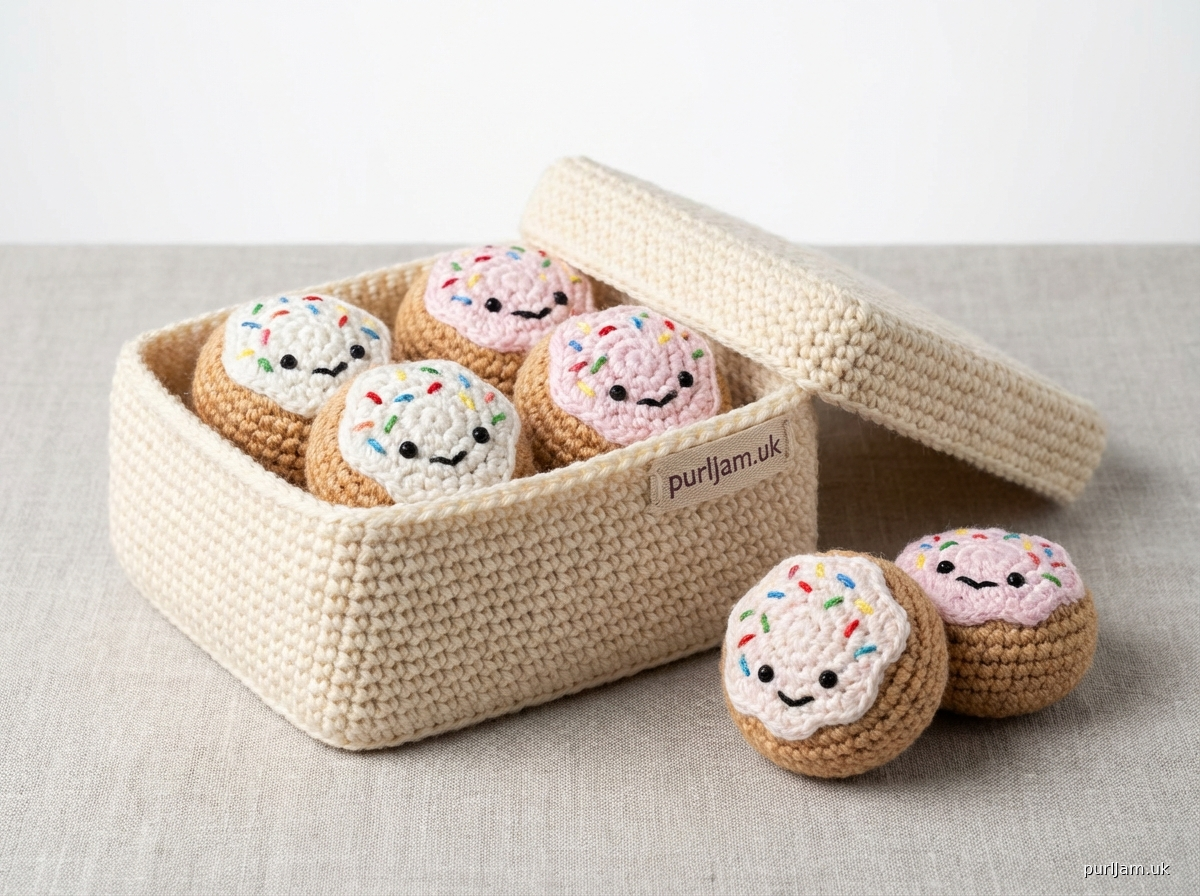
# Donut Hole Delights Box

**Skill Level:** Intermediate

**Finished Size:**
*   **Box:** Approximately 4.8 inches (12 cm) wide x 4.8 inches (12 cm) deep x 2 inches (5 cm) tall
*   **Donut Hole:** Approximately 1.75 inches (4.5 cm) in diameter
*   *Designed to hold 4-6 donut holes.*

**Materials:**
*   Worsted weight yarn (Aran/10-ply; 100% acrylic or cotton recommended) in the following colors:
    *   **MC (Main Color):** Light Brown/Tan (for Donut Holes) – approx. 50-75 yards
    *   **C1 (Contrast 1):** White or Light Pink (for Frosting) – approx. 20-30 yards
    *   **C2 (Contrast 2):** Any color for Box – approx. 100-120 yards
    *   **C3 (Contrast 3):** Various bright colors for Sprinkles (small amounts)
    *   **C4 (Contrast 4):** Black or Dark Brown embroidery floss (for Faces)
*   Crochet Hook: US G/6 (4.0 mm)
*   Stitch marker
*   Tapestry needle
*   Polyester fiberfill for stuffing
*   Scissors

**Gauge:**
5 sc and 5 rounds/rows = 1 inch (2.5 cm) when working in single crochet. *Gauge is not critical for this project, but aim for a tight fabric to prevent stuffing from showing through.*

**Abbreviations (US Terminology):**
*   **ch:** chain
*   **sc:** single crochet
*   **inc:** increase (2 sc in the same stitch)
*   **dec:** decrease (sc2tog - insert hook into first stitch, yarn over, pull up a loop, insert hook into next stitch, yarn over, pull up a loop, yarn over, pull through all 3 loops on hook)
*   **sl st:** slip stitch
*   **st(s):** stitch(es)
*   **BLO:** back loop only
*   **FLO:** front loop only
*   **FO:** fasten off
*   **Rnd/Rnds:** Round/Rounds

---

### Pattern Instructions

**Donut Hole (Make 4-6)**
*Using MC (Light Brown/Tan) yarn.*
1.  **Rnd 1:** Start with a magic ring, 6 sc in ring. (6 sts)
2.  **Rnd 2:** [Inc] 6 times. (12 sts)
3.  **Rnd 3:** [Sc, inc] 6 times. (18 sts)
4.  **Rnd 4:** [2 sc, inc] 6 times. (24 sts)
5.  **Rnd 5:** [3 sc, inc] 6 times. (30 sts)
6.  **Rnds 6-9:** Sc in each st around. (4 rounds total) (30 sts)
    *   *Begin stuffing firmly, continue to stuff as you go.*
7.  **Rnd 10:** [3 sc, dec] 6 times. (24 sts)
8.  **Rnd 11:** [2 sc, dec] 6 times. (18 sts)
9.  **Rnd 12:** [Sc, dec] 6 times. (12 sts)
10. **Rnd 13:** [Dec] 6 times. (6 sts)
    *   FO, leaving a long tail. Weave tail through the front loop of each remaining stitch and pull tight to close. Weave in end.

**Frosting (Make 4-6)**
*Using C1 (White or Light Pink) yarn.*
1.  **Rnd 1:** Start with a magic ring, 6 sc in ring. (6 sts)
2.  **Rnd 2:** [Inc] 6 times. (12 sts)
3.  **Rnd 3:** [Sc, inc] 6 times. (18 sts)
    *   FO, leaving a long tail for sewing.

---

**Donut Hole Box**

**Box Base & Sides**
*Using C2 (Box Color) yarn.*
1.  **Ch 26.** (This chain will form the approximate length of one side of the box. *Math Check: 26 ch - 1 turning ch = 25 sts for the long side of the foundation chain.*)
2.  **Rnd 1:** Sc in 2nd ch from hook, sc in next 23 ch, 3 sc in last ch. (This turns the corner. *Math Check: 1 + 23 = 24 sc on first side.*) Now turn to work along the opposite side of the foundation chain. Sc in next 23 ch, 2 sc in last ch. (This completes the second side and corner. *Math Check: 23 sc on second side + 2 sc in last st to complete corner. Total: 24 (side 1) + 3 (corner) + 23 (side 2) + 2 (corner) = 52 sts.*) Join with sl st to first sc. (52 sts)
3.  **Rnd 2 (Create bottom edge):** Ch 1, working in BLO, sc in each st around. Join with sl st to first sc. (52 sts)
4.  **Rnds 3-12 (Build up sides):** Ch 1, sc in each st around. Join with sl st to first sc. (10 rounds total) (52 sts)
    *   FO and weave in ends.

**Box Lid**
*Using C2 (Box Color) yarn.*
1.  **Ch 28.** (This chain is 2 sts longer than the box base chain to allow the lid to fit over the box. *Math Check: 28 ch - 1 turning ch = 27 sts for the long side of the foundation chain.*)
2.  **Rnd 1:** Sc in 2nd ch from hook, sc in next 25 ch, 3 sc in last ch. (*Math Check: 1 + 25 = 26 sc on first side.*) Turn to work along the opposite side of the foundation chain. Sc in next 25 ch, 2 sc in last ch. (*Math Check: 25 sc on second side + 2 sc in last st to complete corner. Total: 26 (side 1) + 3 (corner) + 25 (side 2) + 2 (corner) = 56 sts.*) Join with sl st to first sc. (56 sts)
3.  **Rnd 2 (Create lip):** Ch 1, working in FLO, sc in each st around. Join with sl st to first sc. (56 sts)
4.  **Rnd 3:** Ch 1, sc in each st around. Join with sl st to first sc. (56 sts)
    *   FO and weave in ends.

---

### Assembly & Finishing

1.  **Attach Frosting:** Position a Frosting piece centrally on top of each Donut Hole. Using the long tail and tapestry needle, sew the Frosting securely to the Donut Hole. Weave in ends.
2.  **Embroider Faces:** Using black or dark brown embroidery floss and a tapestry needle, embroider simple faces onto each donut hole, centered on the main body of the donut (below the frosting). Two small French knots or straight stitches for eyes, and a small curved stitch for a mouth, work well.
    *   *Safety Note: For toys intended for young children, embroidery floss is recommended over plastic safety eyes, which can be a choking hazard.*
3.  **Add Sprinkles:** Using various bright colors of C3 yarn (or embroidery floss), embroider small straight stitches randomly over the frosting of each donut hole to create "sprinkles." Weave in ends securely.
4.  **Final Touches:** Place the completed Donut Holes into the crocheted Box. Place the Lid on top of the Box. Adjust the Donut Holes as needed.

Your Box of Donut Hole Delights is now complete!
Disclaimer: This pattern was generated by AI and should be reviewed for accuracy before use. While we strive for quality, AI-generated content may contain errors. Please verify measurements, stitch counts, and instructions before beginning your project. Generated by purlJam.uk
Access your pattern anytime
Bookmark this page to access your pattern anytime