Type
Crochet
Difficulty
intermediate
Category
toy
AI Thinking Process
Planning
1. **Design Strategy**: Simple round bird amigurumi using a sphere body with small wings, beak, and tail attached. Beginner-friendly with basic sc, increases, and decreases only.
2. **Construction Plan**: Single-piece sphere body worked in continuous rounds bottom-up; small flat wings, triangular beak, and tail sewn on; safety eyes inserted before closing.
3. **Quality Assurance**:
- Stuff firmly before final decreases to maintain round shape
- Use stitch marker for continuous spiral rounds
- Pin wings symmetrically before sewing
4. **Final Calculations**: Gauge ~6 sc x 6 rows = 1" in worsted with 3.5mm hook. Body max 24 sts → ~3" diameter sphere. Finished bird ~4" tall including tail.
Verification
1. **Completeness**: Materials, gauge, abbreviations, instructions, assembly, finishing all included.
2. **Consistency**: Sphere math: 6→12→18→24→24→24→24→24→18→12→6 verified. Wings 6 sts, beak 4-st triangle, tail chain-based.
3. **Constraints**: Easy level ✓, worsted yarn ✓, US terms ✓, simple shapes ✓.
4. **Safety**: All round counts add correctly; increases/decreases balanced.
Pattern
# Little Round Bird — Easy Crochet Amigurumi

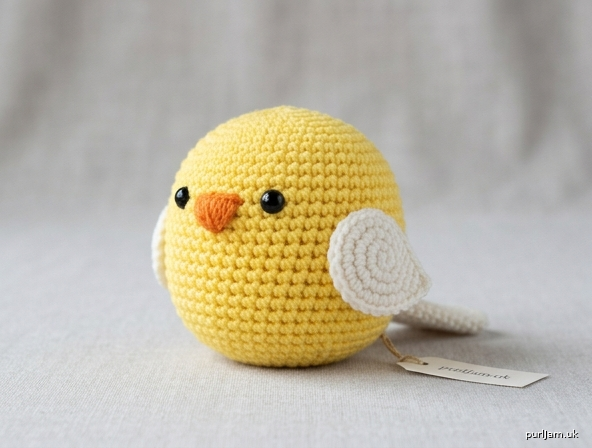
A cheerful, palm-sized bird made from one simple sphere body with cute add-on details. Perfect for beginners learning amigurumi basics!

**Finished Size:** Approximately 3 in (7.5 cm) tall, 3 in (7.5 cm) wide, 4 in (10 cm) including tail
**Skill Level:** Easy

---

## Materials

- **Main Color (MC) Yarn:** Worsted weight (#4) yarn, ~50 yards — choose any bird color (bluebird blue, robin red, canary yellow, etc.)
- **Contrast Color (CC) Yarn:** Worsted weight (#4), small amount (~10 yards) for wings/tail (white, gray, or coordinating)
- **Accent Yarn:** Small amount of orange or yellow for the beak (~5 yards)
- **Crochet Hook:** US E-4 (3.5 mm)
- **Safety Eyes:** Two 6 mm black safety eyes (or embroider with black yarn)
- **Polyester Fiberfill** stuffing
- **Yarn Needle** for assembly
- **Stitch Marker** for marking round beginnings
- **Scissors**

---

## Gauge

6 sc × 6 rounds = 1 in (2.5 cm) worked in the round.
Exact gauge isn't critical — just work tightly so stuffing doesn't show.

---

## Abbreviations (US Terms)

- **ch** — chain
- **sc** — single crochet
- **inc** — 2 sc in same stitch (increase)
- **dec** — invisible decrease (sc 2 stitches together)
- **sl st** — slip stitch
- **st(s)** — stitch(es)
- **MR** — magic ring
- **[ ]** — total stitch count at end of round
- **( ) around** — repeat instructions inside parentheses to end of round

---

## Notes

- Bird is worked in continuous spiral rounds. Do **not** join unless instructed. Use a stitch marker in the first stitch of each round and move it up as you go.
- Stuff firmly as you work — once the opening narrows, stuffing is harder to add.
- All pieces are worked from the bottom up.

---

## Pattern Instructions

### BODY (make 1, in MC)

- **Rnd 1:** 6 sc in MR. **[6]**
- **Rnd 2:** inc in each st around. **[12]** *(6 + 6 = 12 ✓)*
- **Rnd 3:** (sc, inc) around. **[18]** *(12 + 6 = 18 ✓)*
- **Rnd 4:** (2 sc, inc) around. **[24]** *(18 + 6 = 24 ✓)*
- **Rnd 5:** sc in each st around. **[24]**
- **Rnd 6:** sc in each st around. **[24]**
- **Rnd 7:** sc in each st around. **[24]**
- **Rnd 8:** sc in each st around. **[24]**

**Insert safety eyes** between Rnds 6 and 7, about 5 sts apart, centered on what will be the front.

- **Rnd 9:** (2 sc, dec) around. **[18]** *(24 − 6 = 18 ✓)*
- **Rnd 10:** (sc, dec) around. **[12]** *(18 − 6 = 12 ✓)*

**Stuff body firmly** with fiberfill.

- **Rnd 11:** dec around. **[6]** *(12 − 6 = 6 ✓)*

Fasten off, leaving a 6 in (15 cm) tail. Thread tail through front loops of remaining 6 sts and pull tight to close. Weave end inside.

---

### WINGS (make 2, in CC)

- **Rnd 1:** 4 sc in MR. **[4]**
- **Rnd 2:** inc in each st around. **[8]** *(4 + 4 = 8 ✓)*
- **Rnd 3:** (sc, inc) around. **[12]** *(8 + 4 = 12 ✓)*
- **Row 4:** Flatten the circle. sc across through both layers — 6 sc. **[6]**

Fasten off, leaving a 10 in (25 cm) tail for sewing. The wing is a small flat half-circle.

---

### BEAK (make 1, in orange/yellow)

- **Rnd 1:** 4 sc in MR. **[4]**
- **Rnd 2:** sc in each st around. **[4]**
- **Rnd 3:** sc in each st around. **[4]**

Fasten off, leaving a 6 in (15 cm) tail. Do not stuff — flatten slightly to form a small triangular cone.

---

### TAIL (make 1, in CC)

- **Row 1:** Ch 6. Starting in 2nd ch from hook, sc in each ch across. **[5 sc]**
- **Row 2:** Ch 1, turn. sc in each st across. **[5]**
- **Row 3:** Ch 1, turn. sc, dec, sc, dec? — *Simplified:* sc, dec, sc. **[3]** *(5 − 2 = 3 ✓)*

Fasten off, leaving an 8 in (20 cm) tail for sewing.

---

## Assembly

1. **Beak:** Position the beak between the safety eyes, just below them. Sew on with the yarn tail using whip stitches around the open edge. Squish slightly so the beak points outward like a small triangle.

2. **Wings:** Pin the two wings symmetrically on the sides of the body, about 1 round below the eyes and 6–7 sts apart from center front. The flat edge of each wing should sit against the body. Sew along the flat edge using the yarn tail. Weave in ends.

3. **Tail:** Pin the wider edge of the tail rectangle to the back of the bird, opposite the beak, at roughly the same height as the wings. The tapered end (3-st edge) sticks out behind. Sew the wider edge to the body using the yarn tail. Weave in ends.

4. **Optional Feet:** Embroider two small "V" shapes with orange yarn on the bottom of the body for feet, or leave the bird as a round perched shape.

---

## Finishing

- Weave in all remaining yarn ends with a yarn needle.
- Gently shape the body with your hands to even out the round form.
- If embroidering eyes instead of using safety eyes, use black yarn to make small French knots or satin-stitched ovals.

---

## Tips for Success

- **Work tightly** — looser stitches let stuffing peek through.
- **Stuff in stages** — add stuffing little by little after Rnd 8 so the body stays evenly round.
- **Pin before sewing** — symmetry makes a huge difference. Use sewing pins to position wings and adjust until the bird looks balanced from the front.
- **Customize colors:** Try yellow body + orange beak (canary), red body + black wings (cardinal), or blue + white (bluebird).

Enjoy your little crochet bird! 🐦
Disclaimer: This pattern was generated by AI and should be reviewed for accuracy before use. While we strive for quality, AI-generated content may contain errors. Please verify measurements, stitch counts, and instructions before beginning your project. Generated by purlJam.uk
Access your pattern anytime
Bookmark this page to access your pattern anytime