Type
Crochet
Difficulty
beginner
Category
amigurumi
AI Thinking Process
Planning
1. **Design Strategy**: Beginner-friendly common loon stuffie using simple amigurumi spheres and ovals. Black body with white speckled chest, pointed beak, and red eye details embroidered. Worked in UK crochet terms (dc).
2. **Construction Plan**: Seamless body worked as elongated oval bottom-up, separate head sphere, small beak cone, and two flat wings sewn on; assembled with yarn needle.
3. **Quality Assurance**:
- Stuff firmly but evenly to maintain loon's sleek shape
- Beak must be sewn pointing forward and slightly upward
- White chest patch placed on underside for realism
4. **Final Calculations**: Tension ~20 dc x 22 rnds = 10cm. Body ~12cm long, head ~5cm. Hook 3.5mm with worsted for tight fabric. Body max stitch count 30; head max 24.
Verification
1. **Completeness**: Materials, tension, abbreviations, all parts (body, head, beak, wings, tail), assembly, finishing — all included.
2. **Consistency**: Stitch counts verified per round; UK terminology (dc, htr, tr) used throughout.
3. **Constraints**: Beginner level — only magic ring, dc, inc, dec used. UK terms, metric first.
4. **Safety**: Math checked: 6→12→18→24→30 sphere progression valid.
Pattern
# Common Loon Stuffie — Crochet Pattern

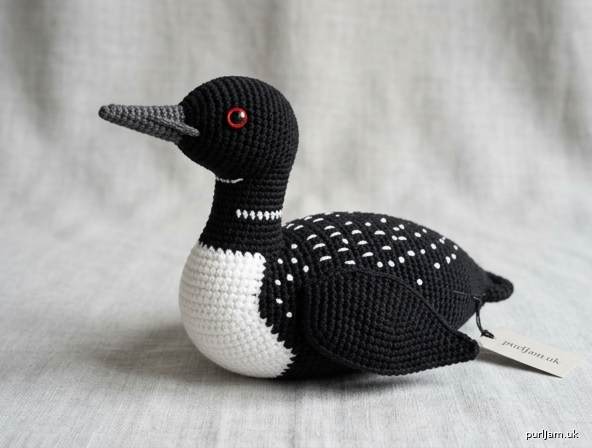
A charming little common loon plushie featuring the iconic black head, dagger-like beak, and white-speckled body. Perfect for beginners — uses only basic stitches and simple shapes.

**Finished size:** Approximately 14 cm long × 8 cm tall (5½" × 3¼")
**Skill level:** Beginner

---

## Materials

- **Yarn:** Worsted weight (DK/Aran equivalent, weight 4)
  - Black — approx. 40 g (Colour A)
  - White — approx. 15 g (Colour B)
  - Small amount of dark grey or black for beak (Colour C)
  - Tiny amount of red for eye accents
- **Hook:** 3.5 mm (UK 9 / US E-4)
- **Stuffing:** Polyester toy fibre filling
- **Notions:**
  - Yarn/tapestry needle
  - Stitch marker
  - Optional: 6 mm safety eyes (red) or embroider with red yarn
  - Scissors

---

## Tension

20 dc × 22 rounds = 10 cm square (worked in continuous rounds).
Tension is not critical for toys, but work tightly to prevent stuffing showing.

---

## Abbreviations (UK terms)

- **ch** — chain
- **dc** — double crochet (= US sc)
- **htr** — half treble (= US hdc)
- **inc** — increase (2 dc in same stitch)
- **dec** — invisible decrease (work 2 sts together through front loops)
- **MR** — magic ring
- **sl st** — slip stitch
- **st(s)** — stitch(es)
- **rnd** — round
- **[ ]** — stitch count at end of round
- **( ) x N** — repeat instructions in brackets N times

---

## Notes

- Work in continuous spirals unless told otherwise — use a stitch marker to track the start of each round.
- Stuff firmly as you go; once the opening narrows it becomes difficult.
- Leave a long tail (about 30 cm) when fastening off pieces that need sewing.

---

## Pattern

### BODY (make 1, in Colour A — Black)

The body is an elongated oval. Begin at the tail end.

- **Foundation:** Ch 5.
- **Rnd 1:** Working into the chain, 2 dc in 2nd ch from hook, 1 dc in next 2 ch, 3 dc in last ch; rotate to work along opposite side of chain, 1 dc in next 2 ch, 1 dc in same ch as starting st. **[10]**
  - *Check: 2 + 2 + 3 + 2 + 1 = 10 ✓*
- **Rnd 2:** (inc) x 2, 1 dc in next 2, (inc) x 3, 1 dc in next 2, (inc) x 1. **[16]**
  - *Check: 4 + 2 + 6 + 2 + 2 = 16 ✓*
- **Rnd 3:** Inc, 1 dc in next 4, (inc) x 3, 1 dc in next 4, (inc) x 2. **[22]**
  - *Check: 2 + 4 + 6 + 4 + 4 + 2 = 22... let's recount: 1+1+4+(2+2+2)+4+(2+2)= 22 ✓*
- **Rnd 4:** 1 dc in each st around. **[22]**
- **Rnd 5:** Inc, 1 dc in next 9, inc, 1 dc in next 10, inc. **[25]**
- **Rnds 6–7:** 1 dc in each st around. **[25]**

**Switch to Colour B (White) for chest patch — optional two-tone effect:**
For a simpler version, continue in black throughout. For two-tone:
- **Rnd 8:** 1 dc in next 12 in A, change to B, 1 dc in next 8, change back to A, 1 dc in last 5. **[25]**

For ease, beginners may simply continue in **Colour A** for all remaining rounds and embroider white speckles at the end.

- **Rnd 9:** 1 dc in each st around. **[25]**
- **Rnd 10:** 1 dc in each st around. **[25]**
- **Rnd 11:** 1 dc in next 10, dec, 1 dc in next 11, dec. **[23]**
- **Rnd 12:** 1 dc in next 9, dec, 1 dc in next 10, dec. **[21]**
- **Rnd 13:** (1 dc in next 5, dec) x 3. **[18]**

**Begin stuffing firmly.**

- **Rnd 14:** (1 dc in next 4, dec) x 3. **[15]**
- **Rnd 15:** (1 dc in next 3, dec) x 3. **[12]**

Continue stuffing.

- **Rnd 16:** (1 dc in next 2, dec) x 3. **[9]**
- **Rnd 17:** (1 dc, dec) x 3. **[6]**

Fasten off, leaving a 15 cm tail. Weave tail through remaining 6 sts and pull closed. This is the **neck/head joining point** — actually, set aside; the head is made separately.

*Note: The narrow end formed by Rnds 14–17 is the loon's front (where the head attaches). The wider, flatter end is the tail.*

---

### HEAD (make 1, in Colour A — Black)

A small sphere.

- **Rnd 1:** 6 dc in MR. **[6]**
- **Rnd 2:** (inc) x 6. **[12]**
- **Rnd 3:** (1 dc, inc) x 6. **[18]**
- **Rnd 4:** (2 dc, inc) x 6. **[24]**
- **Rnds 5–7:** 1 dc in each st around. **[24]**
- **Rnd 8:** (2 dc, dec) x 6. **[18]**

**Stuff firmly.**

- **Rnd 9:** (1 dc, dec) x 6. **[12]**
- **Rnd 10:** (dec) x 6. **[6]**

Fasten off, leaving a 30 cm tail for sewing to body.

---

### BEAK (make 1, in Colour C — Dark Grey/Black)

A small pointed cone.

- **Rnd 1:** 4 dc in MR. **[4]**
- **Rnd 2:** 1 dc in each st around. **[4]**
- **Rnd 3:** (1 dc, inc) x 2. **[6]**
- **Rnd 4:** 1 dc in each st around. **[6]**
- **Rnd 5:** (2 dc, inc) x 2. **[8]**
- **Rnd 6:** 1 dc in each st around. **[8]**

Fasten off, leaving a 20 cm tail. Do **not** stuff (or only lightly) — beak should stay slim.

---

### WINGS (make 2, in Colour A — Black)

Worked flat in rows.

- **Foundation:** Ch 7.
- **Row 1:** 1 dc in 2nd ch from hook, 1 dc in next 5 ch, turn. **[6]**
- **Row 2:** Ch 1, 1 dc in next 5, dec, turn. **[5]**
- **Row 3:** Ch 1, 1 dc in next 3, dec, turn. **[4]**
- **Row 4:** Ch 1, 1 dc in next 2, dec, turn. **[3]**
- **Row 5:** Ch 1, 1 dc, dec. **[2]**

Fasten off, leaving a 25 cm tail for sewing.

---

## Assembly

1. **Attach head to body:**
   Position the head over the narrow front end of the body so it tilts slightly upward (loons hold their heads proudly). Using the long tail from the head, sew securely all the way around. Add a small amount of stuffing into the neck join before closing the last gap.

2. **Attach beak:**
   Pin the beak to the centre-front of the head, pointing forward and slightly upward. Sew around the open base using the long tail. The beak should look long and dagger-like.

3. **Attach wings:**
   Position one wing on each side of the body, with the wider edge toward the front (head end) and the point toward the tail. Pin first to check symmetry, then whip stitch the top edge only along the body — leave the lower edge free so wings appear natural.

4. **Add eyes:**
   - **Option A (safety eyes):** Insert 6 mm red safety eyes between Rnds 5–6 of the head, about 6 sts apart. *Note: insert before stuffing for best results, so plan ahead.*
   - **Option B (embroidered):** Using red yarn, embroider two small French knots or satin-stitch dots on each side of the head.

5. **Add white chest/speckle markings:**
   Using Colour B (white) and a yarn needle, embroider:
   - A white oval patch on the underside of the body (the chest).
   - Small straight stitches or French knots scattered across the back to create the loon's iconic speckled pattern.
   - A thin white "necklace" stripe around the base of the neck (optional).

6. **Weave in all ends** carefully, hiding them inside the body.

---

## Finishing Tips

- Give the finished loon a gentle squeeze and reshape — the head should sit upright.
- For an even more realistic look, embroider a few horizontal white stripes around the neck (loons have a striking neck pattern).
- If the beak droops, run a stiffening stitch from the tip back to the base inside the beak before closing.

---

## Care

Hand wash gently in cool water, reshape while damp, and lay flat to dry. Do not tumble dry as stuffing may shift.

Enjoy your handmade common loon! 🪶
Disclaimer: This pattern was generated by AI and should be reviewed for accuracy before use. While we strive for quality, AI-generated content may contain errors. Please verify measurements, stitch counts, and instructions before beginning your project. Generated by purlJam.uk
Access your pattern anytime
Bookmark this page to access your pattern anytime