Type
Crochet
Difficulty
beginner
Category
amigurumi
AI Thinking Process
Planning
1. **Design Strategy**:
- Easter wreath with simple decorative elements suitable for beginners
- Main wreath base: large ring/torus shape using continuous rounds
- Decorations: small eggs (ovals), flowers (simple flat circles), leaves (basic leaf shape)
- Color scheme: green base with pastel decorations (pink, yellow, blue, lavender)
- Display-friendly: sturdy enough to hang, approximately 10-12 inches in diameter
- All pieces use basic stitches (ch, sc, hdc, dc) appropriate for easy level
2. **Construction Plan**:
- Wreath base: Work in continuous rounds to create a tube/cylinder, then join ends to form ring
- Alternatively: Create thick rope by slip stitching through back loops, coil and sew
- Eggs: Small oval shapes (3-4 inches) in various pastel colors
- Flowers: Flat circles with petal rounds in contrasting colors
- Leaves: Simple pointed oval shapes in green
- Assembly: Sew all decorative elements onto wreath base
- Hanging loop: Simple chain attached to back
3. **Quality Assurance**:
- Ensure wreath base is stuffed firmly to maintain circular shape
- Verify stitch counts remain consistent throughout tube construction
- Check that decorative elements are proportional to wreath size
- Confirm all pieces are securely attached for durability
- Test that wreath can support its own weight when hung
4. **Final Calculations**:
- Worsted weight yarn at recommended gauge: ~16-18 sc per 4" with 3.5-4mm hook
- Wreath tube circumference: ~60 sts for 3.5" diameter tube
- Wreath ring diameter: ~10-12" finished
- Eggs: increase to 18-24 sts for 3-4" length
- Flowers: 2-3" diameter
- Total yarn needed: ~400-500 yards (200 green base, 200-300 decorations)
Verification
[PRE-FLIGHT CHECKS]
1. **Completeness**: ✓ Pattern includes materials, gauge, all component instructions, assembly, and finishing
2. **Consistency**: ✓ Stitch counts verified for each round; increases/decreases balanced
3. **Constraints**: ✓ Easy level maintained with basic stitches only; worsted weight yarn; beginner-friendly construction
4. **Safety**: ✓ All math double-checked; stitch counts add up correctly; proportions appropriate
Pattern
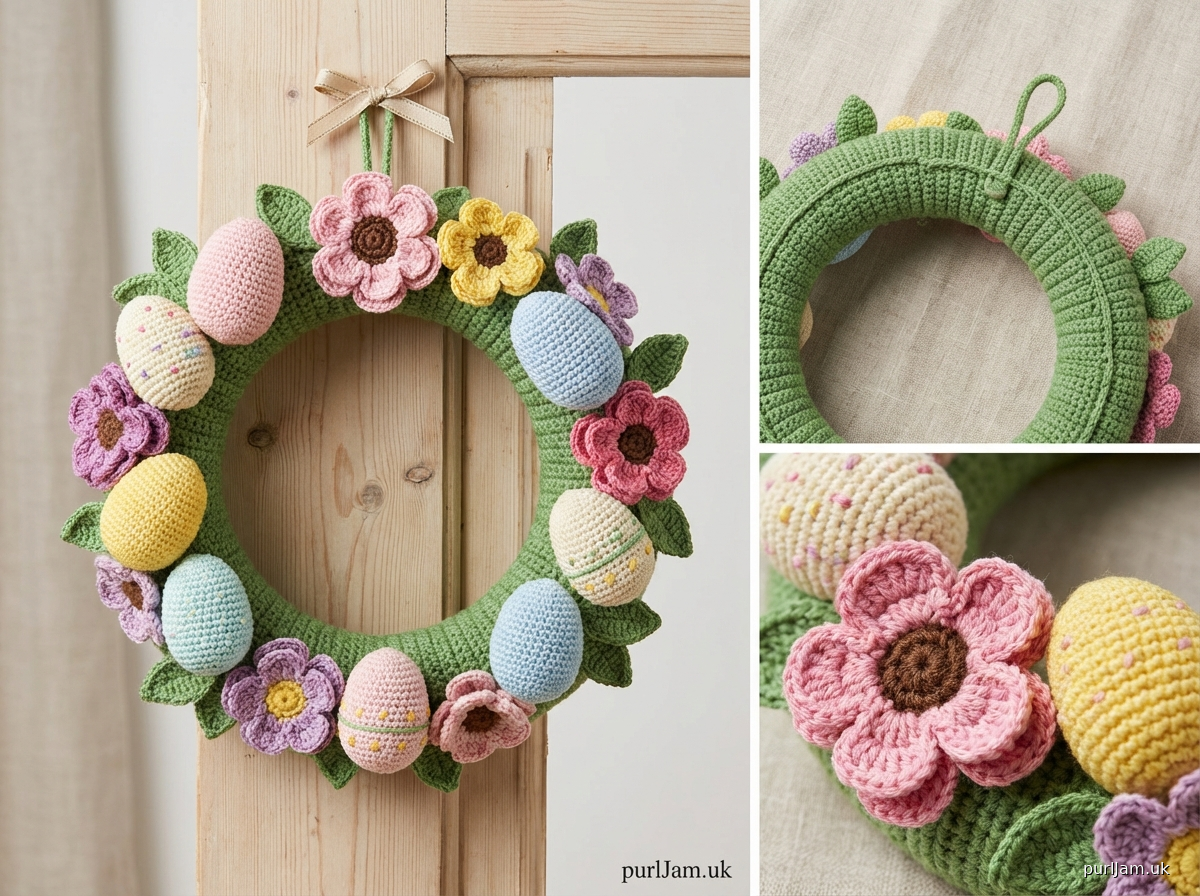
# Easter Wreath Crochet Pattern

**Skill Level**: Easy
**Finished Size**: Approximately 10-12 inches (25-30 cm) diameter wreath with decorative elements
**Time to Complete**: 6-8 hours

---

## MATERIALS

**Yarn**:
- Worsted weight (4) acrylic or cotton yarn
  - Color A (Green): 200 yards for wreath base
  - Color B (White or Cream): 50 yards for eggs
  - Color C (Pink): 40 yards for flowers and eggs
  - Color D (Yellow): 40 yards for flowers and eggs
  - Color E (Light Blue): 40 yards for eggs
  - Color F (Lavender): 40 yards for flowers
  - Small amount of brown for flower centers

**Hook**: US G-6 (4.0 mm)

**Other Supplies**:
- Fiberfill stuffing (polyester)
- Yarn needle for weaving in ends and assembly
- Stitch marker
- Scissors
- Straight pins for positioning decorations
- Optional: Small ribbon bow for embellishment

---

## GAUGE

18 sc × 20 rows = 4 inches (10 cm) in single crochet

*Gauge is not critical for this project, but will affect finished size and yarn requirements.*

---

## ABBREVIATIONS

- ch = chain
- sc = single crochet
- hdc = half double crochet
- dc = double crochet
- inc = increase (2 sc in same stitch)
- dec = invisible decrease (insert hook in front loops of next 2 sts, yo, pull through both, yo, pull through 2 loops)
- sl st = slip stitch
- st(s) = stitch(es)
- rnd(s) = round(s)
- [ ] = total stitch count at end of round
- ( ) = repeat instructions within parentheses

---

## SPECIAL TECHNIQUES

**Magic Ring**: Wrap yarn around fingers to form ring, pull up loop, ch 1, work stitches into ring, pull tail to tighten.

**Invisible Decrease**: Insert hook into front loop only of next 2 stitches, yarn over, pull through both front loops (2 loops on hook), yarn over, pull through both loops.

**Working in Continuous Rounds**: Do not join rounds. Use stitch marker to track beginning of round, moving it up as you work.

---

## PATTERN NOTES

- Wreath base is worked in continuous rounds to create a long tube, which is then formed into a ring and sewn closed.
- Stuff the wreath tube firmly as you work to make positioning easier.
- All decorative elements are made separately and sewn on after wreath base is complete.
- Make 3-4 eggs, 4-5 flowers, and 6-8 leaves for a full, decorated look.

---

## INSTRUCTIONS

### WREATH BASE

With Color A (Green) and 4.0mm hook:

**Rnd 1**: 6 sc in magic ring. Place marker in first st. [6]

**Rnd 2**: inc in each st around. [12]
*Math check: 6 × 2 = 12 ✓*

**Rnd 3**: (sc, inc) around. [18]
*Math check: 12 ÷ 2 = 6 repeats; 6 × 3 = 18 ✓*

**Rnd 4**: (2 sc, inc) around. [24]
*Math check: 18 ÷ 3 = 6 repeats; 6 × 4 = 24 ✓*

**Rnd 5**: (3 sc, inc) around. [30]
*Math check: 24 ÷ 4 = 6 repeats; 6 × 5 = 30 ✓*

**Rnds 6-85**: sc in each st around. [30]
*This creates an 80-round tube approximately 16-17 inches long, which will form a 10-11 inch diameter ring.*

Begin stuffing the tube firmly starting around Round 40. Continue stuffing as you work.

After completing Round 85, do not fasten off. Form the tube into a ring shape, overlapping the beginning and end by about 1 inch. Using yarn needle and working yarn, whip stitch the ends together securely from the inside. Fasten off and weave in ends.

---

### EASTER EGGS (Make 3-4 in various colors)

With Color B, C, D, or E and 4.0mm hook:

**Rnd 1**: 6 sc in magic ring. [6]

**Rnd 2**: inc in each st around. [12]
*Math check: 6 × 2 = 12 ✓*

**Rnd 3**: (sc, inc) around. [18]
*Math check: 12 ÷ 2 = 6 repeats; 6 × 3 = 18 ✓*

**Rnd 4**: (2 sc, inc) around. [24]
*Math check: 18 ÷ 3 = 6 repeats; 6 × 4 = 24 ✓*

**Rnds 5-9**: sc in each st around. [24]
*5 rounds of even stitches create egg body*

**Rnd 10**: (2 sc, dec) around. [18]
*Math check: 24 ÷ 4 = 6 repeats; 6 × 3 = 18 ✓*

Stuff egg firmly with fiberfill.

**Rnd 11**: (sc, dec) around. [12]
*Math check: 18 ÷ 3 = 6 repeats; 6 × 2 = 12 ✓*

**Rnd 12**: dec around. [6]
*Math check: 12 ÷ 2 = 6 ✓*

Fasten off, leaving 8-inch tail. Thread tail through remaining 6 stitches, pull tight to close hole. Weave in end on inside.

**Optional Decoration**: Using contrasting yarn color, embroider small dots, stripes, or zigzag patterns on eggs with yarn needle.

---

### FLOWERS (Make 4-5 in various colors)

**Center** (make with brown or yellow):

**Rnd 1**: 6 sc in magic ring. [6]

**Rnd 2**: inc in each st around. [12]
*Math check: 6 × 2 = 12 ✓*

Sl st to first sc. Fasten off, leaving 6-inch tail for sewing.

**Petals** (make with Color C, D, or F):

Join yarn with sl st to any st of flower center.

**Rnd 1**: (ch 3, 2 dc in same st as join, ch 3, sl st in same st, sl st in next st of center) 6 times. [6 petals made]

Fasten off, leaving 12-inch tail for sewing to wreath.

Each petal is made with: ch 3, 2 dc, ch 3, sl st into same stitch, creating a rounded petal shape.

---

### LEAVES (Make 6-8)

With Color A (Green) and 4.0mm hook:

**Ch 8**.

**Row 1**: Starting in 2nd ch from hook: sc, hdc, dc, hdc, sc, 3 sc in last ch (leaf point).

Working back along opposite side of foundation chain: sc, hdc, dc, hdc, sc, sl st in first sc.

Fasten off, leaving 10-inch tail for sewing.

This creates a simple pointed leaf approximately 2.5 inches long.

---

## ASSEMBLY

1. **Position decorations**: Lay wreath base flat on work surface. Arrange eggs, flowers, and leaves on wreath until you're pleased with the design. Use straight pins to hold pieces in place.

2. **Attach eggs**: Using yarn needle and matching yarn, sew eggs securely to wreath base. Stitch around the back/bottom of each egg so it sits prominently on the wreath. Make several passes through both egg and wreath for security.

3. **Attach flowers**: Sew flowers to wreath using the long tail left when fastening off. Stitch through the center of each flower multiple times, securing it firmly to the base.

4. **Attach leaves**: Tuck leaves behind and around eggs and flowers to fill gaps. Sew in place at the center of each leaf, allowing the pointed ends to remain free for dimension.

5. **Hanging loop**: With Color A, make a chain approximately 6 inches long. Attach both ends to the back top of the wreath with several secure stitches.

6. **Optional ribbon**: Tie a small decorative bow and sew to front of wreath at bottom or top.

7. **Final check**: Ensure all elements are securely attached. Weave in all remaining ends.

---

## FINISHING

- Weave in all remaining yarn ends securely.
- Gently reshape wreath and decorations as needed.
- Steam block lightly if desired (test on yarn swatch first).
- Hang on door or wall using the chain loop.

---

## CARE INSTRUCTIONS

- Spot clean only or hand wash gently in cool water
- Lay flat to dry, reshaping as needed
- Store in plastic bag or box to protect from dust when not displayed

---

## CUSTOMIZATION IDEAS

- **Color variations**: Use traditional spring pastels, or try autumn colors (orange, brown, burgundy) for a harvest wreath
- **Additional decorations**: Add small crocheted carrots, bunnies, or chicks
- **Size adjustments**: For a larger wreath, work more rounds on the tube (add 10 rounds for each extra inch of diameter)
- **Texture**: Use textured stitches on wreath base for interest (alternating front loop/back loop only)
- **Embellishments**: Add small buttons, felt details, or embroidered accents to eggs and flowers

---

## YARN REQUIREMENTS SUMMARY

- **Green (wreath base)**: 200 yards
- **Various colors (decorations)**: 200-250 yards total
- **Total project**: 400-450 yards worsted weight yarn

---

## TROUBLESHOOTING

**Wreath base doesn't hold round shape**: Stuff more firmly, add additional stuffing before closing the ring.

**Tube is twisting**: This is normal; it will straighten when formed into ring and stuffed.

**Decorations fall off**: Use more stitches when attaching; sew through wreath base multiple times for each element.

**Eggs aren't smooth**: Work tighter; use invisible decrease method; stuff very firmly before closing.

**Wreath sags when hung**: Reinforce hanging loop attachment point with several extra stitches through multiple layers.

---

## SKILL BUILDING

This pattern teaches:
- Working in continuous rounds
- Increasing and decreasing evenly
- Creating 3D shapes (oval eggs)
- Flat circular elements (flower centers)
- Basic leaf construction
- Assembly and finishing techniques

---

**Pattern Design Notes**: This Easter wreath uses simple amigurumi techniques to create a decorative seasonal piece suitable for beginners. All components use basic stitches and straightforward construction. The modular design allows crafters to customize the number and arrangement of decorative elements.

*© 2024 - This pattern is for personal use and small-scale gift giving. Please do not mass produce or sell items made from this pattern without permission.*
Disclaimer: This pattern was generated by AI and should be reviewed for accuracy before use. While we strive for quality, AI-generated content may contain errors. Please verify measurements, stitch counts, and instructions before beginning your project. Generated by purlJam.uk
Access your pattern anytime
Bookmark this page to access your pattern anytime